 Thanks: 0
 Likes: 0
 Dislikes: 0
-
Pictures: 1928 Model A - Wetsand, Cut and Buff at Autogeek
Pictures: 1928 Model A - Wetsand, Cut and Buff at Autogeek
Dodo Juice Supernatural Wax
Check out the gloss in the paint, besides all the cool sanding and buffing tools we used, we also used the new Dodo Juice Supernatural
Dodo Juice Supernatural Wax, 250 ml. Refillable Hardwood Pot
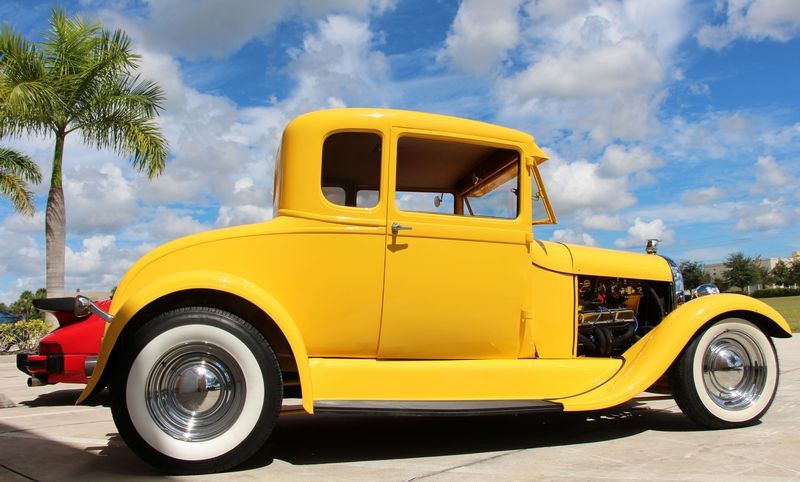
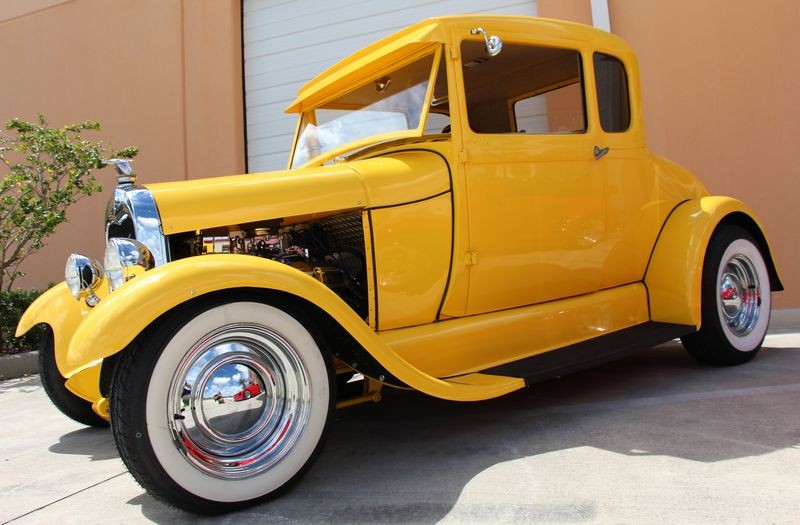
1928 Model A in FULL SUN
In this "walk-around" video I document in FULL SUN that there are zero holograms and a 100% swirl free finish on both the 1928 Model A and the 1986 Porsche I buffed out with some new tools and products.
Just a few pictures to show what we did here last night...
This Model A arrived with a BRAND NEW PAINT JOB but with a LOT of ORANGE PEEL. So we removed the orange peel by machine wetsanding followed by removing the sanding marks using a rotary buffer and then machine waxing.
3M Flexible Abrasive Hookit Sheets
These new flexible Hookit sheets us an anti-loading technology to help prevent the face of the paper from loading up with paint as fast and as easily as traditional wet/dry sandpaper.
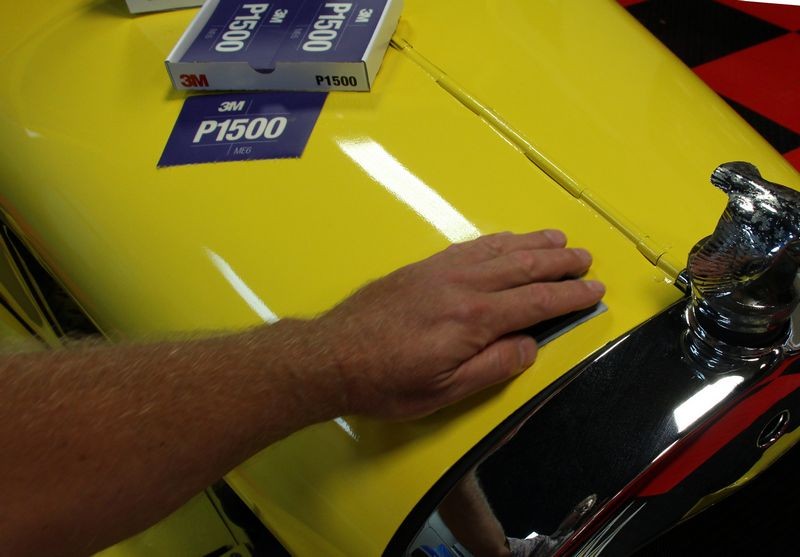
I sanded this section with about 10 back and forth passes and found the #1500 to cut incredibly fast.

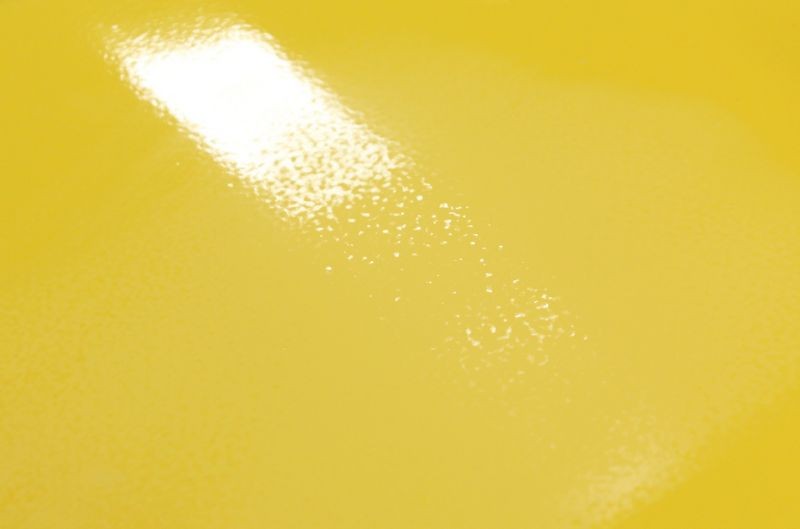
Here you can see the orange peel being removed as you look towards the bottom of the picture the orange peel is being removed leaving behind a very flat surface that after compounding and polishing will produce a smooth, high gloss finish with excellent Distinction of Image or DOI.
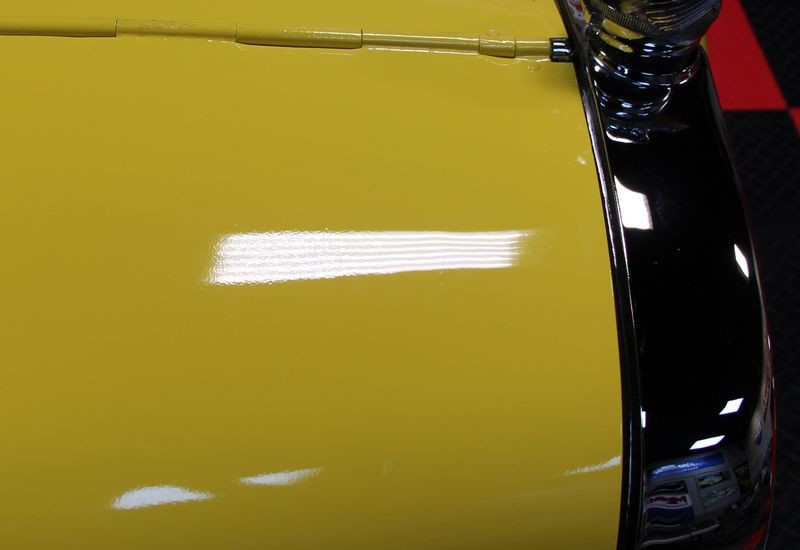
Removing Sanding Marks
"It's easy to sand paint... that's putting scratches into the paint. The tricky part is getting them 100% out"
This morning I wanted to test out what it was going to take to remove the sanding marks to get an idea as to how hard the paint is. Normally I would finish out at #3000 or #5000 grit sanding marks to make the compounding step cooler, faster, easier and safer.
Instead, I threw caution to the wind and just tried removing the #1500 grit sanding marks and to do this I used the Rupes Bigfoot 21 Polisher with the Rupes Zephir Gloss Coarse Gel Compound and Blue Foam Cutting Pad followed by the Rupes Keramik Gloss Fine Gel Polish and the Rupes matching Yellow Foam Polishing pad. I followed this with a quick application of Pinnacle XMT 180 Paste Wax machine applied using a Griot's Garage 3" Mini Polisher with a Rupes 4" polishing pad.
This was just a test to a small section as I'm saving this car for this weekends detailing boot camp class. The Rupes Bigfoot 21 along with their compound and foam cutting pad remove 100% of the sanding marks after just a few passes.
This first pictures will frame up the shot so you can see I worked in the same place I hand sanded...
Now I've zoomed in and you can see the orange peel on the right side where I did not sand and how the paint starts to flatten out as you look to the right side of the picture.

Below are some shots taken using different camera settings including one group of shots with the flash on.
Orange Peel
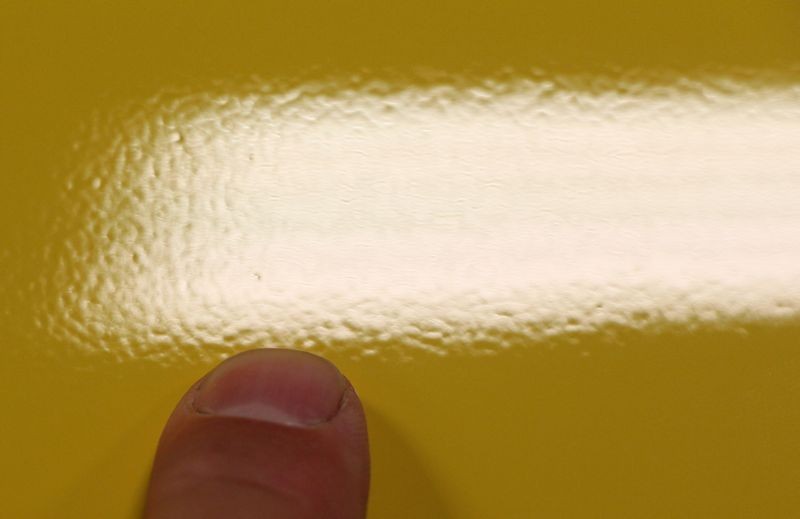
No Orange Peel but also no sanding marks and no holograms or haze...

On the left is John and on the right is Patryk and they are doing some machine wetsanding between the ribs on the filled roof. Patryk attended my detailing boot camp class the previous weekend and has a strong background in Marine Detailing. Now he's taking up car detailing with a focus on Special Interest Vehicles.

Here's Robert using the new 3M Flexible Abrasive Hookit Sheets P1500 to knock out the Orange Peel on the hood cowel.

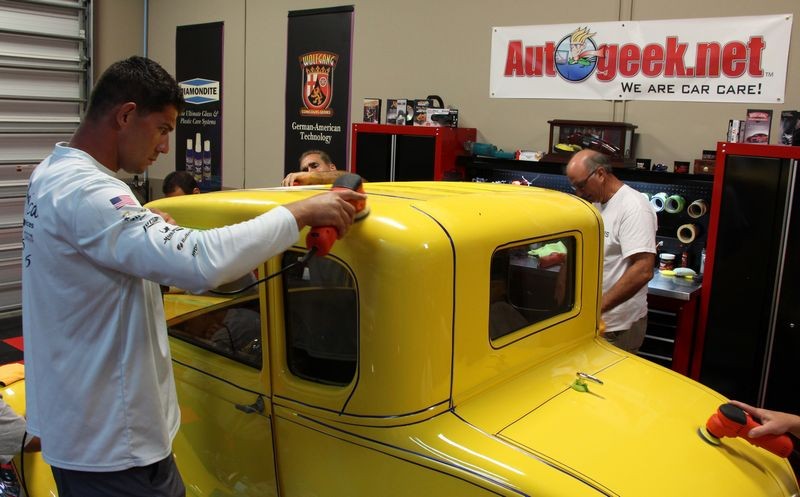
Here's Matt and Craig learning to machine wetsand for their first time on a 1928 Model A Hotrod...
Notice how well taped-off this hotrod is? That's because it has a lot of curves and edges and paint is thinnest in these areas. The tape not only protects these areas but it's a visual reminder to avoid sanding on these areas.

Machine Wetsanding
After hand sanding the passenger side of the engine cowel next Robert machine wetsand using a Porter Cable and 6" Trizact #1500 Sanding Disc. I trust Robert with any sanding and buffing project we have here at Autogeek as he has years of experience and is incredibly talented when it comes to the art of polishing paint.

Frank's First Time
Here's Frank learning all about how to wetsand, cut and buff fresh paint here at Autogeek's Show Car Garage!
This was Frank's first visit to our Thursday night gigs and he picked an great night to join us as not only did he get to see the entire process from sanding, cutting, polishing and machine waxing a very cool traditional hot rod but he also was able to helps us restore the original paint on a 1956 Chevy Bel Air.
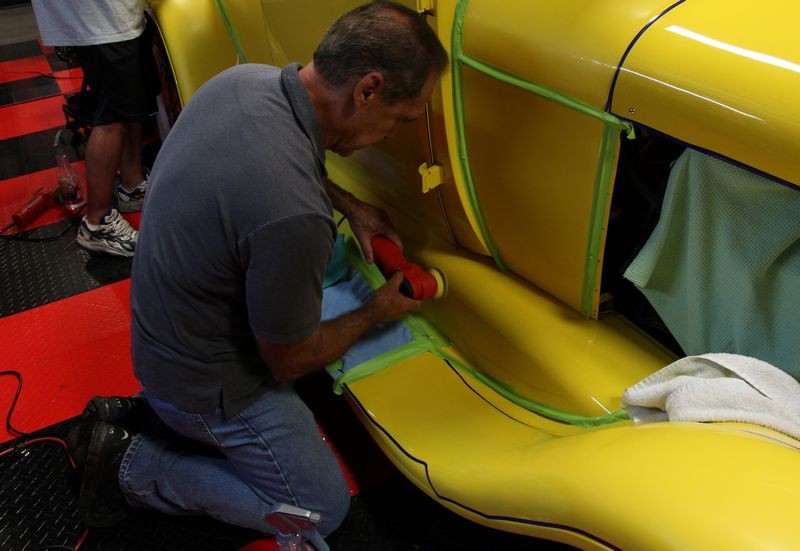
Den wetsanding the curve of the roof...
It's always great to have Den here to help with these projects. Sometime in the near future we're going to have Den's GTO here for a show car makeover.

Big Boys Toys
After getting the feel for how to machine sand using the 3" Peanut Polishers, I let the guys move up to the big boys toys meaning move up to the 6" 3M Trizact Discs on full size dual action polishers. Below Den is using the Meguiar's G110v2 as a machine dampsander.

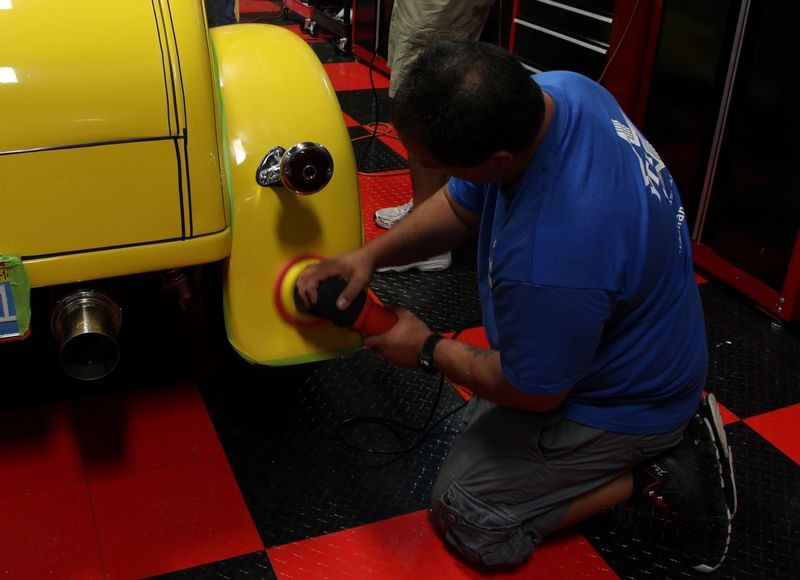
Machine Waxing
Here's Niki machine waxing the passenger side fender using the new Dodo Juice Supernatural Wax. For the most part, we do everything by machine when we can and it's the best fit for the project. Niki also attended the detailing boot camp class that took place the previous weekend.
Just look at here glisten in the sun...

More on Monday...

-
Super Member

Re: Pictures: 1928 Model A - Wetsand, Cut and Buff at Autogeek
I love the last pick with the reflection in the wheel. Too cool. 
-
Super Member
Re: Pictures: 1928 Model A - Wetsand, Cut and Buff at Autogeek
Oh yeah, and the rest of the car looks great too! lol
-
Super Member

Re: Pictures: 1928 Model A - Wetsand, Cut and Buff at Autogeek
Great work as usual gentlemen. Looks amazing.
-
Re: Pictures: 1928 Model A - Wetsand, Cut and Buff at Autogeek
Excellent work as usual.
Mike, question: What kind of work were you using the GG 3" ROPs for?
-
Re: Pictures: 1928 Model A - Wetsand, Cut and Buff at Autogeek
 Originally Posted by Dan K

I love the last pick with the reflection in the wheel. Too cool.
Oh yeah, and the rest of the car looks great too! lol
Ha ha... thanks Dan. The Model A came out GREAT!
Sometimes it's kind of fun to take the self-portrait type of picture with cool projects like this...
About the only thing we didn't polish on the Model A was the wheels and after seeing the wheel self-portrait shot I can now see we should have at least hit the chrome baby moons with a quick detailer.
Next time...

-
Re: Pictures: 1928 Model A - Wetsand, Cut and Buff at Autogeek
Beautiful work Gentlemen.
I love seeing the work done inside the Autogeek garage. Makes me miss my garage.
-
Re: Pictures: 1928 Model A - Wetsand, Cut and Buff at Autogeek
Originally Posted by freddie46
Excellent work as usual.
Mike, question: What kind of work were you using the GG 3" ROPs for?
I call these Peanut Polishers because they make me think of Peanut Grinders and Peanut Grinders for those that might not know are not for grinding peanuts but are small hand held grinders for grinding steel.
What we're using the Griot's 3" mini polishers for are to machine wetsand using Trizact 3" sanding discs by 3M.
Two reasons why...
1. The 3" diameter of the sanding disc works perfect for sanding thin panels and for getting into tight area.
2. The 3" polishers are small, lightweight and compact. This makes them PERFECT for people just starting out and learning to wetsand by machine. Because they are small, lightweight and compact in size they are incredibly easy to control and this is important when sanding on someone else's hotrod or any project.
After sanding with a small size tool like this and getting some experience as to what it's like to machine wetsand paint I then move guys up to the full size dual action polishers and the 6" discs.
Like the old saying goes...
We all learn to walk before we learn to run...
So these small sanders are great for sanding thin panels, curves, tight areas and for learning the art of machine wetsanding...
Good question...

-
Super Member

-
Super Member

Re: Pictures: 1928 Model A - Wetsand, Cut and Buff at Autogeek
Mike,
Thanks for the great opportunity to get hands on experience with wet sanding, cutting and polishing techniques and also for your expert instructions. Looking forward to the next Thursday night gig. I told my neighbor about your Thursday night gigs and he's interested in coming too.
Frank
Similar Threads
-
By Mike Phillips in forum PICTURES: Wednesday Night Detailing Classes
Replies: 23
Last Post: 11-26-2020, 08:11 PM
-
By Mike Phillips in forum PICTURES: 2-Day BOAT Detailing Classes
Replies: 1
Last Post: 12-10-2019, 03:45 PM
-
By Mike Phillips in forum PICTURES: 2-Day BOAT Detailing Classes
Replies: 22
Last Post: 01-04-2019, 09:57 AM
-
By Mike Phillips in forum How to articles
Replies: 5
Last Post: 05-16-2017, 07:28 AM
-
By kelley386 in forum Show N' Shine
Replies: 8
Last Post: 05-05-2011, 03:29 PM
 Members who have read this thread: 0
There are no members to list at the moment.
Posting Permissions
- You may not post new threads
- You may not post replies
- You may not post attachments
- You may not edit your posts
-
Forum Rules
|
| S |
M |
T |
W |
T |
F |
S |
| 31 |
1
|
2
|
3
|
4
|
5
|
6
|
|
7
|
8
|
9
|
10
|
11
|
12
|
13
|
|
14
|
15
|
16
|
17
|
18
|
19
|
20
|
|
21
|
22
|
23
|
24
|
25
|
26
|
27
|
|
28
|
29
|
30
| 1 | 2 | 3 | 4 |
|


 Reply With Quote
Bookmarks