 Thanks: 0
 Likes: 0
 Dislikes: 0
-
Super Member

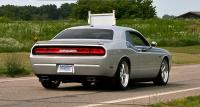
2008 Dodge Challenger SRT8 - the works!
Wow, where to start! This will be a long post, so grab your favorite beverage, head to your favorite seat, hunker down, and enjoy.
This project took me 3.5 days to complete working from 8:30AM to 5:00PM on all but the last day.
This vehicle is my own personal ride and believe it or not, it's my daily driver.
The 2008 Dodge Challenger SRT8 is a 6.1L, 425HP/420ft/lbs. beast of a machine, and this particular one is decked with every option Ma Mopar offered on the vehicle, and it's metallic flake black.
Products used:
CG maxi suds II for wheels
CG honeydew snow foam
Optimum car wash for paint, glass, trim
Carpro Iron X
Nanoskin mitt fine grade with Megs last touch as lube
Pinnacle bug sponge
Flex 3401
LC Hybrid pads - orange, white, gold in 5" and 6.5" flavor so
Megs ultimate compound
Megs ultimate polish
Menzerna SF4500
Megs D114 at 1:15 panel wipe ratio
IPA mixed at 17.5% dilution ratio
Carpro DLux on hard plastic trim and engine plastice
Wolfgang exterior trim sealant on exterior rubber, engine hoses, and wheel wells
1Z Einzett gummi pflege on all rubber seal gaskets on doors, trunk and hood
Opti-lens on all lights
Optimum Gloss Coat on paint and exhaust tips
Stoners invisible glass to clean windows followed by a wipe with Carpro fast glass towel (water only on that)
Optimum power clean at 10:1 on interior plastics and coated leather
PBL leather and vinyl coating for cockpit.
I'm not a pro detailer, just a hobbyist, so I didn't stop to take pictures of all the cleaning, polishing, and application processes, but I do have the finished product pics I'll give you at the end.
It's been about 18 months since I last did a full correction to this vehicle as at that time I had applied PBL diamond surface coating and it had just started to fail about three weeks ago. I liked that product at the time, but had heard some good things about gloss coat, so I decided to go that route this time around.
Monday morning was spent washing the car. I started with the wheels and wheel wells using a wheel master pro brush and CG maxi suds at a pretty strong dilution. About 2 months ago I did a wheels off cleaning and decontamination of the wheels with tarminator and Iron X and recoated with the PBL surface coating as I did not want to crack open the gloss coat at that time. Then I moved to the rest of the vehicle: foam bath, pressure washer rinse and hand wash with Optimums car wash and a MM Incredimitt. The font clip needed more love so I used the pinnacle bug scrub sponge at the end of the wash. That little sponge is awesome, you'd swear by its construction it would scratch to high holy, but it doesn't marr at all as far as I could tell.
By the time all that was done, the sun was getting hot already, and I needed to move the vehicle into the shade of a nearby tree to iron X and clay. Iron X didn't reveal much iron contaimination on the paint, which was great. The wheels bled heavily most likely due to the stock metallic brake pads.
Using the Nanoskin mitt and Megs last touch as lube I hit the whole car. The mitt makes the whole process go so fast, it's crazy. Unfortunately it was so hot by this time, the lube had dried out before I could get all the way around the car. I was worried about polishing with loose bonded contaminates on the car so I rinsed the car again with the pressure washer.
This next part may be of interest to all of you, as a "backward process" actually yielded a better result than the way I had been doing things.
Before I could get the leaf blower all around the car to get rid of the water, I was already getting waterspotting. I grabbed my towel and started to wipe down the little drops that were left and what happened next was crazy in a good way. Normally, I use a QD as a drying aide after a rinse and blow dry to help lubricate the towel going over the surface. It just makes sense in my mind to do it this way. This time, as I was going to polish anyway, I rinsed and blew the water off and went straight to the towel. What I found was the rinse didn't remove all of the Megs Last touch (I believe because this particular product feels pretty oily to the touch) and as I wiped with the towel, the towel glided very smoothly over the paint and the waterspots wiped off like never before. QD before a final rinse worked really, really well, I'd love for some other person to try it and report back their findings. Perhaps it's unique to Megs last touch, but maybe not.
With that all done and the car dry, I moved it to the garage to tape off everything. I hate taping off, but I know it's the right thing to do. It's just so time consuming.
After lunch I got the pads, flex, polishes all assembled and did a test spot on the hood that seemed to be representative of the love marks on the rest of the vehicle. Initially I tried M205 on a white pad, but the heat made it unworkable thru a proper buffing cycle. I switched to the ultimate polish and got what I was looking for, at least I thought. It is my own tendency to get going on something and lose track of time and do "just one more thing". I buffed out the entire roof, hood and trunk deck and at 4PM I stopped, moved the car out into the sun to look for missed polish and saw what every person fears: barely a dent in the swirls. I had just wasted 3 hours. Crap.
Back to the garage, orange pad, ultimate compound, trunk lid. Back to the sun, Bam! That's what I'm looking for, but alas some micro marring to contend with. Hit a quick spot with the UP and white pad and the marring was gone. So this is going to be a 2 step polishing deal. Pack it up for the night and hit it again tomorrow.
Tuesday: Compounded entire vehicle with UC and Orange pad and around 2:00PM I got to the polishing step. By the end of the day, I had all but one side polished out. If you've never buffed out a Challenger, it has a deceptively large amount of real estate. The large panel on the door alone is about 6 work areas, and that's working 6.5" pads. It's big, man. Charge accordingly.
Wednesday, I finished polishing the side in just under 2 hours and had a Forrest Gump moment. I figured, if I've gone this far, I might as well keep on going. I had some SF4500 and the newer gold hybrid LC Pads and thought, "I'll bet I can squeeze a bit more outta this..."
Now, before the debate of whether or not you can actually "jewel" the paint with anything other than a rotary, I'll say this:
I don't care. I used a finer grade polish than UP, and a pad with absolutely no mechanical cutting ability coupled with it. Is that jeweling? I don't know, but it's a finer step than the previous one, and that to me equals a smoother, clearer surface. I will say this, I taped a line and did a test spot comparing a SF4500 step against the UP only step. While staring at the paint and debating whether it actually did any better doing this third polishing step, I stopped looking at the actual paint and looked at my foot in the reflection of the paint. Rocking back and forth, I noticed the foot looked more "in focus" on the SF4500 side. Not much, but noticable. I suspect it was only due to the car being black and really giving a mirror like reflection that this would be noticeable. Light cars likely would see no benefit. It was enough for me to go after the whole car a third time. Yep, I'm that sick.
About 2:30 PM I finished up, packed up the flex, soaked the pads, ran the polishing towels through the wash and started pulling tape. I gave the whole car a wipe down with d114 at panel wipe strength, got all the tape and polish residue off, and then because optimum suggests an IPA wipe down prior to applying gloss coat, I hit the whole car again with a 17.5% shot of IPA.
Finally, gloss coat time! I got the 20CC AG special on the Black Friday sale last year and had been waiting to try it out. I chose to do the paint first as almost all the hard plastic pieces are low on the car or in very easy to reach places so rubbing up against the fresh gloss coat wouldn't be a problem.
Gloss coat is stupid easy to apply, and goes very fast. Wiping off the high spots is so easy, it's laughable. Like immediately wiping off QD residue easy. Pulled it out in the sun and checked for high spots. Found one, it wiped off as simply as the rest of them. I had so much extra time for the day, I proceeded to the DLux step.
DLux unfortunately is not as easy as gloss coat. If you don't get it right the first time, trying to touch it up later makes smear marks. This is especially hard to fix on large pieces. My front lower spoiler had a couple of oops spots and I'll need to look into whether or not that can be touched up after its dried. I know there's some there, it's just not as perfectly uniform as I'd like. If you know it can be touched up later, chime in and let me know.
Opti lens got done too, very easy and quick product as well. High points are very easy to see as it distorts light, especially on clear lenses.
While cleaning up, I pushed all the air out of the gloss coat container before I recapped it and noticed I had only used 5CCs. That didn't seem like enough. So I decided to add another coat Thursday to insure full coverage.
Today (Thursday) second coat of gloss coat. Used 7 more CCs this time. That should do it. Gloss coated the door jambs, engine jambs, and trunk jambs as well. I'm sick, I told you.
Put WETS on all exterior rubber, and coated the wheel wells, at least, as far as I could reach. Gummi Pfledged the rubber seals, vacuumed interior. Wiped steering wheel and seats down with 10:1 OPC, and then followed with a wet clean towel to remove residues. Hit the entire interior with the PBL Leather and vinyl coating, which works great on plastics too.
And here my friends is the end results:


Thanks for reading!
-
Super Member

Re: 2008 Dodge Challenger SRT8 - the works!
Sounds like a solid job. Do you have any pics of the outside?
Scratch that. They just downloaded
Looks sweet! Nice work!!
2012 Dodge Challenger RT Classic Bright Silver
2018 Ford F150 Xlt Sport 4X4 Magnetic Grey

-
Super Member

Re: 2008 Dodge Challenger SRT8 - the works!
Yep, they're up. Photo bucket crashed on me, so I posted before I lost everything. Edited and worked them into the original post.
-
Super Member

Re: 2008 Dodge Challenger SRT8 - the works!
Outstanding write up and awesome job on your sweet ride my friend!
-
Super Member

Re: 2008 Dodge Challenger SRT8 - the works!
Thank you kindly.
I'm not going to lie, this ain't my normal job, I was sore as all get out this morning when I got up. Probably be more so tomorrow.
-
Re: 2008 Dodge Challenger SRT8 - the works!
Excellent write up! Love to car too!
 Originally Posted by aim4squirrels

Now, before the debate of whether or not you can actually "jewel" the paint with anything other than a rotary, I'll say this:
I don't care.
This made me laugh, in a good way. Thank you. I also agree completely.
-
Super Member

Re: 2008 Dodge Challenger SRT8 - the works!
Great job, it looks awesome.
2013 Genesis Coupe 3.8 Track Edition
2015 Hyundai Sonata Limited, 2016 Pearl White Nissan Altima SR
2019 Nissan Rogue SL
-
Super Member

Re: 2008 Dodge Challenger SRT8 - the works!
 Originally Posted by hollerstiltner

Excellent write up! Love to car too!
This made me laugh, in a good way. Thank you. I also agree completely.
Yes, I remember a couple of long threads on this particular subject and whether or not it was possible to "jewel" with forced rotation and oscillation. To me, it's pretty much just another polishing step using ultra-fine polish and very soft pads. I mean, if you've broken the polish down as fine as it gets, and your pad had no cut, what does it matter what machine it's on? I'll tell you this, that paint squeaked like it was basketball practice when I wiped the polish off that last step.
 Originally Posted by custmsprty

Great job, it looks awesome.
Thank you kindly!
-
Super Member

Re: 2008 Dodge Challenger SRT8 - the works!
Nice work ! 
2017 Shelby GT350, 2017 Dodge Charger Scat Pack, 2016 Focus RS. 
-
Super Member

Re: 2008 Dodge Challenger SRT8 - the works!
 Originally Posted by FASTFRED

Nice work ! 
Thanks a lot.
Holy smokes! I just went out to touch the paint after giving it a full 24 hours to cure. It's seriously the slickest paint I've ever felt. If I tried to Duke boys slide across the hood, I'd probably land outside of Hazzard County.
Let's find out about longevity.
Similar Threads
-
By zmcgovern45 in forum Show N' Shine
Replies: 29
Last Post: 09-13-2013, 07:37 AM
-
By Mastercraft241 in forum Show N' Shine
Replies: 7
Last Post: 08-21-2013, 11:14 AM
-
By casvg5 in forum Show N' Shine
Replies: 31
Last Post: 07-10-2013, 10:21 AM
-
By Mike Phillips in forum Ask your detailing questions!
Replies: 9
Last Post: 07-08-2013, 06:01 AM
-
By Becciasm in forum Show N' Shine
Replies: 3
Last Post: 04-15-2013, 12:19 PM
 Members who have read this thread: 0
There are no members to list at the moment.
 Posting Permissions
- You may not post new threads
- You may not post replies
- You may not post attachments
- You may not edit your posts
-
Forum Rules
|
| S |
M |
T |
W |
T |
F |
S |
| 28 | 29 | 30 |
1
|
2
|
3
|
4
|
|
5
|
6
|
7
|
8
|
9
|
10
|
11
|
|
12
|
13
|
14
|
15
|
16
|
17
|
18
|
|
19
|
20
|
21
|
22
|
23
|
24
|
25
|
|
26
|
27
|
28
|
29
|
30
|
31
| 1 |
|


 Thanks:
  Likes:
  Dislikes:


 Reply With Quote


Bookmarks