 Thanks: 0
 Likes: 0
 Dislikes: 0
-
Super Member

First Rotary + 849X = Mind Blown!
I had to share my experience just in case anyone was on the fence about buying a rotary or not...
I just got my Dewalt 849X in the mail today. About 30 seconds later I tore the box apart, screwed on the backing plate and promptly revved her up to see what she is made of. This thing is a beast!!! It's also very quite... much, much quieter than my PC7424XP.
Later on, with the kids in bed, I went out to the man cave to take her for a test drive. My wife's Kia has been shipped from Oregon to Texas and back again in an open car transporter. The last ride was on the top shelf right in front and it must have been driven through a forest or something because the entire roof was thrashed with RIDS from tree branches and lord knows what else. I had tried polishing them before with my PCXP with decent results but still felt I could do better.
OMG!!! The 849X is almost effortless! Sure it's different from a DA... you sort of have to drive it but the learning curve is not too steep. If you are comfortable with power tools then you will be fine. I liken it to snow boarding. Much like tiny movements in your waist can control your direction in the snow, small twists in your wrist go a long way in steering the machine.
Anyway, after a few section passes with a white LC waffle pro pad and some m105 at about 1000rpm the paintwork looked 85% better. This left slight holograms in the paint... I was sort of sad. My first holograms! LOL. After following with m205 on a LC blue waffle pro pad the holograms and micro marring were gone! There were a few deep scratches left that I will have to live with because I want to preserve as much of the clear on the roof as possible. I'm sure they will mostly vanish after a few thin coats of 845 anyway...
The paintwork is hard to photograph because it is white but I will try and post some 50/50's later once I get the photos uploaded.
Oh, and a question for the rotary pros: Is it even possible to finish out m105 without holograms on a rotary?
I was using less pressure on my last few section passes hoping I would finish hologram free but it just wasn't happening... maybe it depends on the paint. Any tips would be much appreciated! 
-
Super Member
-
Super Member

Re: First Rotary + 849X = Mind Blown!
Man I've been eyeing that DeWalt since I saw it on here...
Does it have a slow start function or is it like the other DeWalt buffers that just rev to the moon on the initial trigger pull?
Can't say 105 is ever a clean finish product with a rotary, unless maybe you're talking gel coat. It's made to cut and when you pair it with a high rpm forced rotation machine, that's exactly what you'll get. But since it works so much faster, you could practically work the 105/205 combo before the DA is wiping down from the first pass.
Enjoy the world of SPEED my friend 
-
Super Member

Re: First Rotary + 849X = Mind Blown!
 Originally Posted by RoadRageDetail

Man I've been eyeing that DeWalt since I saw it on here...
Does it have a slow start function or is it like the other DeWalt buffers that just rev to the moon on the initial trigger pull?
Can't say 105 is ever a clean finish product with a rotary, unless maybe you're talking gel coat. It's made to cut and when you pair it with a high rpm forced rotation machine, that's exactly what you'll get. But since it works so much faster, you could practically work the 105/205 combo before the DA is wiping down from the first pass.
Enjoy the world of SPEED my friend
The new 849X has a superb soft start circuit, IMO it has no faults I have noted yet! I got mine a year ago or so. Optimum Polishes are my choice with the Dewalt.
My name is Jim and I am an Old Auburn Tiger.
-
Super Member

-
Re: First Rotary + 849X = Mind Blown!
Originally Posted by Nicholas@Autowerx
This left slight holograms in the paint... I was sort of sad. My first holograms!
The rotating action of the pad against the paint tends to impart it's own scratch pattern, this shows up as holograms also called rotary buffers swirls.
Originally Posted by Nicholas@Autowerx
LOL. After following with m205 on a LC blue waffle pro pad the holograms and micro marring were gone!
Now apply some wax and if you keep the paint waxed all the time you'll likely never see any holograms.
Originally Posted by Nicholas@Autowerx
Oh, and a question for the rotary pros: Is it even possible to finish out m105 without holograms on a rotary?
Probably not, at least not if you're seriously inspecting the paint afterwards including stripping it and using bright light to inspect.
Most people don't strip the paint, they just inspect the results in their garage and assume what they see are the accurate results and then tell everyone it's hologram free.
If you really want to find out, after buffing with ANY pad and product combination, wash the car with a detergent wash or chemically strip the paint and then inspect using bright overhead sunlight for the tale-tale signs of holograms.
If you don't do the above you really won't be able to see what's really taking place on the paint. The polishing oils will make the paint appear to be hologram-free.
Originally Posted by Nicholas@Autowerx
I was using less pressure on my last few section passes hoping I would finish hologram free but it just wasn't happening... maybe it depends on the paint.
What you can do and what you cannot do always depends upon the paint itself, as any honest pro and they will agree.
No one has ever challenged anything I wrote below... and if they do they need to back it up...
Hologram Free with a Rotary Buffer
Over and over the topic of buffing out a car hologram-free, that is without leaving any swirls induced by the rotary buffer, pad and product always comes up on detailing discussion forums.
Over the years I've see a lot of people claim they can buff out every car hologram-free no exceptions. I never believe them because I've done too much testing that proves otherwise.
Besides my own testing, always on black paint, I cannot recall a single time where a person claimed they can produce a hologram-free finish on every car ever back it up with proof. By proof I mean,
- Document how they inspected
- Take honest pictures that show the results of their inspection
One of the problems with proving you can use a rotary buffer and not leave any holograms or rotary buffer swirls is that in order to inspect you have to take what should be a flawless finish and chemically strip it in some manner. For example,
- Wipe the paint with Isopropyl Alcohol
- Wipe the paint with Mineral Spirits
- Wipe the paint with some manufacturers chemical stripper
- Wash the vehicle with a strong detergent soap
All of the above
- Take time
- Potentially induce scratches and/or marring back into the paint
Take time
Buffing out a car already takes a lot of time. To stop after the last machine polishing step and somehow chemically strip the finish to prove even just to yourself that you are in fact producing swirl-free results not only will cause the job to take longer but it's going to mar and even scratch the finish to some level meaning you're going to have to undo the damage you inflict.
Potentially induce scratches and/or marring back into the paint
Most liquid products used to chemically strip paint are not the best lubricants to at the same time lubricate the surface to prevent marring and scratching. It's a lose/lose situation. The best product I have found is Mineral Spirits. It's a dramatically better wiping experience than anything I've ever used just from a lubricating aspect.
100% Hologram Free Claims
So people claim they can do it but don't back it up with proof and for valid reasons. But if you don't chemically strip and inspect, and because paint systems are different from car to car and continually changing even within the same make and model from the manufacturer, how do you know 100% for sure you're leaving a swirl free finish without checking?
Answer: You don't know. You assume.
A couple comments...
I don't know of a single professional and seasoned detailer that's also a true friend that claims to be able to leave a 100% swirl free finish on every car they buff-out. Not one and yes... I ask.
I've never claimed to be able to produce a 100% swirl free finish on every car I buff out and never will. The reason why I won't make that claim is the same reason I post to every thread that brings this topic up and here's what I post...
Paints are different. It's not about you and how great you are or the tool, pad or product you use it's about the paint. Some paints are more polishable than others and some paints are not very polishable. You don't know until you do some testing and inspect your results.
Besides that... I also post this...
Instead of taking a risk that you might be leaving swirls behind, or instead of taking the time to chemically strip the paint and thus waste time and potentially mar or scratch the paint, simply change the action of the tool for the last machine polishing step.
Change from a direct drive, single direction rotating action to a tool that uses both rotating and oscillating actions.
By changing the action of the tool you will ensure a swirl free finish today and down the road after your customer has washed the car a dozen times without ever re-applying a coat of wax.
So I'm not saying it can't be done as I'm confident it can be done and I believe I've done it. I don't believe it can be done on EVERY paint system and the only way to ever know is to chemically strip and inspect in bright, overhead sunlight.
Of course, you don't always have bright, overhead sunlight so that presents another problem to overcome if you do want to inspect.
So everyone can decide what the best approach is for them, I'm just trying to present what's possible and practical and what's not.
Always be open to new ideas, products and techniques...
I do believe in ALWAYS being open to new ideas, products and techniques and when I say this what I mean is I am always open to the introduction of the next best thing as it relates to pads and polishes. The times we're living in have seen more cool new technology introduced in the last few years then I've ever seen in my lifetime. So I practice what I preach when I tell others to be open to new ideas, products, pads, tools and techniques. Bring it on...
The above all said, I have a number of prototype products to test and a couple of them require I start out with a 100% swirl free finish after chemically stripping. So today I went out into the studio and took one of the panels we had painted for SEMA for our SEMA Booth.
I don't know the exact code for the paint or any of the reducers or additive but I can find out as I'm going to interview the painter for another article I'm writing. I do know it's a PPG paint system.
The paint had all kinds of scuffs from being packed and shipped in a crate from Las Vegas to Stuart, Florida so the first thing I did was use a rotary buffer with a medium cut polish and a foam cutting pad to remove all the scuffs, abrasions, swirls and scratches.
Then I re-polished using a fine cut polish and finishing pad, still on a rotary buffer.
Let's establish what holograms look like...
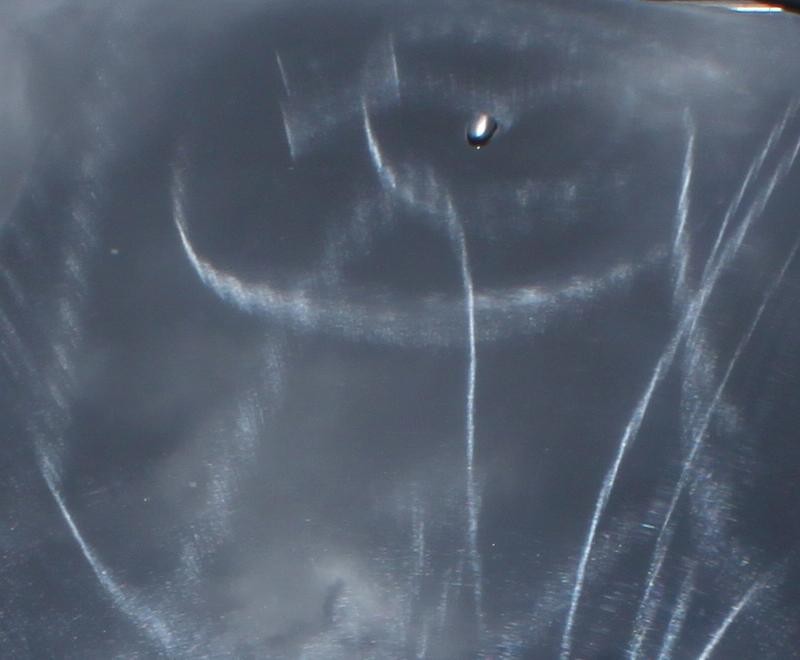
Before I add the pictures, lets take a look at what holograms also called rotary buffer swirls or rotary buffer trails look like so we can establish it's a very distinct scratch pattern. For this I'm going to use some pictures of my friend Rob's black 2006 Mustang GT Convertible because it clearly shows holograms.
Here's a section of the above photo cropped out and in full size...
Often times you'll hear or read about "Holograms" or "Buffer Trails". These are both interchangeable terms for Rotary Buffer Swirls.
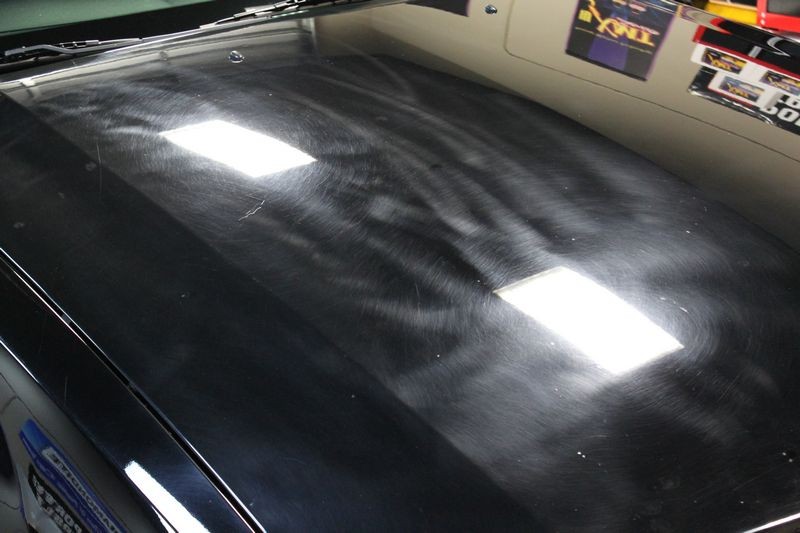
If you look at the below swirls they almost seem to have a 3D appearance or floating in the paint affect, this is the appearance characteristic from which we get the word hologram.

Here's the same car but now we're using the flash from our camera to light up and reveal the horrendous swirls...
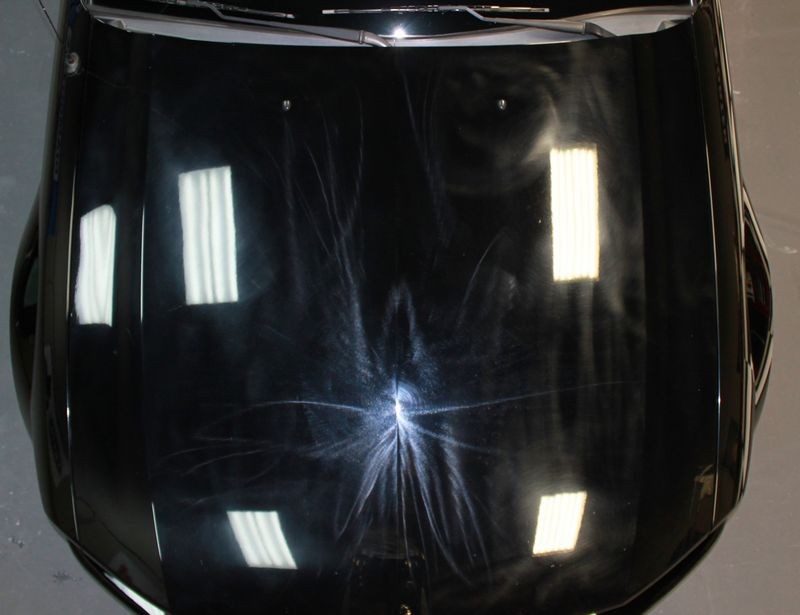
I don't think I've ever seen a car so swirled out by the mis-use of a rotary buffer...
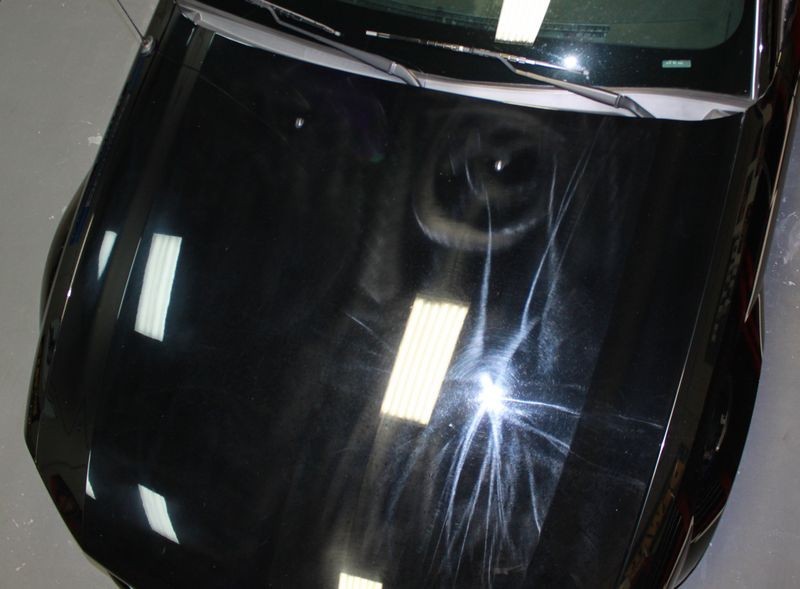
The zillions of swirls in the clear layer makes the paint look hazy and blocks your view of the black paint under the clear top coat. This reduces the darkness of the paint making the true black look gray under florescent lights .
Okay... get the idea?
Do the pictures above establish the pattern of scratches instilled by the mis-use of a rotary buffer?
Good.
Next I had Yancy help me to carry the fender stand and panel out into the sun where I inspected the paint before chemically stripping. Here's a picture, note there are no visible "trails" or holograms.
After Machine Buffing with a Rotary Buffer - Not stripped, just wiped clean
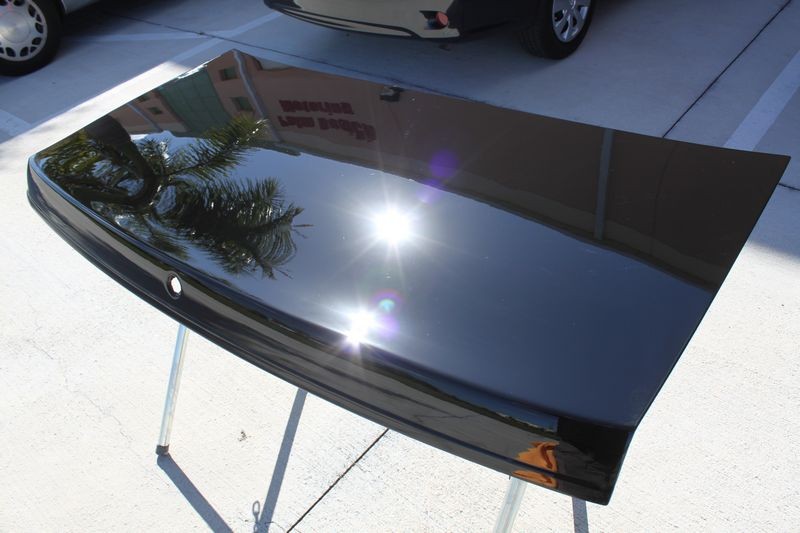
Wiped very thoroughly with Mineral Spirits

Any marring you see now is not "holograms" but marring from wiping. Keep in mind, clear coats are "Scratch-Sensitive" and when working on BLACK paint even the lightest defects show up, that's why I always test on black paint.

I think it's pretty obvious that there are zero holograms or rotary buffer swirls in the paint...

Next I wiped the panel down with IPA at 12.5%. Note when I wiped the panel down both with MS and IPA I dragged the panel into the shade first.
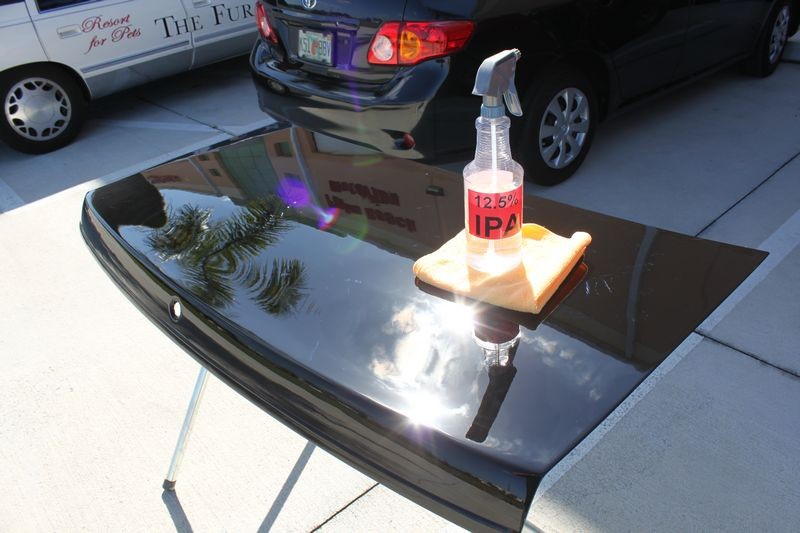
Now you can see some light marring, but that's because IPA isn't a very good lubricant, in fact it's a horrible lubricant. I think of all the people that have been told by others to wipe their car down with IPA before going to the next step and it's pretty easy to understand that when they did this they likely marred their car's paint and this is called working backwards. It's also likely that if the people taking this advice were working on light to medium colored cars they never saw the marring.

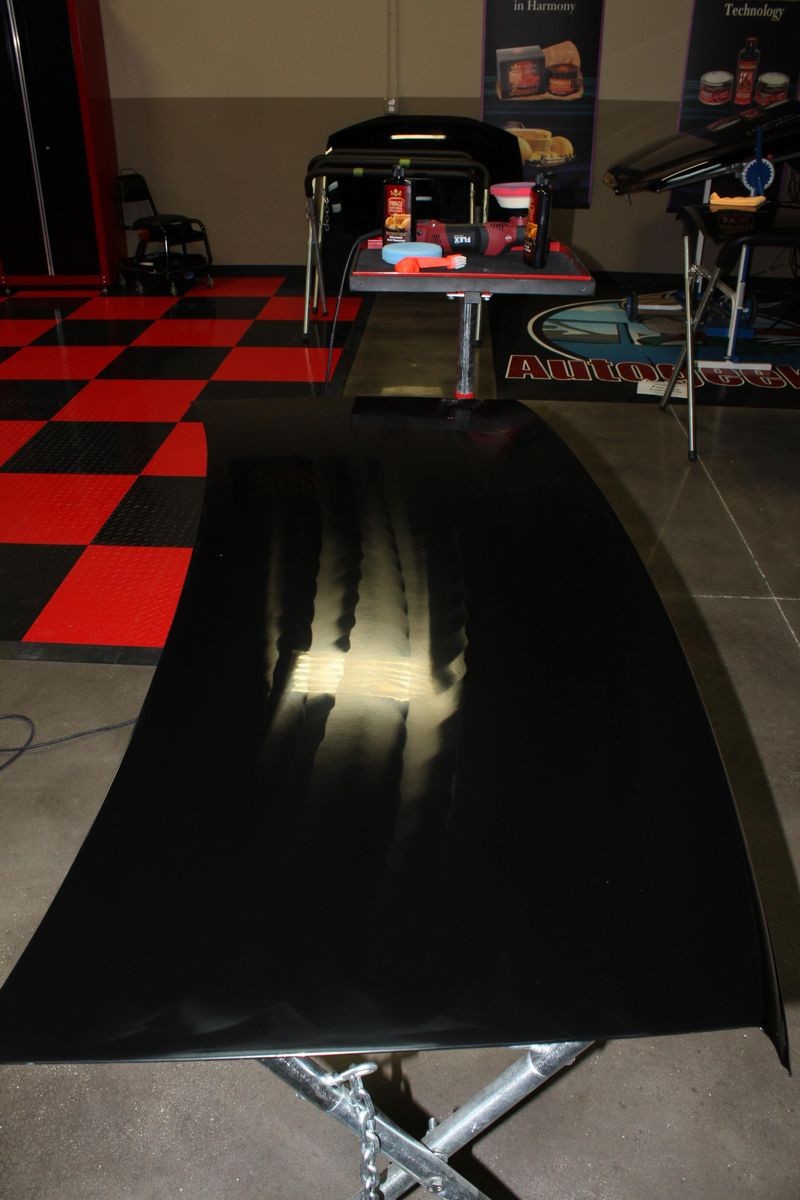
After doing the chemical stripping and inspecting I was back to needing a perfect finish to do my tests so I re-polished the paint. Here you can see the direction I moved the rotary buffer.
Then I wiped the residue off and wiped the paint with Mineral Spirits. Next I took pictures using the flash of my trusty, dusty Canon Rebel. The light to the lower right of my finger is the camera flash.
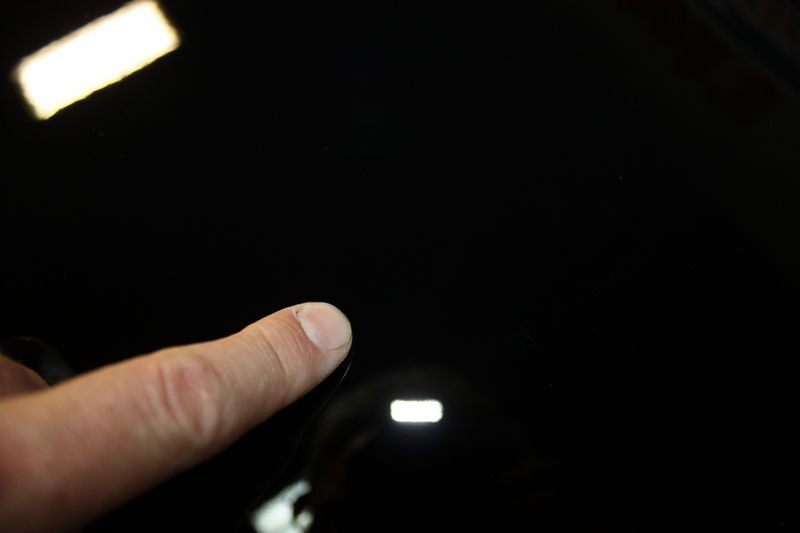
After seeing the fingerprint my finger left on the otherwise perfect finish I placed a business card on the paint to give my camera a focal point. You can learn more about how to capture swirls and other defects with your camera in an article I wrote and the link will be at the end of this post.


I don't think it's a good idea to for anyone to claim they can produce a 100% hologram or swirl free finish on every car they buff out because there's too many different types of paint systems on all the zillions of cars in the world. But others can do as they see fit.
I do think that some paint systems are more polishable than others and a hologram-free finish can be produced using only a rotary buffer.
I also believe the only way you will know is to chemically strip the paint and then move the car into full-on, bright overhead sunlight to inspect. The sun in my opinion does the best job of revealing swirls on car paint versus artificial lights.
I also believe and use as my own practice changing the action of the tool for my last machine process on most projects.
Everyone can find a way that works for them...
I didn't plan on actually writing this article but since I have to test a number of different coatings and needed a flawless, chemically stripped finish for the testing I just happen to come across a paint system that appears to be very polishable.
Hope this helps to shed some light on the topic of what can and what cannot be done using a rotary buffer.
Here's the article I was talking about...
How-To capture swirls, scratches, etchings and other surface defects with your camera
Originally Posted by Nicholas@Autowerx
Any tips would be much appreciated!
Sure, here's a few tips and some tools to add to your arsenal.
Flexible Backing Plate
See my article here,
Flexible Backing Plates
Get a multiple flexible backing plates for all your buffing pads.
Flexible Backing Plates provide,
- An extra level of cushion when using a rotary buffer which helps you when buffing on curved panel and over body lines.
- The flexible foam interface heps to distribute pressure more evenly over the face of the buffing pad.
- They can also make the buffing process less aggressive as compared to using a stiff backing plate which can help to reduce swirls.
Ultra Fine Cut Polish
Besides flexible backing plates, get a quart of Menzerna SF 4500 for your final machine applied polish. Before Todd Helme made the term Jewelling popular [again], I simply referred to this as "finish polishing" as that's what you're doing.
Menzerna - New Names and Product Numbers
Menzerna has introduced all new labels and product names for identifying their products. I know it's easy to stick with what you know and change can be hard but the new product names and identifying numbers are here to stay so might as well make the switch when talking and typing about them..

Soft Flat Face Foam Buffing Pads
Get some soft foam buffing pads, get pads that have a flat face design to them, you want to control any possible factor or variable and this includes the face design of the buffing pad.
Lake Country and Meguiar's make very nice finishing pads.
Lake Country Buffing Pads
Meguiar's W92-7 Soft Buff 2.0 Foam Finishing Pad - 7 inch
Here's an older article that's an overview on this topic...
How to use a rotary buffer
There are a lot of different ways to approach working on any given car, usually you'll want to determine what you're working on, such as new paint, old paint, basecoat clearcoat or single stage paint. Then diagnose the condition of the paint and determine what it is you're going to try to correct, such as removing swirls, scratches, sanding marks, oxidation etc.,
After you have evaluated the paint you can then choose what you think will be the best products and pads for the job
Next you'll want to use the correct technique to apply the products and work them until you've removed all the defects you can to the best of your ability and within what's practical for the paint you're working on. Understand that some defects are too deep and you'll be better off and safer to learn to live with the deeper ones versus trying to remove them all the way and risk removing too much paint.
When you're first learning how to use a rotary buffer, it's a good idea to just tackle a single panel your first time. Considering you have to do the rotary buffer step and then after that a number of more steps until you get the paint up to the waxing step, just tackling a panel, like the hood of a car, is going to take some time to go from start to final wipe-off. So don't tackle an entire vehicle your first time out.
Also don't try to learn on something that's important to you, like a Black Viper, or whatever your pride and joy is, instead either work on an older car that no on will care if you make a mistake or spend a little time obtaining a hood off a car out of the wrecking yard.
Following the advice above, we recently worked on only one half of a panel, and from the time we started to the time we finished to clean, clay clean, polish and the wax and wipe-off took about one hour and that was just for one half of the hood. So start out slowly, and start out on something you can afford to make a mistake on. Then as you gain experience, skill and confidence, you'll be tackling entire cars in no time.
Here's what you do,
Gather your supplies
Get yourself a collection of wool and foam buffing pads, you'll also need some compounds and polishes formulated for use with rotary buffers, these are "Tools" for your tool chest.
You'll need plenty of clean, soft microfiber polishing cloths and a bonnet or two if you want to remove the wax by machine.
Misc Tools
Painters tape, tinfoil, Beach Towels, Bed sheets, Newspaper, Plastic Drop cloths, Plastic Bags... (Just some examples)
Work Clean
Always work clean, this means a clean car and a clean work environment. You don't want any dirt getting into any of the machine buffing processes as you will risk instilling swirls into the paint. Sweep the floor, this will prevent dirt and dust from being kicked into the air as you work around the car. You should at least start out clean, you're going to get dirty in the process.
Dress for success
Put some work clothes on including a soft cotton t-shirt that covers your waist line and you don't care if it gets splatter on it. Sometimes you'll find yourself leaning over a panel and your body touching the paint, have a soft cotton t-shirt to cover your pants so the waist of your paints, things like belt loops, snaps etc., don't come into contact with the paint, only the soft cotton t-shirt.
Also be careful so that you can avoid touch the paint by leaning on it but if you have to, then do everything you can not to instill any scratches. The bigger the car, the bigger the panel the better the odds you might have to "touch" the paint somewhere when you're leaning out to get the hard to reach areas. You can wear an apron but most of the time it's hard to find an apron that's as soft as an old cotton t-shirt.
Quote:
Knock out the top first
Here's a tip, if you think you're going to have to lean on the car to reach an area like the hood or roof, then knock out these areas first, from beginning to end and then tackle the side panels. This way you won't re-instill scuffs or scratches into panels that you've previously buffed.
I almost always knock out the roof on cars from the first step to the last step and then tackle the rest of the car.
Safety glasses are a good idea if you don't wear glasses. The rotary buffer does have a spinning head/pad on it and it could throw something into your eyeball.
Hearing protection is also a good idea as these machines are noisy. You probably don't need hearing protection for working on only one panel, but when you go to buff out an entire car you should have some type of ear protection.
Good shoes. Using the rotary buffer involves you legs, back, arms, shoulders, etc. You'll find that you'll use your legs/feet to anchor your stance while you control the machine. Again it's not that big of a deal if you're just working on just a singe panel but when the day comes and you start tackling entire cars, especially larger vehicles in bad condition where you're going to go around the vehicle 2-3 times with just the rotary buffer, if you don't have good shoes your feet and legs and even the rest of your body are going to pay a price as you work through the day. Something that encases your ankles like high-top tennis shoes work really well, (at least for me).
Prepare the car
Chose a car, wash it and then clay it if it needs it and only tackle one panel on one day to start with. Choose either the hood or the deck-lid, a horizontal panel.
Tip - Wash the day before
If possible, wash the vehicle the day before, that way it will be dry when you go to work on it. Rotary buffers can create an air current and pull water in body seams, cracks and crevices onto the panel as you're buffing.
Also, unless you or your customer has a Floor Lift, then if you can't bring the car up to you... you're going to need to lower yourself to the car in order to properly buff out the lower panels. You should be looking across from the panel as you buff on it, that means for the lower panels sitting your butt on the floor of the garage. It's a bad idea to try to buff out lower panels by bending over, this will stress your lower back. You can drop to one knee, or both knees, (have knee pads on), or use rolling stools, or milk crates, or foam cushion pads, whatever works for you but avoid bending over and running a rotary buffer.
Evaluate the condition of the finish
After washing and drying, inspect with your eyes and look to see what's wrong with the paint, does it have swirls and scratches. Is the finish horrific? As in really horribly swirls-out? Or just light swirls and scratches?
Use two kinds of light
It's a good idea to inspect the paint in at least two kinds of light, sunlight is very good at revealing swirls, florescent lights like many garages have are very good at revealing water spots, etchings and isolated deeper scratches and orange peel.
Use the least aggressive product to get the job done
With experience you can make a judgment call based upon the visual inspection of the paint you're about to work on to choose the appropriate product.
Synergistic Chemical Compatibility
In simple words, I tend to be a system guy, that is I will tend to use all products from a single manufacture using a system approach. Here's how this works...
The chemists that formulate the first step products, since they know what's in them, they are better able to formulate the follow-up or second step products so there's a synergistic chemical compatibility. Using one product designed to be used after the results of the previous product is a system approach.
If you're getting into using rotary buffers, then consider getting a collection of products from a single manufacture designed as a system approach for use with rotary buffers, this usually means products manufactured for the Professional side of this industry which includes products for body shops or the detailing industry. Here's a list of companies that offer system approaches for use with rotary buffers.
Menzerna
Pinnacle XMT
Optimum
Mothers
Meguiar's
Poorboys
3M
Perform a Test Spot
Map out a section on the car about 16" to 20" square or so and work the product against this area, apply a strip or bead of product about 6" to 8" long and pick up your bead using the 10 @ 10 Technique.
After you pick up your bead of product instantly hold the pad flat to trap the product between the face of the pad and the surface of the car and begin making slow, overlapping passes to the section. Like using a DA Polisher, you can make overlapping passes and go in two different directions to insure UMR, Uniform Material Removal. Work the buffer for about a minute, basically long enough to make two to three passes in two directions over this section. Don't buff to a dry buff.
Wipe of the excess residue and inspect.
Are the majority or all of the swirls and scratches gone? If yes you now know what product to use and how long to buff with it, as far as how to use the buffer that's going to come with practice. Start out working on the easy stuff, (large flat panels) and as you get more comfortable with the tool you can start tackling A-Pillars, B-Pillars, doors, fenders, etc.
If after you inspect the finish and most of the swirls and scratches are still there, then re-buff the area a second time, see of a second application of the same product using the same pad will get the job done, if not then it's likely you'll have to try a more aggressive product/pad combination.
In most cases, a medium aggressive polish and a polishing pad on a rotary buffer will at least remove the light or shallow defects and if this is the case then this could be an indicator that the paint is hard and/or the defects are deep but if you're just learning how to use the rotary buffer then it could also be that you're technique just isn't dialed-in enough for "you" to be effective with this combination. That will come with time and for now since you’re learning if you're seeing "better" results then when you started then continue over the rest of the panel.
As you gain experience, you can judge whether or not to start out with a wool cutting pad and a compound if the paint looks like it has a lot of deeper swirls, scratches and water spots. Balance the product and pad you use to the type of service you're offering and your customer is willing to pay for. See this article,
A few tips on starting a part-time detailing business
Before you continue however let's tape-off and cover up.
Tape-off and cover up
Even though the idea is to be very good at what you do so that you don't have splatter onto trim or into cracks and crevices, even the best can make these mistakes, so you need to make a judgment call as to whether you want to tape off and cover up trim, emblems, cracks and crevices or hard sharp body lines where the paint might be thin like the edge or corner edge of a hood.
The Beach Towel Tip
Another trick to help you avoid splatter is to have plenty of pads on hand so that if the pad you're using becomes to wet with product you can simply switch to a clean dry pad. This tends to improve buffing performance and reduce the potential for any splatter. Generally speaking, more pads are better no matter what tool you're using.
The First Step Process – The Cutting or Cleaning Step
once you have your first step process figured out and you have taped-off or covered up anything you want to protect, continue to buff the panel you did your test spot on working each section of the panel equally. In most cases, you'll want to carve out sections of large panels and only buff sections or quadrants of the entire panel during the first step. Smaller panels can be buffed in one or two sections. As I always say...
"Let the panel be your guide"
The most important part of any detail job is the first cutting or cleaning step. It is this step that will determine your end-results. If you don't remove the defects in the first step, then you're going to be seeing them at the end of the job. So invest your time into the first step.
Work each quadrant of the panel you're working on carefully, thoroughly and sufficiently to equally remove enough paint over the entire section to remove the defects to the level you're comfortable with. Understand not all defects can be removed without the risk of removing too much paint and going through the clear on a clear coat paint job and exposing the color coat, or going through the color coat of a single stage paint job and exposing primer.
After working each section, wipe off and remove any excess product. Never apply fresh product to spent product it will dilute and adulterate the fresh product. Always work clean.
After you have worked each quadrant or section over the entire panel, then do what's called a few "Cover Passes", this is where you use the rotary buffer to now buff the entire panel to more or less tie all your work together, that is to give the finish a uniform, level surface with equality in appearance over the entire panel. In most cases the paint is going to have light swirls or haze after this step but that's okay as the next step will remove most of these.
The Second Step Process - The Polishing Step
At this step you can either make another pass using a less aggressive pad and product on the rotary buffer or you can try to move to a machine that oscillates instead of rotates for example the Porter Cable 7424XP, the Griot's Garage ROP, the Cyclo or the Flex 3401.
If your goal is a swirl free finish then you need to find out if the DA Polisher will remove any remaining swirls from your First Step Process or if you need to use a rotary buffer to remove these and then go to the dual action polisher. What determines what you have to do is usually the paint hardness or softness, i.e. polishabilty and of course your ability as a craftsman in the art of polishing paint. Polishability you can't control, but your skill level you can with experience.
At this point you could do another Test Spot, usually you would try to use the DA Polisher and a light cleaner/polish to see if you can remove any remaining swirls and produce a finish perfect for applying your choice of LSP to.
Another option is to only use the rotary buffer for all the correction steps and the final polishing steps but this takes a little practice and not all paints are able to be polished swirl-free using only a rotary buffer.
The only way to really tell is to buff out a horizontal panel like the hood or trunk lid, something you can look down on and then after making doing your last rotary buffer step, strip the paint by wiping with IPA, Mineral Spirits or washing it with a strong detergent wash and then move the car into bright, overhead sunlight. Bright sunlight is very good at revealing even the faintest tale-tale signs of rotary buffer trails also called holograms. If you don't do this kind of test, then how will you know if you truly left behind a 100% swirl free finish?
The problem with this kind of test is that it takes time to do, but if you have the time then go for it. Also, washing and/or wiping with any kind of solvent creates the potential for re-instilling swirls and scratches, just be aware of this as after your inspection you may have to re-polish the panel again.
Once you confirm you are able to create a 100% swirl free finish on the paint system you're buffing on using only a rotary buffer, then simply duplicate that procedure over the rest of the car and as long as no panel has been repaired and thus has different paint on it, then you should have uniform results over the entire car.
If you want to ensure you're not leaving behind any rotary buffer swirls or holograms, and you don't want to wash or strip the panel after buffing, then use a DA Polisher for the final finish polishing step.
By changing the action of the tool from direct drive rotating action to an oscillating action, you will ensure that you've removed any rotary buffer swirls. Of course, now you'll need to make sure you're not leaving any micro-marring, also called Tick Marks or DA Hazing. This is easy enough to check though as it will show up in a small area it's best to check for rotary buffer swirls over a larger panel or section of a panel.
Micro-marring can be avoided by using a high quality finishing polish wit a clean, soft foam finishing pads and then doing a Test Spot and then striping the test spot and inspecting using a Swirl Finder Light
After you decide upon a tool, pad and product to remove the remaining swirls and polish the surface to a smooth, high gloss, (take the paint to its maximum potential), then repeat the above steps of slicing each panel of the vehicle up into sections and working your product over each section thoroughly. Then wipe the entire panel clean and make some Cover Passes. Next wipe the panel clean for the next step.
The Third Step Process – The Protection or Waxing Step
Use your DA Polisher to apply the LSP of your choice usually using a finishing pad. Set your speed setting at around the 4.0 to 5.0 speed setting and apply your LSP over the entire panel making, slow, methodical passes. Try to go over each square inch 2-3 times to allow the oscillating foam pad to really do a good job of pushing the wax or paint sealant into all the microscopic surface imperfection, pockets and pores, hills and valleys, and interstices. Leave a thin, uniform layer over the entire surface.
If you're using a WOWO product then wipe it off immediately.
If you're using a product that needs to dry, then wait till the layer of product swipes clear before removing. Take a break while the wax or paint sealant dries so you're refreshed before wiping off the wax or paint sealant.
At this point in the process under the wax or paint sealant should be a show car finish or something very close to it, so you don't want to instill any swirls or scratches when you wipe the dried product off and besides using clean, soft microfiber towels, you want to be physically refreshed so you can be careful with your wiping actions. Buffing out an entire car using a rotary buffer is a lot of work and by the time you get to wiping the wax off you're going to be tired.
Swipe Test
After allowing the wax to fully dry for anywhere from 10 minutes to longer, how long depends upon temperature, humidity and how thin or thick your layer of wax is, but after some time has gone by test the wax to see if it's dry by performing the Swipe Test, that is to take your clean finger and give the waxed area a brisk swipe.
After you do this inspect the swiped area, it the wax is dry and ready to remove the swiped area will be clear and glossy. If so, the remove the wax. If the area you swiped is smeary, then wait for more time to go by and maybe evaluate how thick the coating of waxy you applied is, perhaps you applying your wax to thick and this is why it's taking a long time to fully dry? In most cases, in average temperatures and humidity, a coating of wax or paint sealant will fully dry in about 15 to 20 minutes. Always check the manufactures recommendations and follow these as the manufacture knows their product best.
Remove the wax
Once you determine the wax has fully dried, then remove the wax by hand or machine using a soft, clean microfiber polishing cloth.
De-Tape
Remove any tape or other items you used to cover and protect areas or components on the car.
Wipe down
Remove any remaining residue and inspect.
Sometimes moving the car into a different light setting will show you places with wax you missed. Sometimes getting another set of eyes to help you to inspect will help you to insure all wax and residue is removed.
Put your tools away... you're done for the day...
Summary...
When you're learning to use the rotary buffer, don't try to tackle an entire car in one day, just tackle a single panel, or even half of a single panel, and get some experience with the different pads and chemicals as well as how to hold and master the tool.
It's also a very good idea to never learn to use a rotary buffer on something that's important to you, like a Black Viper!
Find a less important car, something that no one will care if you make a mistake on or go to a salvage yard or a body shop and get a hood or trunk lid to practice on. Anchor it to a couple of saw horses or go to a PBE store and get an panel stand.
Of course there's more to learning how to use a rotary buffer but the above should provide you with a good starting point. Practice makes perfect. Experimenting with different types of pads and products with different techniques will enable you to hone your skills and find a system approach that works best for you.

-
Super Member
-
Re: First Rotary + 849X = Mind Blown!
-
Super Member
Re: First Rotary + 849X = Mind Blown!
Thanks for the tips Mike!
I do have some flexible backing plates on order from AG and they should be arriving tomorrow.
I am very interested in trying out the Menzerna line. I have heard nothing but good things about it.
-
Super Member

Re: First Rotary + 849X = Mind Blown!
Ack, now you have me wanting to buy one of these again lol. The fact that I might have to finish with a 2nd tool to avoid holograms though is a bit annoying since most of the stuff I work on currently is in good enough shape that one pass with a DA style is usually enough 
Similar Threads
-
By Mike Phillips in forum How to articles
Replies: 15
Last Post: 07-29-2019, 10:26 AM
-
By Calendyr in forum Auto Detailing 101
Replies: 4
Last Post: 03-30-2018, 03:36 AM
-
By WRAPT C5Z06 in forum Rotary Buffers
Replies: 16
Last Post: 05-24-2013, 11:52 PM
-
By RLucky82 in forum Product Reviews
Replies: 11
Last Post: 02-12-2013, 06:51 AM
-
By Chase.Barnett in forum Show N' Shine
Replies: 16
Last Post: 07-11-2012, 11:52 PM
 Members who have read this thread: 0
There are no members to list at the moment.
Posting Permissions
- You may not post new threads
- You may not post replies
- You may not post attachments
- You may not edit your posts
-
Forum Rules
|
| S |
M |
T |
W |
T |
F |
S |
| 31 |
1
|
2
|
3
|
4
|
5
|
6
|
|
7
|
8
|
9
|
10
|
11
|
12
|
13
|
|
14
|
15
|
16
|
17
|
18
|
19
|
20
|
|
21
|
22
|
23
|
24
|
25
|
26
|
27
|
|
28
|
29
|
30
| 1 | 2 | 3 | 4 |
|


 Reply With Quote


Bookmarks