 Thanks: 0
 Likes: 0
 Dislikes: 0
-
Regular Member

Trouble finding the sweet spot
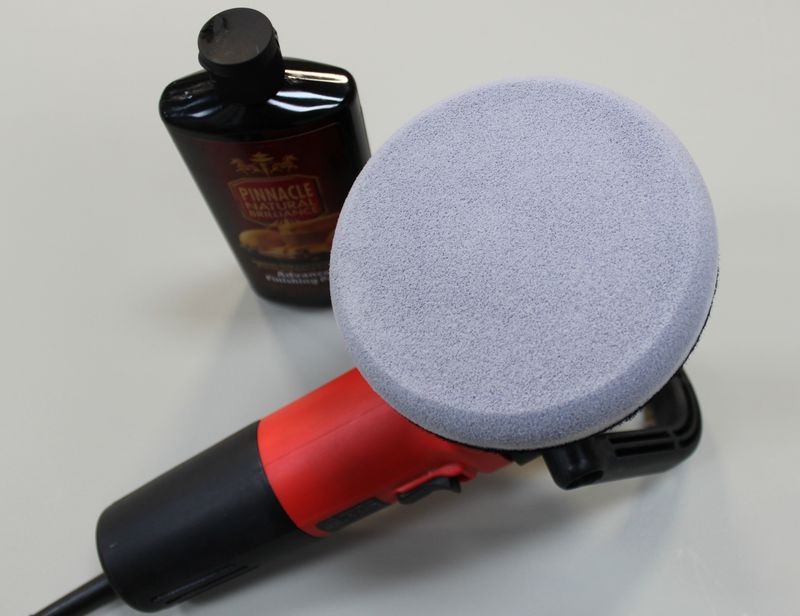
So I tried out the PC that I purchased from AG last week on a car this weekend. I was trying out Duragloss 501 with a LC Orange pad. On the 5 setting with the required downward pressure it worked great. I put the black sharpie mark on the LC backing plate and it was spinning just fine. It seemed that I needed to add more product often more than the 3 dime sized spots. BTW "I primed and loaded the pad prior to starting". Is this normal to apply product 2-3 times on say half a hood?
Also when applying the wax I moved it down to #4 setting with a LC Blue pad. Using less pressure the backing plate was not spinning. I had to barely hold it on the paint for it to spin and it was oscillating pretty slowly.
Is it lack of technique since I am a PC newbie or the machine?

Thanks,
-
Super Member

Re: Trouble finding the sweet spot
Rule 62: Don't take yourself to d*mn seriously
Cincinnati, OH
Shawn
-
Re: Trouble finding the sweet spot
 Originally Posted by Attn2Detailz

So I tried out the PC that I purchased from AG last week on a car this weekend. I was trying out Duragloss 501 with a LC Orange pad. On the 5 setting with the required downward pressure it worked great.
So far so good, next time try the 6.0 setting and she'll really get a buzzing.
Are these 5.5" pads or 6.5" pads?
Originally Posted by Attn2Detailz
I put the black sharpie mark on the LC backing plate and it was spinning just fine. It seemed that I needed to add more product often more than the 3 dime sized spots.
BTW "I primed and loaded the pad prior to starting". Is this normal to apply product 2-3 times on say half a hood?
Yes.
You need the AMPLE amount of product to get the job done. No only do you need enough product for whatever benefit the product offers you also need the product to lubricate the surface to make it easier for the pad to rotate against it under pressure over time.
I don't buy into the pea sized drops and I think most people talking about using only pea sized drops are adding more product as they buff because there's not much lubrication taking place with only 3 peas sized drops.
In my article here I show a minimum of dime-sized drops for most compound and polishing work. Cleaner/Waxes for neglected surfaces would be the same thing, using a finishing wax however you would greatly cut down on the amount of product be used.
How to prime a foam pad when using a DA Polisher
Here are 3 ways to apply product to your pad.
1. Priming the pad then adding product to work with
Priming a clean, dry pad is considered the best approach for using a DA Polisher because it ensures that 100% of the working surface of the pad is wet with product and working at maximum efficiency when you turn the polisher on. I originally learned of this technique from my friend Kevin Brown.
Priming the pad also ensures that you don't have any dry portion of the pad working over the paint un-lubricated. This really isn't a risk because since you're just starting out you're going to be removing defects a lot more serious than would be caused by any portion of the pad that is dry and spinning against the paint.
Plus, after just a few passes, the product you apply to specific areas of the face of the pad will migrate over the entire face of the pad and it will do this rather quickly when you're on the higher speed settings.
Priming the Pad - For clean, dry pads
Start with a clean, dry pad and add some fresh product to be spread out to the face of the pad. Using your finger, spread the product out over the pad and then using your finger work it into the pores of the pad. Don't saturate the pad, just use enough product to make sure that 100% of the working face of the pad has product coverage.


Work the product around the face of the pad and into the pores
Any extra, take and apply to the outer edge until 100% of the working face of the pad is primed with product.

As an option you can also prime the outer edge. This helps if you're buffing around convex curves or around panels that the edge of your buffing pad may come into contact with, like spoilers, side mirror housings, curved panels etc.

Primed and ready to add "Working Product" to.
Adding "Working Product" to the primed pad
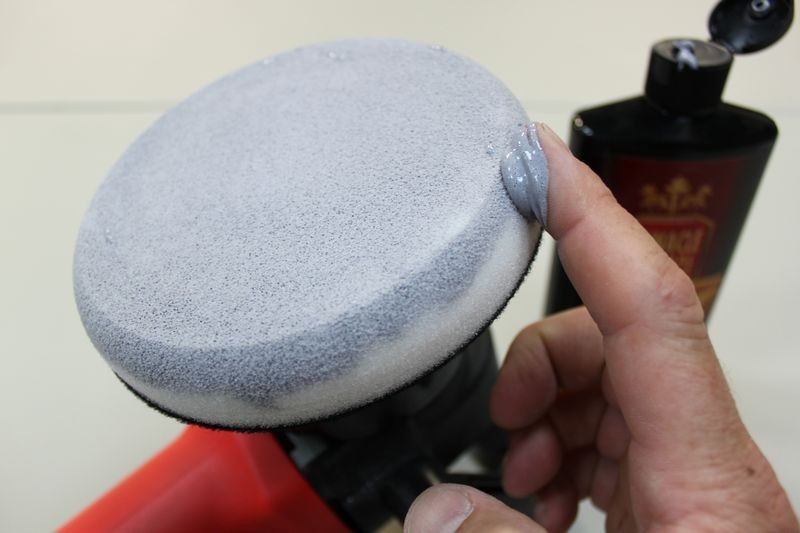
Some people will recommend 3 to 4 pea size drops of product as the proper amount of product to use and this can be correct for concentrated products or working small sections and if you follow this advice make sure you are not under-lubricating the surface being worked.
Pea size drops of product

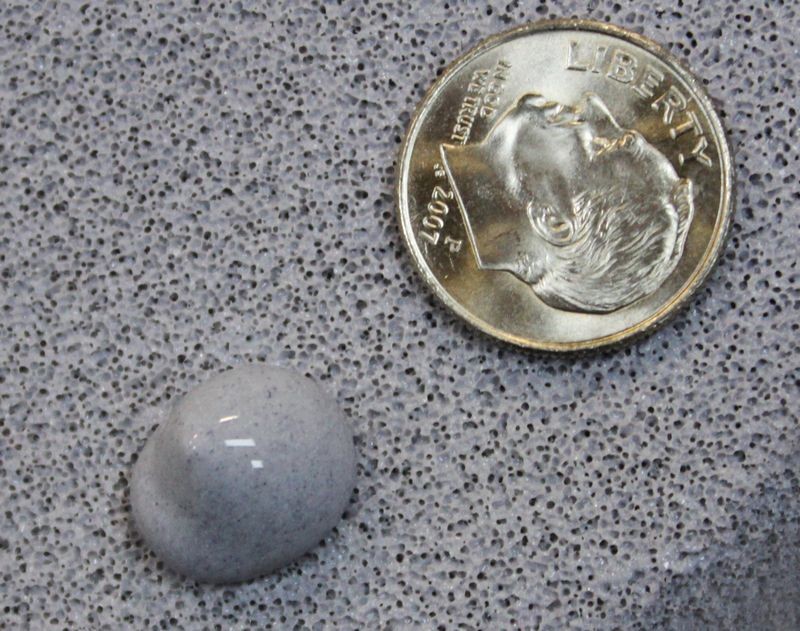
For some products and paint conditions, you may want more product on the surface working for you. Here's an example of dime size drops of product.
Dime size drops of product


How much product to use after priming
Ample
You want an AMPLE amount of product when first starting out because you pad is dry and some of the product is going to seep into the pad leaving less on the surface to LUBRICATE and ABRADE the paint
Cut down on the amount of product AFTER pad is broken-in...
After your pad is broken in with product, clean your pad after each section pass and when you apply fresh product you can cut down on the amount of product you actually apply to the face of your pad.
Too Little Product
Under-using product reduces lubricity and will make it more difficult for your pad to rotate efficiently.
Too Much Product
Using too much product will hyper-lubricate or over-lubricate the pad and will interfere with the abrasives ability to abrade the paint.
Keep in mind that you want enough product on the surface so you have,
- Abrasives working for you.
- A lubricating film between the paint and the pad.
Often times if you don't have enough product to work with you'll end up buffing to a dry buff. When you lose lubrication, friction increase and this can lead to micro-marring or hazing.
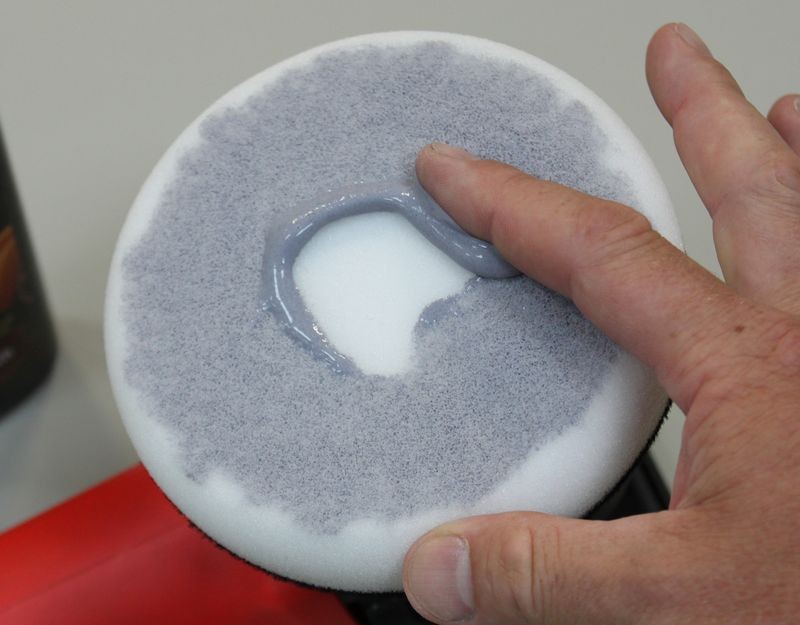
2. Applying a Circle Pattern of Product
Benefits to a Circle Pattern
As you work around the car you'll find that your product will migrate to the center on it's own. This can lead to pad saturation starting at the center of the pad where most of the heat is generated.
This can cause problems because wet foam will hold in heat better than dry foam and over time this can accelerate de-lamination between the hook & loop material and either the foam of the pad or the backing material on the backing plate.
Knowing this... I don't help the problem by using an X pattern as using an X-pattern means putting product onto the middle of the face of the pad.
If you're placing pea or dime sized amounts of product to the face of your pad then it's also a good idea to avoid placing the product directly in the center of the pad.
Circle Pattern on a clean dry pad and then worked for a Section Pass
 
After working the circle of product over a section, you can see it spread the product out over the entire face of the pad without having to spread it with your finger. The pad is now equally primed with residual product.
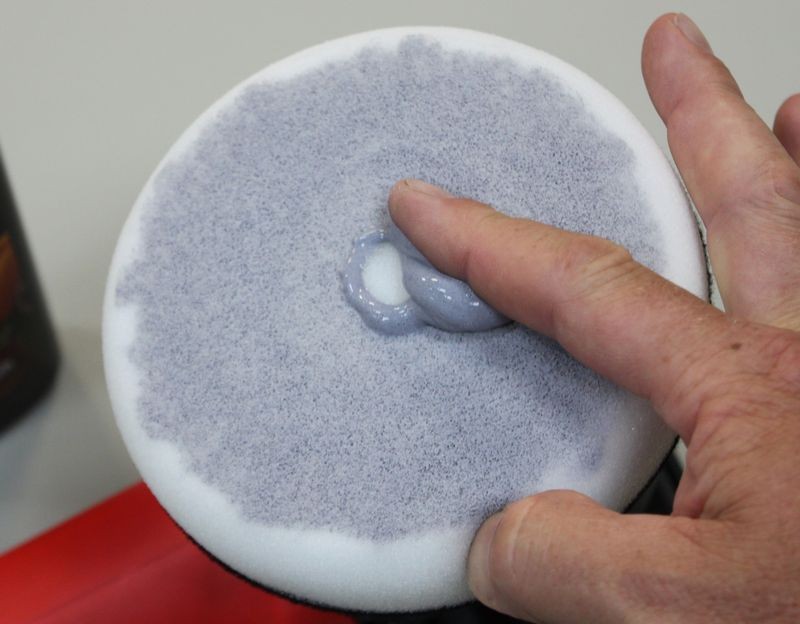
Cut down on product after your first section pass
At this point you could clean your pad or add fresh product and when you add fresh product you can adjust how much product you apply.
In this example I used half a circle of product since 100% of the face of the pad is now primed from the previously applied and worked product.
 
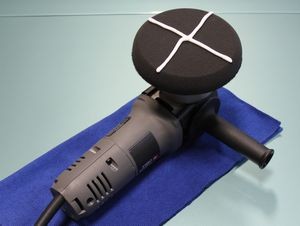
3. Applying an X-Pattern of Product
Applying your product to the face of your buffing pad using an X-pattern is a fast and simple way way to get product out of the bottle and onto the pad in a measured way that's easy to teach others and a method that's easy to duplicate over and over again.
X-Pattern on a clean dry pad and then worked for a Section Pass
Cut down on product after your first section pass
After making a thorough Section Pass. The pad is now equally primed with residual product. At this point you could clean your pad or add fresh product and when you add fresh product you can adjust how much product you apply. In this example I used half an X-Pattern, or a single strip of product since the pad is already primed.
 
Wet Buffing Technique
Maintain a wet film on the surface
The key is to have enough product on the surface as you're working a section to have a wet film of product that you can see on the surface behind the polisher as you move the polisher over the paint.

Originally Posted by Attn2Detailz
Also when applying the wax I moved it down to #4 setting with a LC Blue pad. Using less pressure the backing plate was not spinning. I had to barely hold it on the paint for it to spin and it was oscillating pretty slowly.
Is it lack of technique since I am a PC newbie or the machine?
To answer your question at the end, "yes", it's simply a lack of experience but that's what this forum is for, to bring you up to speed faster than if you were trying to figure this all out on your own.
As for not rotating while applying a wax.
If you did all the correction work and are now using a non-cleaning wax, that is a finishing wax or a show car wax, (or paint sealant), then pad rotation isn't important.
All you're trying to do and all you want to do is spread out a thin, uniform coating and you don't need pad rotating for that nor do you want it. I use the 4.0 speed setting for all the finishing waxes I apply be they liquid or paste.
Watch this video, lots of tips and techniques...
How to remove shallow RIDS and how to machine
apply both a paint sealant and a finishing wax

-
Regular Member
Re: Trouble finding the sweet spot
Originally Posted by shoeless89
What size was your pad?
Whoops 5.5. 
-
Re: Trouble finding the sweet spot
Originally Posted by Attn2Detailz
Whoops 5.5.
You're good to go... just need to spend more time behind the buffer and reading our forum plus watching videos.
-
Regular Member
Re: Trouble finding the sweet spot
Originally Posted by Mike.Phillips@Autogeek
You need the AMPLE amount of product to get the job done. No only do you need enough product for whatever benefit the product offers you also need the product to lubricate the surface to make it easier for the pad to rotate against it under pressure over time.
Hey Mike,
I think I didn't use enough product when I initially primed the pad. Maybe that's why I had to add more product than I thought was normal.
Let me tell you this PC is a huge difference from my WaxMaster W109 that I've had since the 90's ha!

Originally Posted by Mike.Phillips@Autogeek
To answer your question at the end, "yes", it's simply a lack of experience but that's what this forum is for, to bring you up to speed faster than if you were trying to figure this all out on your own.
Over these past few months before pulling the trigger on the PC I have been a MP stalker (don't be scared) on all the AG YouTube videos and ordered the PC-DVD with my last order to round out my virtual learning.  Now it's just a matter of practicing what the pros preach! I've been detailing since '88 (parents would drop me off with my supplies at people's houses) then came the military and life after. I have missed it and figured what a perfect way to pay off some debt by having a side job that I love while working out of the house too. Now it's just a matter of practicing what the pros preach! I've been detailing since '88 (parents would drop me off with my supplies at people's houses) then came the military and life after. I have missed it and figured what a perfect way to pay off some debt by having a side job that I love while working out of the house too.
Originally Posted by Mike.Phillips@Autogeek
As for not rotating while applying a wax. If you did all the correction work and are now using a non-cleaning wax, that is a finishing wax or a how car wax, (or paint sealant), then pad rotation isn't important. All you're trying to do and all you want to do is spread out a thin, uniform coating and you don't need pad rotating for that nor do you want it. I use the 4.0 speed setting for all the finishing waxes I apply be they liquid or paste.
Whew.. so I'm good...
My LSP was Mothers Pure Brazilian Carnauba Wax paste. I'll be posting the thread later when I upload the pictures on the Mercury Milan in Show N' Shine.
Here is a shot after I applied the LSP with the PC. The products didn't act how they normally would have because of the heat, even though I was shaded. I think it was pretty thin even after going over it 2-3 times.

I think the weather had a lot to do with it 100+ degree days. Even though I grew up in Port St. Lucie it was really bad the hottest we've seen it in MD. Fortunately I had the shade, canopy, tons of water and a fan were my friend. I need to sell one of the Datsun's to free up a garage bay just for detailing. I had 5 days off from my day job. I started two details on the 5th and ended on the 8th back to back. Needless to say I am beat..
Appreciate the reply and feedback Mike! 
-
Re: Trouble finding the sweet spot
Originally Posted by Attn2Detailz
Hey Mike,
Let me tell you this PC is a huge difference from my WaxMaster W109 that I've had since the 90's ha!
After using both I'm confident you can see why the ol Waxmaster is now referred to as a "Wax Spread" and not a true "Paint Polisher"
Originally Posted by Attn2Detailz
Appreciate the reply and feedback Mike!
Your welcome. We understand there are other forums a person can go to so we do our best to make sure everyone that joins this form gets top notch help with all their questions on the craft of detailing.
Remember to share AGO with the rest of your car buddies!
-
Regular Member
Re: Trouble finding the sweet spot
Originally Posted by Mike.Phillips@Autogeek
After using both I'm confident you can see why the ol Waxmaster is now referred to as a "Wax Spread" and not a true "Paint Polisher"
You got that right. 
Originally Posted by Mike.Phillips@Autogeek
Remember to share AGO with the rest of your car buddies!
Always do you guys are great!
Similar Threads
-
By jcarson112 in forum Auto Detailing 101
Replies: 9
Last Post: 04-25-2018, 11:18 PM
-
By master_photog in forum Boat & Marine Craft Detailing
Replies: 14
Last Post: 05-19-2015, 07:04 PM
-
By Joe@Superior Shine in forum Show N' Shine
Replies: 23
Last Post: 02-27-2012, 01:12 PM
-
By ShineTimeDetail in forum Off-Topic
Replies: 2
Last Post: 07-13-2011, 05:12 AM
-
By pnut in forum Ask your detailing questions!
Replies: 5
Last Post: 09-17-2009, 12:39 PM
 Members who have read this thread: 0
There are no members to list at the moment.
Posting Permissions
- You may not post new threads
- You may not post replies
- You may not post attachments
- You may not edit your posts
-
Forum Rules
|
| S |
M |
T |
W |
T |
F |
S |
| 28 | 29 | 30 |
1
|
2
|
3
|
4
|
|
5
|
6
|
7
|
8
|
9
|
10
|
11
|
|
12
|
13
|
14
|
15
|
16
|
17
|
18
|
|
19
|
20
|
21
|
22
|
23
|
24
|
25
|
|
26
|
27
|
28
|
29
|
30
|
31
| 1 |
|


 Reply With Quote
Bookmarks