 Thanks: 0
 Likes: 0
 Dislikes: 0
-
applying sealant or wax by machine
I finally took the leap and applied sealant by machine, (finish kare 2180 by flex xc3401 on a black finishing pad), it worked great but i did notice that i used a ton of sealant, most of it was soaked up by the pad. the pad was 6.5" diameter and about 1" thick, is there a way to avoid wasting so much product? my thoughts are either a smaller and/or thinner pad, a microfiber pad or bonnet (2180 says to use a mf towel for application), or maybe a different pad? i started out by priming the pad with a light mist of qd then some product, and then for each section about 3 pea sized drops on the face of the pad. then spread the product on speed 1.
-
Super Member

Re: applying sealant or wax by machine
-
Re: applying sealant or wax by machine
 Originally Posted by cplchris

I finally took the leap and applied sealant by machine, (finish kare 2180 by flex xc3401 on a black finishing pad), it worked great but i did notice that i used a ton of sealant, most of it was soaked up by the pad.
Was the product really thin? Even after shaking the product well?
If so, thin product tend to soak into the pad easily. If I'm applying a liquid product, I prefer products that are a lot thicker for this reason.
For thinner products, prime the face of the pad so it's lubricated and then either use the Kissing the Finish Technique or place product directly onto the car sporadically around a panel and then tilt the pad when picking up the product.
I show explain this in my how-to book and also in a number of videos as well as in this article that can be found in my article list.
Kissing the Finish by Mike Phillips
Kissing the Finish is a technique you can use to apply a liquid wax and help keep the wax spreading out over the paint instead of loading up inside your pad.
I use the "Kissing the Finish" technique when machine applying a liquid wax or paint sealant, that is instead of taking the wax you see on the face of the pad and simply squishing it up into the foam by placing the foam pad flat against the paint, I'll first "kiss the finish" or in other words, touch the face of the foam pad with wax on it down onto your panel at an angle thus depositing only a portion of the wax on the pad to one area on the paint.
The effect is to have a bunch of dabs of wax on the paint deposited off the face of the pad. You're car's panel will look like it has spots, or arcs of product on it...
It's really the lazy man's way to machine wax a car because there are similar methods that will do the same thing. This technique works well for two reasons,
1) If you're already use a DA Polisher then you're already use to applying product to the face of the pad.
2) If you're working on vertical panels it can be a challenge to sling a small amount of product onto the vertical panel directly out of the bottle so applying to the face of the pad is faster, easier and uses less product. For horizontal panels you could simply squirt a little wax randomly over the surface and then pick up the product under the face of your buffing pad on the fly, but if you're a creature of habit you might find yourself just applying to the face of the pad via reason 1 above.
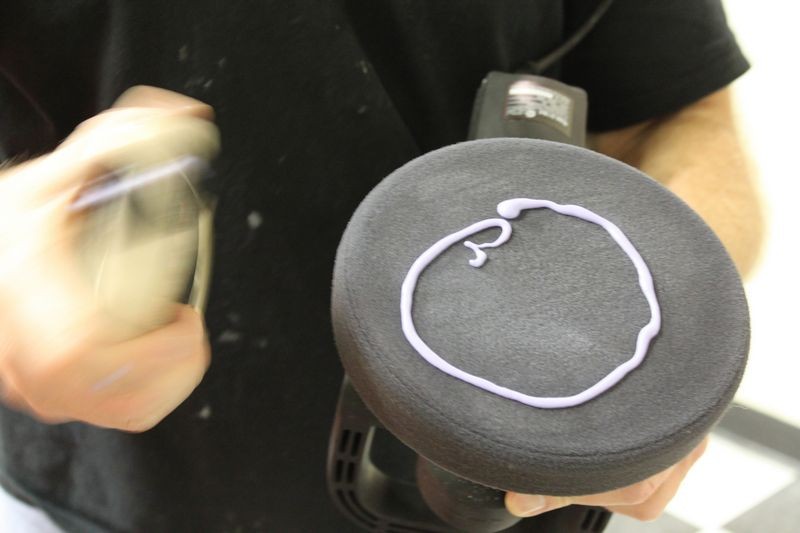
First, shake shake shake... always shake liquid car care products up thoroughly before applying.
Next, apply a small circle of product onto the face of the pad... you can also use an x-pattern or even make a smiley face... whatever makes you happy...
Next, touch down just an edge of the face of the foam pad and deposit a little of the wax to a portion of the panel you're working on.
Then after you've Kissed the Finish in a few places, take what's left and place the face of the foam pad against the paint and THEN turn the polisher on and begin making overlapping passes over the paint.
UNLIKE removing swirls with a DA Polisher where you only want to work a small section at a time, (about 20" squarish or so), if you've removed all the below surface defects and now you're just applying a wax or paint sealant, you can work a section as far as you can reach as long as you have ample product to spread out.
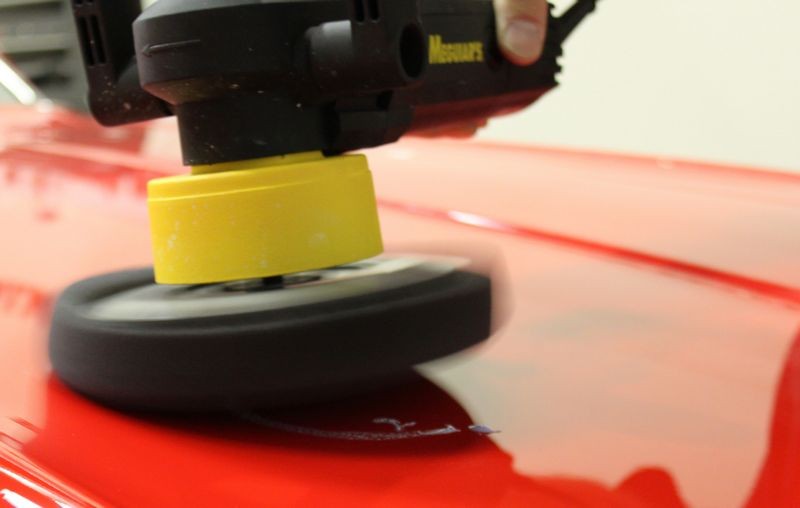
For the hood of this El Camino I can easily reach and work on half of the hood at one time, so I use enough wax to coat over half of the hood and move the pad over each square inch at least 2-3 passes to sufficiently work the sealant over and into, (to whatever level possible), the paint.

As I come up to a dab of wax from where I "Kissed the Finish" with my pad, I tilt the polisher, lifting the leading edge of the pad but maintaining constant contact with the trailing edge of the pad and then run the pad over the dab of wax and then immediately lay the pad flat again and then work new territory with this new dab of wax.


Tilt the polisher a little to lift the leading edge of the pad...

Then move the tilted leading edge over the wax to draw and trap the wax between the paint and the pad...

Then lay the pad flat and begin working the wax or in this case a synthetic paint sealant over the paint.

Continue doing this as you work around the car and all panels are coated with an application of wax or paint sealant.
This is called, Kissing the Finish...
Note: This technique works well with basecoat/clearcoat finishes because clear coat paints don't absorb liquids very well. Be careful if you use this technique on a single stage paint, especially a metallic single stage finish as portions of ANY liquid paint care product if left to stand for too long of a time on single stage paint can act to stain the paint. This is usually not a problem and simply picking up the excess with your pad and working it into the paint will even out the appearance by equally coating the entire surface.
I just want to point out that older single stage paints can and do absorb some types of liquids, so pay attention and either avoid this technique on single stage paints, or work quickly to spread the dabs of product out before any concentrated dabs of product soak into the paint.
Again, it's not really a problem, just want to make you aware because single stage paints are not very common and a lot of people have never worked on these types of paints.


-
Super Member

Re: applying sealant or wax by machine
I still like applying wax/sealant by hand its easier for me.
-
Re: applying sealant or wax by machine
Thanks for the help guys. Mike, the 2180 was a thin product so that was definitely a contributing factor, i will be applying another coat later on this month, i'll use the kissing the finish technique and report back, i think i might also try the ccs smart pad for applying it next time and see what kid of difference that makes, the paint is a white with metal flake on a new sonata and i think it has a clear coat but i'll do some research to be sure. i'll report back with an update in a few weeks.
-
Re: applying sealant or wax by machine
Originally Posted by Pureshine
I still like applying wax/sealant by hand its easier for me.
I used to think the same thing but ill be honest after using the flex to do this i don't ever want to go back to hand applying sealant, although i may still stick with hand application of klasse sealant glaze. the machine put down a perfect thin coat and it was insanely easy to wipe off.
-
Super Member

Re: applying sealant or wax by machine
If its a newer Sonata it's a tri coat with pearl. They weren't very generous with the pearl coat at least on the 10 plus ones I've closely looked at. Depending on what type of LSP is being used I like to apply just like I was painting a room. Edge out all the paint next to the trim or anything I don't want product on by hand and then do the larger sections by machine. You also might want to try a closed cell foam pad like a Lake Country HydroTech or similar as it will as absorb less product.
-
I find that spritzing my pad with onr or any quick detailer helps moisten the pad a little so the wax will spread easier. I get a much nicer uniform, thin coat applying by machine so I prefer that than by hand. Plus it's faster.
-
Super Member

Re: applying sealant or wax by machine
I have been applying Coll 845 the last couple weeks with GG6 and red LC CCS pad. This is after the 845 has sat in the sun for a good hour or so, so it is really thin. Haven't had any problems using a lot of product. I don't think I have used more than 1-1.5 oz. per car? Maybe the red pad is a little less porous than the grey? I did prime the pad real good with product before I started though...I was actually able to do an entire hood and fender with just what I used to prime the pad. From there I used 2-4 dime sized dollups per panel.
2016 Accord EXL V6 w/Navi & Sensing - Black/Ivory
2019 Acura RDX A-Spec - Black/Red; 2019 Acura TLX Base 2.4L - MSM/Black
2008 CRV EX - Black/Black 2003 Accord EX V6 - Black/Tan
-
Re: applying sealant or wax by machine
Originally Posted by cplchris
Thanks for the help guys. Mike, the 2180 was a thin product so that was definitely a contributing factor, i will be applying another coat later on this month, i'll use the kissing the finish technique and report back,
i'll report back with an update in a few weeks.
Already looking forward to your follow-up post...

Similar Threads
-
By Mike Phillips in forum How to articles
Replies: 8
Last Post: 06-29-2017, 02:43 PM
-
By Mercedes350 in forum Ask your detailing questions!
Replies: 12
Last Post: 05-22-2013, 08:25 PM
-
By Kaban in forum Auto Detailing 101
Replies: 16
Last Post: 04-01-2011, 08:42 AM
-
By Apokiliptik1 in forum Auto Detailing 101
Replies: 4
Last Post: 11-05-2010, 09:10 PM
-
By BillH in forum Ask your detailing questions!
Replies: 2
Last Post: 08-09-2010, 06:57 AM
 Members who have read this thread: 0
There are no members to list at the moment.
Posting Permissions
- You may not post new threads
- You may not post replies
- You may not post attachments
- You may not edit your posts
-
Forum Rules
|
| S |
M |
T |
W |
T |
F |
S |
| 31 |
1
|
2
|
3
|
4
|
5
|
6
|
|
7
|
8
|
9
|
10
|
11
|
12
|
13
|
|
14
|
15
|
16
|
17
|
18
|
19
|
20
|
|
21
|
22
|
23
|
24
|
25
|
26
|
27
|
|
28
|
29
|
30
| 1 | 2 | 3 | 4 |
|


 Reply With Quote
Bookmarks