 Thanks: 0
 Likes: 0
 Dislikes: 0
-
Super Member

Re: First shot at fixing the black Vette
 Originally Posted by J S Machine

It has been very hard, time consuming work.
No doubt...But I bet it's been very rewarding!!
Originally Posted by J S Machine
I finally got the back bumper cover finished.
And it looks excellent! 
-I meant to comment earlier in your thread, about how your correction of others "mishandlings" of
your Corvette's paint, is surely evoking feelings of elation.
-Also...It's nice to see your documentation of bringing your Corvette's paint back to a: Healthy-status.
-And...From not only the above photo, but many others you've posted as well,
it appears (from what's scattered around the floor) your keeping all those:
Horses under the hood...Healthy as well!!
-I know it may seem arduous work at times...
But don't allow it to stall your project's progression.

Bob
"Be wary of the man who urges an action in which he himself incurs no risk."
~Joaquin de Setanti
-
Re: First shot at fixing the black Vette
Originally Posted by slapshot
Great work so far. The car has come a long way since you first asked for help.
Great observation...
Originally Posted by J S Machine
Thanks. I appreciate it. It has been very hard, time consuming work.
And that's why ANY detailer that can be considered a Pro, that is they know what they are doing will be and should be charging more than all the hack detailers.
Doing the job wrong is still hard work and takes a lot of time but it's also a waste of everyone's time, money and it's also destructive to the paint on the car which is already thin to start with.
-
Super Member

Re: First shot at fixing the black Vette
Originally Posted by J S Machine
Thanks. I appreciate it. It has been very hard, time consuming work.
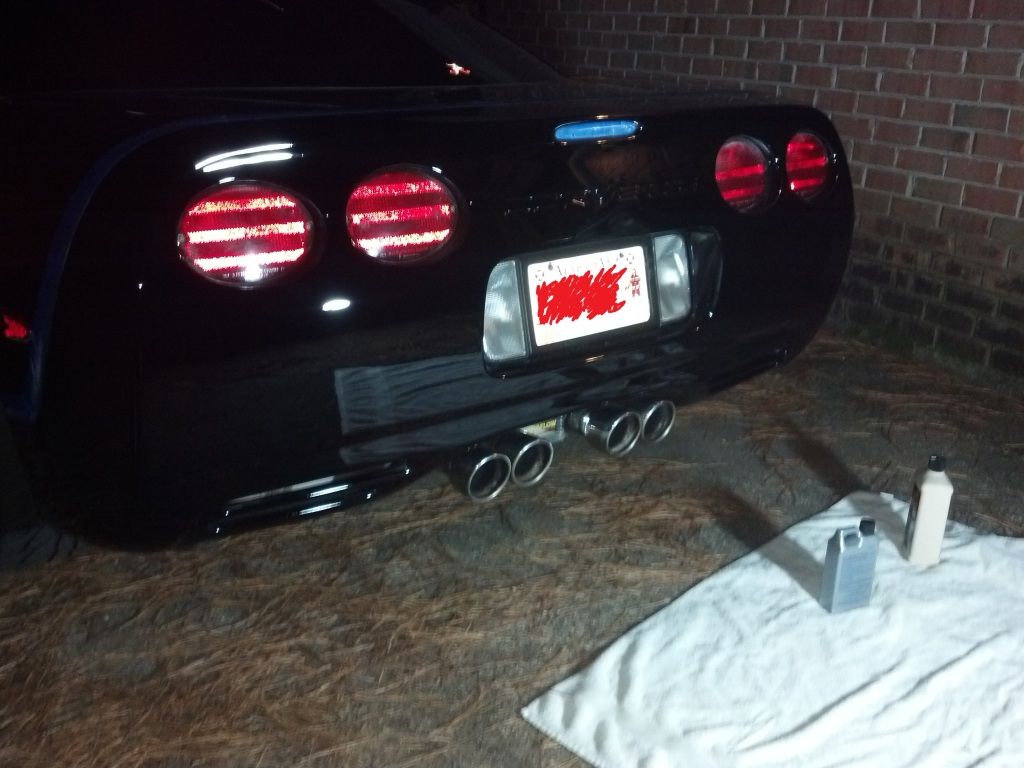
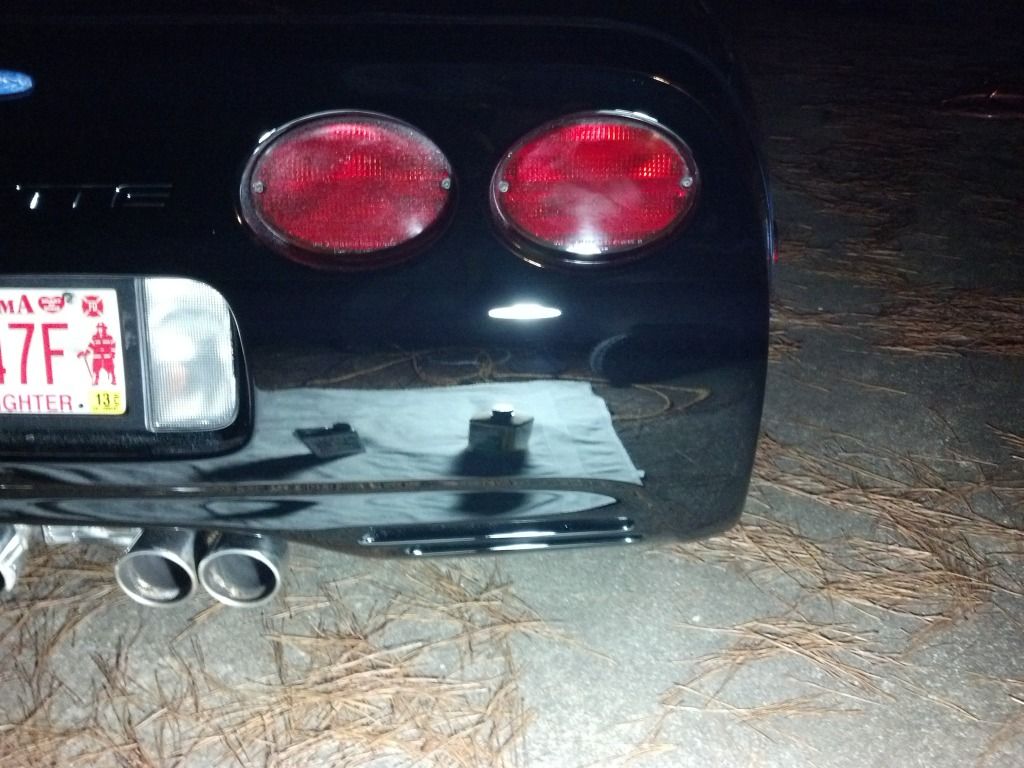
I finally got the back bumper cover finished. It was truly too big of a job to take on as a whole panel. I should have either divided it in half, or maybe quarters. I've noticed that depending on how big the area is I'm working on, it increases my chances of slipping up, or not doing as good of a job. I eneded up re-doing several steps, because I was moving to fast in an effort to get it done. I did divide it up into smaller areas as I was doing section passes, simply because I could not stretch the compound too far..but still, when it takes 10 different areas individually to do an entire panel, it takes an hour for each step..I'm sure you get my drift..
Here are some pictures of the back. Finished up at about 9pm last night. 26 hours into the correction now.

Beautiful transformation!!
Well worth the time and effort, imagine if you paid someone to do it?
More satisfaction by doing it yourself.
-
Re: First shot at fixing the black Vette
I took a shot at the passenger rear fender yesterday. I got it done, but I am struggling. I was put back on 12 hrs/day at work, and that coupled with the time change has really taken its toll. My goal is to do at least one panel start to finish, but it is very hard to do in a decent time frame with the amount of correction that is needed. I am driving the car, so I don't want to be cruising around with blue tape hanging out on it, and that's the reason I try to fully complete each panel. There just seems to be so much damage. It is getting frustrating.
I made my first mistake last night. I'm getting up at 2am and going into work, so I can still get off by 3:30pm and have a tad of daylight when I get home. Yesterday I got after it at about 4:15pm. By 5pm it was dark. At 7pm, I was still working on the same fender. Working in the dark is doable, but it is just easier when you have light to see everything better.
Here is a picture before I started

I have washed and dried it, taped it off, and started sanding the scratches. It is just very discouraging to hit these panels with a bright light and see numerous scratches..all of them deep enough where the DA and M105 wont get them out. My only option is to sand every single one. Usually, after I complete an area, I can still see the scratches (some are slightly deeper than others), so I have to go back over them. Just seems like I can't ever get past this sanding step in order to get to the compounding steps.
And then once I do, I usually start with one set of five section passes. I can still see scratches after that, and I have to do another set of five section passes. This usually g4ets them all out.
So in order, my steps are like this:
1. wash/dry
2. tape
3. compound with about five section passes of M105 to expose the deeper scratches where I can see them better (this step is optional, sometimes there are few enough of them where I can just go straight to the next step)
4. Sand the scratches
5. compound with five section passes of M105
6. come back and sand any scratches again that may still show through (rare that this happenes but it does every so often)
7. another five section passes of M105
8. five section passes with Wolfgang TSR
9. four section passes with Wolfgang Finishing glaze
10. wipe with IPA well, buff with Microfiber
11. Paint sealant
12. Buff paint sealant off.
Last night, I skipped number seven. I thought that the first set of compounding section passes had sufficiently removed all the scratches...but it had not. By the time I did the TSR step, I still could not see the true condition of the paint. After I did the finishing glaze step and wiped with IPA, that's when I could still see the light holograms and spiderweb swirls that the section set of section passes with M105 would have gotten out. At this point, I just gave up and went ahead and sealed it. I will just go back to it later. It still looks about 90% better than the damaged panels, but it isn't as good of a job as I have done on the previously corrected panels. I am going to keep moving and come back to that one after the whole car is complete. If I had slowed down, wiped with IPA after every step, and done the necessary steps to ge tthe defects out before moving to the next, I'd be ok. Since I didn't I just caused mysef more work.
The point of this post is just to re-emphasize several things I've learned.
1. Don't try to do too big of a panel or work area at a time.
2. Don't move faster than you should, and don't skip steps. They may not show up until later on, and then you have wasted the time since the skipped step. Since compounds usually get progressively less in cut, the only feasable way to get the defects out is to go back to that step in the process. Theoretically it could be done with the compound that is not so aggressive you have arrived at, but it would be quicker to just go back and use the agressive stuff. But..at this point, rememeber, you will still have to come back down the line of steps to get back to the point you are at.
-
Re: First shot at fixing the black Vette
I forgot to mention that I forgot to take finished pics of the back fender. I will try and get some of those up in a day or two.
-
Re: First shot at fixing the black Vette
Great post John. Nice work too. I might add to your list...
3. Don't be afraid to divde a panel into halves, or thirds, etc.
You're already tired and we both know where that leads.
Keep pressing man, you're almost home.
I think me and you both need to invest in a small Griot's to sand with and for polishing in tight areas. It's on my Christmas list, for sure.
You ought to see what I've been doing. Rotary, wool pad, M105. About 7 1/2 hours in just the roof of this black Trailblazer I told you about. I still have another M105 step, and a polishing step. Not sure if I'll do any sanding or not this year.
My first and main goal is simply to remove the oxidation and get it looking better than it does. If I have time before any real cold snap hits I'll do more, if not I'm going to stop at M105 on a DA and seal it with a DG 105 and plan on finishing in the spring. At this stage I'm sort of at the mercy of Mother Nature, which is fine.
Like you, I have a new found respect for what it takes to do this sort of work...the right way. Like Mr. Phillips stated and eluded to...I haven't been charging nearly enough for the work I have done...even my one-steps.
Really glad to see your progress.
Last edited by Hoytman; 11-16-2012 at 07:59 AM.
Bill
-
Super Member
Re: First shot at fixing the black Vette
Try to divide the doors in half if that's the next area to get done. I've done sections of the vehicle every day until it's finished, took 2 weeks.
The results of your work are great and documentation is very complete.
-
Re: First shot at fixing the black Vette
Like night and day..
I feel better about it now.
-
Re: First shot at fixing the black Vette
Night and day? You better believe it. Great work, John.
-
Super Member

Re: First shot at fixing the black Vette
Similar Threads
-
By shad2fast4u in forum Show N' Shine
Replies: 4
Last Post: 04-20-2015, 09:20 PM
-
By Siorus in forum Auto Detailing 101
Replies: 4
Last Post: 08-01-2012, 05:32 PM
-
By shadybreal in forum Show N' Shine
Replies: 21
Last Post: 12-02-2007, 11:34 PM
-
By DantheMan in forum Show N' Shine
Replies: 12
Last Post: 05-17-2007, 04:30 PM
-
By Totoland Mach in forum Show N' Shine
Replies: 18
Last Post: 02-15-2007, 07:38 PM
 Members who have read this thread: 2
Posting Permissions
- You may not post new threads
- You may not post replies
- You may not post attachments
- You may not edit your posts
-
Forum Rules
|
| S |
M |
T |
W |
T |
F |
S |
| 28 | 29 | 30 |
1
|
2
|
3
|
4
|
|
5
|
6
|
7
|
8
|
9
|
10
|
11
|
|
12
|
13
|
14
|
15
|
16
|
17
|
18
|
|
19
|
20
|
21
|
22
|
23
|
24
|
25
|
|
26
|
27
|
28
|
29
|
30
|
31
| 1 |
|


 Reply With Quote
Bookmarks