 Thanks: 0
 Likes: 0
 Dislikes: 0
-
Super Member

Doing test spots
I finished reading "The Art of Detailing" this morning. There is one part of the book I felt was not entirelly complete.
In the section about test spots, it is mentionned to do up to 5 test spots starting with Finishing polish+Finishing pad then moving to medium polish+polishing pad and up until you find the right combination.
What would be you choices of combinations after that?
Here is what I am thinking, please tell me if there is something better:
3. Medium polish (not sure what that one would be, would M205 be considered one with an aggressivity of level of 4?) + Light cutting (orange) pad
4. Medium polish + heavy cutting pad (yellow)
5. Medium polish + Microfiber cutting pad
Seems this would take for ever if I still need to go higher and repeat all those steps with a rubbing compound. Please help! 
-
Re: Doing test spots
I received some very good information when I posted a similar question to the one you're asking:
http://www.autogeekonline.net/forum/...test-spot.html
-
Super Member

Re: Doing test spots
With some experience you will get a feel for the equipment and products you work with. This will enable you to pretty much zero in on a combo that will work from the get go or require a small adjustment. Until you have that feel starting off with a less aggressive combo will help prevent damage. That said so not start off with a jeweling pad for defect removal or your going to be doing test spots for 8 hours, use some common sense and research what needs to be done.
M205 would not be considered aggressive as it's primarily a polish. Yes you can use different pads wool and foam to alter the end result.
mf system is a little different than working with foam. For the most part yes it's more aggressive than foam as it was designed for defect removal to compete with rotary buffers (but with more margin of error). You should have a special backing plate to help cool the mf pads. Ther are compounds and polishes designed for this system but you can use others as well.
Now cut to the chase. If you need to remove defects below and above the surface of the paint.
Wash
Clay (removes above surface contaminants)
Polish with compound (here is where you can vary the pad but usually a white polishing or compound pad)
Polish with polishing media like M205
Wax or seal
Since the entire car is washed and clayed do your test spots with compound thru the polish stage. You should only need to do 2-3 test spots, keep them small and tape them off to compare when finished.
***********************
Semper Fi
Ralph
-
Re: Doing test spots
 Originally Posted by Calendyr

I finished reading "The Art of Detailing" this morning. There is one part of the book I felt was not entirely complete.
That's the first editing. For those reading this into the future, the second edition is called
The Complete Guide to a Show Car Shine
Originally Posted by Calendyr
In the section about test spots, it is mentioned to do up to 5 test spots starting with Finishing polish+Finishing pad then moving to medium polish+polishing pad and up until you find the right combination.
What would be you choices of combinations after that?
I wrote that to work for even the newest newbie to machine polishing. The idea being since they don't know what they are doing, to walk them through the process of using the least aggressive product "approach".
Now once a person gets a little experience under their belt they'll be able to look at the condition of the paint and knowing their "goal", be able to dial in the process doing less test spots.
On this page here I document doing multiple test spots because,
A. The car/paint was new to me
B. The compound was new to me and the world
C. I wanted to be uber careful as I didn't have any history on this paint system. Check this out, be sure to read the text, not just look at the pretty pictures... 
Testing Out Chemical Guys Black Wax - 1964 BLACK Catalina
Post #15...
Doing a Test Spot with Menzerna FG 400 on a Black BC/CC 1964 Pontiac Catalina
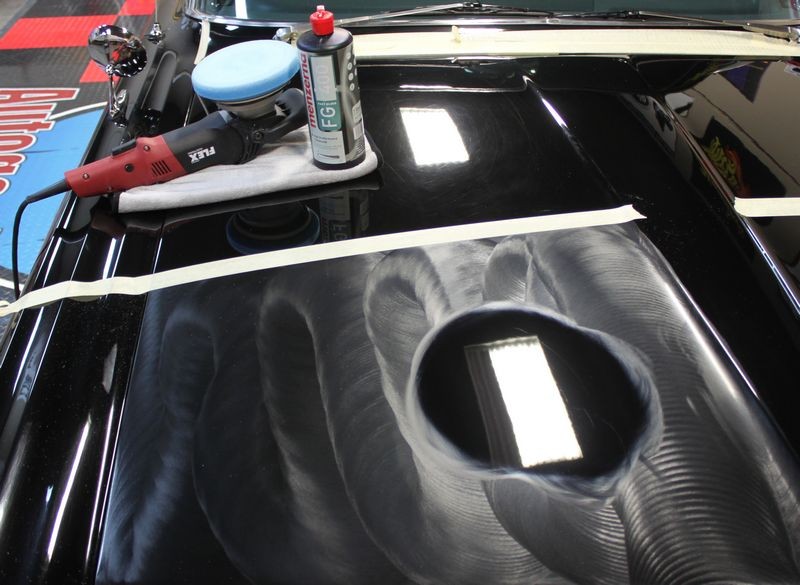
Below are three test spots I did using Menzerna FG 400 starting with the least aggressive Hybrid Pads, (excluding the back finishing pad as that's too soft), starting with white, then going to blue and then finally testing the orange pad.
My results showed that I need to use the Orange Hybrid Foam Cutting pad with the Menzerna FG400 and the Flex 3401 to get the level of defect removal quality I'm looking for and the speed in which to remove the defects per my needs.
Note: At this time I have not done any finish polishing or waxing with the Menzerna SF 4000 Fine Cut Polish or the Chemical Guys Black Wax. I'm confident these two products and steps will take the incredible results I'm getting with just the FG 400 Compound to an even higher level and that will reach my goal of restoring a show car finish to very cool classic muscle car.
Prepping the paint
To start with I wiped the paint clean and then decontaminated it using the Nanoskin Autoscrub Wash Mitt as a decontamination towel using the Nanoskin Glide Spray Lubricant.
First Test Spot = White 6.5" Hybrid Pad
Next I taped-off a dedicated section to perform my first Test Spot using the White 6.5" Hybrid Pad.


This is just to give you perspective...

This is the same area as above only I've zoomed in my camera...

6 Section Passes

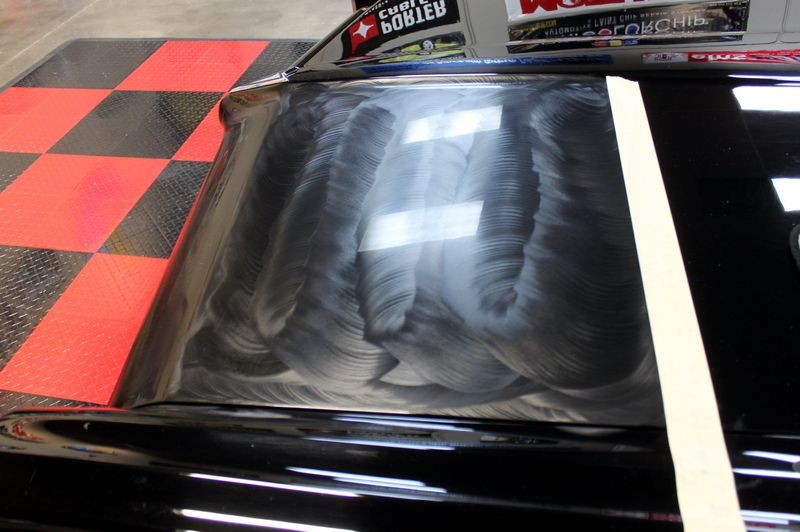
Carefully wiping off a section in the center

Already looking much better...

Lighting up the paint with the flash of my camera...

Very light DA Haze left in the paint. It's possible working the product longer may have removed all the haze. I'm going to do a two-step so I'm mostly looking for defect removal, not perfection.

-
-
Re: Doing test spots
Originally Posted by Calendyr
Here is what I am thinking, please tell me if there is something better:
3. Medium polish (not sure what that one would be, would M205 be considered one with an aggressivity of level of 4?) + Light cutting (orange) pad
M205 is more of a Fine Cut Polish. Think about it... it's only supposed to have to clean up the haze from a wool pad and M105 on a rotary buffer. Remember this is a body shop tool for use at body shops. Always think about the original market a product was intended to go after.
After M205 the paint is supposed to look good enough to kick it out the door at a body shop, that means it can't be "that" aggressive.
Originally Posted by Calendyr
4. Medium polish + heavy cutting pad (yellow)
5. Medium polish + Microfiber cutting pad
Seems this would take for ever if I still need to go higher and repeat all those steps with a rubbing compound. Please help!
Questions?
What are you working on?
What condition is the paint?
What is your goal?
What compounds and medium cut polishes do you have right now?

-
Super Member
Re: Doing test spots
Wow, thanks for all that info Mike.
I guess I formulated my question incorrectly. I wanted to know what is a medium cut polish. M205 rates at 4 on the agressiveness scale. What number would be considered a medium polish?
What I have in inventory right now is:
-M105 (rates at 9)
-Ultimate Compound (rates at 7 on the agressiveness scale according to posts on the Meguiar's forum)
-M205 (rates at 4)
-Ultimate Polish (not sure what it rates at but I am guessing it is a bit more abbrasive than M205 since it is also designed to be used by hand. I might be wrong).
Considering I am using a Meguiar DA, maybe I should start a little more aggressive considering it doesn't have the correction ability of a Flex, Bigfoot or rotary... right?
Oh and one last question, when do you consider that the finish is good enough to do the whole car? If the only thing remaining are RIDS, how do you decide if they are Worth removing or not? I read everywhere that RIDS should not be pursued at all cost, but how do you figure which one should be removed and which ones should not? The fingernail test?
Btw I loved your book Mike, as soon as I have 2 minutes in my insane full time job+Detailing startup phase I will order the next one (Guide to showcar finish).
I just read there are Wool pads now for DAs. So that will add an other tool to work with.
Similar Threads
-
By h8dirtycars in forum Auto Detailing 101
Replies: 36
Last Post: 05-10-2018, 06:54 AM
-
By Hoytman in forum Auto Detailing 101
Replies: 6
Last Post: 11-12-2015, 10:13 PM
-
By Matt@Revive in forum Ask your detailing questions!
Replies: 28
Last Post: 08-08-2015, 10:16 PM
-
By Vortech5.0 in forum Auto Detailing 101
Replies: 11
Last Post: 04-12-2014, 05:59 PM
-
By jto667 in forum Auto Detailing 101
Replies: 9
Last Post: 02-27-2011, 11:33 PM
 Members who have read this thread: 0
There are no members to list at the moment.
Posting Permissions
- You may not post new threads
- You may not post replies
- You may not post attachments
- You may not edit your posts
-
Forum Rules
|
| S |
M |
T |
W |
T |
F |
S |
| 31 |
1
|
2
|
3
|
4
|
5
|
6
|
|
7
|
8
|
9
|
10
|
11
|
12
|
13
|
|
14
|
15
|
16
|
17
|
18
|
19
|
20
|
|
21
|
22
|
23
|
24
|
25
|
26
|
27
|
|
28
|
29
|
30
| 1 | 2 | 3 | 4 |
|


 Reply With Quote


Bookmarks