 Dislikes: 0
-
04-23-2024, 10:31 PM
#1411
Super Member

Re: DFB's Garage
Have a look at bojo trim tools from Ultracut Australia.
-
04-24-2024, 02:30 AM
#1412
Super Member

Re: DFB's Garage
 Originally Posted by DFB

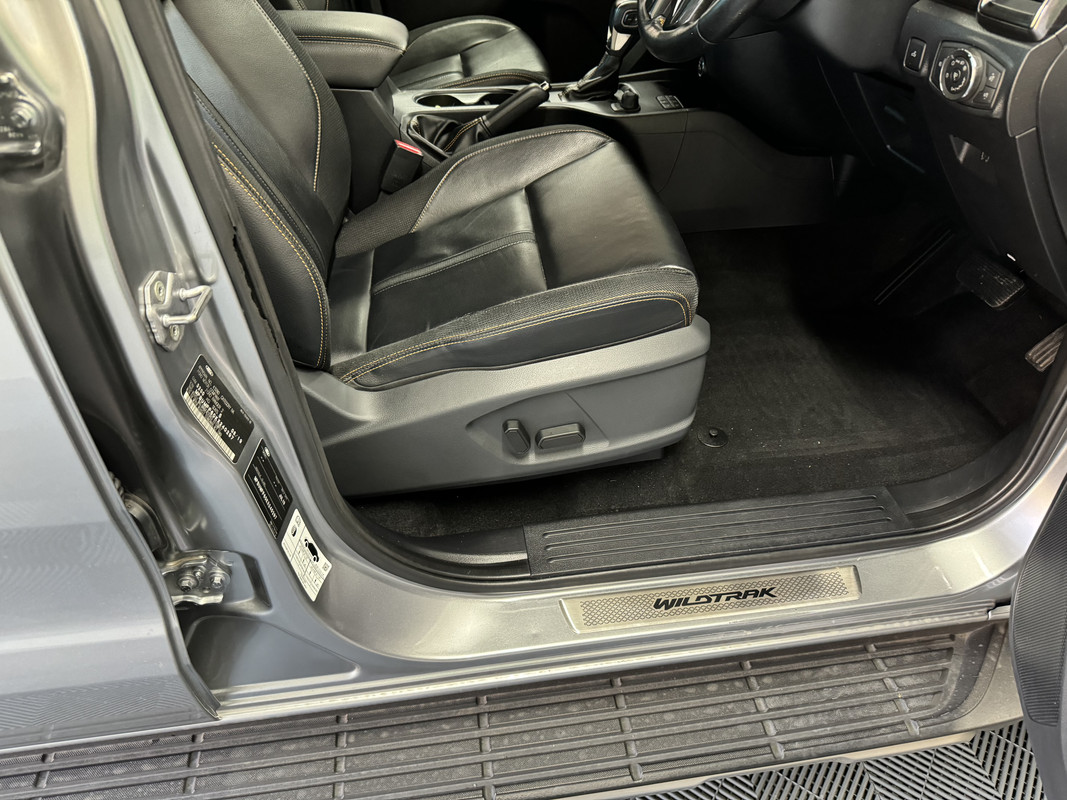
Wildtrak Seat Trim Replacement
Some time ago, the drivers side seat base trim valance on the Wildtrak broke. From memory, the XLT that this car replaced also did the same, so Im pretty sure this is a common failure part.


From what I can tell, the way the trim is shaped and attached to the seat has it subjected to substantial pressure as the driver enters and exits the vehicle. Repeated cycles of compression and release sees the plastic fatiguing over time, which then leads to it cracking.
Could I have made a warranty claim on this failure? Perhaps, but unlikely. Apart from the fact that its just outside of warranty now, Ford would likely claim it as wear and tear, which is fair enough. As such, I decided to order the part from Bayford and do the job myself.
There are a few different versions of this part, all dependent on trim and model spec, and of course driver or passenger orientation. For example, the same part in my Ranger would not have cut-outs for power seat adjustment but would have a mechanical backrest lever. There are also two versions for the 8-way powered Wildtrak, with or without seat heating. This particular Wildtrak is not equipped with seat heaters. At this point, I would list the part number and provide the link, but more on that in later.
First, I removed the two electric seat adjustment levers with my fancy skin wedge tool. There is also a singular Phillips head screw on the rear of the seat. The trim is then "massaged" from the locator tabs.

Next, remove the two screws holding the switch module to the trim, you then need to release it from the tabs.


For the new trim, refit the switch module, then wrangle the trim into place to align and then snap into the three locator tabs, replace the rear screw. The adjuster levers then snap back into place. But........................
Despite being a professional online shopper, for some reason I bought the wrong part. I think the new one is for an XLT and not the Wildtrak with its black rather than grey plastics. I've tried searching the part number for the old piece, but I can only find the grey version.
Does it matter? To me it does, to my father, not at all. I might try and track down the correct part, but I guess its not critical concern. I'm just chuffed I managed to do this myself.
Well, it got the better of me!


I had the local Ford dealer find the correct part, which was ordered late yesterday and was at the parts department by 9am this morning. Can't beat that for turnaround, not to mention not paying for shipping.
-
Post Thanks / Like - 0 Thanks, 2 Likes, 0 Dislikes
-
04-24-2024, 05:27 AM
#1413
Super Member
Re: DFB's Garage
Originally Posted by Tasmania
Have a look at bojo trim tools from Ultracut Australia.
Those look very enticing, almost too many to chose from so I'm not sure where to start.
I have my eye on the new Detail Factory Pick Set, they haven't arrived in Australia yet though.

-
Post Thanks / Like - 0 Thanks, 2 Likes, 0 Dislikes
-
04-25-2024, 12:43 AM
#1414
Super Member
Re: DFB's Garage
I feel so much better now.....................
Black -

River Rock Silver, not the contrast to the black switch levers -
And what I would have preferred to include in the original post, the part number. If you have a PX MK III Ranger Wildtrak WITH 8-way powered seat but WITHOUT seat heating, you want the following part in black and NOT River Rock silver -
EB3Z 17A861 FH
You would think that having done this before, removing the wrong part and putting the correct one on would have been easy. NO! 
The incorrect part put up a fight and I broke one of the rear locator tabs, which is no matter because I have no use for it anyway. The new part went on pretty good but.....................then I realized I forgot to reattach the two screws that secure the adjustment module to the trim. Rookie!!
So, off the trim comes, screws reattached and then the fight started.  I got the thing on again, but something didn't look right, and I somehow unhooked the front of base cushion from the seat frame. It was then I realized I hadn't slotted the front of the trim to the frame properly, so off it came again. I got everything lined up and clicked into place, I then had to fight that final screw to get it properly aligned. I got the thing on again, but something didn't look right, and I somehow unhooked the front of base cushion from the seat frame. It was then I realized I hadn't slotted the front of the trim to the frame properly, so off it came again. I got everything lined up and clicked into place, I then had to fight that final screw to get it properly aligned.
What was going to be a 10-minute job turned into 45 minutes. A lot of that was moving the seat base and backrest up/down/backwards/forwards. It's at this point I have to wonder why powered seat bases are seen as a luxury, every movement takes far longer than a manual adjustment lever.
In any case, I don't mind, I think this is what they call a "learning experience".
-
Post Thanks / Like - 1 Thanks, 4 Likes, 0 Dislikes
-
04-30-2024, 03:22 AM
#1415
Super Member
Re: DFB's Garage
Originally Posted by DFB
I feel so much better now.....................
Black -
River Rock Silver, not the contrast to the black switch levers -
And what I would have preferred to include in the original post, the part number. If you have a PX MK III Ranger Wildtrak WITH 8-way powered seat but WITHOUT seat heating, you want the following part in black and NOT River Rock silver -
EB3Z 17A861 FH
You would think that having done this before, removing the wrong part and putting the correct one on would have been easy. NO!
The incorrect part put up a fight and I broke one of the rear locator tabs, which is no matter because I have no use for it anyway. The new part went on pretty good but.....................then I realized I forgot to reattach the two screws that secure the adjustment module to the trim. Rookie!!
So, off the trim comes, screws reattached and then the fight started. I got the thing on again, but something didn't look right, and I somehow unhooked the front of base cushion from the seat frame. It was then I realized I hadn't slotted the front of the trim to the frame properly, so off it came again. I got everything lined up and clicked into place, I then had to fight that final screw to get it properly aligned.
What was going to be a 10-minute job turned into 45 minutes. A lot of that was moving the seat base and backrest up/down/backwards/forwards. It's at this point I have to wonder why powered seat bases are seen as a luxury, every movement takes far longer than a manual adjustment lever.
In any case, I don't mind, I think this is what they call a "learning experience".
Just have to replace that worn weather strip next.....
-
04-30-2024, 04:53 AM
#1416
Super Member
Re: DFB's Garage
Originally Posted by Tasmania
Just have to replace that worn weather strip next.....
Yeah, that's from wear and tear in less than 60,000 km. The one on the rear door was also damaged when a department store loaded up a flat screen TV into the back seat with little to no care. Wasn't impressed with that one.
-
04-30-2024, 09:10 AM
#1417
Re: DFB's Garage
Originally Posted by DFB
Yeah, that's from wear and tear in less than 60,000 km. The one on the rear door was also damaged when a department store loaded up a flat screen TV into the back seat with little to no care. Wasn't impressed with that one.
I spotted that when zoomed in to see the color match of the replacement....
Those are not as easy as it looks - at least in the 1X I attempted it.
OCD kiddos rubbing the bottom on both rears. Decided to go all in and replace it all
It' just a rubber weatherstrip - 1 piece, with a metal flex channel-ish that -grips- the frame of the body.
Out of frustration, I ended up removing it and buying another brand new set and brought it my Indy to have him deal.
Upon pickup, he himself said it's a bit tricky to lay it down
Basically you lay the new weatherstrip roughly in the opening and you press it in.
The issue is if while it appears even and you press it in, slowly from one corner and going 360.....sometimes when you get close to the end, you have too much dang material that it won't press it flush, so you to to -readjust- the strip so more material is where you pressed in it. However, in my case, once you have pressed it it, to some degree some of the the metal channel doesn't sit at tight once agin once you remove and re-press it back into the frame.
Hopefully you will have better luck that I did with that
-
04-30-2024, 03:04 PM
#1418
Super Member

Re: DFB's Garage
Originally Posted by chefwong
I spotted that when zoomed in to see the color match of the replacement....
Those are not as easy as it looks - at least in the 1X I attempted it.
OCD kiddos rubbing the bottom on both rears. Decided to go all in and replace it all
It' just a rubber weatherstrip - 1 piece, with a metal flex channel-ish that -grips- the frame of the body.
Out of frustration, I ended up removing it and buying another brand new set and brought it my Indy to have him deal.
Upon pickup, he himself said it's a bit tricky to lay it down
Basically you lay the new weatherstrip roughly in the opening and you press it in.
The issue is if while it appears even and you press it in, slowly from one corner and going 360.....sometimes when you get close to the end, you have too much dang material that it won't press it flush, so you to to -readjust- the strip so more material is where you pressed in it. However, in my case, once you have pressed it it, to some degree some of the the metal channel doesn't sit at tight once agin once you remove and re-press it back into the frame.
Hopefully you will have better luck that I did with that
In an OEM environment those seals are installed with a pneumatic palm hammer.
Kinda like this:
Pneumatic Hammer for Trim | Palm Air Hammer | Trim-Lok
-
Post Thanks / Like - 1 Thanks, 0 Likes, 0 Dislikes
 DFB
DFB thanked for this post
-
04-30-2024, 04:35 PM
#1419
Re: DFB's Garage
Originally Posted by SNP209
Thx. Issue is not seating it.
Just setting the pre-formed weather ship evenly and pressing it in so it sits evenly was my issue.
What appears trivial on procedure was not quite what I expected.....along with buying a whole new 2nd set of weatherstrips + subbing it to a Indy
-
Post Thanks / Like - 1 Thanks, 0 Likes, 0 Dislikes
DFB thanked for this post
-
05-01-2024, 01:01 AM
#1420
Super Member
Re: DFB's Garage
Originally Posted by DFB
Yeah, that's from wear and tear in less than 60,000 km. The one on the rear door was also damaged when a department store loaded up a flat screen TV into the back seat with little to no care. Wasn't impressed with that one.
Yeah I've had some bozo Harvey Norman stuff do that but to the vinyl floor in mum's Amarok....No respect but they will sell you a TV
-
Post Thanks / Like - 0 Thanks, 1 Likes, 0 Dislikes
 DFB
DFB liked this post
Similar Threads
-
By Matador in forum Auto Detailing 101
Replies: 7
Last Post: 08-11-2021, 06:22 PM
-
By Nick McKees37 in forum How to Articles
Replies: 3
Last Post: 02-17-2015, 11:14 AM
-
By Mike Phillips in forum Off-Topic
Replies: 5
Last Post: 09-17-2010, 09:47 PM
-
By Mike Phillips in forum PICTURES: 3-Day CAR Detailing Bootcamp Classes
Replies: 20
Last Post: 06-28-2010, 03:05 PM
-
By Mike Phillips in forum How to articles
Replies: 3
Last Post: 06-23-2010, 01:00 PM
 Members who have read this thread: 89
- KirkH,
- cb804,
- ev780,
- Dyerlog,
- mikeinauburn,
- GrnEyeDog,
- AMarkham40,
- FocusSTguy,
- melF1fan,
- jstollar,
- PaulMys,
- Gridlink,
- barryscott,
- Dynoguy,
- The Guz,
- Jplouch,
- ellens2,
- no cigar,
- Bosko,
- D.BRITT,
- cyclops,
- delt1964,
- tradecraft1,
- chris87,
- vaced,
- John U,
- jrose0070,
- Danube,
- aannatshlzea6696,
- ollever,
- 02whitetundra,
- VISITOR,
- Rsurfer,
- 11Silverado,
- Desertnate,
- Ace22,
- damonb10,
- JSkibisky,
- georgia boy,
- chris12,
- larr12,
- gibby68,
- filhotran,
- Awickedtruth,
- Alansr,
- DG3.7,
- eveausasdy529,
- pdl2mtl90,
- Mklauss,
- T-STeve,
- ajdavies91,
- Silly Rabbit,
- Thunderchicken,
- 2FORDS,
- Vegas1,
- Odrapnew,
- WillSin865,
- 4getgto,
- BTW574,
- Wknd Dtlr,
- bill walsh,
- Optimus Grime,
- RippyD,
- TroyScherer,
- DanaDetailingPros,
- Texchappy,
- scottlee,
- bapatickmjnra7168,
- dbeng,
- chefwong,
- Dirty Harry,
- Azure,
- oneheadlite,
- chilly,
- msharpe785,
- gregory1420,
- Setec Astronomy,
- Prange,
- Rollo,
- jvanseeters,
- Innovator,
- hansen97,
- Karl_in_Chicago,
- brianshaeffer,
- kappy,
- wierdkid,
- SNP209,
- Tasmania,
- DFB
Posting Permissions
- You may not post new threads
- You may not post replies
- You may not post attachments
- You may not edit your posts
-
Forum Rules
|
| S |
M |
T |
W |
T |
F |
S |
| 28 | 29 | 30 |
1
|
2
|
3
|
4
|
|
5
|
6
|
7
|
8
|
9
|
10
|
11
|
|
12
|
13
|
14
|
15
|
16
|
17
|
18
|
|
19
|
20
|
21
|
22
|
23
|
24
|
25
|
|
26
|
27
|
28
|
29
|
30
|
31
| 1 |
|


 Reply With Quote
Bookmarks