 Dislikes: 0
-
Re: Barn Find - 1950 Pontiac Chieftain Deluxe Convertible - Extreme Paint Correction
 Originally Posted by Mike Phillips

One last thing....
I often get asked,
Can you re-use the buffing pads?
You see, when working on single stage paint the pigment in the paint is going to stain the pads.
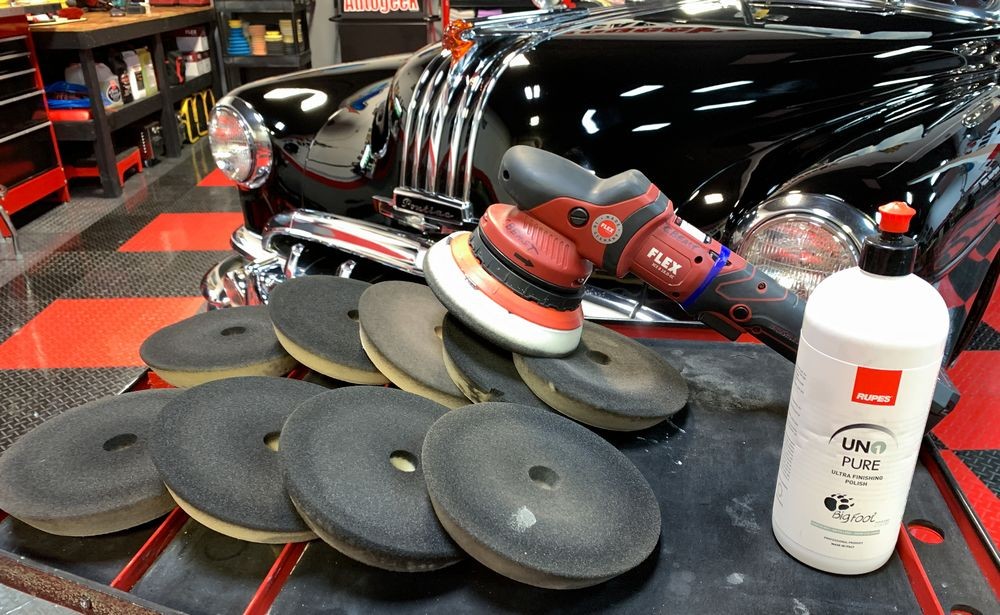 My answer is YES!
I through all the above pads in the washing machine and then the dryer. Here's a brand new pad next to a washed pad.
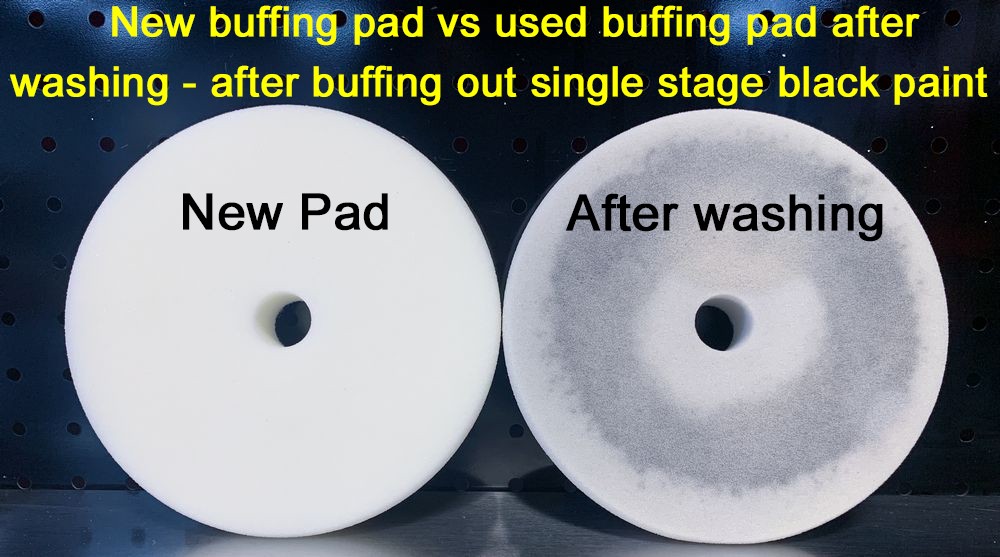
Although there is still some color staining of the foam - I wouldn't hesitate to use this pad or any of the pads on any car in the future.

I was just about to ask this question!
-
Re: Barn Find - 1950 Pontiac Chieftain Deluxe Convertible - Extreme Paint Correction
Mike, can you take some measurements with your paint thickness meter to see how much difference it shows. Not sure if it is accurate enough to show tenths of mils differences but it would be interesting if we could see a general 0.2 mil reduction (example) after your polishing. Thanks. Great job!
-
Super Member

Re: Barn Find - 1950 Pontiac Chieftain Deluxe Convertible - Extreme Paint Correction
Sweet car and great rejuvenation work Mike. 
Pontiac had such iconic styling ... love the hood "waterfall" and Chief Pontiac is looking good too !
-
Super Member

Re: Barn Find - 1950 Pontiac Chieftain Deluxe Convertible - Extreme Paint Correction
Super cool project! Looks killer now!
Scott Harle
Autodermatology
#autodermatology
-
Super Member

Re: Barn Find - 1950 Pontiac Chieftain Deluxe Convertible - Extreme Paint Correction
Awesome.....
Anyway--question for you.
Do you recommend changing to a larger backing plate on the CBEAST?
Tom
Mr Tommy's
Wash, Buff, Wax
Website: mrtommyshine.com
-
Re: Barn Find - 1950 Pontiac Chieftain Deluxe Convertible - Extreme Paint Correction
-
Re: Barn Find - 1950 Pontiac Chieftain Deluxe Convertible - Extreme Paint Correction
Originally Posted by dgage
Mike, can you take some measurements with your paint thickness meter to see how much difference it shows.
Not sure if it is accurate enough to show tenths of mils differences but it would be interesting if we could see a general 0.2 mil reduction (example) after your polishing.
Thanks. Great job!
Too late - car is gone. Wouldn't show much difference anyways and in order to be accurate - I would have to do what I did here in this really in-depth write-up I did in 2009 and it's very controlled and also time-consuming.
Removing Orange Peel & Sanding Marks with the Griot's ROP and the Wolfgang Twins
A grid pattern laid out to provide 3 areas to test that are all flat in shape and in places where we would hope the paint thickness or film-build would be as uniform as possible from a factory paint job as compared to testing on the hood, a door, (vertical panel), or some other curved or slanted panel. Again, trying to reduce the variables as much as possible.
3M Painter's Tape Grid System

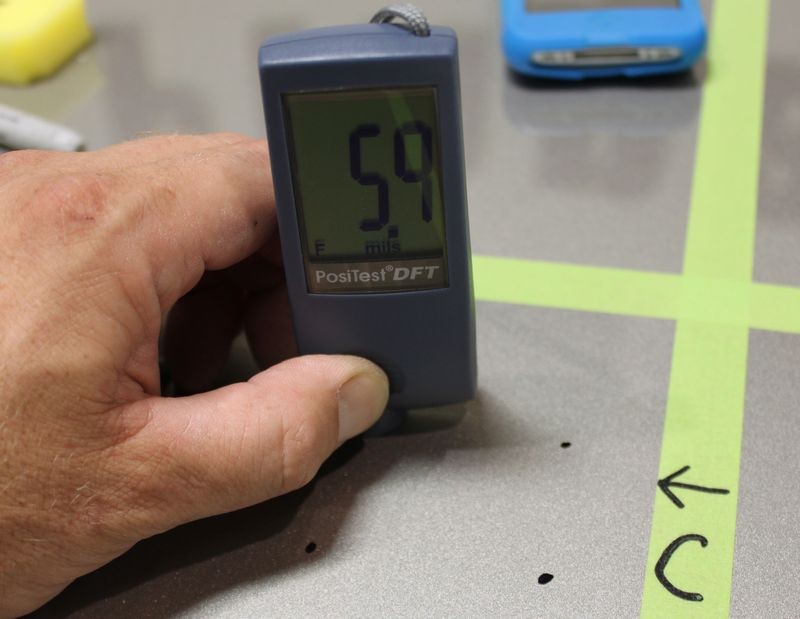
Three sections marked A, B, and C. The piece of foam is marked with the letter E which stands for "Equalizer" as I need a quick simple tool to help me place 4 dots on the paint in roughly the same place for each step and measurement. I hindsight a piece of thin cardboard with 3-4 holes punched into the corners would have been more accurate but this isn't Rocket Science, I'm just trying to show how much paint is being removed on average when hand-sanding with the higher grit papers like the average online enthusiast might do in their garage. In other words, I'm keeping it real-world.


Then I used the PosiTest Paint Thickness Gage and measured each dot 3 times and took the average of the 3 readings. I started in the upper left hand corner and moved around the dots in a clockwise manner. In this picture I've just finished taking the last reading of the number #4 dot at the C location on the panel. (The upper left hand corner dot)
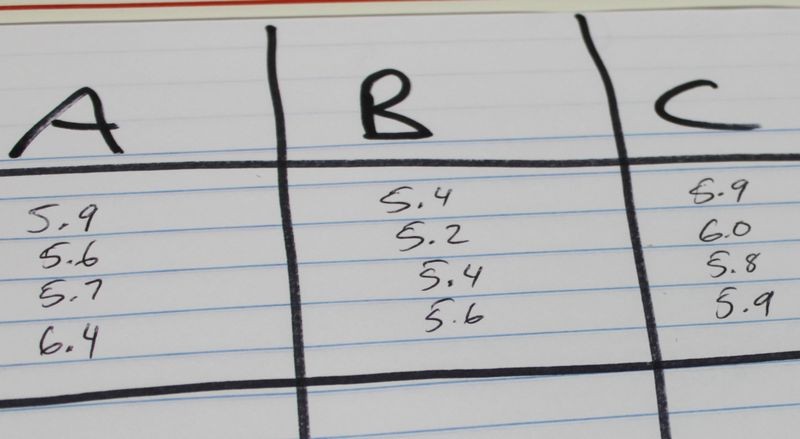
Here are the results from the first set of measurements from the three locations on the paint panel.
The above is just a portion of the entire write-up. It's super in-depth but guess what? No one reads anymore.
And I sanded each section 3 times - that's 600 strokes of #2000 followed by #2500 followed by #3000 grit finishing papers. Did you see that?
600 STROKES!
And after all the sanding, compounding and polishing I only removed .5 mils
Take a moment to read through this article as it shows how much paint is removed via sanding and buffing and if you're using great products and doing precise work - it's not as much paint as you think.
Removing Orange Peel & Sanding Marks with the Griot's ROP and the Wolfgang Twins
While I know it's interesting to measure and monitor how much paint you're removing for any detail job - in the really big picture - we should all be using the least aggressive process so we fix the paint to our expectations while leaving as much paint as possible on the car to hold up over the mechanical service life of the car.
Make sense?
This goes back to what I wrote here,
The Professional Detailer's Oath

-
Post Thanks / Like - 1 Thanks, 1 Likes, 0 Dislikes
 dgage
dgage thanked for this post
-
Re: Barn Find - 1950 Pontiac Chieftain Deluxe Convertible - Extreme Paint Correction
Great post and thread Mike. Thank you! That answered my question. And as I figured, even with a more expensive thickness gauge, the variability is likely too great to accurately measure a set of compounding and polishing passes.
-
Re: Barn Find - 1950 Pontiac Chieftain Deluxe Convertible - Extreme Paint Correction
Originally Posted by 57Rambler
Sweet car and great rejuvenation work Mike.
Thanks - I had to be super careful with the machine buffing. The entire time I was buffing I watched the paint surface closely for signs of the ghostly appearance of primer. 
Originally Posted by 57Rambler
Pontiac had such iconic styling ... love the hood "waterfall" and Chief Pontiac is looking good too !
Now that you mention it - now I see it. I know about how some furniture uses waterfall styling but didn't think to apply it to the hood of this car until you pointed it out.
Good eye.
-
Super Member
Re: Barn Find - 1950 Pontiac Chieftain Deluxe Convertible - Extreme Paint Correction
Originally Posted by Mike Phillips
Now that you mention it - now I see it. I know about how some furniture uses waterfall styling but didn't think to apply it to the hood of this car until you pointed it out.
Good eye.
Harley Earl was the one who brought the waterfall styling to Buick and Pontiac. First he did the Buick Y-Job, the first concept car ever done by a major manufacturer, and where he introduced the famous Buick "waterfall" grille styling that still lives on today.
.jpg)
Then at Pontiac he introduced the ornamental "waterfall" hood and trunk moldings.
P.S. - FYI, the "William H. Leland, II" listed as the 2nd owner on the Chieftain's display placard is no less than the great-nephew of Henry Leland, founder of Cadillac (and Lincoln as well). So this car has some interesting provenance.
Similar Threads
-
By 62Rambler in forum Ask your detailing questions!
Replies: 27
Last Post: 05-22-2017, 07:10 AM
-
By CAMMIN HEMI in forum Auto Detailing 101
Replies: 17
Last Post: 05-01-2017, 07:41 PM
-
By Mike Phillips in forum Ask your detailing questions!
Replies: 1
Last Post: 11-14-2016, 03:48 PM
-
By SR99 in forum Off-Topic
Replies: 3
Last Post: 04-21-2014, 09:02 AM
-
By atlpierce in forum Wet-Sanding, Cutting & Buffing
Replies: 15
Last Post: 04-17-2014, 09:39 PM
 Members who have read this thread: 1
Posting Permissions
- You may not post new threads
- You may not post replies
- You may not post attachments
- You may not edit your posts
-
Forum Rules
|
| S |
M |
T |
W |
T |
F |
S |
| 31 |
1
|
2
|
3
|
4
|
5
|
6
|
|
7
|
8
|
9
|
10
|
11
|
12
|
13
|
|
14
|
15
|
16
|
17
|
18
|
19
|
20
|
|
21
|
22
|
23
|
24
|
25
|
26
|
27
|
|
28
|
29
|
30
| 1 | 2 | 3 | 4 |
|


 Likes:


 Reply With Quote


Bookmarks