 Thanks: 0
 Likes: 0
 Dislikes: 0
-
Super Member

Cant Control The Polisher
Okay, so I just bought a Flex PE-14 Rotary and I am new to rotary polishing. I have been using the PC DA for about 3 years.
With that being said, this past weekend I tried using the PE-14 with both LC Flat Pads and LC CCS pads using the Wolfgang 3.0 system. I then primed the pad with XMT pad conditioner and applied a good amount of Wolfgang Swirl Remover onto the orange pad, started up the machine and tried buffing the hood. The Rotary had complete control over me and it seems like I am doing something completely wrong. I literally could not buff in a straight line.
Any tips or pointers? It almost feels like I wasn't applying enough product but I was applying a good amount, definitely more than what I see them use on the AG instructional videos. Maybe its the pads that I am using?
-
Re: Cant Control The Polisher
What speed were you running at?
-
Super Member
Re: Cant Control The Polisher
 Originally Posted by Stang Man

What speed were you running at?
Speed setting 2 and also tried in between 2 and 3
-
Re: Cant Control The Polisher
Originally Posted by STI4Life06
Maybe its the pads that I am using?
The PE14 is one of the easiest rotary buffers to learn how to use because of it's lightweight and compact size.
What size pad were you using?
It's easiest to learn how to use a rotary buffer with smaller pads like 5.5" pads and as your comfort level and skill increases, increase the size of your pads.
Unlike DA polishers, you don't apply the product to your pad but as a strip or bead of rpoduct directly onto the paint and then pick your bead of product up using the 10 @ 10 Technique.
The 10 @ 10 technique for picking up a bead of product with a rotary buffer
The 10 @ 10 Technique for picking up a bead of product is a way you can grabbing your product on the fly with your rotary buffer in a way that pulls the product under and into the face of the buffing pad instead of splattering it all over the place.
Some people take their pad and simply spread their product out over the paint with the buffer off and then after spreading it out turn the buffer on and start buffing, this works but can also throw splatter all over the place.
The 10 @ 10 Technique not only works but has a cool factor to it that shows anyone watching that you know how to pick up a bead of product like a Pro.
First of all, the term bead in detailing talk beans a line or strip of product. Just want to make sure everyone understands that term.
To pick up your bead of product using the 10 @ 10 Technique, while holding the rotary buffer in your hands, looking at the back of the buffing pad, pretend it's clock. The top is 12:00 O'clock and going clockwise you have the 1, 2, 3, etc. positions on the buffing pad that would correlate with a clock.
What you want to do is bring the rotary buffer up to speed and then lock the trigger into place so you don't have to hold it in the entire time you're buffing.
Next, place the buffing pad just in front of your bead of product at the 10 O'clock position.

The pad should be spinning but not in contact with the paint.
Lightly touch the buffing pad down so the 3 O'clock position is just making contact with the paint and the 10 O'clock position is raised off the paint about 10 degrees.
Now run the buffing pad over the bead of product from right to left drawing the bead in at the 10 O'clock position. (not the 9 O'clock or 11 O'clock posting but the 10 O'clock position).
Since the pad is rotating clockwise, the bead of product will be pulled into and under the pad instead of being thrown away from the pad as splatter.
As soon as you move the polisher past the last portion of the bead of product instantly move the raised portion of the buffing pad so that the entire pad is now flat against the paint and proceed to spread the product out over the area you're going to work.
After the product is spread out, then start working the product against the paint with slow overlapping passes.
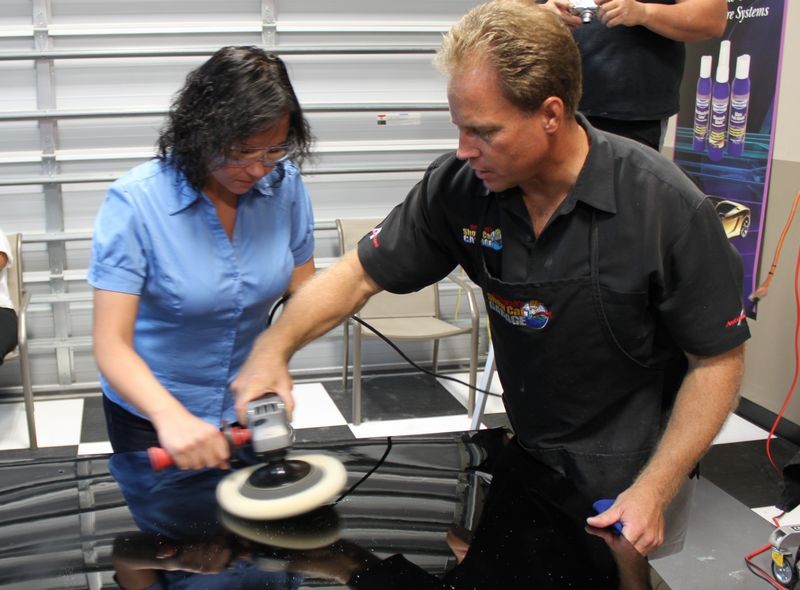
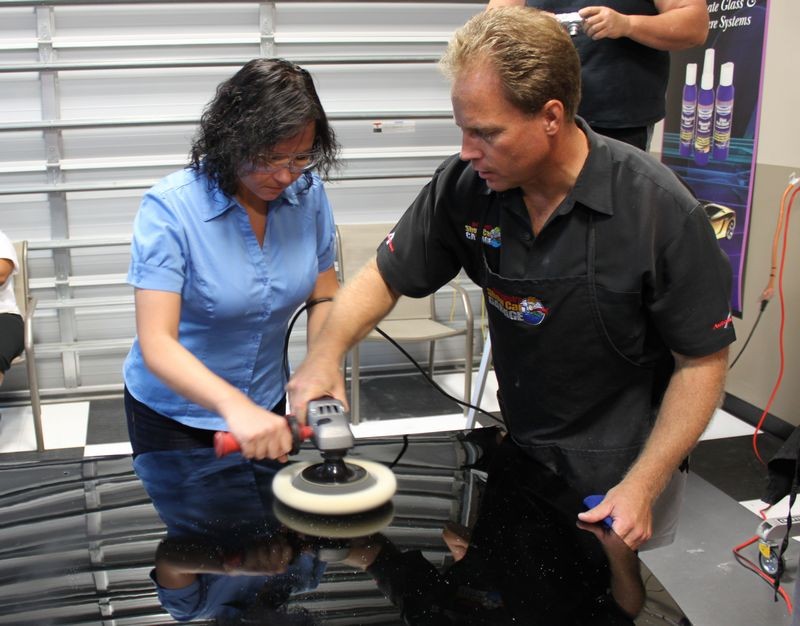
At our recent Advanced Detailing Class, I helped Tanya to learn how to pick up a bead of product using the rotary buffer. With a little practice you'll be picking up your bead like a Pro!
Tanya is ready to learn the way of the rotary buffer...

First things first and that's learning the 10 @ 10 Technique for picking up a bead of product...

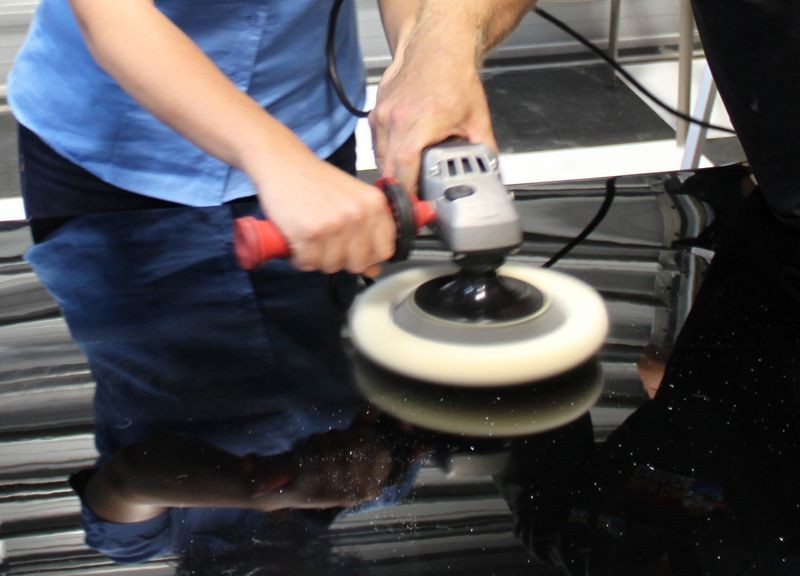
Tilt about 10 degrees and run the buffing pad over the bead at the 10 O'clock position with the 3 O'clock position of the pad just lightly against the paint...

Continue moving the buffing pad over the bead of product at the 10 O'clock position on the buffing pad.

When you get to the end of the bead of product then lay the pad flat and then spread the product out over the area you're going to work.

Here's a good picture that shows how Charles has spread his product out over an average size area to work at one time and now he's compound the paint.

Once you master the 10 @ 10 Technique and understand how the technique works, you can then start freestyling and picking your bead of product up anywhere on the buffing pad as long as you do it in such a way that the spinning pad is pulling the product into and under the pad and not throwing it as splatter.
For example, another common way to pick up your bead of product is at the 4 @ 10 Technique.
For this you would be moving the rotary buffer from left to right, with the pad just touching down at the 9 O'clock position and lifting the opposite side about 10 degrees and then running the bead in at the 4 O'clock position.
Since the pad is rotating clockwise, the bead of product will be pulled into and under the pad instead of being thrown away from the pad as splatter.

-
Re: Cant Control The Polisher
I show the technique with Bryan Fuller on Two Guys Garage on SPEED Channel in this video...
[ame=http://www.youtube.com/watch?v=PqTnIefWRg8&hd=1]How to Use a Rotary Buffer to Remove Swirls - YouTube[/video]
-
Re: Cant Control The Polisher
Here's a thread with a lot of tips and techniques for using a rotary buffer...
New Flex PE14 - How to use ONLY a rotary buffer to finish out hologram free?

-
Super Member

Re: Cant Control The Polisher
Originally Posted by STI4Life06
... and applied a good amount of Wolfgang Swirl Remover onto the orange pad... The Rotary had complete control over me ...
Any tips or pointers? It almost feels like I wasn't applying enough product but I was applying a good amount, definitely more than what I see them use on the AG instructional videos.
Try using less product. I believe Mike says the bead should be about the length of a brand new #2 pencil and just as thin or thinner. This amount is good for a 18" x 18" section. I think you may be using too much product. Sometimes less is more.
Enrique - Amateur Detailer Extraordinaire 
"Man is an emotional animal, occasionally rational; and through his feelings he can be deceived to his heart's content." - Durant
-
Super Member
Re: Cant Control The Polisher
Thank for the tips and links Mike! Its most likely because I am using 6.5 pads. Ill have to take the 5" backing plat off my DA and try 5.5" pads. Thanks!
-
Super Member

Re: Cant Control The Polisher
Just like in Golf, don't grip the polisher like you're holding on for dear life
Relax!
Hard times create strong men, strong men create good times, good times create weak men, and weak men create hard times.
-
Re: Cant Control The Polisher
Originally Posted by STI4Life06
Thank for the tips and links Mike! Its most likely because I am using 6.5 pads. Ill have to take the 5" backing plat off my DA and try 5.5" pads. Thanks!
Unless you have an adapter that's not going to work; the threads are incompatible.
Similar Threads
-
By jonn127 in forum Auto Detailing 101
Replies: 4
Last Post: 10-15-2010, 07:25 PM
-
By cosmo e46 in forum Rotary Buffers
Replies: 3
Last Post: 02-26-2009, 07:17 PM
-
By Meghan in forum Off-Topic
Replies: 10
Last Post: 07-19-2007, 07:37 PM
 Members who have read this thread: 0
There are no members to list at the moment.
Posting Permissions
- You may not post new threads
- You may not post replies
- You may not post attachments
- You may not edit your posts
-
Forum Rules
|
| S |
M |
T |
W |
T |
F |
S |
| 31 |
1
|
2
|
3
|
4
|
5
|
6
|
|
7
|
8
|
9
|
10
|
11
|
12
|
13
|
|
14
|
15
|
16
|
17
|
18
|
19
|
20
|
|
21
|
22
|
23
|
24
|
25
|
26
|
27
|
|
28
|
29
|
30
| 1 | 2 | 3 | 4 |
|


 Reply With Quote
Bookmarks