 Thanks: 0
 Likes: 0
 Dislikes: 0
-
Regular Member

Re: Video: The Flex 3403 Rotary Buffer How to remove Sanding Marks after Dampsanding Orange Peel
Love the write-up Mike. I too like that little Flex. Great job. 
-
Re: Video: The Flex 3403 Rotary Buffer How to remove Sanding Marks after Dampsanding Orange Peel
***Update***
I e-mailed Robert Eichelberg the President of Flex North America, Inc. the link to my recent articles on the Flex 3403 with my max recommendation of 6.5" for a pad diameter and asked as to the official recommendation for maximum pad size for the Flex 3403 by Flex and he replied,
 Originally Posted by Robert Eichelberg
I would go with your suggestion. Our catalog states 6.5 inch max.
There's a fuzzy line between what some would judge as a small pad and some would judge as a large pad and in my book that line goes like this...
6.5" and smaller pads = Small Pads
_________________________________
7" and larger pads = Large Pads
Everyone can decide for themselves where they want to draw the line but that's the guideline I go by...

-
Re: Video: The Flex 3403 Rotary Buffer How to remove Sanding Marks after Dampsanding Orange Peel
Originally Posted by Meghan

The paint on Harvey never looked so good!
Well at least the paint on the trunk lid never look so good... 
Originally Posted by clearview
That was so much fun to read. I love the results, unreal! Every time I see you use a certain product/pad combo I want to run out and get it to achieve the same results. I know, I know, user experience, conditions etc... all affect it but what you do to cars is awesome!
Thanks for the great tutorials, and PLEASE keep em coming!
You'll see a few more wetsanding or dampsanding articles coming up as I continue working around Harvey removing the Orange Peel.


-
Re: Video: The Flex 3403 Rotary Buffer How to remove Sanding Marks after Dampsanding Orange Peel
Nice job, Mike. Just to clarify, you used speed setting 1( M205), for both the blue and white pad, correct?
I'm surprised the blue pad was able to remove swirls from the black wool/M105. Generally speaking, are rotary buffer swirls considered fine swirls?
Last edited by WRAPT C5Z06; 11-26-2010 at 05:08 AM.
'03 Corvette Z06
-
Re: Video: The Flex 3403 Rotary Buffer How to remove Sanding Marks after Dampsanding Orange Peel
Mike,
I'm wondering how you were able to blend the original masking tape lines on the edges, where you never sanded ?
In the final picture, it looks like everything is uniform and perfect, right to or past the edge.
I have always wanted to know how professionals are able to do this so well.
Is the orange peel visible on the edges at all ? Please direct me to any info if there is some available online. thank you very much for all your articles. I have learned so much from them.
-
Re: Video: The Flex 3403 Rotary Buffer How to remove Sanding Marks after Dampsanding Orange Peel
Originally Posted by mg6045
Mike,
I'm wondering how you were able to blend the original masking tape lines on the edges, where you never sanded ?
I didn't. I could, but it would take more time, the idea was to capture the big picture...
Major on the majors... minor on the minors...
I answered a similar question about doing fine perfectionist work here...
Step-by-Step How-To Article using Pinnacle Products with the new PC 7424XP
Originally Posted by Mike Phillips
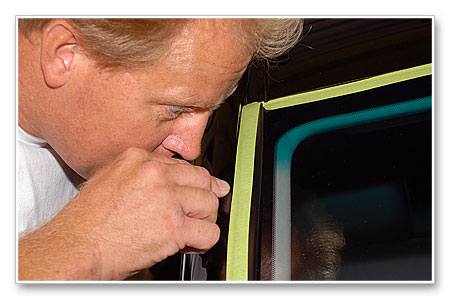
Here we've taped-off the rubber gasket between the glass and the window frame and I'm pointing to show that there's about an 1/8th of an inch of paint that's not going to get buffed with either of the two polishing steps.
After the correction steps we'll remove the tape and carefully wax these areas for a uniform look that will match the polished areas next to the tape line.
While not perfectionist detailing in some eyes, remember this is a daily driver, not a show car. [B
You[/B] can invest more time and just run the tape down the rubber and get it close to the edge of the panel if you want or just overhang a little like I did here. It's your choice based upon what you're trying to accomplish and how much time you want to invest.
Same kind of idea applies to removing orange peel right up to every single edge on a car.
If it's your car, then it's your time and money and you can invest your time and money into sanding up to the edge and then carefully removing the sanding marks without burning through the paint on the edges.
If you're doing this for a customer, in most cases you'll find that because doing this kind of perfectionist work takes a LOT of time, that most people won't want to pay for it let alone understand what's involved.
For the most part, you're going to need to explain to the customer how careful you'll have to be when sanding close to and edge and then what it will take work-wise, and time-wise to remove the sanding marks out of the paint close to the edge, and then get them to pay you your rate.
Originally Posted by mg6045
In the final picture, it looks like everything is uniform and perfect, right to or past the edge.
There's a fuzzy half inch of orange peel around all the perimeter edges, actually it's a bout the length of my thumbnail which goes along with this article I wrote on this topic here,
The Rule of Thumb
There's actually some pretty good information on this topic you've brought up in the above article.
Originally Posted by mg6045
I have always wanted to know how professionals are able to do this so well.
A lot of times when I'm check out show cars, I look at the edges to see if the orange peel was sanded and removed around the edges and usually it's not. It's not that it can't be done, it's just time intensive as compared to buffing out the major portions of each panel where most people look.
That's what I mean by major on the major and minor on the minors...
Major on the mass portions of each panel and minor on the minor portions of each panel unless it's your car and your time or your customer is willing to pay for you time to do this kind of perfectionist work.
I interviewed with Chip Foose a couple of times to do all his wetsanding, cutting and buffing and this was the kind of work he wanted done and the cool thing was he understood what it takes to do this kind of work. The average person doesn't know or understand.
I'm working with a local guy right now that anded down his Jeep, he sanded right up to all the edges. He has never sanded a car before, he has never used a rotary buffer before, he has no clue as to what he's doing or the work he's created for himself. He offered to pay me to finish his project but I'd rather let someone else have the opportunity. To date, no one else wants the opportunity, so I'm guiding him through the project and he's getting hands-on training and education.
Originally Posted by mg6045
Is the orange peel visible on the edges at all ? Please direct me to any info if there is some available online. thank you very much for all your articles. I have learned so much from them.
Yes, definitely visible.
If I wanted to sand the panels flat right up to the edge of this 1964 Ford Falcon or any car then I would still tape-off the very edge of each panel, carefully sand to the tape-line and then pull as many of the sanding marks out by machine using small pads on a rotary and then finishing the job by hand using M105, like you see in this picture,
Again, from this article,
The Rule of Thumb
Originally Posted by Mike Phillips
Show Car and Perfectionist Sanding and Polishing
For those of you wanting to do perfectionist sanding and polishing, first make sure you're getting paid well because you can sand right up to an edge but removing your sanding marks has to be done carefully and this means it will require you to invest more time into the project.
How to sand right up to an edge and remove your sanding marks by hand
There is a fix for the issue of sanding right next to an edge or a raised body line and that's by carefully sanding and then using Meguiar's M105 Ultra Compound by hand to remove your sanding marks. Another way to remove sanding marks next to an edge or to a raised body line is to use Spot Repair Pads on a rotary buffer using a technique I call Edging.
Because M105 is aggressive, (rated at being able to remove #1200 Grit Sanding Marks on fresh paint), and recommended for use by hand, you can easily remove sanding marks by hand if you're willing to put a little passion behind the pad.
There are a lot of compounds that can be applied by hand to remove sanding marks, but it's the ability of the super micro abrasive technology, (SMAT), used in M105 that gives it both its' cutting ability and the ability to polish out clear and glossy that makes M105 Ultra Compound a good choice for carefully rubbing out sanding marks right up to an edge or a raised body line by hand.
Note: The blue line you see in the pictures below is vinyl tape applied over the top of a body lines on the hood of this 1969 El Camino to make it easier to see and protect them. You can also do this with the edges of a panel.


Sanding to the edge and then removing 100% of your sanding marks can be done, it just takes time, perspiration and patience...
-
Re: Video: The Flex 3403 Rotary Buffer How to remove Sanding Marks after Dampsanding Orange Peel
Originally Posted by 07 z-oh-6
Nice job, Mike. Just to clarify, you used speed setting 1( M205), for both the blue and white pad, correct?
Don't remember now, but my normal process wold be to do the first passes around 1400 RPM to cut out any swirls and then clean the pad, clean the paint, apply fresh product and then slow the RPM down.
Originally Posted by 07 z-oh-6
I'm surprised the blue pad was able to remove swirls from the black wool/M105. Generally speaking, are rotary buffer swirls considered fine swirls?
Lots of factors come into play...
Hardness or softness of paint, actually, I prefer to reference paint as polishable or workable, it's more descriptive than just hard or soft.
Abrasives used during the compounding step - With M105 it's less of an issue, but if someone were using a compound with larger/different types of abrasives you could leave deeper swirls that would/could require more work to remove.
Downward pressure for the final passes, pushing hard will inflict swirls deeper, buffing lightly will leave more shallow swirls to have to remove.
Type and condition of wool pad - I always recommend to people to work clean and practice it myself.
Those are off the top of my head... I wouldn't say that generally speaking rotary buffer swirls are fine swirls.
I would say rotary buffer swirls can be fine or shallow, depends upon the process, products and person.
-
Re: Video: The Flex 3403 Rotary Buffer How to remove Sanding Marks after Dampsanding Orange Peel
Mike, thank you very much for the detailed answer and links you provided !
You have finally helped me get to the bottom of a topic that I was always curious about !
-
Re: Video: The Flex 3403 Rotary Buffer How to remove Sanding Marks after Dampsanding Orange Peel
Originally Posted by mg6045
Mike, thank you very much for the detailed answer and links you provided !
You have finally helped me get to the bottom of a topic that I was always curious about !
No problemo...
Great questions...
I try to add enough typed-out information that you or anyone reading this into the future gets the answers they're looking for, on some forums you'll just have people post, use the search button, or PM me or call me... but not here on AGO.
We aim to provide quality information in a public way... that is the idea of a text and picture-based "discussion forum".
-
Junior Member

Re: Video: The Flex 3403 Rotary Buffer How to remove Sanding Marks after Dampsanding Orange Peel
Hey Mike, so your readings were all over the place on this one with the PTG and you were guessing it was because of body filler. What do you do in this case where you cannot get an average paint thickness since you can't tell if there is one are that is thinner than the other?
Traditionally, how thick is factory CC paint and how do you handle it if the readings do vary quite some bit and you plan on sanding?
Similar Threads
-
By Mike Phillips in forum How to articles
Replies: 57
Last Post: 03-19-2021, 03:45 PM
-
By Mike Phillips in forum PICTURES: 3-Day CAR Detailing Bootcamp Classes
Replies: 5
Last Post: 02-03-2019, 12:30 AM
-
By Wills.WindowsAndWheels in forum Show N' Shine
Replies: 50
Last Post: 06-28-2013, 02:58 PM
-
By Labster in forum Flex Polishers
Replies: 0
Last Post: 08-07-2012, 11:13 AM
 Members who have read this thread: 0
There are no members to list at the moment.
Posting Permissions
- You may not post new threads
- You may not post replies
- You may not post attachments
- You may not edit your posts
-
Forum Rules
|
| S |
M |
T |
W |
T |
F |
S |
| 31 |
1
|
2
|
3
|
4
|
5
|
6
|
|
7
|
8
|
9
|
10
|
11
|
12
|
13
|
|
14
|
15
|
16
|
17
|
18
|
19
|
20
|
|
21
|
22
|
23
|
24
|
25
|
26
|
27
|
|
28
|
29
|
30
| 1 | 2 | 3 | 4 |
|


 Reply With Quote
Bookmarks