 Dislikes: 0
-
Review: GYEON Q2 ONE Enthusiast Ceramic Coating by Mike Phillips
Review: GYEON Q2 ONE Enthusiast Ceramic Coating by Mike Phillips
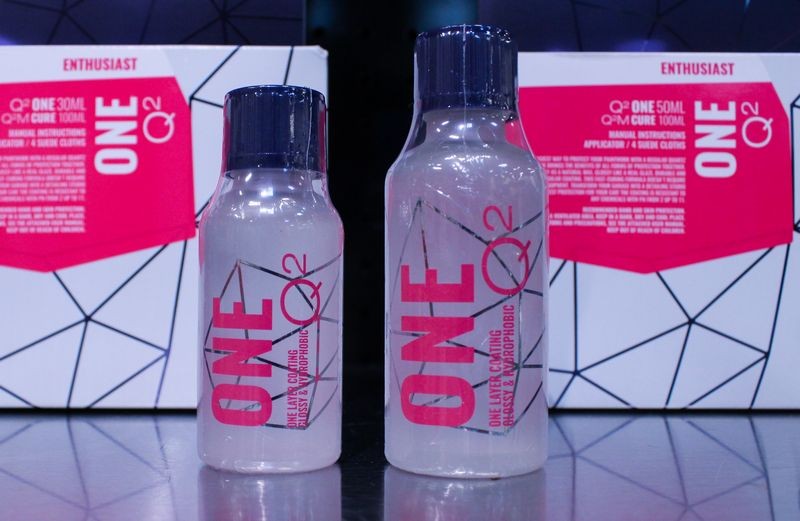
GYEON Q2 ONE Enthusiast Ceramic Coating
First my review
This is a great product. Although it's targeted at first time coating users in my opinion it's a perfect coating for anyone. Why? Because I'm in the camp that for most people, driving daily drivers, you don't want a 2, 3, 4, 5, 6, 7, 8, 9 year or infinity coating because even with a coating, your car because it's exposed to the elements and wear-n-tear, should really be re-polished and then re-coated once a year to maintain both maximum protection and maximum gloss and beauty. I knows this because I've polished coated cars and I've seen the embedded dirt film called road grime come off the car and onto my pad. So call it a once a year coating or an enthusiast coating, it's really a great choice for anyone wanting to protect their daily driver. If you have a garage queen... then sure go for the 2, 3, 4 and so-on coatings advertised to last for multiple years because the paint on garage queens does't see the elements or the wear-n-tear like daily drivers.
Application
Coatings are NOT like traditional car waxes and synthetic sealants. First unlike a car wax or synthetic sealant, there is one extra step required of you to do to the paint on your car before you can apply the coating and that is to chemically strip the paint. I'll show you how below.
Also, coatings take a little more effort to apply. They don't tend to glide over paint like waxes and sealants and this isn't a big deal as long as you're aware of this (and now that you're reading my review you are "aware"), and here's my very simple tip and technique to make applying any coating easier. Slow-down. That's right, don't try to push the applicator over the paint quickly like you can with waxes and sealants. Simply slow down and allow the applicator and the coating to spread over the paint at a speed you can feel through your sense of touch that makes the movement feel easy, not forced. This means allowing a tick more time to apply a coating to your car than you would allow for applying a traditional car wax or synthetic paint sealant. The benefits are worth it.
What are the benefits of a ceramic paint coating?
Extreme gloss - So much gloss that the word I use to describe the appearance is glassy. Glassy is a tick higher than glossy.
Extreme durability - Correctly applied, coatings simply don't wear off like car waxes and synthetic paint sealants. Of course, it is important to still wash a coated care carefully and I have an article on that and will share it later in this thread.
Better protection - Hey if it's lasting longer on the car obviously it's protecting longer.
Faster washing - Ceramic coatings create a hydrophobic or water-fearing surface - water naturally wants to get away from a ceramic coated surface thus washing is faster as dirt is released easier and faster when washing.
Faster drying - Same reasons a ceramic coated car is faster to wash, water wants to get off the car so it will naturally blow off or wipe off.
Self-cleaning effect - Because of the hydrophobic surface, when it rains the water will run off faster and easier and take any accumulated dirt with it.
GYEON Q2 One Enthusiast Ceramic Coating
This new coating is targeted at you if you're still using car waxes and synthetic paint sealants. I'll show you below how to apply it. It's not hard as long as you follow the directions and once you've coated your car you'll have all the experience you need to tackler future coating projects.
This new coating is as easy as it gets when it comes to applying and wiping off the coating. Professional grade coatings can last longer because there is a higher concentration of "solids" in the formula. It is this higher concentration of solids that also makes it more difficult to wipe-off. The solvents used to hold the coating in a liquid emulsion can vary greatly, and this will also have a major influence on how easy or how difficult a coating is to wipe-off. GYEON has taken all these things into consideration and created the perfect balance of a super high quality coating that is easy for the novice to install.
Install
When I hear the word install I think of having new tires installed on my car or having a new stereo installed in my car. The word install is the new term for the word apply. So when you hear or read about someone installing a coating all that means is they are wiping it on and then wiping it off. There is no mystery around the word install, it's just the latest detailing slang for the word apply and wipe-off. 
Now let's take a look at how to install the GYEON Q2 One Enthusiast Ceramic Coating
Requirements to install a coating
The key thing is the paint needs to be clean as in any above surface bonded contaminants removed as well as any road grime or road film that is impacted onto the paint. Normal washing will not remove above surface contaminants or road film. To remove above surface bonded contaminants you need to use detailing clay or tools like the Nanoskin towels, mitts or pads. Washing will also not remove embedded and impacted road film. To remove road film you need to use one of the below or a combination of the below.
- Paint Prep Polish
- True Paint Cleaner
- Polish
- Compound
If you are unsure of what any of the above are please reply to this thread and ask me and I will explain. Or call our customer care hotline and our friendly staff can answer all your car care questions 1-800-869-3011
The BIG PICTURE is you want the paint to be smooth and clean or free from any substance that is not the paint.
Chemically stripping the paint
Assuming you have already reached the point where the paint is clean and smooth, now it's time to chemically strip the paint. What does this mean? In simple terms you're going to use a mild solvent to wipe the paint surface to remove any foreign substance. The best example for what this is abll about is say for example as a part of the process of prepping the paint you used 2, 3, or 4 of the listed ways to prep paint above. A paint cleaner, polish or compound will tend to leave oily residues on the paint even after wiping with a microfiber towel. These oily residues will HINDER the coating from making a proper bond. So the idea behind chemically stripping the paint is to dissolve and remove any substance that could hinder the bonding of the coating to the paint.
This is the extra step that is required for use when installing coatings that is not required when using a traditional car wax or synthetic paint sealant.
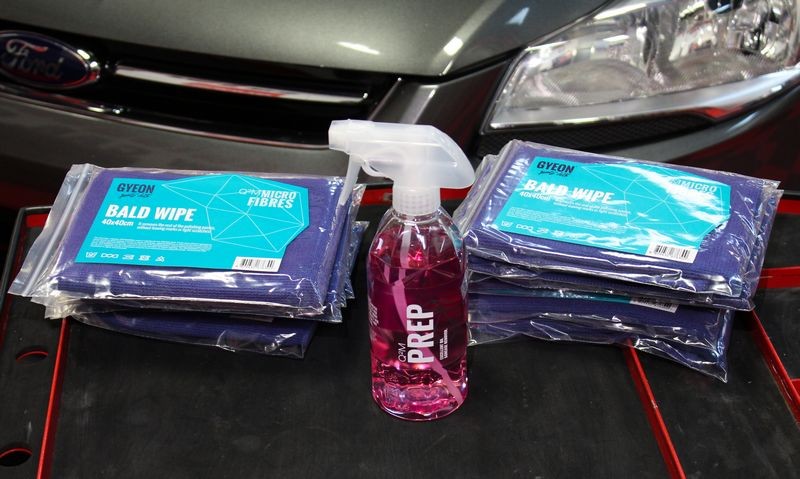
GYEON Prep
This is a very safe solvent that works great and unlike some options smells good too...

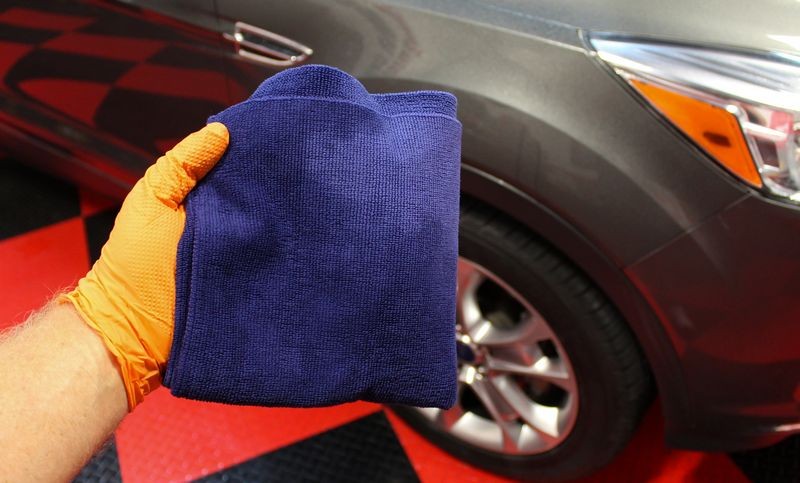
LOTS OF CLEAN SOFT MICRFOBER TOWELS
Note how I used all capital letters for the heading for this section? That's to stress how important it is to have lots of high quality, clean and soft microfiber towels. You see, clearcoat paints are scratch-sensitive, this means THEY SCRATCH EASILY. Now follow me... it takes HOURS to buff out a car to perfection. It takes SECONDS to put swirls and scratches into a clearcoat paint finish. Guess where most swirls and scratches come from? Dirty, contaminated towels.
My strong recommendation
If you're going to invest the time and money into putting a ceramic paint coating on your car's finish then plan for and budget for a generous amount of DEDICATED microfiber towels JUST for this process. I cannot speak highly enough about the Bald Wipes from GYEON. These towels, unlike most towels have a flat weave instead of a fluffy fiber nap. They are SO LESS LIKELY to become contaminated due to the flat weave. This takes a LOT of the risk out of using them the first time and then using them over and over again because they simply hard to contaminate.
What do I mean by contaminate?
I mean fluffy microfiber towels, it's very easy for any type or form of abrasive particle to embed into the fluffy nap. Not so with a flat weave. Inspecting the towels is faster too and this speeds up all paint related processes. If you don't know how to inspect a microfiber towel or why, read my article here and watch the video.
How, why & when to inspect your microfiber towels when detailing cars
Remember - takes HOURS to remove the swirls and scratches and only SECONDS to put them in... so clean towels are key.
Lots of them...
The last thing you want to do is start a detailing project and run out of trusted towels. So my recommendation is to get 6 Bald Wipes minimum and if your budget allows, get 12. Why 12? Because then you can make a dedicated small wash load washing ONLY these 12 towels. Then dry them together and then store them together. Look at them as tools or as a "tool investment". Take my word for it... towels are your best friend if you're don't want to put swirls and scratches into your car's scratch-sensitive clearcoat finish. (this applies to wash mitts and drying towels too, basically anything that touches the paint).
12 packs of GYEON Bald Wipes

How to chemically strip your car's paint
I know for some, this can sound horrible, that is chemically stripping your car's paint. It's something about the words, chemically stripping. But have no fear, we're not using Aircraft Qualtiy Paint Stripper, a product designed to melt and dissolve paint right off a car. We're talking about a product formulated by GYEON specifically to carefully remove trace polishing oils. It's really not that bad.

First gather your supplies, GYEON Prep and lots of GYEON Bald Wipes
Mike's Method --> Wet Pass followed by Insurance Pass
This is my method, you can come up with your own if you don't like mine. I wipe a car down twice.
The first pass is a very wet pass to remove 98% of any trace oils or other substances. This is called the Wet Pass.
After wiping down the entire car I then wipe the car a second time only I dramatically reduce the amount of Prep I use, this is a moist paint I call the Insurance Pass. This second pass insures I have thoroughly removed any and all trace residues.
How to begin....
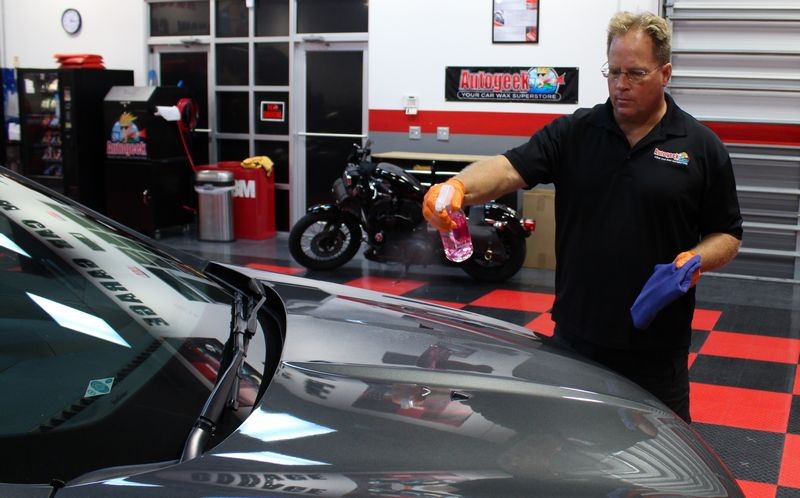
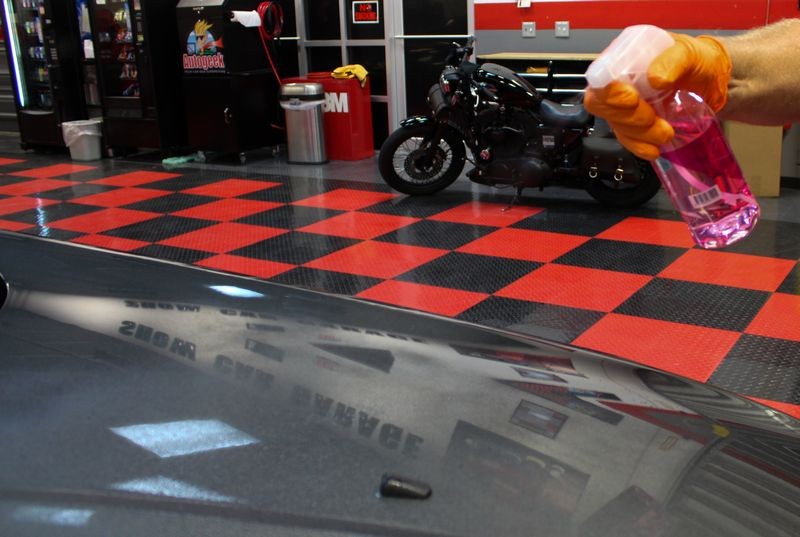
Start by spraying a heavy saturation of the prep directly onto the paint. (note I'm wearing nitrile gloves for this step)
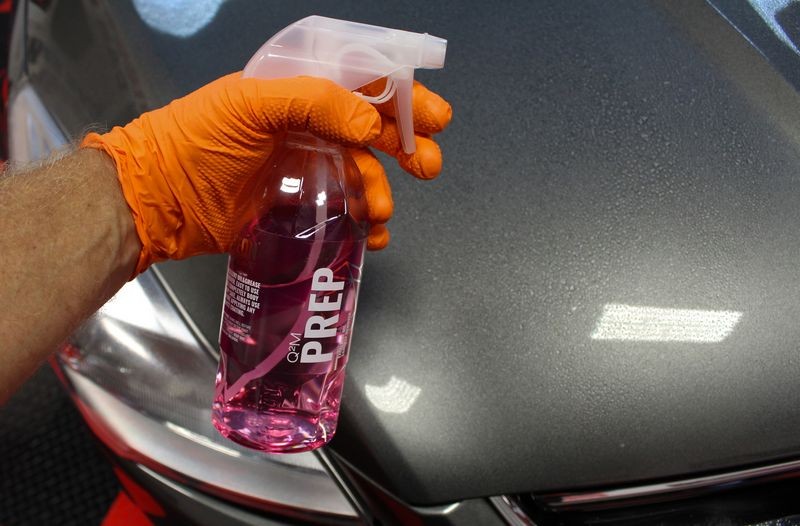
Spray enough to see beads of product on the surface.

You should spray enough that the product almost starts to run off like you see in the picture below. IF it's running off that's a tick too much, aim for just before running off.
Me spraying Prep onto the hood...
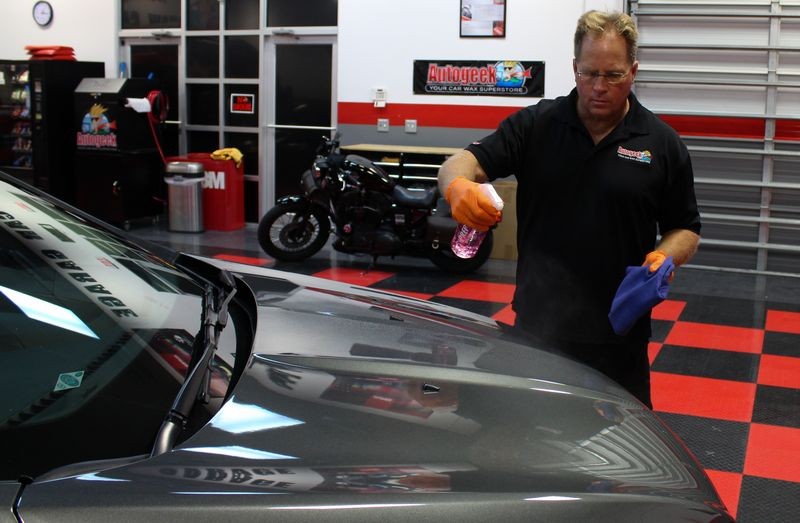
Me spraying a mist or two onto a clean, folded 4-ways Bald Wipe. Then wipe down a section of a large panel like the hood. Sorry no pictures, but my camera broke, use good technique by spreading the product out and then wiping the product off.

Below is what the towel looks like after wiping just the hood on this Ford Escape. I've unfolded it to show you how wet it looks after one section.
Question: Now think about it... besides the Prep... what else is on this section?
Answer: Oily residues.
So think about it some more... do you want to wipe the next section with this portion of the towel? The answer is "no". If you do you risk removing oils from the next section but also leaving oils on the next section. This is called,
Cross-contamination
You want to avoid cross-contamination. This is why you need lots of towels for the chemical stripping step.
Make sense?

Now I've refolded the towel and while this portion of the towel is wet with Prep, it is still clean as it has not been used to wipe paint. Continue moving around the car spraying sections or panels of paint with Prep and then using clean sides of your Bald Wipes to wipe off oily residues.

Note how I hold my towels?
I fold them 4-ways and then CLAMP the open edges shut using my thumb on one side and my 4 fingers on the other side. This is called
Clamping a towel
Here's another picture showing how much Prep I spray for the first or initial wipe. I sprayed enough onto the front fender that here were plenty of beads of Prep and it just started to form together to run or stream off the fender.
Continue the above until you have wiped down the entire car. Normally you start at the top and work your way down. For pictures for this article I started on the hood and after getting some pictures moved to the roof.
BONUS - Here are some pictures that show what you're trying to do...
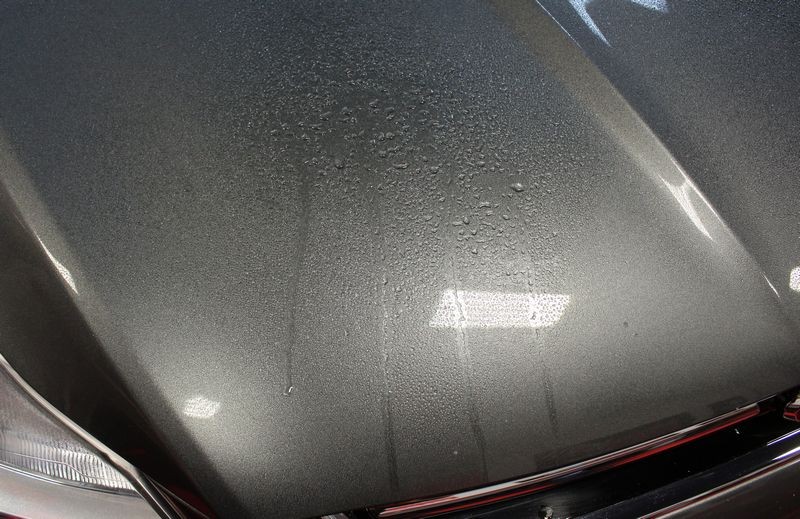
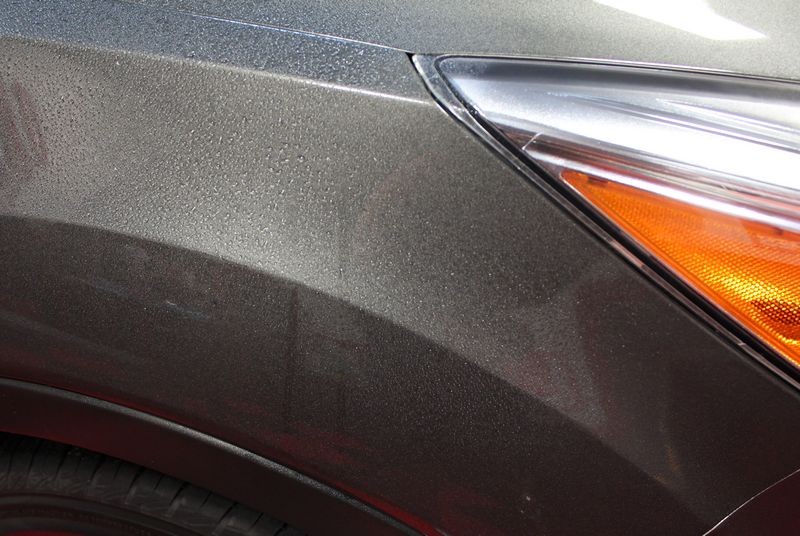
This first one is a section of the roof that I have sprayed with the Prep. Note the way the light looks on the paint in the front, right hand corner of the picture?

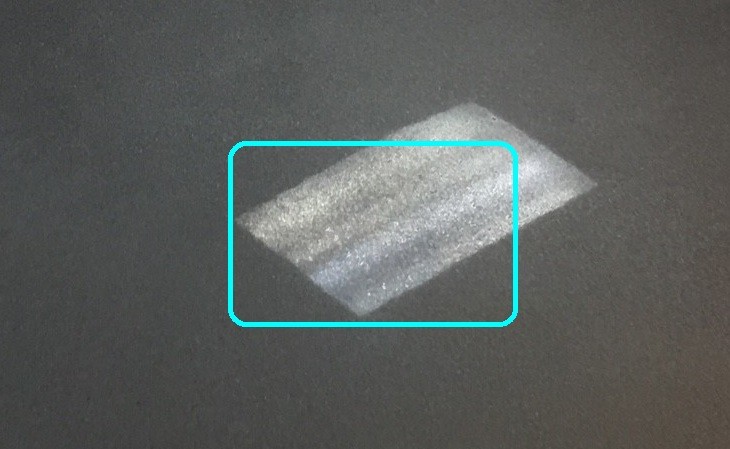
Here I've cropped out the above section. See where it looks kind of mottled?

What you're seeing is trace residues of oils from the polishing step. Sure I wiped the entire car down but trace oil residues are CLEAR - you cannot see them until you do something to make them show up. In this case I could see them AFTER spraying the paint with the Prep and instead of simply wiping them off I got my cell phone and took these pictures to hopefully enlighten you or to use a bad pun... clear things up. 
The Insurance Pass
Fro the second wipe or the Insurance Pass, simply MIST some Prep onto a clean, folded Bald Wipe and use this slightly damped side of the towel to re-wipe a panel. After wiping one panel, flip or fold to a clean side and repeat until you've made this second pass to the entire vehicle. Don't spray Prep directly onto the panel, you'll get overspray mist onto finished panels.


Sorry no pictures of me doing the Insurance Pass, no one around to take the picture. Use your imagination.
Dirty wet towels
I used 3 Bald Wipes for the Wet Pass and 2 Bald Wipes for the Insurance Pass.
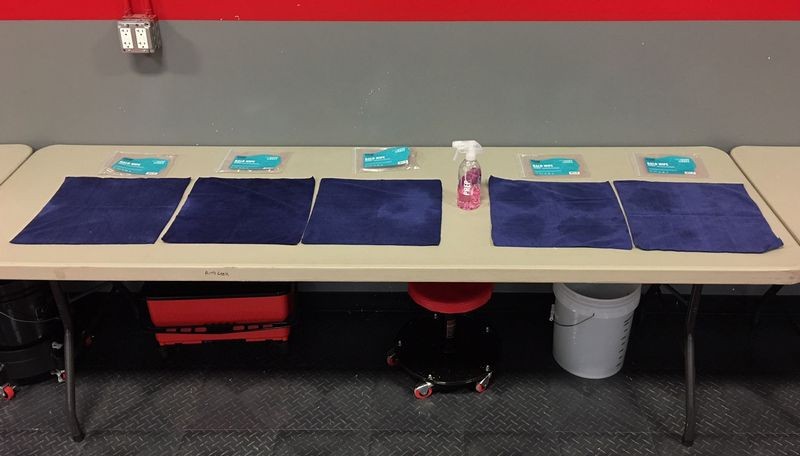
You can visibly see how wet these towels became doing the wet pass.
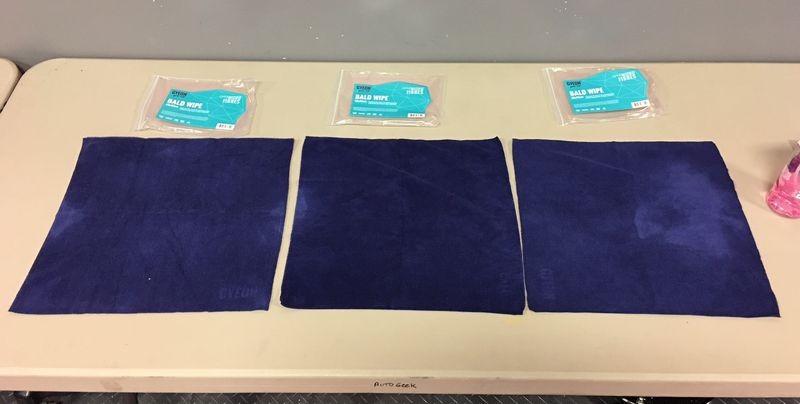
And you can visibly see how lightly dampened these towels become doing the Insurance Pass.

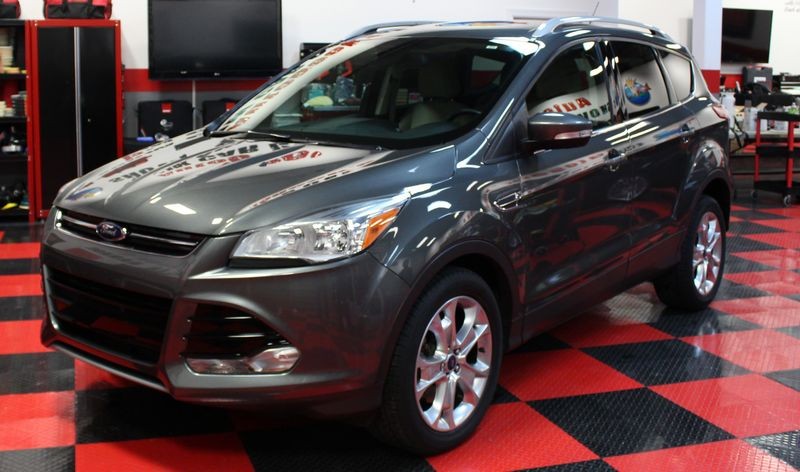
And here's how much Prep I used to chemically strip a 2014 Ford Escape Sports Utility Vehicle.

This is the level in the bottle before I started...
And here's the Ford Escape after chemically stripping.
Before getting to this point I will note that I started this project by washing this car, then claying, then compounding. So the paint was very clean and smooth before the chemical stripping step.
-
Post Thanks / Like - 3 Thanks, 2 Likes, 0 Dislikes
Similar Threads
-
By Mike Phillips in forum Product Reviews by Mike Phillips
Replies: 44
Last Post: 10-18-2020, 02:26 AM
-
By Mike Phillips in forum Product Reviews by Mike Phillips
Replies: 4
Last Post: 02-06-2020, 12:51 PM
-
By Mike Phillips in forum Product Reviews by Mike Phillips
Replies: 5
Last Post: 02-19-2019, 08:13 AM
-
By Mike Phillips in forum Product Reviews by Mike Phillips
Replies: 4
Last Post: 02-19-2019, 08:11 AM
-
By Mike Phillips in forum Product Reviews by Mike Phillips
Replies: 10
Last Post: 09-10-2018, 12:30 PM
 Members who have read this thread: 1
Posting Permissions
- You may not post new threads
- You may not post replies
- You may not post attachments
- You may not edit your posts
-
Forum Rules
|
| S |
M |
T |
W |
T |
F |
S |
| 28 | 29 | 30 |
1
|
2
|
3
|
4
|
|
5
|
6
|
7
|
8
|
9
|
10
|
11
|
|
12
|
13
|
14
|
15
|
16
|
17
|
18
|
|
19
|
20
|
21
|
22
|
23
|
24
|
25
|
|
26
|
27
|
28
|
29
|
30
|
31
| 1 |
|


 Thanks:
  Likes:


 Reply With Quote
Bookmarks