 Thanks: 0
 Likes: 0
 Dislikes: 0
-
Preparing For First Machine Detail - Ford Expedition
Hey everyone, sorry if this is in the wrong area. I tried posting it in Ask the Expert section, but I get an error of no data received from server (tried with IE, firefox and chrome browsers, all with same result).
Anyway, I'm waiting the delivery of my GG DA and wanted to run my plan of attack on my wife's expedition past the experts to get some input and make sure I'm not creating more problems than I'm trying to fix. This will be my first go at machine detailing, and this is my testbed (and some friends/family cars) so I'm confident enough to use the GG to do polishing/waxing of my black BMW X3.
Note: Product selection is based on what I have on hand, but if there's something missing or you see potential problems with, please advise as I would rather spend a few bucks now to get the right product instead of having to deal with self-inflicted defects later :-) Thanks everyone for any input and suggestions. Questions and my "plan" are below.
Few questions I had:
- Any concerns/issues with using the GG on the "plastic" painted bumper? I have seen a few threads and learned that these don't like the heat and if you aren't careful to avoid some of the edges/lines, the paint comes off pretty easily. Would this be better left to hand polishing (either completely by hand or pad attached to polishing pal)?
- Any tips on black plastic restoral? See pictures but I have a small section by the tires that has turned almost white with oxidation.
- Anything else I should be aware of? I am planning to have this be a two day ordeal (at least) as I know I will be going slow and focusing. Also, I plan to be careful and cognizant of where I am relative to the sharp body lines and plastic/rubber, but still am going to tape them off for an added layer of security.
My plan of attack:
1. Wash with body shampoo and then follow that up with clay.
2. Perform a test spot on the main body - planning to start with Meguiars 205 and a white pad on the GG. If this looks good, I will use go ahead and hit the entire car with the M205 and white pad knowing I will most likely have to revisit some of the scratches/problem areas. If the M205/white combo isn't enough, I will progress to M205/orange pad, then to XMT-3000 (Pinnacle intermediate) with a white pad, and finally Pinnacle intermediate with orange pad. Again, I'm going to use the least aggressive combo that gives the results I want, but that's my "progression" from least aggressive to most aggressive.
Steps 3 & 4 will only apply to the problem areas with scratches/problems
3. Revisit the scratches/areas that need correction and if the white/M205 didn't restore to my liking, use the same progression I mentioned above just on the localized area trying a more aggressive pad/product combo to see if it improves the defect to my liking.
4. After correction done, I was going to "reverse" whatever I had to do on the spots. Meaning if I did M205/white, M205/orange, XMT-3000/white and was happy, I'd go over the area again with M205/orange, and then M205/white so I remove any scratches from the most aggressive applications - just wanted to know if this is necessary?
5. Entire car with GG and XMT-4000 Carnuaba Finishing Glaze.
6. Apply a nice coat of Souveran Carnuaba wax.
Here are some pictures with explanation of what they are showing:
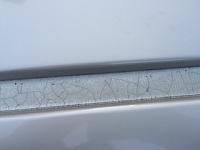
This first picture is looking down on the roof. The door/roofline would meet down below the bottom of this picture, and this is a "trough" along the roof which can see the paint is cracking inside of it. Too small to get any tools in there, but my plan is to try to clean it up as best I can and try to put some of my Klasse sealant over it followed by a nice coat of wax. Good thing is this is only visible if you are standing on running board and looking down from above.
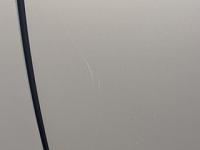
This picture shows a scratch I'm hoping to improve/remove. Several scratches like this exist on different areas of the car.
This picture is the plastic. Yes that white piece in front of the tire was black/dark gray, the same as the rest of it at one point. I am going to try solution finish on this (after a good thorough cleaning) but if anyone has any tips/advice I'm all ears. Not expecting perfection here, but would like it to be much closer to the color of the other plastics as opposed to complementary color to the rim..LOL

This is the left front on the rubber/plastic bumper. My wife has a "habit" of misjudging how far she is from the car next to her, so here I was planning to see what clay would remove, and then possibly try some hand buffing. While I might consider using the GG on other areas of the bumper, I plan to avoid this area due to the scratches/scrapes as the high speed, heat and power could make this much worse instead of improving it, especially in the hands of a noob like myself.

Overall picture of the car. Other than some scratches/defects, the majority of the paint (ie hood, doors, fenders, rear door) are in decent shape and I'd expect it to clean up nicely.

-
Super Member

Re: Preparing For First Machine Detail - Ford Expedition
NYJETFAN, have you tried Meguiars paint protect on the black trim? I did on my 2004 Dodge ram. Been almost 7 days since applying and I am pleased. I realize this is an old post.
-
Re: Preparing For First Machine Detail - Ford Expedition
You will end up using an orange pad with a medium cut product. (maybe an orange pad with a heavy cut on some spots) 205 is pretty weak and used to finish the paint.
Similar Threads
-
By Alek@DeepClean in forum Show N' Shine
Replies: 14
Last Post: 03-07-2013, 12:56 PM
-
By Flannigan in forum Show N' Shine
Replies: 20
Last Post: 06-25-2012, 03:40 PM
-
By astrogus in forum Show N' Shine
Replies: 13
Last Post: 11-01-2009, 05:31 PM
-
By Dust2Glory in forum Show N' Shine
Replies: 13
Last Post: 06-21-2007, 04:56 AM
-
By Frugle in forum Show N' Shine
Replies: 48
Last Post: 10-31-2006, 11:53 PM
 Members who have read this thread: 0
There are no members to list at the moment.
Posting Permissions
- You may not post new threads
- You may not post replies
- You may not post attachments
- You may not edit your posts
-
Forum Rules
|
| S |
M |
T |
W |
T |
F |
S |
| 31 |
1
|
2
|
3
|
4
|
5
|
6
|
|
7
|
8
|
9
|
10
|
11
|
12
|
13
|
|
14
|
15
|
16
|
17
|
18
|
19
|
20
|
|
21
|
22
|
23
|
24
|
25
|
26
|
27
|
|
28
|
29
|
30
| 1 | 2 | 3 | 4 |
|


 Reply With Quote
Bookmarks