 Thanks: 0
 Likes: 0
 Dislikes: 0
-
Re: GG 6", Megs G110v2, or Flex 3401
First off that why you join the forum to get question answered and show off your work and help other out with their problems. Now back to you question. In my opinion the Flex is worth it if you can afford it. I have one and would highly Recommend it. But I aslo have GG HD and is a very nice machine plus you change out to Scrub Brushes and Spot Buff pads. I use to own the 7424xp was not very impressed Very loud and it vibrated to much. I have not used Megs 110v2 but have read so good reveiws
Lots of luck
Steven
-
Super Member

Re: GG 6", Megs G110v2, or Flex 3401
 Originally Posted by 07 z-oh-6

I been communicating with Kevin Brown a lot the last couple weeks. He's the most knowledgeable guy when it comes to a DA, IMO.
You only use the KB method when using non-dimishing abrasives(M105, M205, UC, Swirl X, Scratch X 2.0, D151). Menzerna polishes use diminishing abrasives. 
I have seen the "KB Method" referenced a few times. Can anyone explain or link me to an expalanation of it?
Kevin
Griots Garage 6in ROP, 3in ROP, pneumatic 3in polisher
Flex 3401, Porter Cable PC7424 (the old non-XP model).
-
Re: GG 6", Megs G110v2, or Flex 3401
Originally Posted by Rsurfer
Get the G110v2 or GG with 5.5" flat pads at AG. I would use the Menz polishes you have and if that doesn't do the job, get Meg's 105/205 combo.
Thanks! Just to make sure, you are suggesting the LC flat pads over the LC hydro pads? Which color pads do you recommend?
Tuan
-
Super Member

Re: GG 6", Megs G110v2, or Flex 3401
Originally Posted by tuan209
Thanks! Just to make sure, you are suggesting the LC flat pads over the LC hydro pads? Which color pads do you recommend?
Tuan
Yes, the LC flat, as some are having problems with the Hydro. Get some orange, white, grey and blue for jeweling and wax application.
-
Re: GG 6", Megs G110v2, or Flex 3401
Originally Posted by 5.4 Shelby
I have seen the "KB Method" referenced a few times. Can anyone explain or link me to an explanation of it?
I've seen pages written on this when it's really very simple.
Instead of making an X-pattern of product on a pad, instead of making a Circle-Pattern of product on the face of a pad, instead of placing a few Pea sized drops of product on the face of a pad, you take and spread out and work into and over the entire face of the pad the SMAT product you're going to use. Then wipe your fingers and hands clean before buffing so you won't coat the body of the polisher with whatever chemical it is you're using.
By doing this the moment you turn on the polisher with the pad against the paint 100% of the pad is doing 100% work.
The theory being that if you only apply product to portions of the face of the pad then not all of the face of the pad will be working at 100% efficiency until you've applied a few applications of product to the pad and the product has moved out over the face of the pad just by the act of working the product over the surface.
Kevin's method does insure that 100% of the pad is working at full efficiency from the very beginning but it would theoretically require you to,
- Clean the pad after each application to remove spent product
- Re-apply fresh product to the entire face of the pad for each new section that you buff
It pre-wets the face of the pad so that it's wet with product versus wet portions and dry portions but anyone that's ever used a DA Polisher for more than the hood of one car knows that after you buff the area the size of a hood on a car whatever pad you're using, whatever product you're using and whatever technique you're using, by the time you've buffed a few sections the entire face of your pad is now wet with product.
Same end result is achieved either way, the primary benefit that I can see with working the product over the entire face of the pad when first starting out is for your first passes the entire face of the pad is wet with product and abrading the paint.
How much of a benefit there is to this versus using an X-pattern or a Circle-Pattern is questionable BECAUSE the same effect will take place after 2-3 applications of product by simply placing an X-Pattern or Circle Pattern on the face of the pad. Once your pad become wet with product it reaches an equilibrium point of saturation, at this point when you apply fresh product, less of the fresh product is going to seep into the pad via capillary action as the pad is already wet.
IF you use good technique, that is if after you apply your product in any manner to the face of the pad and THEN quickly spread the product out over the area you're going to work instead of just placing the pad against the surface and starting to make slow overlapping passes, then it's this spreading the product out over the area you're going to work that SPREADS THE PRODUCT OUT OVER THE AREA YOUR GOING TO WORK and thus lays down a uniform layer of fresh product onto the surface versus having it simply push up inside of the pad.
(The sentence in capital letters above should be spoken in your best Christopher Titus voice impersonation ala The Titus Show).

To be honest, (and this is just my opinion), if two skilled detailers started out in identical situations, that is same tool, same chemicals, same pads, same car with paint in the exact same condition, and then both people started at 8:00am buffing out the car, assuming they worked at the same speed, they would both finish removing the swirls, polishing to a high gloss, applying and removing a wax or paint sealant about the same time at the end of the day.
I don't think one person would finish at noon and the other person would finish at 8:00pm because there's that HUGE of a difference.
If you actually stop after each application and clean your pad to remove spent product and then take your hands and fingers and apply, smear around and work the fresh product into and over the face of the pad and compare that to removing the spend product from the face of the pad and the quickly applying a fresh circle or X-pattern of product to the face of the pad and then turning the polisher back on and getting back to work, the person doing the polishing this way would be back to work while the other person would be wiping the product off their hands and fingers so they could get a firm, clean grip on the polisher, otherwise you would have chemicals all over at least the fingers of one hand.
And of course, having a pad washer on hand always makes cleaning off spent product faster and more effective than any other method when using a DA Polisher.
Dirty pad


Using a slow speed, press the face of the pad against the Grit Guard insert and push up and down on the Grit Guard and this will pump cleaning solution up and into the pad to remove built-up polish residue.
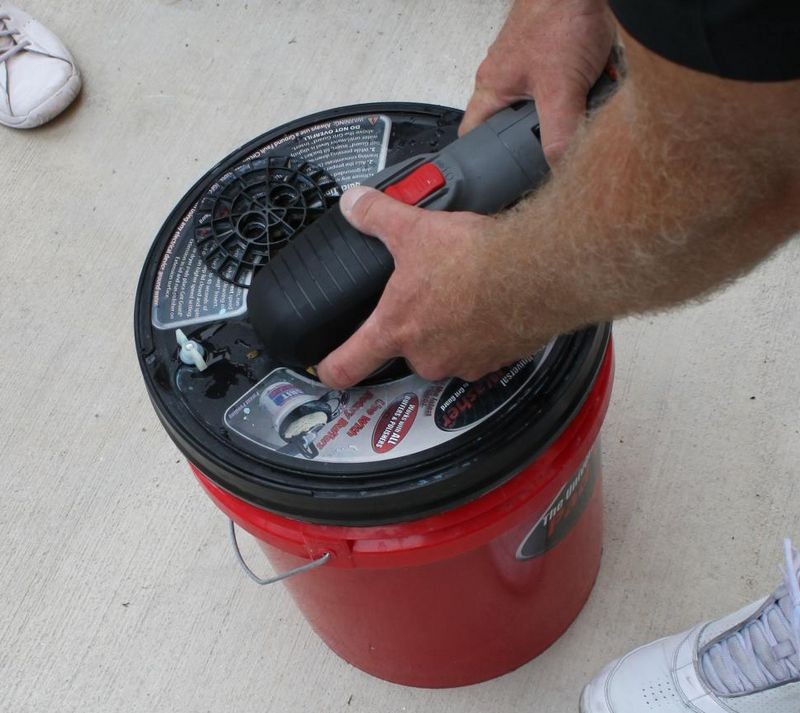
Clean pad, ready to put back into service...

If you do a lot of buffing, a pad cleaner will safe you time and enable you to work cleaner while getting more use out of your buffing pads.
Grit Guard Universal Pad Washer
My comments...
Surbuf Pads and SMAT Products
I think it helps anytime you're starting out with a clean dry Surbuf pad to pre-wet the surface with the SMAT product you're going to use to insure that 100% of the pad is working for you because there is a more shallow or shorter nap of fibers before you run into an attaching interface as compared to a thick foam pad which will absorb liquids till it reaches a saturation point. After the Surbuf pad is wet with product I think as long as you're removing spent product you will get close-enough results by simply applying fresh product to the face of the pad and getting back to the task at hand as you will by taking a moment to spread the product out with your fingers. The product is going to be distributed after you turn the polisher on and and being to move it over the area you're going to work. There isn't' anywhere else for the product to go because of the shallow depth of the microfiber fingers and the interface in which they are attached to.
Foam Pads and SMAT Products
I think it helps anytime you're starting out with a clean, dry foam pad to pre-wet the surface with the SMAT product you're going to use to insure that 100% of the pad is working for you because it can only help my maximizing efficiency since 100% of the pad will be wet with product. After the initial application, if you're using a pad washer to clean your pads, since the pad will now be wet with both water, cleaning solution and product, (to some level), at this point it's just as fast to just pick a style of placing fresh product back onto the face of the pad, spread the product out over the area you're going to work and then slow your arm speed down and begin working the paint with the fresh product. Even though most foam pads offer a thicker medium, (the foam formula itself), for fresh product to seep into, because the pad is now wet, if you spread the product out and get to work like you're supposed to be, then most of the product will be on the surface between your pad and the paint, where it's supposed to be.
Recommendation
The best thing to do would be to experiment with applying and working a SMAT product over the face of a buffing pad with your fingers and/or hand, wiping your hand off and then getting back to work and comparing that method to squeezing out a strip of product onto the face of our pad and getting back to work.
Big picture
One thing for sure, if you're working on a car that has swirls and you're using nothing but a DA Polisher for all the steps, this includes the correction step, the polishing step, possibly a second polishing or jeweling step and then application and removal of Your LSP, on an average size car, it's going to take you anywhere from a range of 6 to 12 hours from start to finish and this usually assumes the car is washed, dried and clayed before hand. This may or may not include taping off trim before starting depending upon the detailer.
I don't know that choosing one method over the other method of getting product onto a pad is going to make a dramatic difference in the amount of time to do the job and if the person doing the work is really doing a great job for the first step, that is the correction step BECAUSE your end results are always determined by the first step, that is how well you remove the below surface defects, then either method is going to work just as well as the other when you make the final wipe to remove any trace wax or paint sealant residues and then stand back, admire the results and say to yourself, it is finished.
-
Re: GG 6", Megs G110v2, or Flex 3401
Mike,
I PM'ed 5.4 Shelby links about the KB method yesterday. I thought about posting the links here so others can see, but I wasn't sure if that allowed because the links are from another forum?
Just to add, while the KB method does have a lot to do with priming the pad, pressure is also a key point. That is, you want to use a lot of pressure. Just *make sure* the pad is still spinning, even if it's not that much. Also, the pressure should be *uniform* from start to finish, not letting up at the end of the buffing cycle.
Last edited by WRAPT C5Z06; 03-02-2010 at 10:52 AM.
-
Re: GG 6", Megs G110v2, or Flex 3401
Originally Posted by 07 z-oh-6
Mike,
I PM'ed 5.4 Shelby links about the KB method yesterday. I thought about posting the links here so others can see, but I wasn't sure if that allowed because the links are from another forum?
Just to add, while the KB method does have a lot to do with priming the pad, pressure is also a key point. That is, you want to use a lot of pressure. Just *make sure* the pad is still spinning, even if it's not that much. Also, the pressure should be *uniform* from start to finish, not letting up at the end of the buffing cycle.
And you'll finish the job faster in the big picture?
Just to note, in every class I've ever taught, in every post I've ever made on the techniques for using the DA Style polisher, I've always stressed pressure PLUS keep the pad rotating as that's when it's removing paint. It's not a new idea.
I also can remember most people and even company's stating to use light pressure, they would say things like, let the weight of the machine do the work. In the real world that means it will take you decades to de-swirl a clear coat finish.
I covered all this in my first DVD and I think it's the "only" DVD ever produced that uses the SAME car from start to finish and shows the correct technique for using a Porter Cable Dual Action Polisher to completely buff out a car including removing swirls and applying the LSP and even removing the LSP with the PC. It's 2.5 hours long? and over 4 years old now...


You see, in order to make a really good before and after, process and technique how-to video you need a car in which the finish is horrific, but salvageable!
Before getting our hopes down, we asked Steve to drive the Corvette out of the garage and into full sun...

Ahh... now that's a little better... horrific swirls everywhere!


Here's Richard shooting some before footage in the morning...

This is myself working defects out using M80 Speed Glaze...

Here's the results of our Test Spot on the hood by machine


I never used the KM method once while buffing out this car or any car I've ever used a DA on and all my work comes out just fine.
It's the trend on detailing discussion forums to over-complicate things that are very simple. I don't know why, that's just the nature of detailing enthusiasts.
I've asked Kevin, who is a very good friend of mine and a very long time friend of mine to share his technique and reasoning on our forum, so lets leave it at that and the other forums can have their threads.
How's that?
Now I have to get to work finishing the El Camino...

-
Re: GG 6", Megs G110v2, or Flex 3401
It's too bad this one was never allowed to go to market... it's too dated now but it was finished and ready to go into manufacturing back in 2007
The PC video was 2.5 hours long and this video was 3.5 hours long, it went over each step of how to take a completely swirled out and water spotted Viper to a show car finish.
How to use the Rotary Buffer for Show Car results


-
Re: GG 6", Megs G110v2, or Flex 3401
Originally Posted by Mike.Phillips@Autogeek
Now I have to get to work finishing the El Camino...
Obviously, many of us learn from you, Mike. 
I'm just saying with the KB method, from what I understand, there are certain factors/combinations that make it unique.
FWIW, Richard Lin detailed my black 08 C6 about 2 years ago. He showed me that video you guys made about the PC. I didn't actually watch it, but it was in his arsenal.
-
Super Member

Re: GG 6", Megs G110v2, or Flex 3401
Mike,
Do copies still exist of the DVD you made using the PC? or was it a combo set with the rotary polisher video which if I'm reading your past post correctly you say never went into production.
Mark
Last edited by kb2ehj; 03-02-2010 at 12:18 PM.
Similar Threads
-
By Mc'lovin in forum Flex Polishers
Replies: 5
Last Post: 07-02-2015, 09:59 PM
-
By totoro in forum Flex Polishers
Replies: 9
Last Post: 07-23-2013, 11:32 AM
-
By The Critic in forum Ask your detailing questions!
Replies: 9
Last Post: 02-14-2010, 08:04 PM
-
By C30-Mike in forum Flex Polishers
Replies: 18
Last Post: 12-10-2009, 02:01 PM
 Members who have read this thread: 0
There are no members to list at the moment.
Posting Permissions
- You may not post new threads
- You may not post replies
- You may not post attachments
- You may not edit your posts
-
Forum Rules
|
| S |
M |
T |
W |
T |
F |
S |
| 31 |
1
|
2
|
3
|
4
|
5
|
6
|
|
7
|
8
|
9
|
10
|
11
|
12
|
13
|
|
14
|
15
|
16
|
17
|
18
|
19
|
20
|
|
21
|
22
|
23
|
24
|
25
|
26
|
27
|
|
28
|
29
|
30
| 1 | 2 | 3 | 4 |
|


 Reply With Quote
Bookmarks