 Thanks: 0
 Likes: 0
 Dislikes: 0
-
Re: Pictures & Comments: Sept 2014 Detail Boot Camp Class
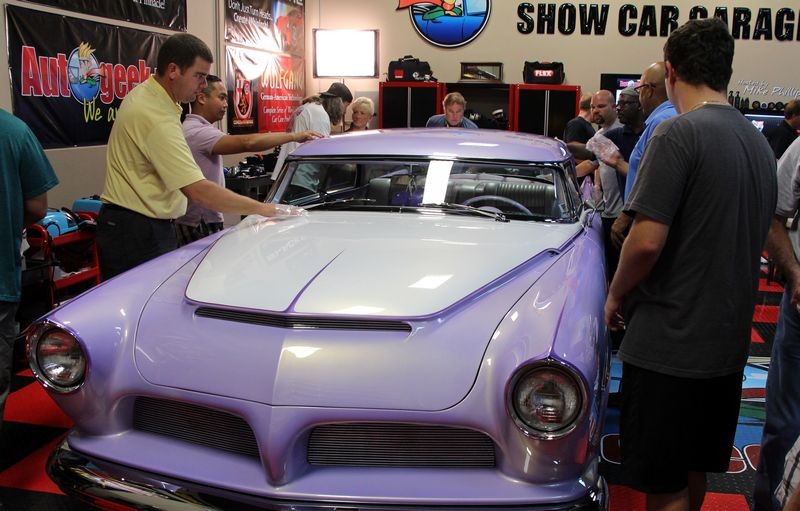
Richard Zocchi Kustom 1956 Dodge Lancer - Detailing Class at Autogeek
Multiple Car Show Winner
1956 Royal Doge Lancer
The car premiered at the 2000 Grand National Roadster Show San Francisco Cow Palace and was awarded the prestigious George Barris Kustom d’Elegance Award.
(Richard Zocchi has won this award three times now … he was the winner of the very first George Barris Kustom D’Elegance Award in 1992 with his fabulous ‘39 Dodge and again in 1994 with his chopped yellow pearl ‘51 Olds).
At the Sacramento Autorama the car won the very first Manuel Arteche Memorial award.
At the Good Guys All American Get Together in Pleasanton, California, it was in the Top Five Customs.
Finally, at the West Coast Kustoms Paso Robles 2000 car show, it received the Larry Watson Nostalgia Pick.
The top was chopped four inches. The rear window was sunk into the package tray to create the flowing line. The side roof molding was hand-built. The windshield and all glass work was done by Dan Mazzoncini of Dan’s Glass, Concord, California.
The upper hood was lengthened 1 inch to create the hood grill and rear scoop.
The centerpiece of the grill opening was sectioned three inches and the grill cavity was hand-formed.
The front grill hood scoop and rear grill were hand-made of three-sixteenths round rod by John Aiello.
Headlights were extended out four inches to simulate early 50s Studebaker look.
Headlight bezels again used by Zocchi is his trademark look – ‘56 Olds with the outside lip cut off.
Front and rear bumpers were frenched and extended … all bumper bolts shaved off to give it a clean appearance.
Front and rear wheel wells were flared.
Hand-made rear skirts were added.
Rear quarter panels were extended four inches.
One-half inch round rod was used to create cavity opening on taillights, which were hand-built by Gene Winfield.
Side molding was used from ‘57 Pontiac which was altered on the quarter panels.
Doors and trunk handles were all removed and Unkl Al’s remote system was used.
Paint was applied by Marcos of Lucky 7 Auto Body, Antioch, CA. PPG toners of violet and white were used in a custom mix by Marcos with gold pearl.
The front suspension was re-worked with drop spindles from Fat Man Fabrications by Bob Madsen.
The car was then turned over to bob Westbury for installation of Air Technology Air Ride System.
The interior was hand-built by Bob Divine Interiors of Martinez, California. It was done in violet and white to match the dash and exterior. Pioneer sound system was also installed by Divine.
The engine is a stock 315 Hemi except for a mild cam. The engine was all painted and detailed.
All chrome work and stainless work was done by Sherm’s Plating of Sacramento, California.
The car has radial tires with 2 ¼ inch whitewalls.
Hubcaps were custom made.
Class Topics
- How to use a Waterless Car Wash.
- How to visually inspect paint.
- How to inspect paint with your sense of touch.
- How to inspect paint using The Baggie Test.
- How to use a Porter Cable 7424XP Polisher to remove swirls, scratches, oxidation and staining.
- How to use a Porter Cable 7424XP to polish the paint to a super high gloss.
- How to use a Porter Cable 7424XP and Griot's 3" Mini Polisher to machine apply a show car wax.
- How to inspect your microfiber towels.
- How to break open a coating of wax and carefully remove it.
We start by washing the car using Pinnacle Waterless Car Wash.
Why? Because as a "Best Practice" I don't introduce lots of water to classics, kustoms, antiques, streetrods or muscle cars and I don't teach others to do it either.


Visual Inspection & The Baggie Test
Now that all the loose dirt and dust has been removed we inspect the paint using swirl finder lights and also with our clean hands followed by the Baggie Test.
Most people would think a show car has perfect paint in every sense of the word "perfect" but that's usually never the case. To the shock of many of the students, the paint on this car felt rough to the touch, somewhat like concrete.
The correct way to use Detailing Clay
Next we went over the correct techniques for using detailing clay. There's lots of confusion over how to form the clay bar once it's removed from its packaging plus how to push it over the paint. All this is demonstrated first and then put into practice by the class.

After
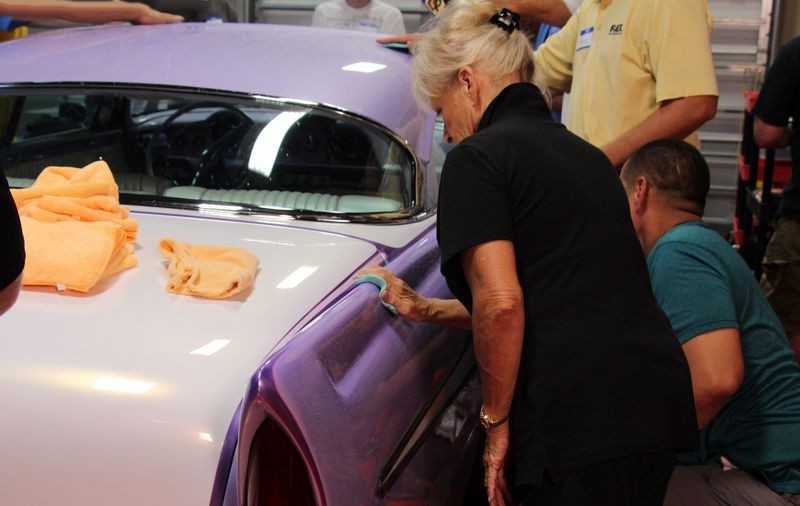
After I clayed a section of paint I asked Sam to inspect my work using the Baggie Test. Here's Sam feeling the section of paint I clayed....

Here's Sam inspecting the section of paint left un-touched....

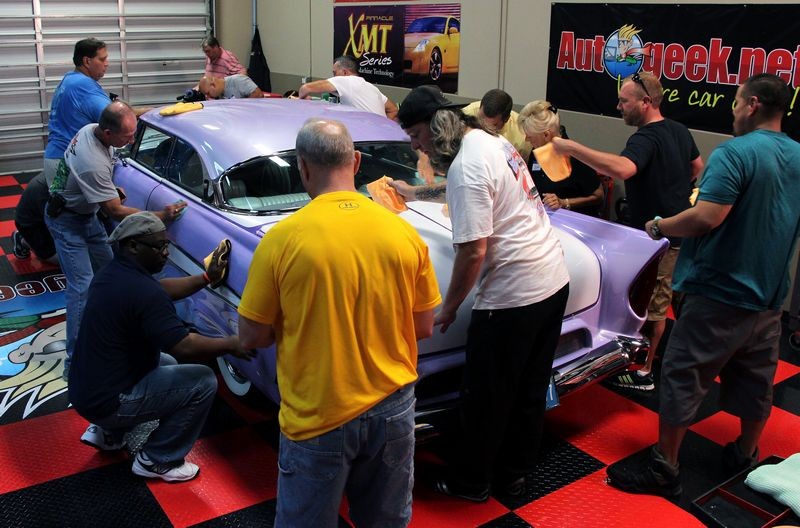
Hands-on time!
The owner told me this car was recently appraised at $156,000.00
I have great relationships with all the local area "Car Guys" and having been at Autogeek for 5 years, and before that teaching classes at Meguiar's Corporate Office in Irvine, California, I've worked very hard to earn their trust.

Contaminants on clay
Often times the contaminant you remove will be a blackish, grayish and even brown color. But it's possible to have contaminants bonded to the clay with very little color to them, clear overspray paint is a good example. Whatever was on the paint, claying removed it and left a clean, smooth surface for the next step, machine polishing.


Just as important as claying is so is carefully wiping off the clay lube so as not to re-instill toweling marks, especially to a show car.


-
-
-
Super Member

Re: Pictures & Comments: Sept 2014 Detail Boot Camp Class
You guys did a super job! That's a beautiful car too!
-
Re: Pictures & Comments: Sept 2014 Detail Boot Camp Class
 Originally Posted by FrankS

You guys did a super job! That's a beautiful car too!
On behalf of the class....
Thank you Frank....
You've been a part of a lot of projects here at Autogeek and you know I always tell people that it's EASY to take a car in really bad condition and create a dramatic before and after results.
What's actually really hard to do is take something that most people think looks fine the way it is and take it to a higher level. Well that's what this class did when they worked on this SoCal Kustom Led Sled...

-
-
Super Member

Re: Pictures & Comments: Sept 2014 Detail Boot Camp Class
Totally impressed with this class. Learning on such special cars definitively boosts the confidence for any work you'll perform later. Also, it develops the sense of responsibility we must have when working on any car.
What I really like about these works is that the individual effort and care of each one multiplies in the end, making the results show at least 18+ times better.
Congratulations all,
*Loved Sam's expressions while inspecting the paint for contaminants!
Thanks for sharing,
Kind Regards.
Nature is pleased with simplicity. And nature is no dummy 
― Isaac Newton
-
Super Member

Re: Pictures & Comments: Sept 2014 Detail Boot Camp Class
what a nice finish on that car, really like that color combo
-
Re: Pictures & Comments: Sept 2014 Detail Boot Camp Class
Originally Posted by Tato
Totally impressed with this class. Learning on such special cars definitively boosts the confidence for any work you'll perform later.
Also, it develops the sense of responsibility we must have when working on any car.
I agree.
I could get mundane daily drivers, but no one gets excited to work on transportation cars. Most people in their normal lives work on transportation cars or daily drivers and never get the chance to work on cars like I bring to these classes so it turns hard work, (buffing out a car is hard work), into a fun experience. And hard work is a lot more enjoyable when it also fun and rewarding.
There are other "detailing classes" offered in the world but I can assure you... when you attend one of these classes you're going to learn a lot and also have a lot of fun.
Originally Posted by Tato
What I really like about these works is that the individual effort and care of each one multiplies in the end, making the results show at least 18+ times better.
Again I agree. There's a synergy among the people that make up the class that starts to grow from the first hands-on project and gets stronger with each new project. You can stand back and literally watch strangers become friends bringing more impact to the learning process.
Originally Posted by Tato
*Loved Sam's expressions while inspecting the paint for contaminants!
These pictures....
After I clayed a section of paint I asked Sam to inspect my work using the Baggie Test. Here's Sam feeling the section of paint I clayed....
Here's Sam inspecting the section of paint left un-touched....
I have to admit I picked on Sam quite a bit over the course of the two day class but she was a real high energy gal and it was great having her in the class.
Plus she sent us a Fruit Bouquet yesterday and it was delicious!


-
Re: Pictures & Comments: Sept 2014 Detail Boot Camp Class
Originally Posted by OnsiteDetailing
This class was absolutely awesome. I learned more information and had plenty of opportunity to learn to use new equipment than I thought was possible during a two-day training. It was great to work with one of the top professionals in the industry.
Thank you sir for the kind words....
Originally Posted by OnsiteDetailing
I had two goals in mind I wanted to take away from this class.
The first was to introduce myself to different polishers. Currently, I use the Porter Cable and want to purchase a second, more advanced polisher, and with so many on the market, I was unsure of which one.
My new polisher will be the Flex.
The Flex 3401 is a BEAST when it comes to powering through a car that's completely wiped-out! Plus for heavy contamination, you cannot beat the results from using the Flex 3401 with the Nanoskin Medium Grade Autoscrub Pads.
Wait till I get the 1965 Plymouth Belvedere II pictures posted, it's going to blow everyone away....
Originally Posted by OnsiteDetailing
My second goal was exactly how Mike Phillips stated, and that was to bring my comfort level up with paint correction.
Thanks for bringing that aspect into the conversation Rick. I borrowed that phrase from Mike Pennington, (Director of Training for Meguiar's), as that's one of the things he would always stress when we taught classes together.
There's no way I can turn anyone into an expert at anything in two days.... but if I can impart both head knowledge and practical skills based upon hands-on experience, then I can bring up, and hopefully dramatically bring up your comfort level with all aspects of car detailing and that's where you start. It's only time and experience that turns a person into an expert. In other words, putting time in behind the buffer... (or any tool or product).
Originally Posted by OnsiteDetailing
I detail for a living. Beyond the above, I learned some new information that can improve my business skills, assess a potential client's needs, and realistically - from both my client's perspective and mine - meet those needs.
This is so important when ti comes to being successful on the business side of car detailing. Job number #1 is to evaluate the customer, not evaluate the car and then match your services to your customer.
Originally Posted by OnsiteDetailing
I was also introduced to new compounds, polishes, and waxes that I can add to or replace what is currently in my arsenal.
Everything we use has to be top notch in quality if for no other reason due to the caliber of the cars you're working on... while not every car at my class is valued at $156,000.00 like the 1956 Dodge Royal Lancer, every car is valuable to their owners and to date... we've always earned every car owner's trust by avoiding mistakes delivering customer pleasing results. (Knock on cyber wood)
Originally Posted by OnsiteDetailing
In Ken Robinson's book, "The Element," he writes about doing your passion and being in your "tribe," and how this helps create a successful and satisfying life. It was great to spend a weekend with both enthusiasts and other detailers doing this work for a living.
I like that idea... I'll have to check out Ken's book... definitely spending two days with like minded people passionate about this craft tends to light your fire for cars and car detailing.
Originally Posted by OnsiteDetailing
Thanks for recognizing our passion Nick, and thank you for all of your guidance too!
Rick it was a genuine pleasure having you in the class and thank you ahead of time for helping us to get the seats out of the Chrysler Town & Country Van. That's another set of before and after pictures from this class that are going to blow people away!
Similar Threads
-
By Nick McKees37 in forum PICTURES: 3-Day CAR Detailing Bootcamp Classes
Replies: 47
Last Post: 04-17-2019, 02:20 PM
-
By Mike Phillips in forum PICTURES: 3-Day CAR Detailing Bootcamp Classes
Replies: 58
Last Post: 02-14-2019, 11:55 AM
-
By Mike Phillips in forum PICTURES: 3-Day CAR Detailing Bootcamp Classes
Replies: 35
Last Post: 10-13-2015, 02:50 PM
-
By Mike Phillips in forum PICTURES: 3-Day CAR Detailing Bootcamp Classes
Replies: 26
Last Post: 02-05-2015, 03:42 PM
-
By Mike Phillips in forum PICTURES: 3-Day CAR Detailing Bootcamp Classes
Replies: 54
Last Post: 12-03-2013, 08:11 AM
 Members who have read this thread: 0
There are no members to list at the moment.
Posting Permissions
- You may not post new threads
- You may not post replies
- You may not post attachments
- You may not edit your posts
-
Forum Rules
|
| S |
M |
T |
W |
T |
F |
S |
| 28 | 29 | 30 |
1
|
2
|
3
|
4
|
|
5
|
6
|
7
|
8
|
9
|
10
|
11
|
|
12
|
13
|
14
|
15
|
16
|
17
|
18
|
|
19
|
20
|
21
|
22
|
23
|
24
|
25
|
|
26
|
27
|
28
|
29
|
30
|
31
| 1 |
|


 Reply With Quote

Bookmarks