 Thanks: 0
 Likes: 0
 Dislikes: 0
-
Junior Member

-
Junior Member

Re: DIY Clear-coat failure repair
check your tags [IMG] Ive know it does that sometimes. Make sure they are all closed
-
Junior Member
Re: DIY Clear-coat failure repair
The photos aren't loading into my album correctly for some reason. I'll keep messing around with it.
-
Junior Member
-
Super Member

Re: DIY Clear-coat failure repair
 StreetLight you got mad skills. The before/afters are dramatic. StreetLight you got mad skills. The before/afters are dramatic.
Tuscarora Dave has a thread where he was able to get the color match from a paint supplier in a rattle can.
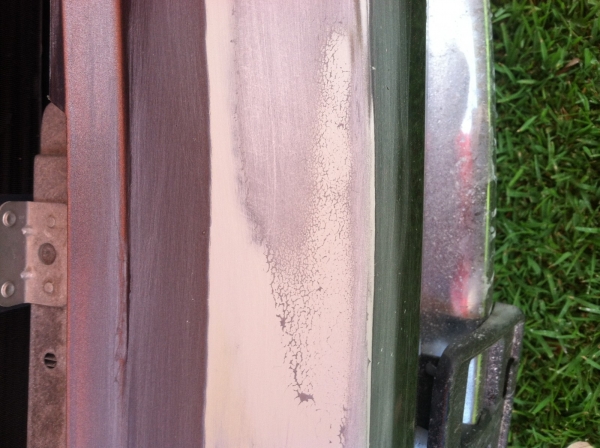
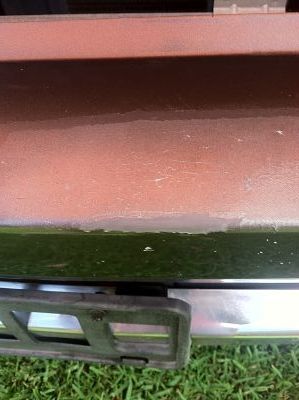
Did a little bumper repair in my new shop.
I'm sure that you'll be a big influence on these forums 
Keep up the good work 
VT
 Originally Posted by glen e

....It's all I use these days....they are buffing when I'm relaxing...and still don't get the powder out of canines!
-
Junior Member
Re: DIY Clear-coat failure repair
Thanks Vegas, I hope to contribute whatever I can lord knows I've learned a lot from the members here already. The process I used was similar to TD's in the link you posted, but this was a quickie took me about 3 hours, and maybe another half or so tomorrow to finish with the polishing. Now I don't have to look at that ugly faded mess on my bumper, exciting!
Yes, and you can get a local paint supply shop to match colors in a rattle can for you. A big plus is that if you have the car available they can usually match the color directly to whats there already. That way if the O.E paint is faded they can match that and not just mix it up using the paint code. If you blend it correctly though its very hard to notice the subtle change in tint.
Last edited by St.LightDetails; 08-12-2013 at 02:03 AM.
Reason: Forgot to add something
-
Super Member
Re: DIY Clear-coat failure repair
We all come to the table with different abilities...but we come to learn.
This undertaking is awesome. No doubt that you will inspire others to attempt this on their own...and save $$$ in the process.
You motivated me to attempt the $50 Rustoleum results on a junker that a relative has just sitting in a field. Just curious...that's all.
VT
Originally Posted by glen e
....It's all I use these days....they are buffing when I'm relaxing...and still don't get the powder out of canines!
-
Junior Member
Re: DIY Clear-coat failure repair
Give it a shot! I've painted cars with Rustoleum in a gallon can before. I diluted it slightly with some mineral spirits and got some foam rollers and went to town. It was in my younger days of course but it came out pretty good. The finish wasn't nearly as glossy as automotive paint but it was smooth, and took rocks like a beast. I swear, rocks just bounced off the bumper and hood. The trick is to take your time in the prep. Get the surface as smooth as you can before painting, and keep it as clean as possible. IPA works great as a wipe down after sanding as it evaporates quickly and won't leave any residue. Follow that with a tack rag and you're good to go. I didn't have a tack rag today so you can still get good results without it.
-
Super Member

Re: DIY Clear-coat failure repair
Nice job. I have painted my front bumper numerous times on my daily driver. Front gets a lot of chips over the course of 12 months so every year I end up having to paint. A few things I would add to your article. After sanding I apply a dark color filler primer to the damaged area only. This can be sanded after 30 minutes and does 2 things. It provides a good base for the paint to adhere to and after light sanding will give a good indication of how smooth the finish coat will look like. I keep applying primer and sanding until I'm happy the finish coat will lay down smoothly (front bumper has lots of chips and pot marks where the top coat is removed right down to the primer-I use black primer as it is less noticeable on my dark colour). Also I never tape off the section around the damage (of course I tape off any area that I don't want paint on). I wet sand with 1500 grit as large an area that I think paint might hit when I spray the damaged area. 1500 scratches provide adequate adhesion and also cover with clear coat. Other than that your results speak for themselves.
Crispy 2001 Pontiac Grand Prix DD, always clean (except today) Hobby Detailer
Similar Threads
-
By Jacob Harrod AUTOCLEAN in forum Auto Detailing 101
Replies: 6
Last Post: 10-03-2020, 08:03 PM
-
By pman626 in forum Auto Detailing 101
Replies: 23
Last Post: 06-28-2016, 10:12 AM
-
By bob53 in forum Wet-Sanding, Cutting & Buffing
Replies: 2
Last Post: 06-11-2016, 03:42 PM
-
By 02nissanISR in forum Show N' Shine
Replies: 72
Last Post: 06-06-2013, 03:29 PM
 Members who have read this thread: 0
There are no members to list at the moment.
Posting Permissions
- You may not post new threads
- You may not post replies
- You may not post attachments
- You may not edit your posts
-
Forum Rules
|
| S |
M |
T |
W |
T |
F |
S |
| 31 |
1
|
2
|
3
|
4
|
5
|
6
|
|
7
|
8
|
9
|
10
|
11
|
12
|
13
|
|
14
|
15
|
16
|
17
|
18
|
19
|
20
|
|
21
|
22
|
23
|
24
|
25
|
26
|
27
|
|
28
|
29
|
30
| 1 | 2 | 3 | 4 |
|


[/IMG]
[/IMG]
[/IMG]


 Reply With Quote


Bookmarks