Navigation
Install the app
How to install the app on iOS
Follow along with the video below to see how to install our site as a web app on your home screen.
Note: This feature may not be available in some browsers.
More options
Style variation
Autowerx CeriGlass Guide
- Thread starter AutowerxDetailing
- Start date
AutowerxDetailing
New member
- Apr 10, 2012
- 2,791
- 0
- Thread starter
- #22
Do you have a link to these CarPro glass pads, I did a quick search on them and could not find them, only ceriglass. Are they thicker, more flexible, more suitable for a DA. Do you have a DA or access to one to see if the CarPro glass pads will work with a DA? I was just going to say forget trying to get the scratches out of my windshield after my experience and just Rain X them but if you get good results from the CarPro pads and a DA I will give them a shot.
With the popularity of DA buffers and with so many windshields scratched up whoever makes a good glass polish/pad system for DA's that really works is going to get a lot of business. Same with whoever makes a permanent coating for headlights that will last several years before yellowing again.
I will get a link to you. The CarPro glass pads look very promising. They are thicker than the LC cutting pads and they are also more flexible. They seem to be very well made. I do not have a backing plate small enough to fit them onto my PC... I may need to order some larger pads and do another test. There is another thread where someone achieved excellent results with a GG DA and the CarPro pads. I will update this thread as soon as I am able to try them out.
Great review.
Thank you! I hope you and others find it helpful. Glass is the most annoying thing when it isn't perfect... especially if the windshield is jacked up because you have a constant reminder every single time you drive anywhere.
AutowerxDetailing
New member
- Apr 10, 2012
- 2,791
- 0
- Thread starter
- #23
Round 2: Destroyed Glass vs CeriGlass via DA.

A recent thread showing excellent results removing scratches from glass using CeriGlass and a Griot's DA polisher has me convinced that with proper technique it should be possible to fully correct this window without a rotary.
Thread will be updated within the next few weeks with the results... :buffing:
AutowerxDetailing
New member
- Apr 10, 2012
- 2,791
- 0
- Thread starter
- #24
:updated:
Since I originally created this guide I have had a lot more experience with CeriGlass. It is now a permanent component of my detailing arsenal and is, what I consider, an essential compound for any detailer.
I have also come to HATE the LC glass cutting pads that I show in my original post. The more times I use them the more and more I dislike them. I no longer recommend using them for correcting glass. Instead I recommend CarPro's glass polishing pads. They are much thicker than the LC glass cutting pads and do an awesome job with ZERO micromarring like the LC pads... even when using a DA!
I have also revised my technique a little to ensure that there is almost ZERO sling when working with CeriGlass. This polish is meant to be worked very wet and it will dry rather quickly (similar to M105 buffing cycle). A spritz of water will instantly reactivate the polish and allow for an almost infinitely long buffing cycle. The problem, usually, is that when the water is added to the mixture it becomes very runny and can sling EVERYWHERE. I have found a great solution to this that I will show below. On to the show!
This window was replaced with a used piece from a scrap yard after our car was broken into. As you can see... it doesn't necessarily have that "like new" look and feel.

Ridiculous RIDS and swirls all over. it's difficult to capture in a photo just what horrible condition this glass is in.

This time around I wanted to try correcting these incredibly deep scratches with my DA instead of the rotary. With the CarPro glass pads it works perfectly!!! It's a little bit slower process than with the rotary but it absolutely gives the same results.
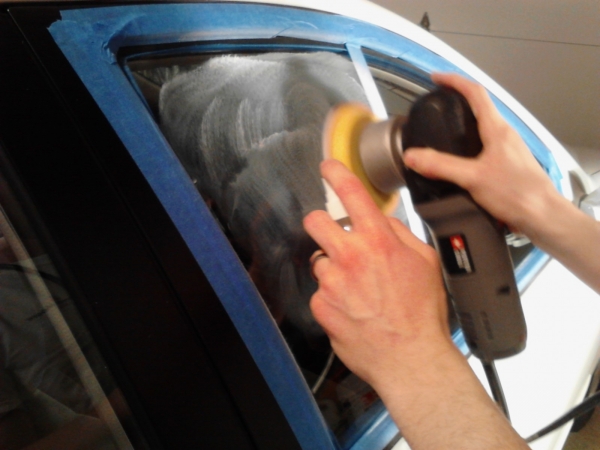
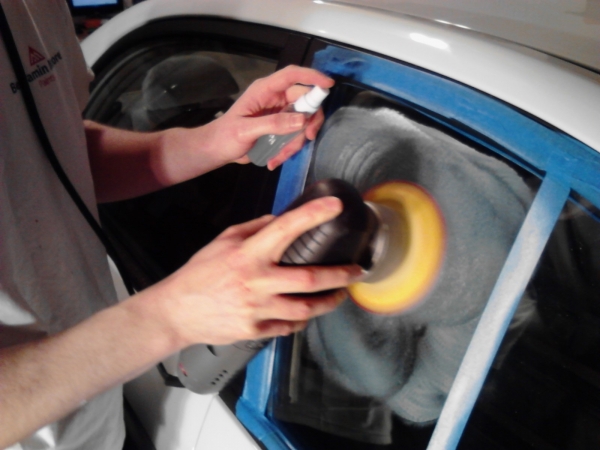
The key to perfect results with ZERO sling is to control the water input onto the surface as you polish. Here I am spritzing the surface with a finely atomized mist of water/ONR solution right in front of where the pad is traveling. This gives the perfect amount of water to reactivate the CeriGlass so it can perform work WITHOUT the sling created by a typical large amount of water from a spray bottle.
It takes a little getting used to this technique because you have to hold the polisher steady with one hand while still applying moderate downward force. Using a DA it isn't so hard because you can control the machine easily with one hand... I use the DA on speed 6 the entire time.
When using a rotary it's a little more complicated. For rotary use I trigger lock @ 1000rpm and hold the bottle with the same hand that is over the "front" of the polisher (the pad side). I aim the bottle so when pumped it goes right next to the pad. The key really is just using a small enough bottle that you can hold while still maintaining control of the machine. The atomizer spray pattern is also a must so you can control the amount of liquid applied to the glass...
I divided the window into two sections. I was going to do a 50/50 but it was getting late and I just wanted to finish.

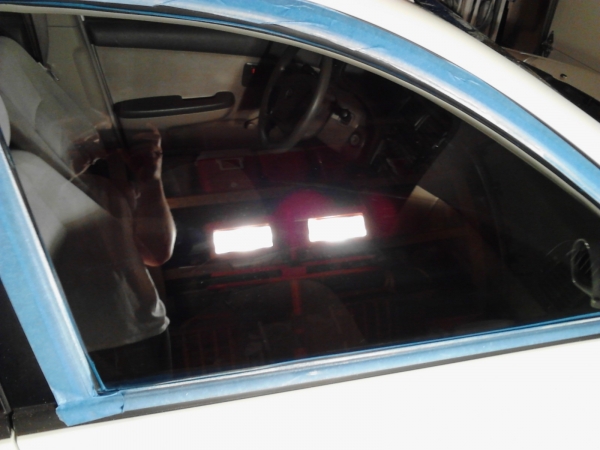
This is what the polish should look like over the glass as it is being worked. If there are ever any clear spots it means it is drying up and you need to use more water. If water isn't making a difference you need to clean the window and add more CeriGlass.

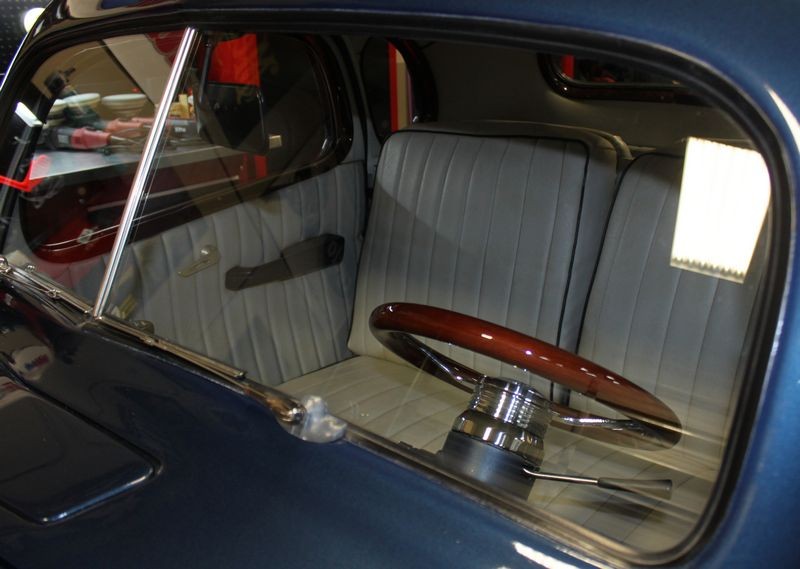
Final results after about 30-45 mins of polishing with a DA. I will note I cheated and used the rotary with a smaller pad on a few sections around the edges. Even so, the DA was more than capable of removing these serious defects.

Ignore the streaks and lint... This was after just a quick wipe with Eraser to clean off the spent polish.
Conclusion: You can remove almost any type of scratch in your glass with CeriGlass with proper technique and enough well spent time polishing. My best advice is DON'T GIVE UP! You will find yourself spending 15 minutes polishing with what looks like nothing happening; then, all of a sudden on that last section pass all the scratches will disappear. It really is magical when it happens.
Word of advice: It is CRITICAL to use overlapping passes and alternate the direction of the polisher. When you are correcting deep scratches you are removing glass and it can cause a "warped effect" when looking through the glass. This problem is solved by overlapping each pass and alternating the direction of each pass while you work.
Thanks for looking! Feel free to leave questions or comments below.
Since I originally created this guide I have had a lot more experience with CeriGlass. It is now a permanent component of my detailing arsenal and is, what I consider, an essential compound for any detailer.
I have also come to HATE the LC glass cutting pads that I show in my original post. The more times I use them the more and more I dislike them. I no longer recommend using them for correcting glass. Instead I recommend CarPro's glass polishing pads. They are much thicker than the LC glass cutting pads and do an awesome job with ZERO micromarring like the LC pads... even when using a DA!
I have also revised my technique a little to ensure that there is almost ZERO sling when working with CeriGlass. This polish is meant to be worked very wet and it will dry rather quickly (similar to M105 buffing cycle). A spritz of water will instantly reactivate the polish and allow for an almost infinitely long buffing cycle. The problem, usually, is that when the water is added to the mixture it becomes very runny and can sling EVERYWHERE. I have found a great solution to this that I will show below. On to the show!
This window was replaced with a used piece from a scrap yard after our car was broken into. As you can see... it doesn't necessarily have that "like new" look and feel.
Ridiculous RIDS and swirls all over. it's difficult to capture in a photo just what horrible condition this glass is in.
This time around I wanted to try correcting these incredibly deep scratches with my DA instead of the rotary. With the CarPro glass pads it works perfectly!!! It's a little bit slower process than with the rotary but it absolutely gives the same results.
The key to perfect results with ZERO sling is to control the water input onto the surface as you polish. Here I am spritzing the surface with a finely atomized mist of water/ONR solution right in front of where the pad is traveling. This gives the perfect amount of water to reactivate the CeriGlass so it can perform work WITHOUT the sling created by a typical large amount of water from a spray bottle.
It takes a little getting used to this technique because you have to hold the polisher steady with one hand while still applying moderate downward force. Using a DA it isn't so hard because you can control the machine easily with one hand... I use the DA on speed 6 the entire time.
When using a rotary it's a little more complicated. For rotary use I trigger lock @ 1000rpm and hold the bottle with the same hand that is over the "front" of the polisher (the pad side). I aim the bottle so when pumped it goes right next to the pad. The key really is just using a small enough bottle that you can hold while still maintaining control of the machine. The atomizer spray pattern is also a must so you can control the amount of liquid applied to the glass...
I divided the window into two sections. I was going to do a 50/50 but it was getting late and I just wanted to finish.
This is what the polish should look like over the glass as it is being worked. If there are ever any clear spots it means it is drying up and you need to use more water. If water isn't making a difference you need to clean the window and add more CeriGlass.
Final results after about 30-45 mins of polishing with a DA. I will note I cheated and used the rotary with a smaller pad on a few sections around the edges. Even so, the DA was more than capable of removing these serious defects.
Ignore the streaks and lint... This was after just a quick wipe with Eraser to clean off the spent polish.
Conclusion: You can remove almost any type of scratch in your glass with CeriGlass with proper technique and enough well spent time polishing. My best advice is DON'T GIVE UP! You will find yourself spending 15 minutes polishing with what looks like nothing happening; then, all of a sudden on that last section pass all the scratches will disappear. It really is magical when it happens.
Word of advice: It is CRITICAL to use overlapping passes and alternate the direction of the polisher. When you are correcting deep scratches you are removing glass and it can cause a "warped effect" when looking through the glass. This problem is solved by overlapping each pass and alternating the direction of each pass while you work.
Thanks for looking! Feel free to leave questions or comments below.
Results look good and promising. You definitely had better luck then I did with the Lake Country pad with my PC. Thanks for sharing. I will give that glass pad a try with my DA after reading about your positive experience and seeing your results.
Did you have to clean/wash the pad every so often, did the pad end up getting too soft or were you able to use it for the whole window without washing the polish out and drying it out? Did the windshield seem to heat up much while using it? Were the results enough to go straight to adding a glass protectant like rain x or was there a little micro marring/fog that should be finished down with a less aggressive pad/polish.
Did you have to clean/wash the pad every so often, did the pad end up getting too soft or were you able to use it for the whole window without washing the polish out and drying it out? Did the windshield seem to heat up much while using it? Were the results enough to go straight to adding a glass protectant like rain x or was there a little micro marring/fog that should be finished down with a less aggressive pad/polish.
AutowerxDetailing
New member
- Apr 10, 2012
- 2,791
- 0
- Thread starter
- #26
Results look good and promising. You definitely had better luck then I did with the Lake Country pad with my PC. Thanks for sharing. I will give that glass pad a try with my DA after reading about your positive experience and seeing your results.
You're welcome! If you have previously used the LC glass pads and you switch to the CarPro pads you will be amazed at the difference! :dblthumb2:
Did you have to clean/wash the pad every so often, did the pad end up getting too soft or were you able to use it for the whole window without washing the polish out and drying it out? Did the windshield seem to heat up much while using it? Were the results enough to go straight to adding a glass protectant like rain x or was there a little micro marring/fog that should be finished down with a less aggressive pad/polish.
I used only 2 pads on the whole window. One 5" on the DA and one 3" on the rotary in a few small spots around the edge. I did not have to clean the pads at all. If you were correcting deep scratches like this on every single window than you would probably want one pad for each window and maybe 2 for the windshield. Otherwise just cleaning them and spinning them dry would be fine too. They get wet anyway while you are polishing and spritzing water onto the glass.
The glass does heat up some while polishing but never to the point that it is too hot to touch. That is one benefit of using a DA is the heat generated seemed to be kept to a minimum and the polish did not dry as fast as it usually does when I use a rotary.
The results were LSP ready after the CeriGlass and CarPro glass pads. I didn't notice any micro-marring at all the entire time. I even worked the polish till it was dry and clear in one spot to see if it would mar and it didn't. These pads really make all the difference in the world.
swanicyouth
New member
- Mar 3, 2011
- 9,388
- 0
I think the disappointment most people experience the first time they attempt intensive glass correction is due to those LC glass cutting pads. They are SO unforgiving. They are decent with a rotary but they are absolutely HORRIBLE when paired up with a DA polisher. I have never been able to use them without seeing DA haze.
I have recently ordered some CarPro glass pads but have not been able to use them yet. There was another glass polishing thread recently where someone was able to get very good results with the CarPro glass pads, CeriGlass and a DA polisher. I would recommend giving those a go because I am 100% positive it is not the polish that has let you down.
I will be doing another test very soon with the CarPro glass pads, CeriGlass, and rotary. My hope is that I can achieve the same results as in this tutorial but only in one step. :buffing:
Great article, we need more on glass! Well written & good pictures. Nick you are 100% right. LC pads + PC = Jacked up Glass. I posted on the CarPro pads and Griots DA. I was able to get stunning results with this combo and CeriGlass in ONE step (one very LONG and MESSY step) using a Griots. Not only did it finish crystal clear, removal all scratches, but, it removed all the DA Haze from my PC and LC pads. I was as surprised as anyone else. I was just looking for improvement.
I agree, it does take a ton of downward pressure, but keeping the polish wet (and a Griots DA) will keep the pad spinning no problem. Nice Work! Once you try the CarPro pads with CerriGlass, you'll never touch the LC pads again.
Mike Phillips
Active member
- Dec 5, 2022
- 51,004
- 6
Hey Nicholas...
Just to note, if you look at the top of your first post to this thread I gave it a blue clickable link to itself you you, or anyone can highlight, copy and paste the blue clickable link to anywhere else in the forum world to share you very well-written article.
I always do this for my articles to make it easy for anyone to share the link to an article. Even have an article on this topic...
How to share an article using a blue clickable link
I did this because I just shared your articles on one of my how-to articles and now I can share the link to your article faster and easier into the future...
How to Polish Glass with Pinnacle GlassWork Water Spot Remover
:xyxthumbs:
AutowerxDetailing
New member
- Apr 10, 2012
- 2,791
- 0
- Thread starter
- #31
Great article, we need more on glass! Well written & good pictures. Nick you are 100% right. LC pads + PC = Jacked up Glass. I posted on the CarPro pads and Griots DA. I was able to get stunning results with this combo and CeriGlass in ONE step (one very LONG and MESSY step) using a Griots. Not only did it finish crystal clear, removal all scratches, but, it removed all the DA Haze from my PC and LC pads. I was as surprised as anyone else. I was just looking for improvement.
I agree, it does take a ton of downward pressure, but keeping the polish wet (and a Griots DA) will keep the pad spinning no problem. Nice Work! Once you try the CarPro pads with CerriGlass, you'll never touch the LC pads again.
Isn't it amazing what a difference the pads make!? I am completely convinced now that with CeriGlass + CarPro glass pads + essentially any type of variable speed machine polisher will give you excellent results if you copy the steps from my guide.
Makes me want a rotary! Nice write up
A rotary is nice, and is still what I prefer for glass polishing; however, based my ongoing testing I think it is absolutely possible to get similar results with a DA. It's just going to take you longer. And I have only tested the DA with the CarPro glass pads, I wouldn't try it with the thin LC glass cutting pads anymore because you will get a lot of micro-marring.
I wonder why AG doesn't sell the CarPro glass pads?
I don't know... they should really consider bringing them in!
 rops:
rops:Hey Nicholas...
Just to note, if you look at the top of your first post to this thread I gave it a blue clickable link to itself you you, or anyone can highlight, copy and paste the blue clickable link to anywhere else in the forum world to share you very well-written article.
:xyxthumbs:
Thanks so much Mike! This forum is awesome and I have learned so much from all the members. I am glad to be "giving back" to such a great community.
rops:I got the 5" CP pad and glass wipes, hopefully I can get around to doing it tomorrow. How much pressure did you put on the DA when trying to correct the glass? I can't push/put too much pressure on my PC and keep it spinning properly and I would be afraid of cracking/breaking the glass by putting a lot of pressure anyway. Is it roughly what you do when working on paint or do you have to press harder?
swanicyouth
New member
- Mar 3, 2011
- 9,388
- 0
I got the 5" CP pad and glass wipes, hopefully I can get around to doing it tomorrow. How much pressure did you put on the DA when trying to correct the glass? I can't push/put too much pressure on my PC and keep it spinning properly and I would be afraid of cracking/breaking the glass by putting a lot of pressure anyway. Is it roughly what you do when working on paint or do you have to press harder?
You wont break the glass. The key is keeping the polish wet with water and the pads will spin well - actually better than foam. This is because when your polish is wet it becomes "watery"/slippery and the glass pads have little mass for the polisher to spin (or absorb water/polish). I would use speed 6 on a PC. I used similar pressure as compounding, but it just takes a long time, as the polish just keeps working - you will quit before the polish does.
Did I mention to keep the polish wet?
You should have little to no heat being generated by a DA, as the wet polish will keep everything cool.
I used the CarPro pads with a Griot's, but I believe you will be able to remove scratches with a PC as well if you use the CarPro pads. It will just take a while.
AutowerxDetailing
New member
- Apr 10, 2012
- 2,791
- 0
- Thread starter
- #36
You wont break the glass. The key is keeping the polish wet with water and the pads will spin well - actually better than foam. This is because when your polish is wet it becomes "watery"/slippery and the glass pads have little mass for the polisher to spin (or absorb water/polish). I would use speed 6 on a PC. I used similar pressure as compounding, but it just takes a long time, as the polish just keeps working - you will quit before the polish does.
Did I mention to keep the polish wet?
You should have little to no heat being generated by a DA, as the wet polish will keep everything cool.
I used the CarPro pads with a Griot's, but I believe you will be able to remove scratches with a PC as well if you use the CarPro pads. It will just take a while.
:iagree:
Something I have started doing is using a water/ONR mix instead of just pure water. I have found that you can use a lot less water and still keep the polish wet this way. It is my belief that the ONR gives a little more lubrication and allows your pad to spin more freely (especially handy when using a DA).
Also, I really can't stress enough the importance of using a smaller bottle with an atomizer sprayer. It makes it SO much easier to use the machine one handed and apply a fine mist of water/ONR solution to reactivate the CeriGlass. This is the key to zero sling!
Best of luck on your glass project lexusgs!
rops:Really great work and review! Thanks for sharing this!
Thanks!
Great work. Very helpful review thanks.
Thanks!
ShaunD
New member
- Nov 19, 2010
- 1,255
- 0
First off, great article/review. I will be purchasing the car pro pads ASAP. I have been wanting to post about LC glass cutting pads because I had some really bad experiences with them. They cut alright! The edges cut right into the glass if your aren't extremely careful, and sometimes even if you are. I got the GG glass polishing pads but they cut a lot slower but with Ceriglass they will remove deep scratches.
Thanks for point us to another great carpro product.
Sent from my SAMSUNG-SGH-I897 using AG Online
Thanks for point us to another great carpro product.
Sent from my SAMSUNG-SGH-I897 using AG Online
AutowerxDetailing
New member
- Apr 10, 2012
- 2,791
- 0
- Thread starter
- #38
First off, great article/review. I will be purchasing the car pro pads ASAP. I have been wanting to post about LC glass cutting pads because I had some really bad experiences with them. They cut alright! The edges cut right into the glass if your aren't extremely careful, and sometimes even if you are. I got the GG glass polishing pads but they cut a lot slower but with Ceriglass they will remove deep scratches.
Thanks for point us to another great carpro product.
Sent from my SAMSUNG-SGH-I897 using AG Online
Thanks! I've never been let down by any CarPro product that I have tried. I have never used the GG glass pads but from the photos I have looked at they seem closer to the CarPro design.
Sent from my LG-VM701 using AG Online
I tried polishing my windshield with the CP pads and Ceriglass yesterday and unfortunately my results were far from good.
I worked a small section, maybe 10-12 square inches for about 5-10 minutes keeping it wet with water/ONR and putting a pretty good amount of pressure, at first after I was done wiping which is a PIA getting it all off the windshield it looked like it had done something and corrected it because I could not really see the scratches. After wiping it more though the scratches were still there and it made no difference in my really light wiper scratches. These wiper scratches are hard to see, you have to catch them in the right angle of the garage lights to even see them. Using a 50/50 with tape I could see no difference .
.
Mostly out of a anger I found a small area with the scratch, put more polish on it and worked maybe a 4-6 in section for 10 min pressing really hard and constantly wetting it(easier said then done). After finishing and wiping and wiping it may have took 15-30% of the scratches out but most were still there. That is way too much work and time for such little results. The only way I was able to make the slightest dent in the wiper scratches was to just concentrate very hard on one very little area for a while and it still did not get rid of that much. I was pressing so hard the rayon fibers from the pad were coming off all over the windshield/hood.
I am debating if I should even try the rest of the windshield as it is going to take forever hitting those small little sections at a time to get any kind of small result, I don't know how I could do the center windshield with having to press so hard for so long on little spots and spraying it constantly with water.
When I read someone comment that you work and work an area with no results and then suddenly they just disappear that sent up some red flags that this may not work very well, unfortunately it turned out to be true.
There is no way I could even do 10-12 foot sections at a time like I do when I polish paint and get any results, it has to be a really small spot and put a ton of work into it just to get a small result. I am not sure why my results are so poor because the scratches are so light and not even very visible at certain angles/lighting. I am not sure what else I could do to get better results.
I worked a small section, maybe 10-12 square inches for about 5-10 minutes keeping it wet with water/ONR and putting a pretty good amount of pressure, at first after I was done wiping which is a PIA getting it all off the windshield it looked like it had done something and corrected it because I could not really see the scratches. After wiping it more though the scratches were still there and it made no difference in my really light wiper scratches. These wiper scratches are hard to see, you have to catch them in the right angle of the garage lights to even see them. Using a 50/50 with tape I could see no difference
. Mostly out of a anger I found a small area with the scratch, put more polish on it and worked maybe a 4-6 in section for 10 min pressing really hard and constantly wetting it(easier said then done). After finishing and wiping and wiping it may have took 15-30% of the scratches out but most were still there. That is way too much work and time for such little results. The only way I was able to make the slightest dent in the wiper scratches was to just concentrate very hard on one very little area for a while and it still did not get rid of that much. I was pressing so hard the rayon fibers from the pad were coming off all over the windshield/hood.
I am debating if I should even try the rest of the windshield as it is going to take forever hitting those small little sections at a time to get any kind of small result, I don't know how I could do the center windshield with having to press so hard for so long on little spots and spraying it constantly with water.
When I read someone comment that you work and work an area with no results and then suddenly they just disappear that sent up some red flags that this may not work very well, unfortunately it turned out to be true.
There is no way I could even do 10-12 foot sections at a time like I do when I polish paint and get any results, it has to be a really small spot and put a ton of work into it just to get a small result. I am not sure why my results are so poor because the scratches are so light and not even very visible at certain angles/lighting. I am not sure what else I could do to get better results.
AutowerxDetailing
New member
- Apr 10, 2012
- 2,791
- 0
- Thread starter
- #40
I am debating if I should even try the rest of the windshield as it is going to take forever hitting those small little sections at a time to get any kind of small result, I don't know how I could do the center windshield with having to press so hard for so long on little spots and spraying it constantly with water.
When I read someone comment that you work and work an area with no results and then suddenly they just disappear that sent up some red flags that this may not work very well, unfortunately it turned out to be true.
There is no way I could even do 10-12 foot sections at a time like I do when I polish paint and get any results, it has to be a really small spot and put a ton of work into it just to get a small result. I am not sure why my results are so poor because the scratches are so light and not even very visible at certain angles/lighting. I am not sure what else I could do to get better results.
I'm sorry to hear that the windshield scratches are giving you trouble! One thing I will say that I believe I mentioned in the guide is that it is going to take a VERY long time to remove glass defects. Much longer than correcting paint. I spent somewhere around 2 or 3 hours just on the windshield and that was with a rotary. My glass was particularly jacked up though. Even so, I can imagine it taking at least 3 hours of straight polishing on a windshield with a DA style tool.
It is true that you can work and work and work on a small section to see very little improvement and then all of a sudden the scratches will vanish. I believe this is because (under the right lighting) scratches in glass are very easy to see. Regardless of how deep they are you will be able to see them easily until you have completely leveled the glass around them. Once the surface has been polished perfectly flat they will vanish right before your eyes.
The center of the windshield SUCKS to work on. That's where I put my tape line in my original guide... I know how bad it sucks. My best advice is don't give up. Use a small bottle for water that you can hold while holding the polisher at the same time. This way you won't have to stop the polisher to apply more water when reactivating the CeriGlass. That alone should shave about 10% off the total time spent.
Best of luck my friend!!! :buffing: