Re: How To: Detail Your Engine Like a Professional
Originally Posted by flyinion
Second, for some reason I envision the alternator as being directly connected to the battery, so this isn't the case and foil on it won't give you a big jolt?
Originally Posted by crash93ssei
I will say though that I wouldn't really recommend foil to cover the alternator. There is a stud on the back side of an alternator that a positive wire bolts to and is directly connected to the positive side of the battery so it is always energized, even with the key out of the ignition, unless the battery itself is disconnected or removed.
This stud does have a black rubber boot in it to protect it from being shorted out and should be perfectly fine on newer cars, but I have seen many older cars that this boot has deteriorated to the point of falling off or the stud poking through it and even people just removing it all together when they replace an alternator as they think it is just a stupid extra part.
I think that if you want to cover the alternator up then you should use plastic wrap or a shopping bag just to be safe.
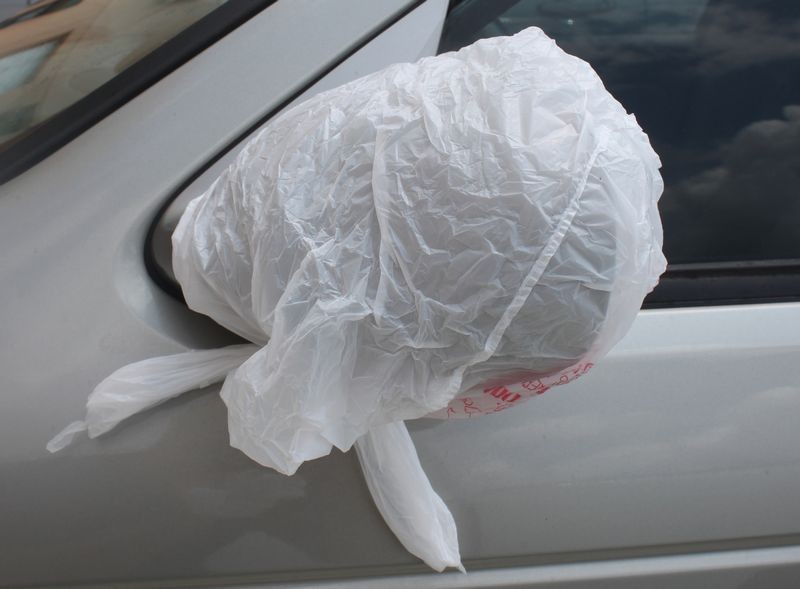
The shopping bag is a good tip and a great way to get more use out of all the plastic shopping bags that tend to accumulate over time.
I also use these to cover up side mirrors so you don't fill the inside of the mirror housing up with water that will then drip the rest of the time you're detailing the car. Simply cover the mirror housing before washing and then use a spray detailer to actually clean the exterior of the housing and a glass cleaner on the mirror.
The idea or practice behind using plastic wrap and tinfoil is you always FIRST cover the component with the plastic wrap, that's the "waterproofing" portion of protecting components.
After wrapping anything you want to protect with plastic wrap then you can use tape and/or tinfoil around the plastic to help secure the plastic in place.
I've never just used tinfoil and don't teach this in any of my classes, it's always plastic wrap first and then tape or tape and tinfoil over the plastic.
And you're right about older cars, if they did have the protective rubber cap over the stud and wire on the back they are often missing or punctured and this would cause a short problem to put a conductive tin foil cover over the alternator by itself.
Another tip...
Don't disconnect the battery in a customer's car without first getting permission as you risk losing anything saved in any type of memory device, for example station pre-sets in the stereo at a minimum.
When in doubt about any car engine and what should be protected, check out this article,
Re: How To: Detail Your Engine Like a Professional
Originally Posted by Mike.Phillips@Autogeek
The shopping bag is a good tip and a great way to get more use out of all the plastic shopping bags that tend to accumulate over time.
I also use these to cover up side mirrors so you don't fill the inside of the mirror housing up with water that will then drip the rest of the time you're detailing the car. Simply cover the mirror housing before washing and then use a spray detailer to actually clean the exterior of the housing and a glass cleaner on the mirror.
The idea or practice behind using plastic wrap and tinfoil is you always FIRST cover the component with the plastic wrap, that's the "waterproofing" portion of protecting components.
After wrapping anything you want to protect with plastic wrap then you can use tape and/or tinfoil around the plastic to help secure the plastic in place.
I've never just used tinfoil and don't teach this in any of my classes, it's always plastic wrap first and then tape or tape and tinfoil over the plastic.
And you're right about older cars, if they did have the protective rubber cap over the stud and wire on the back they are often missing or punctured and this would cause a short problem to put a conductive tin foil cover over the alternator by itself.
Another tip...
Don't disconnect the battery in a customer's car without first getting permission as you risk losing anything saved in any type of memory device, for example station pre-sets in the stereo at a minimum.
When in doubt about any car engine and what should be protected, check out this article,
Re: How To: Detail Your Engine Like a Professional
Originally Posted by shoeless89
Great work Nick!
Gracias!
Since I had plenty of Detailer's Engine Degreaser and Detailer's Trim Detailer left over, Jason went ahead and detailed the engine in his Toyota Tundra last Saturday.
Re: How To: Detail Your Engine Like a Professional
Thanks to Nick's article, I detailed my first engine today!
I purchased the Detailers Pro Engine Degreaser (item#DP-600), Lake Country detailing sticks (item# LC-89-099) and the Daytona Speed Master Wheel Brush Jr (item#DSM-2000). I highly agree that these three items work well for this task.
This vehicle is 8 years old and has only had the engine rinsed a time or two in 8 years so it was really grungy! The engine degreaser worked well on engine parts and underside of hood and cowl painel painted areas. The only two brushes I used were the speed master jr brush and the detail sticks. I did have an old wash rag to also rub certain areas as well. This took me 3-3.5 hours from start to finish on a really dirty full size truck engine. Aerospace 303 protectant was used to finish coat plastic and hoses. This gives a clean non shiny look. It took about half of a 32 oz. bottle of engine degreaser for me to accomplish this on a really dirty engine. I hope to do this again in October and this should go much easier this next time.
Thanks again Nick, Mike and all others who contributed to this thread!
Re: How To: Detail Your Engine Like a Professional
Originally Posted by silvermesa
Thanks to Nick's article, I detailed my first engine today!
I purchased the Detailers Pro Engine Degreaser (item#DP-600), Lake Country detailing sticks (item# LC-89-099) and the Daytona Speed Master Wheel Brush Jr (item#DSM-2000). I highly agree that these three items work well for this task.
This vehicle is 8 years old and has only had the engine rinsed a time or two in 8 years so it was really grungy! The engine degreaser worked well on engine parts and underside of hood and cowl painel painted areas. The only two brushes I used were the speed master jr brush and the detail sticks. I did have an old wash rag to also rub certain areas as well. This took me 3-3.5 hours from start to finish on a really dirty full size truck engine. Aerospace 303 protectant was used to finish coat plastic and hoses. This gives a clean non shiny look. It took about half of a 32 oz. bottle of engine degreaser for me to accomplish this on a really dirty engine. I hope to do this again in October and this should go much easier this next time.
Thanks again Nick, Mike and all others who contributed to this thread!
Looks great!
Originally Posted by Coakley Carwash
How much do all those products cost?
In my original post you'll find a clickable link to each product in the Autogeek store.
Re: How To: Detail Your Engine Like a Professional
I do most if not all of the preventive steps in this write up when I detail an engine but I use different products such as APC (switching to OPC) and a different brand dressing.
I also use a power washer hose nozzle that is about 2 feet long to get down into the bay.
My question is it is a good idea to have the engine running when using the hose to rinse? I have noticed that local car washes will pressure wash the engine before going thorugh the tunnel with the engine running.
What I like to do is hose, then start the engine immediately and use a leaf blower to dry while engine is running.


 Thanks:
  Likes:
  Dislikes:
 Originally Posted by flyinion
 The shopping bag is a good tip and a great way to get more use out of all the plastic shopping bags that tend to accumulate over time.


 Reply With Quote


Bookmarks