Re: The Definitive How-To Article for Removing Swirls, Scratches and Water Spots Using a Porter Cable 7424XP, G110v2 or Griot's Garage Polisher
Originally Posted by Buggy Bath
Mike, would you mind posting pictures of the product that goes with the level of correction needed?
We carry a lot of paint correction products, my style is to be very detailed and in-depth, meaning that could take a while.
Originally Posted by Buggy Bath
Meaning, I know what swirls are and I always start off with the least aggressive product first but a 'trained eye' would be able to tell that swirl remover might not work.
If I come across a car that has been wetsanded and that's it, I already know I need more than an ultra fine cut polish.
Originally Posted by Buggy Bath
I get frustrated when I start with a swirl remover and do several section passes and there are still imperfections. I am using a Flex dual action polisher with Smart Pads. Maybe there is problem with my technique but I think if my eyes were trained I would have just gone with a more aggressive product first. I just get concerned about adding more work for myself by having to buff out the marks made from aggressive product.
What I have always done and still do today is a Test Spot, that is a test out pad and product combinations until I find the right combination that gets the job done and then buff out the rest of the car.
If you follow this procedure you should rarely ever buff out an entire car only to find out you're not getting the results you were trying for.
Re: The Definitive How-To Article for Removing Swirls, Scratches and Water Spots Using a Porter Cable 7424XP, G110v2 or Griot's Garage Polisher
Originally Posted by Mike.Phillips@Autogeek
We carry a lot of paint correction products, my style is to be very detailed and in-depth, meaning that could take a while.
If I come across a car that has been wetsanded and that's it, I already know I need more than an ultra fine cut polish.
What I have always done and still do today is a Test Spot, that is a test out pad and product combinations until I find the right combination that gets the job done and then buff out the rest of the car.
If you follow this procedure you should rarely ever buff out an entire car only to find out you're not getting the results you were trying for.
Okay. I also have a question about knowing when I am actually done buffing something. Should it be completely smooth with no imperfections? Or do I use a filler or something to hide them?
Re: The Definitive How-To Article for Removing Swirls, Scratches and Water Spots Using a Porter Cable 7424XP, G110v2 or Griot's Garage Polisher
Originally Posted by Buggy Bath
Okay. I also have a question about knowing when I am actually done buffing something. Should it be completely smooth with no imperfections? Or do I use a filler or something to hide them?
Thanks
You know that's actually a really good question and the answer depends upon what your goal is?
100% Perfection
If you're aiming for 100% perfection or very close to it, then you need to thoroughly inspect each section you buff after the first correction step and make sure all the defects you want to remove and feel comfortable removing have been removed.
If there are still defects in that section then you need to re-buff that section till you're satisfied with the condition of the paint at this time.
It's okay if there's still haze from the buffing process, but ANY "below surface defects" that you don't want to see after you make your final wipe still remain then you need to continue buffing till they are fully removed during this first correction step.
If you don't remove them during the first correction step then they will still be there after the final wipe.
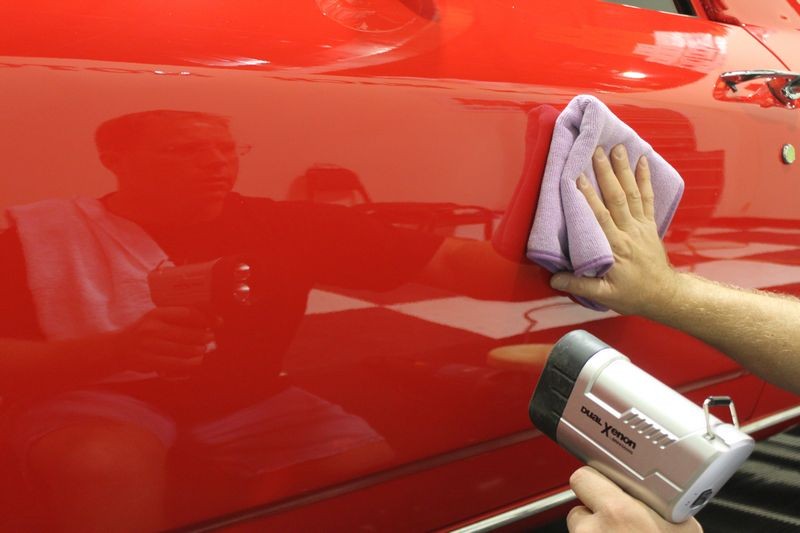
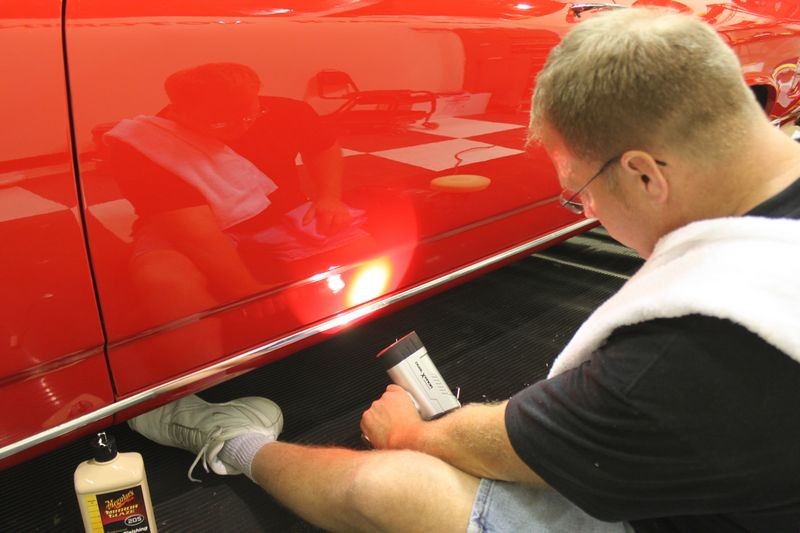
The way to inspect is like you see me doing here in this article, this is how I normally inspect after wetsanding paint and then after the first compounding step. The sanding marks must be removed after the compounding step because the polishing step are only going to restore gloss and clarity. Polishing will remove some of any defects left after compounding of course, but the major portion of any below surface defects must be removed after what I call "The Major Correction Step" in my first how-to book.
Checking my work each step of the way by wiping with Mineral Spirits and using the Brinkmann Swirl Finder Light to insure no sanding marks were missed and no swirls were left behind.
For really low panels, if you hold the light down low and at just the right angle it will shine just right to show the "surface" condition of the paint, this is the area you want to be looking at when inspecting. The part of the light I'm using in these shots is the small lit up area that's is the reflection of the bulb in the paint, not the large blown out area lit up by the light.
Note: You never chemically strip fresh paint using products like IPA or MS. The paint on this El Camino was a custom paint job but when I sanded and buffed it, it was already a few years old, i.e. no longer "fresh" paint as in 30 days or less old.
90% Defect Removal
If you're aiming to remove the majority of the shallow swirls, scratches and other below surface defects but not the deeper RIDS or random, isolated deeper scratches, then you should be accomplishing this using the system you dial-in during the correction step of your Test Spot. After doing the correction and/or the correction and polishing step of your Test Spot, inspect thoroughly that section of paint.
If you're happy with the results from your Test Spot, then theoretically, if you repeat or duplicate the process you didn in your test spot to the rest of the car then you should produce the same results.
For this type of buffing I normally don't inspect each panel after I buff it it I assume and trust in my skills to be doing good work.
Great question, I think I'll turn this question and the answers into an article so this information isn't buried on 5 of this thread where fewer people will find it.
Re: The Definitive How-To Article for Removing Swirls, Scratches and Water Spots Using a Porter Cable 7424XP, G110v2 or Griot's Garage Polisher
Originally Posted by BobbyG
Mike,
Another superb informative thread that everyone should bookmark for future reference...
Thank you Bobby, that means a lot to me coming from you.
The time stamp on this article is, 08-18-2009, 11:49 AM and I officially went to work for Autogeek on Monday, August 10th, 2009 and this was the first major article I wrote.
(I arrived on Friday August 7th and came into the office to meet everyone and get situated but didn't start working till Monday, here's my first post from my office at Autogeek)
I think it's around 8000 words long and at that time the most detailed article on using a DA Polisher I had ever written.
Yancy took all the photos for this article as I was the "new guy". After this article I went back to taking all my own pictures for my articles like I did previously on MOL.
If you look at a majority of the pictures they are all 450 pixels wide and have a border around them, that's Yancy's style, or it was back then.
My style is 800 pixels wide and I don't bother with a border.
But again, thank you Bobby, I appreciate the compliment and I think the majority of the information presented in this article is still accurate today.
I know I copy and paste a lot of the text into replies I post every week and in articles and even videos I make today.
Re: The Definitive How-To Article for Removing Swirls, Scratches and Water Spots Using a Porter Cable 7424XP, G110v2 or Griot's Garage Polisher
Originally Posted by Buggy Bath
Okay. I also have a question about knowing when I am actually done buffing something. Should it be completely smooth with no imperfections? Or do I use a filler or something to hide them?
Thanks
Hey Mitchell!
You're now part of a article that will probably be around for decades...
Re: The Definitive How-To Article for Removing Swirls, Scratches and Water Spots Using a Porter Cable 7424XP, G110v2 or Griot's Garage Polisher
WOww
that is very good tread. I like it and thumbs up for those who started it. You explained very well guy that how to remove the strains and scratches from the body of car without any trouble. I really appreciate your work.
Re: The Definitive How-To Article for Removing Swirls, Scratches and Water Spots Using a Porter Cable 7424XP, G110v2 or Griot's Garage Polisher
Originally Posted by Albert1
WOww
that is very good tread. I like it and thumbs up for those who started it. You explained very well guy that how to remove the strains and scratches from the body of car without any trouble. I really appreciate your work.
Thank you Albert.
This is one of the longest, most in-depth articles I have ever written on this topic. Like I told a co-worker this morning, it's hard to teach people how to buff out a car using a keyboard but with carefully chosen word the goal can be reached if people will simply read the article instead of scanning it.
Just to note, if you find any other article on this topic, my guess is it will basically regurgitate what has been written here as this was and is the first article ever written on the topic of how to use a DA Polisher. It's actually a re-write of the article I originally wrote while I worked for Meguiar's.
The principals and techniques shared are just as accurate today as when I first wrote this article and I share all of these in all my classes, both formal and informal.
Excellent thread! Thanks Mike for sharing your wealth of knowledge in such detail that is easy to understand.
I have a question relating to the test spot. When starting out and doing the test spot, is it done all the way from compounding, polishing to sealing and waxing before moving on to the rest of the car? Is is safe to say only do the compounding and polishing on the test spot, then transfer the method to the entire car then follow up by a sealant or wax on the entire car last?
Re: The Definitive How-To Article for Removing Swirls, Scratches and Water Spots Using a Porter Cable 7424XP, G110v2 or Griot's Garage Polisher
Originally Posted by UDP
Excellent thread! Thanks Mike for sharing your wealth of knowledge in such detail that is easy to understand.
I have a question relating to the test spot. When starting out and doing the test spot, is it done all the way from compounding, polishing to sealing and waxing before moving on to the rest of the car? Is is safe to say only do the compounding and polishing on the test spot, then transfer the method to the entire car then follow up by a sealant or wax on the entire car last?
I'm not Mike, but maybe I can help a tiny bit.
I may be completely wrong, but to me a 'test spot' is for the compounding step. Once you get rid of the scratches, etc, the polishing stages are more or less automatic.


 Thanks:
  Likes:
  Dislikes:
 Originally Posted by Buggy Bath


 Reply With Quote


Bookmarks