 Dislikes: 0
-
What it looks like when you buff through the clearcoat - Burn Through - Strike Through - Mike Phillips
What it looks like when you buff through the clearcoat - Burn Through - Strike Through - Mike Phillips
Recently, we held a ceramic coating class and upon our walk-around inspection, one of the cars, a custom streetrod, we discovered an area on the top half of the driver's door where the previous owner, or the previous detailer, buffed through the clearcoat and exposed the basecoat.
Here's the car - a 1949 Mercury Convertible

And here's the area where the someone buffed through the clearcoat and exposed the basecoat.
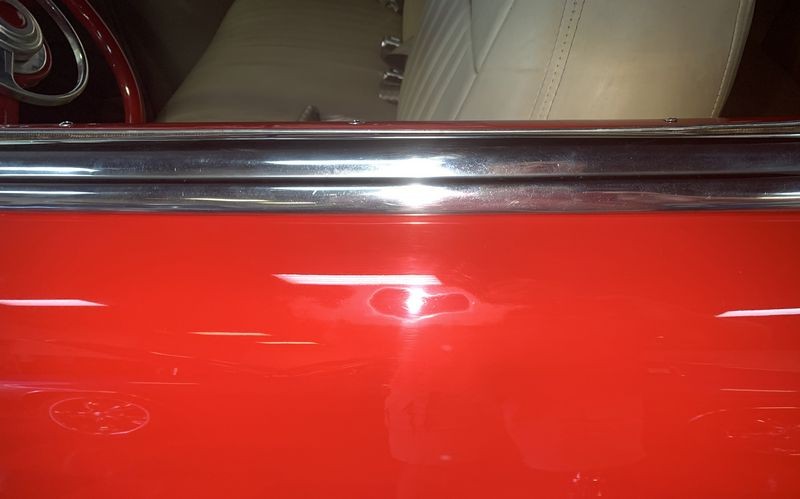
The darker center section is the BASECOAT. The perimeter you see is the edge of the clearcoat. The faded looking area beyond the perimeter is VERY THIN clearcoat. If a person were to buff on this area some more - the circular area you see and the perimeter line you see - will grow and grow as you buff away more of the clear layer of paint and expose more of the basecoat. If you buff too much of the basecoat off the panel you will expose the primer coat. If you buff away too much of the primer coat you'll see shiny metal or whatever the substrate the car body panel is made from..

In detailing lingo - this is referred to by different names but they all mean the same thing and that is someone buffed for too long and removed all the clearcoat in an area and has exposed the basecoat also called color coat.
- Buff-through
- Burn-through
- Strike-through
I'm pretty confident the term strike-through is the commonly used term in Europe.
Here in America, we tend to use the term burn-though. I'm not a fan of the term burn-through because it's most commonly used to describe buffing through the top layer of paint via the use of a rotary buffer. But in reality, a person can burn-through or buff-through the top layer of paint using any tool and even by hand. Use whatever term you like as as long as it works for you and your audience.
The bad news
If you're new to the car detailing world, here's the bad news, this type of paint defect cannot be fixed without re-painting the affected area or the entire panel.
Best option - Re-spray the entire panel
The best option for repair is to have the entire panel re-painted. By the word panel, I mean the entire hood, or the entire door, or the entire fender, etc. When the entire panel is repainted, the painter is able to spray new paint from edge-to-edge, i.e., re-spray the entire panel.
Less costly option - Spot repair or blending paint
A less costly repair is to for a painter to only re-spray a portion of the panel. This means they will spray the primer and the basecoat to the affected area and then spray a little further out onto the original paint. After the color coat or basecoat has been sprayed, next they will spray the clearcoat over the affected area and spray a little past the end of the basecoat they sprayed. Sort of a stepped application of the three different types of paint. When done correctly it cost less money then repainting the entire panel. But, this leaves what is called a blend line. A blend line is the line you can see where the new clearcoat layer of paint ends on the original paint. You have to look close to see it and without the right light and without being at the right angle it can be very difficult to see.
The BIG PICTURE
Anytime you're working on your own car or a customer's car, trying to remove any type of below surface paint defect, you need to know when to stop buffing. A Paint Thickness Gauge can be helpful but in most cases you're going to need to rely on experience and your gut instinct.
Me? When I'm trying to remove a deeper defect like an isolated scratch, water spots, sanding marks, gouges, etc. My normal practice is to,
First, evaluate the car. Is this a daily driver with the factory clear coat? Or is this a custom car with a custom paint job? (usually thicker paint)
Second, evaluate the customer. If it's a daily driver, do they understand the factory clearcoat is thinner than a Post-it Note? If not, can I educate them on this fact? If the car is a Special Interest Vehicle, for example a body-off, rotisserie restoration or resto-rod 1969 Chevelle with a custom paint job? If it is, does the owner have confidence the painter sprayed plenty of paint on the car?
I take the above factors into consideration. In most cases, if the car is in fact a daily driver with the factor clearcoat intact, then I'll dial-in my Test Spot and once I'm satisfied with the results and the process, I'll duplicate this process over the rest of the car. Whatever defects buff out from the process is what I normally call good or good enough. I educate the owner about paint and explain to them they are better off to learn to live with a few deeper defects and have the paint on the car hold-up over time and hold-up to match the mechanical service life of the car versus having me remove more and more clearcoat paint in an effort to make the paint on a daily driver, (a car that is going to see more swirls and scratches into the future), only to have the clearcoat fail sooner than later. This will mean the car has to be repainted and if it's a daily driver, the cost of repainting a used car is usually higher than most people want to pay. The better choice would have been to use common sense and learn to live with a few deeper defects here and there but overall, have a great looking car/great looking paint job.
For custom paint jobs, I'll get more information from the owner and in most cases, buff a little more to remove the deeper defects WHILE educating the owner that after I'm finished, they need to be super careful moving forward and stop doing the things they are doing that are putting the deeper scratches/defects into the paint. There's only so much a professional detailer can do before they buff-through the clearcoat and expose the basecoat.
I'd will always error on the side of caution versus buying someone else a new paint job.
Hope this helps explain buff-through, burn-through and strike-through.

-
Post Thanks / Like - 1 Thanks, 6 Likes, 0 Dislikes
 Diner
Diner thanked for this post
Similar Threads
-
By Mike Phillips in forum Ask your detailing questions!
Replies: 16
Last Post: 07-28-2022, 08:15 AM
-
By Mike Phillips in forum Product Reviews by Mike Phillips
Replies: 24
Last Post: 01-27-2022, 04:01 PM
-
By kdubski in forum Auto Detailing 101
Replies: 13
Last Post: 12-01-2017, 05:22 AM
-
By Mike Phillips in forum Ask your detailing questions!
Replies: 15
Last Post: 09-12-2013, 06:15 AM
 Members who have read this thread: 1
Posting Permissions
- You may not post new threads
- You may not post replies
- You may not post attachments
- You may not edit your posts
-
Forum Rules
|
| S |
M |
T |
W |
T |
F |
S |
| 28 | 29 | 30 |
1
|
2
|
3
|
4
|
|
5
|
6
|
7
|
8
|
9
|
10
|
11
|
|
12
|
13
|
14
|
15
|
16
|
17
|
18
|
|
19
|
20
|
21
|
22
|
23
|
24
|
25
|
|
26
|
27
|
28
|
29
|
30
|
31
| 1 |
|


 Likes:


 Reply With Quote
Bookmarks