 Dislikes: 0
-
Junior Member

Re: Help! My first detail project, and its a 26ft boat!
That totally makes sense. Based on how I am going to use it, the G9 makes more sense for me. Right now I don't need to do any heavy correction. I still do have my Makita rotary, so there is that should I ever need it. And you already showed me how to use that (on my GTO). I have a new Scat Pack now (Destroyer Grey) and the G9 will be more than enough to handle the few RIDS that it has.
RamAirV1
-
Post Thanks / Like - 0 Thanks, 1 Likes, 0 Dislikes
-
Re: Help! My first detail project, and its a 26ft boat!
Mike, Aaryn... Thanks again!
My amazing wife has gone through all the pros and cons of the Makita vs Flex and she acutally WANTS me to get the Flex!! Looks like I will be learning the ways of the beast! Thank you both for your input, it has been invaluable helping me navigate the the minefield of options that a novice faces. I only have a one question before I start gathering bits and pieces for my detailing project.
I have found the new Rupes wool pads that you shared with the blue fibers. I have a rotary tool I can borrow, however not for another two weeks due to the COVID lockdown in NZ and restrictions on inter-provincial travel. Mike, I found your article "MEGA pad selection for the FLEX 3401 - From Wool pads to Foam pad and even ABRALON SANDING DISCS" where it looks like you put a wool pad on the Flex. I like the comment that it will "turn and burn anything". Will the Flex spin the blue/white Rupes wool pad effectively enough to cut gel, or should I look for a cheap rotary in the mean time?
Thanks again, and I look forward to sharing some images and feedback on my progress!!
Kind regards
Dan
-
Post Thanks / Like - 1 Thanks, 1 Likes, 0 Dislikes
-
Super Member

-
Re: Help! My first detail project, and its a 26ft boat!
Wow Aaryn thank you, that is very kind! I will send you a PM
Thanks for info on the flex/wool pad combo... TIME is one thing we all seem to have a little more of at the moment! I have to say there is a little bit of "new project" excitement building over this, or maybe it's just that I get to go shopping for a new power tools?!
In terms of kits, that's a good question. I will probably focus on what I need for the job and not push my luck haha!
Cheers
Dan
-
Re: Help! My first detail project, and its a 26ft boat!
Made it out of the house with the credit card today, though I would post a picture of the damage...
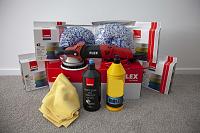
Tools and pads as follows; Flex 3401, 2 Rupes rotary wool pads (will try these on the Flex), 6 Rupes coarse blue pads, 2 Rupes ultrafine pads (to polish the isinglass on the boat), some Rupes Zephir Gloss Coarse, and some UV wax (label blanked to respect the forum rules).
I would like to say a HUGE THANK YOU to Aaryn NZ who has gone out of his way to help me locally here in New Zealand. He has even sent me a sample of the product he uses in his detail shop to try, along with making calls to track down a Flex on my behalf. Awesome stuff!
Thank you to Mike Phillips as well for all the product testing and suggestions! This has, without question, cut down on the pain I would have endured trying to figure all this out on my own!
Give me a few days to figure out how all this stuff works and I will be back with an update, and hopefully something others might one day find of use!
-
Re: Help! My first detail project, and its a 26ft boat!
[QUOTE=Dan NZ;1673727]
Made it out of the house with the credit card today, though I would post a picture of the damage...
Tools and pads as follows; Flex 3401, 2 Rupes rotary wool pads (will try these on the Flex),
Here's the deal, any traditional wool pad will work on the BEAST - BUT - unlike a rotary polisher that spins in a circle, due to the 8mm oscillation action - you won't be able to get as close to an edge like a rub rail as you could a rotary. So just be aware of this when your sanding.
What I practice and what I teach in my wet sanding classes is,
DON'T sand where you cannot buff
Otherwise- you'll be trying to work your sanding marks out by HAND.
Also - I don't know why, it could just be my fault from PUSHING the BEAST too hard when buffing with wool pads - but when I use these types of pads on the BEAST it seems to generate a LOT of heat at the backing of the pad and this can lead to de-lamination of the adhesive between the velcro on the back of the pad and the pad liner. So don't full mad man when using the FLEX for compounding out sanding marks.
If it were me - I would stick with a rotary buffer to remove sanding marks and use the BEAST to remove holograms and polish to a clear, high gloss. This is a great combo.
 Originally Posted by Dan NZ

6 Rupes coarse blue pads, 2 Rupes ultrafine pads (to polish the isinglass on the boat), some Rupes Zephir Gloss Coarse, and some UV wax (label blanked to respect the forum rules).
Sounds good. And remember - before going full comando on your boat - START WITH A TEST SPOT.
Test the PROCESS you think, hope, dream and pray will work on the boat to one small area all the way through from start to finish and then inspect the results. If you cannot make one small area look good you won't be able to make the entire boat look good.
The good news is - if you can make one small area look GREAT - you can make the entire boat look great. Sometimes you get close and all you need to do is tweak your technique.
Originally Posted by Dan NZ
I would like to say a HUGE THANK YOU to Aaryn NZ who has gone out of his way to help me locally here in New Zealand. He has even sent me a sample of the product he uses in his detail shop to try, along with making calls to track down a Flex on my behalf. Awesome stuff!
I told you so - he's a great guy and a great resource.
Originally Posted by Dan NZ
Thank you to Mike Phillips as well for all the product testing and suggestions! This has, without question, cut down on the pain I would have endured trying to figure all this out on my own!
Ah shucks.... I just do what I always do - help the world removes swirls one car at a time and in your case, one boat at a time.
Originally Posted by Dan NZ
Give me a few days to figure out how all this stuff works and I will be back with an update, and hopefully something others might one day find of use!
I'm already looking forward to you next post.

-
Post Thanks / Like - 0 Thanks, 1 Likes, 0 Dislikes
-
Re: Help! My first detail project, and its a 26ft boat!
Just a very quick update!
The weather is turning and it may be a week before I can start the polishing of my boat, however I am impatient so I had to power up the flex for a quick go! Cant get a new power tool and not at least turn it on?!
I don't have a rotary yet, so this is the result of the Rupes Zehpir and the Rupes coarse blue pad directly on the oxidized gel, plus some wax.
I guess white/light coloured gel doesn't reflect like the darker gels, however I am very happy the result!
Grady Whites are not white at all, but a slightly cream/tan colour, and the photo doesn't do the restoration of colour justice! It is like night and day in person.
I am sure I will get better results soon as my feel for the tool and pad develops, plus tool control. This was on speed 3 with the tool rested (not pressed hard) against the boat...
I think I can go faster and use more pressure but baby steps first! Also looking forward to another attempt with a rotary and wool pad.
Cheers for now!

-
Post Thanks / Like - 1 Thanks, 2 Likes, 0 Dislikes
-
Re: Help! My first detail project, and its a 26ft boat!
Looks good Dan!

Like I tell people, gel-coats DON'T like soft mushy pads for polishing. They like a hard, sharp foam pad and I have not found a pad that works better than the RUPES coarse blue foam pads for the POLISHING step.
This is why I always teach these pads in my boat detailing classes. You can get "show car results" in the finish on a boat.
Also - might go against the average person's thinking - but when polishing gel coat, (after correction), spin those RUPES pads on the highest speed setting and on your last few passes - REDUCE pressure - DON'T maintain pressure.
Polishing anything is an art form.
And getting GREAT results ALWAYS starts with GREAT abrasive technology. So many guys think it's all about THEIR technique. That thinking is EGO-DRIVEN. Sorry to disappoint whole lot of Alpha Male detailers but YOU are NOT touching the surface - the abrasives are.
Abrasive Technology - THE most important factor when it comes to polishing paint
But according to my own poll.... I'm wrong....
POLL - What's the number one most important factor when it comes to polishing paint?
Thanks for sharing!

-
Post Thanks / Like - 0 Thanks, 1 Likes, 0 Dislikes
-
 Re: Help! My first detail project, and its a 26ft boat! Re: Help! My first detail project, and its a 26ft boat!
Thanks Mike!
And getting GREAT results ALWAYS starts with GREAT abrasive technology. So many guys think it's all about THEIR technique. That thinking is EGO-DRIVEN. Sorry to disappoint whole lot of Alpha Male detailers but YOU are NOT touching the surface - the abrasives are.
If you ever need proof of this (and I know you don't), then all I can say is look at me. I have almost zero technique having only logged only about 3 hours on the buffer, however the results I have obtained by following the formula have exceeded what I thought possible. With improvement in technique I am sure my results will improve as I put the abrasives to work more efficiently. I have been lucky to get some time in between passing showers of rain, and thought I would post some more progress. I have done about 1/4 of the boat so far, but my progress will slow as I tackle more complex areas of the boat. I am not a shortcut guy, and I will soon start removing and replacing components and opposed to trying to buff around them. I see another 4 full days work ahead and a LOT MORE learning.
I started polishing the hull sides as these already had a wax shine compared to the chalky topsides, and thought this would be a good place to start as I don't have a rotary. In the picture below I have polished from the left side of the frame up to the red line, the right side is in "original" condition. While both sides look reflective from a distance, an up close image reveals the truth!

This is the polished area

This is the unpolished area which looks shiny from a distance, but dull up close.

Taking a photo at a shallow angle is probably cheating, however I have a very narrow work area in places and this is the gap I squeeze through coming from the garage. When I turned back towards the boat after buffing out an area, this is the view I had from the garage and I WAS BLOWN AWAY with the results that the Rupes pad/polish combo had produced! Total time on the Flex at this stage... About 45 minutes!

Moving to the topsides I thought I would have a go with 2000 wet and the Flex/Rupes Coarse combo. The Zephir Gloss Coarse says it will remove 1500 grit sanding marks. I don't have the lamps/eye for scratches and defects that many of you here will have, but from what I can see the combination had no issue with the 2000 grit. I will concede that there are a couple of areas that will need a second go, but it would be an understatement to say that I am happy with the results. Left frame is polished, right frame is in original condition.
 
Now for a question! This was the condition of the pad after about 2 hours of intermittent polishing (with a couple of dabs of new polish added). I polished one more section with it, then put a new pad on. Have I gone past the point where I should have swapped the pad out? (I have 6 pads).
 
I hear people say that the Rupes Zephir Coarse makes a lot of dust. I didn't notice any dust at first, but once I began to use less compound and more seed (5 on the Flex) I did notice that I created quite a lot of dust. This doesn't bother me, however I wondered if it was a sign that I was starting to use the pad more efficiently? There were a couple of moments where I was finishing a section out and most of the compound had started to 'dust off' leaving more of a shine in the wake of the pad than a trail of wet compound. Is this the sweet spot when finishing a section, or should I be aiming to keep things 'wet' (for lack of a better description)?
Oh, following the advice that Rupe make on cleaning the pads (soak in water until wash time, then machine wash with unscented detergent and 1/4 cup vinegar), all the pads and buffing cloths came out like new! I cannot notice any deterioration in the pads, except for the edges of one were I clipped the fuel vent with the 'ghosting' part of the pad. Do these pads actually ware down, or do they just become dull over time while retaining their volume/shape? How does one determine the service life of such a pad?
Thanks again in advance, and I am already eying up smaller detailing tools for tight nooks and crannies. No one warned this detail thing could become a slippery slope....
Kind regards to all!!
Dan 
-
Post Thanks / Like - 1 Thanks, 1 Likes, 0 Dislikes
-
Super Member
-
Post Thanks / Like - 1 Thanks, 1 Likes, 0 Dislikes
Similar Threads
-
By Mike Phillips in forum Wednesday Night Detailing Classes - Info & Dates
Replies: 14
Last Post: 05-23-2019, 09:53 PM
-
By TTQ B4U in forum Show N' Shine
Replies: 7
Last Post: 02-05-2019, 07:22 AM
-
By Mike Phillips in forum 2-Day BOAT Detailing Classes - Info & Dates
Replies: 7
Last Post: 10-24-2018, 03:39 PM
-
By Compulsive Detail in forum Auto Detailing 101
Replies: 30
Last Post: 04-16-2018, 12:30 PM
-
By Mike Phillips in forum 2-Day BOAT Detailing Classes - Info & Dates
Replies: 10
Last Post: 05-21-2015, 10:00 AM
 Members who have read this thread: 0
There are no members to list at the moment.
Posting Permissions
- You may not post new threads
- You may not post replies
- You may not post attachments
- You may not edit your posts
-
Forum Rules
|
| S |
M |
T |
W |
T |
F |
S |
| 31 |
1
|
2
|
3
|
4
|
5
|
6
|
|
7
|
8
|
9
|
10
|
11
|
12
|
13
|
|
14
|
15
|
16
|
17
|
18
|
19
|
20
|
|
21
|
22
|
23
|
24
|
25
|
26
|
27
|
|
28
|
29
|
30
| 1 | 2 | 3 | 4 |
|


 Thanks:
  Likes:


 Reply With Quote

Bookmarks