 Thanks: 0
 Likes: 0
 Dislikes: 0
-
Super Member

How to Spot Micro Marring on Metallic Paint
What is Micro-Marring?
Micromarring/DA haze is the name given to the fine defects left behind after cutting or compounding. These defects are created because the heavy cutting pad combined with a cutting compound is often not capable of finishing down perfectly, and therefore leaves behind these very fine scratches which appear as 'tick marks' and are referred to as micromarring.
This type of defect is often easy to see on dark paint, especially non-metallic paint. In the following photo you will notice that the right side has not been corrected, and the left side has been improved considerably, however the surface finish is not so great. What you see on the left side is the marring left from the compounding phase. Again, this is very easy to see on this jet black paint.

If you've ever worked on a light colored vehicle, you've probably noticed that it will often appear to be nearly perfect after a heavy compounding step. This can also be the case when working on highly metallic paint (especially lighter colors).
While this is certainly possible that some paints will finish down perfectly after heavy compounding, the truth is that many people simply don't know how to spot marring/haze on lighter colors or on metallic paint as these colors are much more forgiving.
This 50/50 shot shows what appears to be a perfectly finished corrected side after just compounding with a MF cutting pad and a cutting compound. Looks great, right?

So right about now you're thinking "Awesome! Less work for me... Heavy cutting and perfect finishing all in one step"... but maybe we should take a better look with a different light source...
In the following photo you will notice the left side of the section is darker and clearer than the right. The left side has been finished with a fine finishing polish. View the image at full resolution and take a look at the reflection of the window towards the top of the photo, even without the direct lighting from the flashlight, you can tell that the reflection of the window in the background is much more crisp on the side that has been properly finished.

A closer look at the same section shows that while the right side is certainly in great shape after compounding, there is no denying the fact that the left side is more refined.

How to Check for Marring
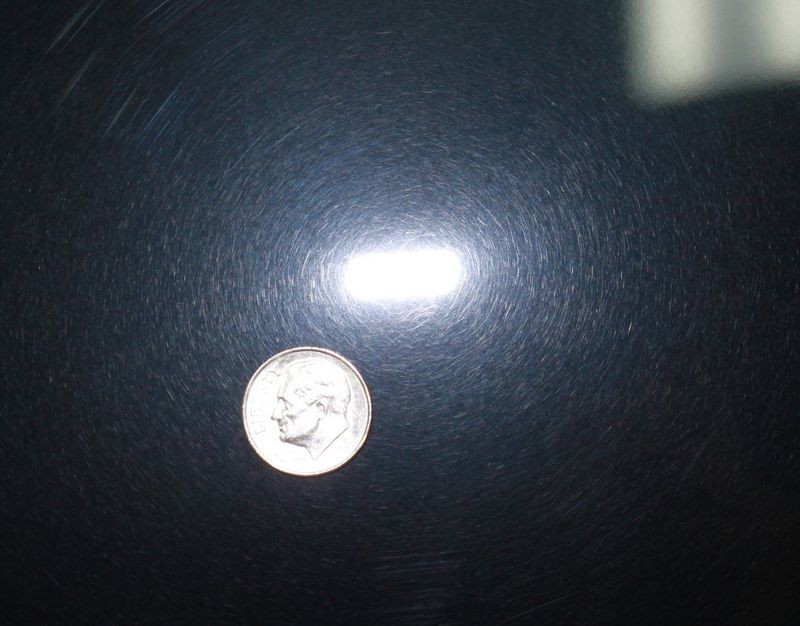
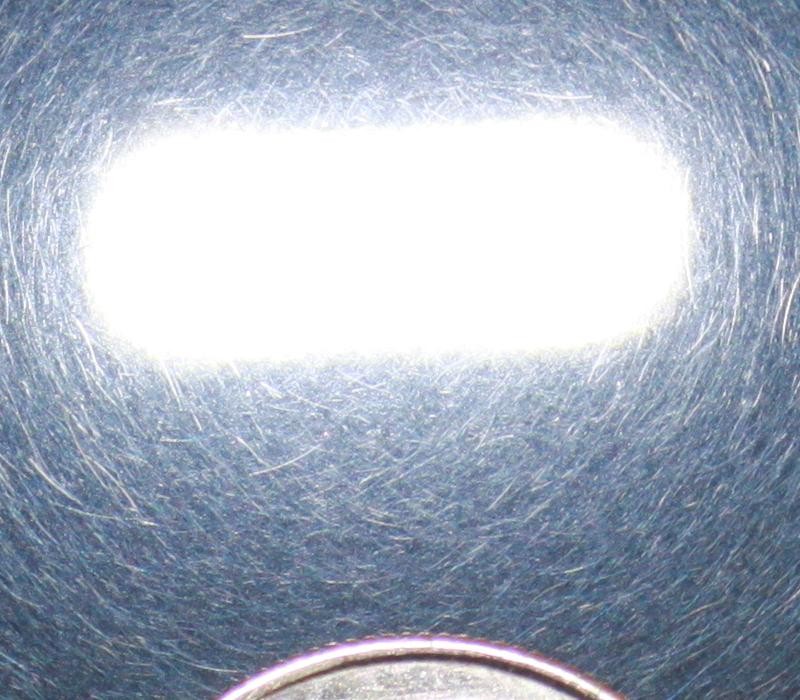
On lighter colors, especially light colored metallic paint, I have found the best way to check for marring is with a small LED flashlight. I use a Coast HP7 simply because it was available locally. This light is a 251 lumen light that is zoomable so you can change between a flood light and a spot light (this feature is important!). It can take a bit of experimenting to find the best conditions to spot marring on paint like this. You can alter the angle of light output (zoom), physical distance of the light to the panel, etc. to find something that works best for each particular scenario.
In the following video, you'll notice there are visible 'streaks' or light trails towards the right of the panel, and they are completely gone as I pan towards the left. These light trails are a dead giveaway that the surface is not finished properly. This particular panel was compounded and then wiped down with Eraser to be 100% sure that I was not just seeing streaks from compound oils, but I was looking at the true condition of the finish. The right side was then polished to remove the marring.
Spotting Micro-Marring on Metallic Paint
It is important to note that the marring was not evident with any other light source that I used for inspection. These include halogen work lights, my DIY LED Lights, and the sun. The reason is that all of these light sources are simply too powerful to highlight such a fine defect on brighter/lighter paints. Most people's eyes simply can't detect it. This is why the smaller LED light seems to work the best (at least for me).
So I suppose the real moral of the story is this... check your work with many different kinds of lights, and it never hurts to do a test spot with a finer polish even if you think the paint looks great after cutting. After all, the time required for a final finishing step is definitely worthwhile when you are seeking a true mirror like finish.

Hope this helps!
-Zach
 Retired Professional Detailer
-
Super Member
Re: How to Spot Micro Marring on Metallic Paint
Forum Moderator: Can someone please embed the youtube video into the post? I cannot get it to work no matter what I try. Thank you.
Retired Professional Detailer
-
Super Member

Re: How to Spot Micro Marring on Metallic Paint
Zach. Awesome write up as always. I'll have to use what you suggested. I own a lovely metallic colored car and have resulted to positioning myself in crazy awkward angles with my Brinkman light.
Back to the full-time grind.
-
Super Member

Re: How to Spot Micro Marring on Metallic Paint
I do like the video. The level of refinement that you are bringing is way above the average guy. Thanks for the inspiration! Now create a dang DIY light rig to show EVERYTHING!! I'm tired of buying lights LOL!
-
Super Member

Re: How to Spot Micro Marring on Metallic Paint
Nice post, Zach! 
When doing my test spots I've had some paints where they even looked good under my LED flashlight, and then when taking a pic with my DSLR and using the same LED flashlight (Fenix), if I zoomed in close using just the camera display, I can occasionally pic up faint marring that was VERY hard to see with the naked eye.
Now to be fair that is getting a little over the top OCD, but it sure helps narrow down which finishing process I want to go with. 
-
Super Member

Re: How to Spot Micro Marring on Metallic Paint
Meanwhile...
Somewhere in a not too far-off Parallel Universe:
http://www.autogeekonline.net/forum/...ick-marks.html
An excerpt:
 Originally Posted by Mike.Phillips@Autogeek

Micro-Marring - Tick-Marks - DA-Haze
These three terms are pretty much the accepted terms for a scratch pattern left in some paints from the oscillating and rotating action from a compound or polish and a buffing pad when applied using a DA Polisher.
Unlike Cobweb swirls or Rotary Buffer Swirls, the scratch pattern instilled by a dual action polisher is made up of millions of tiny scratches, some are curved or circular but some are straight, like a small tick mark you would make with a pencil if you were keeping track of a count of some type.
Tick Marks are a sign that either the paint is on the soft side, so easily scratched or the pad and compound or polish you're using are too aggressive to finish out without leaving a mark.
In most cases Tick Marks can be removed by re-polishing with a different pad and product combination.
Bob
"Be wary of the man who urges an action in which he himself incurs no risk."
~Joaquin de Setanti
-
Junior Member

This definitely applied to me last week when I compounded my wife's BMW 135 with red metallic paint. Thought it looked awesome in garage under normal work lights , but got down close with the LED the next day and saw lots of micro marring. Gonna hit it with WG Finish Glaze and a white pad sometime in the next month.
-
Re: How to Spot Micro Marring on Metallic Paint
Beautiful article Zach. Thaniks for putting it together and sharing.
-
Super Member

Re: How to Spot Micro Marring on Metallic Paint
Thanks Zach! Been doing this for while you will be amazed what you can see with a small less powerful light. I did the black Mustang last week looked great in sun light and Zach's DYI light but when I put my smaller light on the front lip of bumper I needed to go back and hit it again.
-
Super Member
Re: How to Spot Micro Marring on Metallic Paint
Originally Posted by Dr_Pain
Spotting Micro Marring on Metallic Paint - YouTube
I do like the video. The level of refinement that you are bringing is way above the average guy. Thanks for the inspiration! Now create a dang DIY light rig to show EVERYTHING!! I'm tired of buying lights LOL!
Thank you sir. Your LED panel thing may work nicely for this sort of inspection  so maybe you don't need anymore lights. so maybe you don't need anymore lights.
Originally Posted by RaskyR1
Nice post, Zach!
When doing my test spots I've had some paints where they even looked good under my LED flashlight, and then when taking a pic with my DSLR and using the same LED flashlight (Fenix), if I zoomed in close using just the camera display, I can occasionally pic up faint marring that was VERY hard to see with the naked eye.
Now to be fair that is getting a little over the top OCD, but it sure helps narrow down which finishing process I want to go with.
Very good point... I too have often thought I was achieving perfection until I take a pic, then zoom in on it afterwards and notice I have some more work to do although it is completely invisible to the naked eye (this happened last night again, actually)... and yes, this is often "over the top". Usually if it is not apparent in the sun, high powered LED, hand held LED, and brinkmann then I'll call it good (I've contemplated getting a digital microscope...... but even I know that is just getting crazy lol)
Originally Posted by Tacket
This definitely applied to me last week when I compounded my wife's BMW 135 with red metallic paint. Thought it looked awesome in garage under normal work lights , but got down close with the LED the next day and saw lots of micro marring. Gonna hit it with WG Finish Glaze and a white pad sometime in the next month.
Originally Posted by Mike@DedicatedPerfection
Beautiful article Zach. Thaniks for putting it together and sharing.
Sure thing, thanks for reading.
Originally Posted by Pureshine
Thanks Zach! Been doing this for while you will be amazed what you can see with a small less powerful light. I did the black Mustang last week looked great in sun light and Zach's DYI light but when I put my smaller light on the front lip of bumper I needed to go back and hit it again.
Yep... it pays to inspect in as many different light sources as you can! Thanks!
Retired Professional Detailer
Similar Threads
-
By Mike Phillips in forum Live Detailing Classes - How-to Videos
Replies: 7
Last Post: 08-06-2020, 03:32 PM
-
By Osnapman in forum Ask your detailing questions!
Replies: 15
Last Post: 06-28-2020, 04:29 PM
-
By Octaviavrs in forum Auto Detailing 101
Replies: 1
Last Post: 08-29-2017, 12:31 PM
-
By Octaviavrs in forum Ask your detailing questions!
Replies: 4
Last Post: 08-28-2017, 03:37 PM
-
By rsv in forum Auto Detailing 101
Replies: 1
Last Post: 12-13-2009, 04:59 PM
 Members who have read this thread: 0
There are no members to list at the moment.
Posting Permissions
- You may not post new threads
- You may not post replies
- You may not post attachments
- You may not edit your posts
-
Forum Rules
|
| S |
M |
T |
W |
T |
F |
S |
| 31 |
1
|
2
|
3
|
4
|
5
|
6
|
|
7
|
8
|
9
|
10
|
11
|
12
|
13
|
|
14
|
15
|
16
|
17
|
18
|
19
|
20
|
|
21
|
22
|
23
|
24
|
25
|
26
|
27
|
|
28
|
29
|
30
| 1 | 2 | 3 | 4 |
|


 Reply With Quote
Bookmarks