 Dislikes: 0
-
Regular Member

Re: Buffing pad changing
 Originally Posted by Cruzscarwash

Swapping over cleaning on the fly saves time when on the job. They get tossed in a bucket of blackfire pad cleaner so clean is as simple as spraying with a hose until the water runs clear and then they go on the shelf to dry.
Sent from my Pixel using Tapatalk
Do you spin them on the polisher to speed up drying ? Just asking.
-
Super Member

Re: Buffing pad changing
Originally Posted by Avgguy
Do you spin them on the polisher to speed up drying ? Just asking.
Sometimes but not always just depends where I'm at when I wash them really.
Sent from my Pixel using Tapatalk
-
Super Member

Re: Buffing pad changing
Originally Posted by Calendyr
Today I used the Porter Cable polisher for the first time. Picked it up at a DeWalt store for 99$ (it's a refurbished unit).
Used it to apply wax on a Honda HRV. So first thought: That thing seriously lack power  Had to put it on speed 6 to have any spinning of the pad worth mentioning, even without applying any pressure (just waxing the car with D166).
So halfway through the process, I go to the pad washer to remove some residue the pad had picked up and the white buff&shine foam pad desintegrated when I lifted it up from the grit guard to dry it off. The velcro was completelly torn off the backing plate. Never seen anything llike that in 6 years doing this profesionnally. So I put my hand on the backplate and it's boiling hot. Very strange indeed!
So depending on what machine you are using, Changing pad often might be a good idea. On my Rupes 21, I usually switch pad once halfway through the process. I clean the pad after every panel if I am doing any type of correction, and when needed if applying wax. Using 13 pads per vehicles seems like overkill to me, but if that is what you want to do, more power to you I would not mind doing that if I did not have to clean all those pads afterwards, that's a good hour of pad cleaning to do that many.
If this is your experience with the PC, its "refurbishing" process was hacked.
While it doesn't possess as much power as many other 8mm polishers, it certainly doesn't run hot, or have trouble maintaining rotation with little pressure (as you mentioned) Especially to apply wax.
It is no coincidence that man's best friend cannot talk.
-
Post Thanks / Like - 0 Thanks, 2 Likes, 0 Dislikes
-
Super Member

Re: Buffing pad changing
Originally Posted by PaulMys
If this is your experience with the PC, its "refurbishing" process was hacked.
While it doesn't possess as much power as many other 8mm polishers, it certainly doesn't run hot. Especially to apply wax.
Since it was the backing plate that was so hot, and the pad was destroyed, I wonder if it was incompatibility between the hooks and loops used on the backing plate and pad? If the pad was loose on the backing plate, running at speed 6 would make for a lot of heat as the two vibrate against each other.
-
Super Member

Re: Buffing pad changing
Originally Posted by oneheadlite
Since it was the backing plate that was so hot, and the pad was destroyed, I wonder if it was incompatibility between the hooks and loops used on the backing plate and pad? If the pad was loose on the backing plate, running at speed 6 would make for a lot of heat as the two vibrate against each other.
That is very possible. I have not used that backing plate in a long time, it was the first one I purchased years ago. The backing plate is (was) from Lake Country and the pad I was using was from Buff&Shine. It is possible they are incompatible.
-
Post Thanks / Like - 1 Thanks, 0 Likes, 0 Dislikes
-
Super Member

Re: Buffing pad changing
Originally Posted by Cruzscarwash
I swap to a new pad on every panel, I brush off the pad I'm using Everytime it leaves the paint before it gets more product.
A fresh pad give you the best cut and prolongs pad life when swapped often
Sent from my Pixel using Tapatalk
This is my practice.
60% of the time, it works every time.
Dan Tran
Car Detailing in Maine and NH - Paint Polishing and Car Care
-
Post Thanks / Like - 0 Thanks, 1 Likes, 0 Dislikes
-
Super Member
Re: Buffing pad changing
As I've stated before, I go through around 20 pads for my truck.
Yup, 20. I don't know if it was the dissatisfaction of trying to polish the truck with only a few, (5) my first time, or the way the pads just seemed "spent" and didn't want to come fully clean afterward.
Either way, I'm a pad changing fool when I correct. Call me crazy, or insert your own adjective [HERE]. Lol
It is no coincidence that man's best friend cannot talk.
-
Re: Buffing pad changing
Originally Posted by PaulMys
As I've stated before, I go through around 20 pads for my truck.
Yup, 20. I don't know if it was the dissatisfaction of trying to polish the truck with only a few, (5) my first time, or the way the pads just seemed "spent" and didn't want to come fully clean afterward.
Either way, I'm a pad changing fool when I correct. Call me crazy, or insert your own adjective [HERE]. Lol
A few more than me. One for the hood, one for each front fender/door. One for each rear door, and the pillars, one for each quarter panel, one for the tail gate and the roof. If I don't feel like I'm getting what I need, I switch to a clean pad. So, 9-10 for a one step. All I know is I read every thread on here about buying as many as you can afford, and I'll attest to that rule.
-
Post Thanks / Like - 0 Thanks, 1 Likes, 0 Dislikes
-
Super Member
Re: Buffing pad changing
Originally Posted by pilotpip
A few more than me. One for the hood, one for each front fender/door. One for each rear door, and the pillars, one for each quarter panel, one for the tail gate and the roof. If I don't feel like I'm getting what I need, I switch to a clean pad. So, 9-10 for a one step. All I know is I read every thread on here about buying as many as you can afford, and I'll attest to that rule.
Clean pads equal cleaner paint.............. 
It is no coincidence that man's best friend cannot talk.
-
Re: Buffing pad changing
Originally Posted by Strat
I like to use farecla g mop on a rotary polisher and find that after a while things get clogged up. Also I think polish starts to dry up in the pad as a lot of dusting happens.
Wondred if I should be swapping pads during the polishing for a fresh clean one?
If so how often roughly and do you prime it first like a new one?
As always ant advice at all for a novice hugely appreciated
Thanks
I'm guessing you're in Europe?
To my knowledge, Farecla isn't available in the U.S.? Maybe, been years since I checked. I've used their G-mop pads and products, I found their pads to be very stiff and hard. Don't remember my experience with their compounds and polishes, but nothing stands out in my memory as positive or negative.
Be careful if using foam cutting pads on a rotary buffer, they can generate a LOT of heat very quickly. Like others said, change pads often.
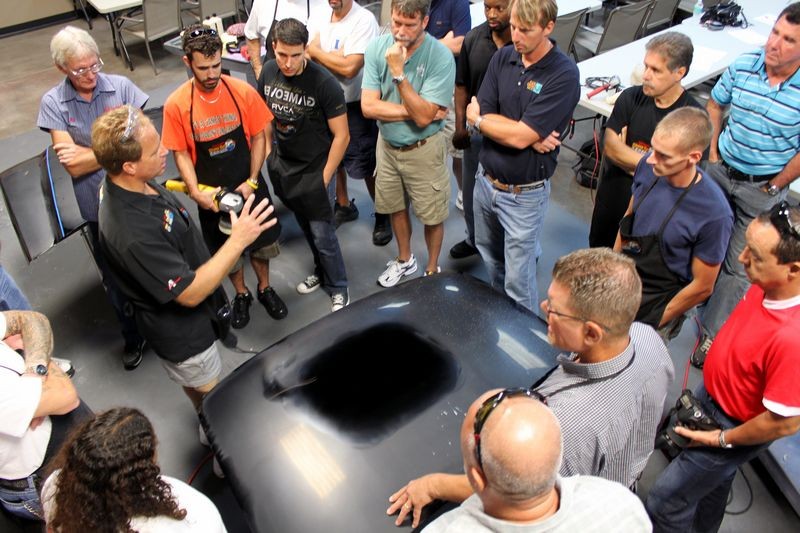
When I use rotary if I "need" to do correction work I use a wool pad as it buffs faster and much cooler. It also leave holograms behind but I already am aware of this and I know my second step process with an orbital and a foam pad and quality polish will remove the holograms.
I share all of this in my write-ups here,
Review: RUPES BigFoot LHR 19E Rotary Polisher by Mike Phillips at Autogeek
Great pics of holograms after wool and then removed after orbital in this thread. Also great pics of what it looks like to "go up on edge"
Battery Time - FLEX Cordless Polishers - Real World Detail by Mike Phillips at Autogeek
Originally Posted by Strat
So do you prime your changed pad with product?
In my entire life I've NEVER primed a wool pad or foam pad when using a rotary buffer. Pad saturation is a problem. Why would I accelerate the problem?
Either use the 10 @ 10 technique or place a circle of product about 2" 3" in diameter around the middle center of the pad, place the pad against the paint, set the polisher to a low speed and then turn the polisher on and spread the product out. If buffing with wool go up on edge, if buffing with foam you can keep the pad flat, you will still get some buffer hop with stiff pads when holding flat with rotary.
The 10 @ 10 technique for picking up a bead of product with a rotary buffer
thread,
Pictures & Comments from September 19th Detailing 102 Class
It's important to wear safety glasses anytime you're operating power tools...
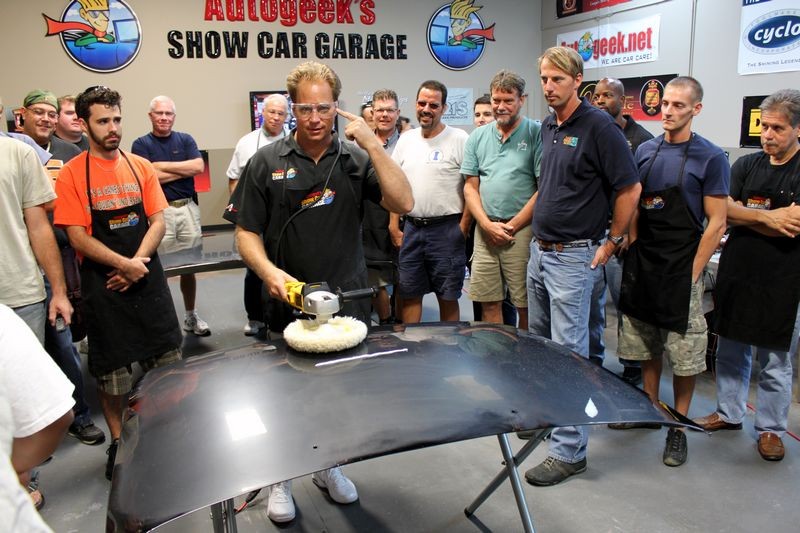
Demonstrating the 10 @ 10 Technique for picking up a bead of product...
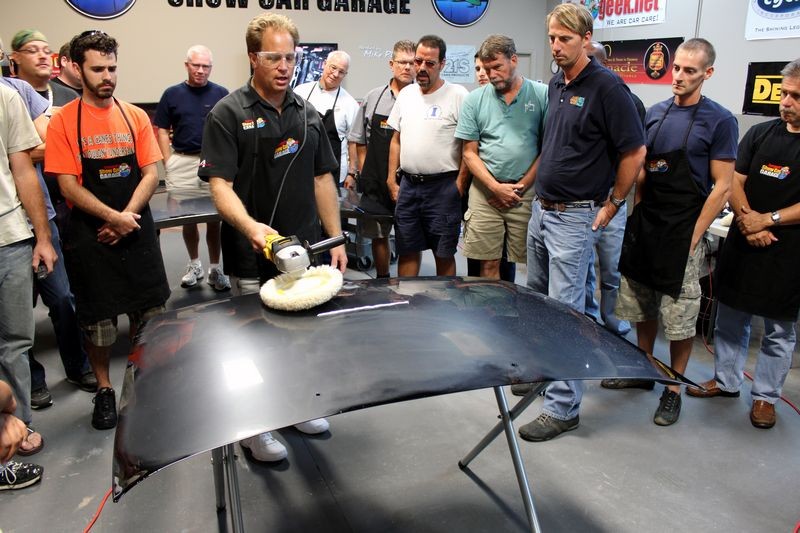
With this technique you run the bead of product into that pad at the 10 O'Clock position on the pad while tilting the pad approximately 10 degrees moving the buffer from right to left...


When you do this instead of splattering the product outward, the pad will pull the product into into itself and under the pad...

After you pick up your bead you can then lay your pad flat, spread the product out over the area you're going to work and begin making slow, overlapping passes.

The goal is to remove all of the sanding marks and restore gloss and clarity to the paint. It's okay if there are still swirls left behind as we'll remove those during the polishing step.

-
Post Thanks / Like - 2 Thanks, 1 Likes, 0 Dislikes
Similar Threads
-
By crovello in forum Auto Detailing 101
Replies: 8
Last Post: 03-16-2018, 04:45 PM
-
By asalesagent912 in forum Auto Detailing 101
Replies: 11
Last Post: 03-17-2014, 10:17 PM
-
By ShineTimeDetail in forum Auto Detailing 101
Replies: 10
Last Post: 03-23-2012, 04:20 AM
-
By Mike@DistinctImage in forum Off-Topic
Replies: 8
Last Post: 08-22-2011, 06:41 PM
-
By Bags in forum Porter Cable 7424XP Dual Action Orbital Polisher
Replies: 4
Last Post: 06-14-2007, 10:59 AM
 Members who have read this thread: 0
There are no members to list at the moment.
Posting Permissions
- You may not post new threads
- You may not post replies
- You may not post attachments
- You may not edit your posts
-
Forum Rules
|
| S |
M |
T |
W |
T |
F |
S |
| 31 |
1
|
2
|
3
|
4
|
5
|
6
|
|
7
|
8
|
9
|
10
|
11
|
12
|
13
|
|
14
|
15
|
16
|
17
|
18
|
19
|
20
|
|
21
|
22
|
23
|
24
|
25
|
26
|
27
|
|
28
|
29
|
30
| 1 | 2 | 3 | 4 |
|


 Thanks:
  Likes:


 Reply With Quote
Bookmarks