 Thanks: 0
 Likes: 0
 Dislikes: 0
-
Test Spot vs Working Area - Using a Flex 3401
Test Spot vs Working Area - Using a Flex 3401
As with all new projects, I use a test spots to see what is going to work best for the project. Once I have nailed down the process, I get to work. Unfortunately though, due to poor lighting in the garage space (which is going to be another post later and no swirl light yet), I will finish out a couple of panels before I check the results again. What I find is sometimes the results of the worked panels aren't as good as the test spot. Usually, I find there are more swirls and defects left behind than the test spot.
So, with everything being equal such as pads, machine, and product, there must be something I am doing differently in my "working" process than the test spot. Correct? After thinking it through, I used the same number of passes as well as kept my arm speed relatively the same. I racked my brain trying to think about what is happening to finally have the light bulb flicker on.
I say flicker on for a reason. Sometime ago, I read a post/thread about "expanding the work area when using the Flex 3401." I don't know if that was the name of the post or not, but I seem to remember a large, older model Chevrolet hood where Mike Phillips buffed/polished an entire hood. Or was it a half? I've searched for the thread/post, but I just cannot seem to find it.
Here is what I think might be happening. The test spot is usually the first step. What I mean is the test spot is performed with a freshly primed pad with three dime-sized dabs of product worked into an approximately 2ft x 2 ft section, however when I get to work, I spread that amount into a larger working area. I suppose my question is, could this be the reason I am getting a different result? If so, when using the Flex, is not a good practice to work on a larger area than the test spot? But if it is ok to work on a larger area, are you still using 3 dime sized drops or do you increase the amount of working product for the larger working area (ie. double the amount of working product for doubling the working area)? As far as the test spot is concerned, is 3 dime sized drops ample or excessive?
Just for additional consideration, I am working at a used auto dealership where the vehicles greatly differ in condition, and as expected, turn around time is important. I primarily use Wolfgang Uber Compound for the vehicles with heavier defects and XMT 360 for polishing/waxing. The vehicles with lesser defects, I may only one-step with the XMT 360. I also have a variety of pads which include yellow, orange, and white Lake Country CCS 6.5 pads.
-
Re: Test Spot vs Working Area - Using a Flex 3401
First off their are some good topics brought up and I will try and dissect them.
I have written an article on maximizing the performance of the Flex 3401. My pads of choice for the 3401 is the Hybrid pads mentioned in this article. I also use Menzerna products and from what I know Wolfgang Uber is similar to Menzerna FG400.
http://www.autogeekonline.net/forum/...brid-pads.html
We all know the importance of proper lighting and checking the results with a good light source. With that said this will allow you to see exactly what is going on.
What I have found through my own testing is that sometimes the defects may be more concentrated in other areas of the vehicle than what the test spot contains. What I like to do is step up the aggressiveness a notch with either pad or product and sometimes both to ensure that I am getting the necessary results not only in the test spot but the rest of the vehicle as well. Again, this is my personal preference.
You mentioned that your results are not following through as you leave your test spot and continue on throughout the vehicle. A few things come to mind. You may not be concentrating your efforts in other areas as you have done in the test spot. Are you cleaning the pad after every section with a pad brush? I also see mention that your working areas are quite large. This is not a problem for the larger pads and forced rotation of the Flex to accomplish however remember that with that added area of correction you will want to add more than three dime sized drops of working product.
I remember the thread that Mike posted about correcting nearly half the hood of a mid 90's green Chevrolet hood. I will look for it.
Mike
-
Re: Test Spot vs Working Area - Using a Flex 3401
This is the one I was talking about. Is this the one you were thinking of?
After reviewing this link I see the hood was attacked in quarters.
http://www.autogeekonline.net/forum/...ex-3401-a.html
-
Re: Test Spot vs Working Area - Using a Flex 3401
Yes....that is the article indeed. Thanks for finding it. And yes, I do clean the pad after each section. I feel that I concentrate as much, but perhaps spreading out the work area does not give the same amount of attention. I will look into your article...thanks for the reply.
-
Re: Test Spot vs Working Area - Using a Flex 3401
I had a chance to review your article and two things stick out with me is your machine speed of 3-4 during your compounding process and more working product dots on your pads. My thoughts behind the machine speed is the diminishing abrasives are not breaking down as quickly at those speeds as they would at the higher speeds. Is that a reasonable conclusion?
As for more product it makes sense. My recollection of the article you found for me was Mike worked on about half a Chevy hood, but in reality it was 1/4. He took a picture of his pad with 3 dots and worked it in on the 1/4 sized section of the hood. So, if I worked on a half a hood with that same amount of product, chances are there is not enough working product to do this sized area. The abrasives are too spread out and therefore will more than likely break down too quickly. Meaning, potentially less defect removal. Is that also reasonable to conclude?
BUT... if a test spot is performed with a primed pad and say, three dots of working product to a traditionally sized test spot area, how can the results from the test spot give accurate feedback if I were to spread that same amount out to a larger working area? You are using more than the three dot approach,and that makes sense to me, but in Mike's write-up, he clearly shows 3 dots for the 1/4 sized hood. How did he do that? Is it possible that his test spot he may have used less than three dots? Maybe Mike can chime in.
Also of note, I prime a pad with product rather than a pad conditioning spray. Are there any advantages or disadvantages to using a pad conditioning spray as opposed to using the product to prime the pad? A couple come to mind as it is slightly quicker to pump a spray onto a pad than to evenly spread product onto a pad. Less overall product consumption is another for sure, but how about performance? Are you getting less dusting, better cutting/polishing performance, less pilling, etc.?
-
Re: Test Spot vs Working Area - Using a Flex 3401
 Originally Posted by bwatereagleman

I had a chance to review your article and two things stick out with me is your machine speed of 3-4 during your compounding process and more working product dots on your pads. My thoughts behind the machine speed is the diminishing abrasives are not breaking down as quickly at those speeds as they would at the higher speeds. Is that a reasonable conclusion?
It is a reasonable conclusion however on the bottle of FG400 it states rotary speed from 900-1200 rpm. This translates to speed 2 and 3 on the Flex's.
With other compounds you you run them faster.
As for more product it makes sense. My recollection of the article you found for me was Mike worked on about half a Chevy hood, but in reality it was 1/4. He took a picture of his pad with 3 dots and worked it in on the 1/4 sized section of the hood. So, if I worked on a half a hood with that same amount of product, chances are there is not enough working product to do this sized area. The abrasives are too spread out and therefore will more than likely break down too quickly. Meaning, potentially less defect removal. Is that also reasonable to conclude?
In Mike's article he was using a MF pad that was primed with working product. MF pads give better performance when primed with a compound rather than a pad conditioning spray.
BUT... if a test spot is performed with a primed pad and say, three dots of working product to a traditionally sized test spot area, how can the results from the test spot give accurate feedback if I were to spread that same amount out to a larger working area? You are using more than the three dot approach,and that makes sense to me, but in Mike's write-up, he clearly shows 3 dots for the 1/4 sized hood. How did he do that? Is it possible that his test spot he may have used less than three dots? Maybe Mike can chime in.
When working a larger area you will want to add another drop or two to compensate for the increased surface area.
Also of note, I prime a pad with product rather than a pad conditioning spray. Are there any advantages or disadvantages to using a pad conditioning spray as opposed to using the product to prime the pad? A couple come to mind as it is slightly quicker to pump a spray onto a pad than to evenly spread product onto a pad. Less overall product consumption is another for sure, but how about performance? Are you getting less dusting, better cutting/polishing performance, less pilling, etc.?
I find for DAT based polishes such as Menzerna I get better performance with a pad spray and adding working product rather than doing the KBM method of covering a pad with product and then adding product.
I feel that the KBM method is great for SMAT based products including working with MF pads.
With my method of priming the pad and not exceeding 1200 rpm with FG400, this gives me the best performance. I have run FG400 at higher speeds and when I run it faster it's working cycle diminishes.
-
Re: Test Spot vs Working Area - Using a Flex 3401
Originally Posted by smack
I remember the thread that Mike posted about correcting nearly half the hood of a mid 90's green Chevrolet hood. I will look for it.
Mike
Here's the article,
Originally Posted by Mike Phillips
How To Use The Flex 3401
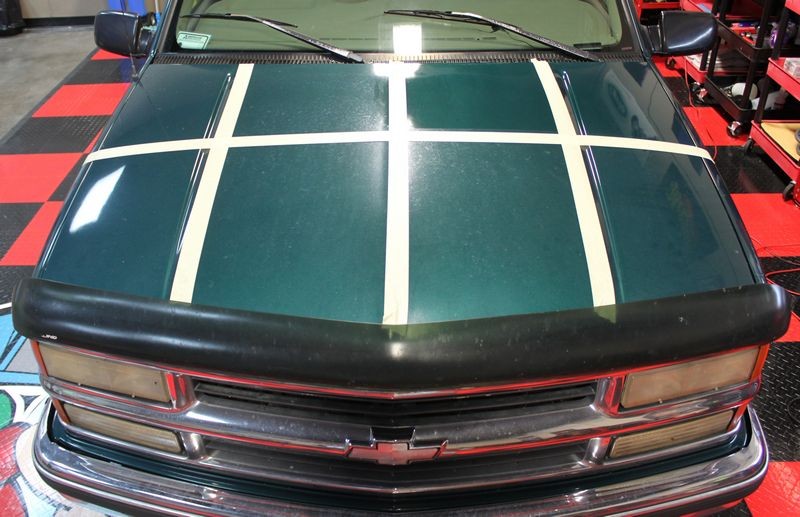
Here I've turned the polisher on and spread my working product evenly over the entire surface I'm going to work.
 I work the section using overlapping passes and a crosshatch pattern...

And in the pictures above that's actually a 1/4 of the hood. I divided the hood into 4 rectangular sections to show that with the power provided by the gear-driven Flex 3401 that a person could tackle larger areas. You still have to make as many crosshatch pattern section passes that you would do if you worked a smaller section but it can be done.
The thing I didn't talk about, at least in the first post of the above thread was that while it can be done a person really needs to be in good physical shape to man-handle a Flex 3401 to work such a large section AND work it thoroughly.
For any tool that uses a free spinning spindle bearing design you would HAVE to work smaller sections to maintain work efficiency or defect removing ability.
Like I show in this how-to article,
How To Use The Cyclo Polisher
Now days I pretty much use the Flex PE14 with a wool pad and a compound and knock stuff like this out the fast way. Then just come back with a DA of some type to remove the holograms, machine wax it and then kick it out the door.

-
Super Member

-
Super Member

Re: Test Spot vs Working Area - Using a Flex 3401
Perhaps it is a combination of a few things....
The first being : If x amount of product on x pad worked at x speed over x surface area with x pressure = x microns of defect removal, then surely if you increase the surface area you must decrease the micron's removed, all else being equal. In other words you are trying to achieve the same amount of work by spreading the 'force' over a bigger area - it can't work.
Buffer creep I suppose would also come into play here - although you are intentionally increasing your working area, the idea I described above must surely hold true too when people unintentionally increase their working area (as defined by their test spot) - i.e. buffer creep
And secondly, as Smack indicated, there is a real possibility that the defects may be more concentrated in certain areas.
Lastly, I think the fact that not all swirls are created equal, means that some will be deeper than others and so where x amount of paint removal suffices for your test spot, you may need x plus a little in others as the defects are deeper.
Smack, I am going to be trying out your version of priming vs the more 'traditional' KBM method this coming weekend - I am quite keen to see the results
-
Re: Test Spot vs Working Area - Using a Flex 3401
One more thing to add...
This is mostly isolated to foam pads versus fiber pads and that is as a pad becomes wet with product its cutting ability decreases.
Similar Threads
-
By david b in forum Flex Polishers
Replies: 29
Last Post: 09-01-2019, 12:43 PM
-
By Ted Y in forum Flex Polishers
Replies: 9
Last Post: 07-12-2015, 08:04 PM
-
By grambow in forum Flex Polishers
Replies: 1
Last Post: 03-06-2015, 11:38 PM
-
By fabz in forum Flex Polishers
Replies: 22
Last Post: 12-21-2011, 12:42 AM
-
By Mike Phillips in forum How to articles
Replies: 8
Last Post: 10-04-2010, 09:21 PM
 Members who have read this thread: 0
There are no members to list at the moment.
Posting Permissions
- You may not post new threads
- You may not post replies
- You may not post attachments
- You may not edit your posts
-
Forum Rules
|
| S |
M |
T |
W |
T |
F |
S |
| 31 |
1
|
2
|
3
|
4
|
5
|
6
|
|
7
|
8
|
9
|
10
|
11
|
12
|
13
|
|
14
|
15
|
16
|
17
|
18
|
19
|
20
|
|
21
|
22
|
23
|
24
|
25
|
26
|
27
|
|
28
|
29
|
30
| 1 | 2 | 3 | 4 |
|


 Reply With Quote


Bookmarks