 Thanks: 0
 Likes: 0
 Dislikes: 0
-
Black Paint
Hello everyone I need some help with what products you guys use on black paint. I just got a brand new jetta and washed and waxed it for the first time last night. The wax that I used was pinnacle liquid souveran and it left an oily haze on the car. I have had this wax for 2 years and kept it in the house during the winters in MN. Im looking for products that others have used on black paint that works. Thanks so much for the help
-
Re: Black Paint
Treat black the same as any other color, you are working on clear. Polish to correct then finish with what you like to use. I finish my polishing with m205 then use auto finesse tough coat or wolfes s and s then body wrap.
As mike says, find what you like to use, then you will use it often
-
Re: Black Paint
 Originally Posted by Mike lambert

Treat black the same as any other color, you are working on clear.
Exactly.
Originally Posted by Mike lambert
As mike says, find what you like to use, then you will use it often
Here's where that quote comes from,
"Find something you like and use it often"

-
Re: Black Paint
Originally Posted by bus3
I just got a brand new jetta and washed and waxed it for the first time last night.
Good start, get the car clean...
Originally Posted by bus3
The wax that I used was pinnacle liquid Souveran and it left an oily haze on the car.
The Pinnacle waxes all have polishing oils and the reason for this is they create a very clear finish on clear coats and that acts to let your eyes see the true color under the clear. They are easy to use when used correctly.
Anytime you see a haze, or streaks after using ANY wax, that means there are still residues left on the paint after initial wipe-off.
A couple of tips...
IF the bottle of Pinnacle Liquid Souveran Carnauba Wax has sat for 2 years it would be really important to shake it really, really well to make sure it's mixed back into a uniform consistency as liquid waxes can and do separate out when left to stand for extended periods of time.
Besides that, wiping technique is very important for finishing waxes also called show car waxes which is what the Pinnacle wax is...
Check out these two articles,
How to correctly fold and use a Microfiber Towel
People Watching
Most of my life and even just recently while working on an expensive car with a nice finish, I observe people and the techniques they use for any and all aspects of detailing cars. The goal is to help them tweak their technique if anything they're doing could use some improvement. Most pros would agree, when it comes to taking a car's finish to it's maximum potential, that even more important than pad, product and tool selection is technique.
Technique is everything...
Basic Technique but Vitally Important
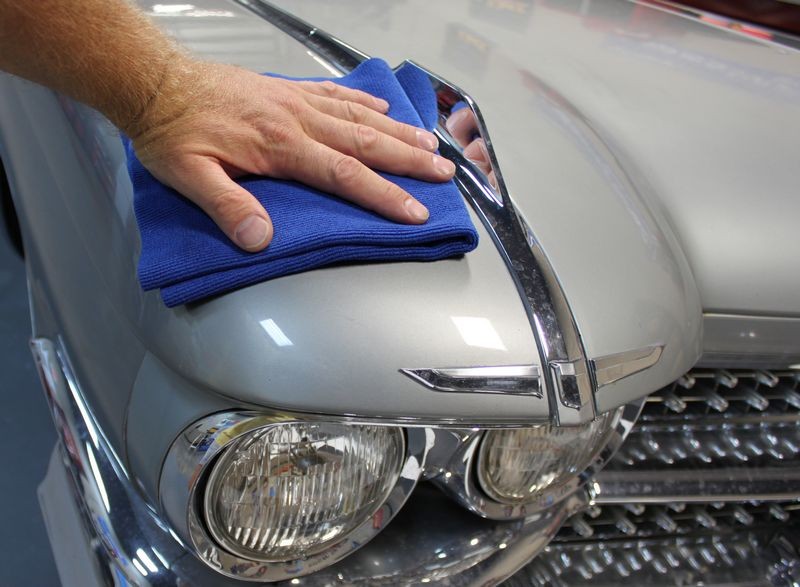
One common procedure that is as basic as you can get is also one of the most important procedures involved with creating a true show car shine and that's correctly folding and using a microfiber towel to remove a coating of polish, wax, paint sealant, spray-on-wax or spray detailer.
- Good Technique - Used correctly, your hand and a microfiber towel will create and eye-dazzling finish that that will hold up under intense scrutiny under bright light conditions like full overhead sunlight or while on display at an indoor car show.
- Wrong Technique - Used in-correctly and you can easily instill swirls and scratches into the paint not only ruining the finish but requiring machine polishing to remove them and then you're back to wiping the polish off without instilling swirls all over again... catch 22
How To Fold and Use a Microfiber Towel
Here's the basics on how to correctly use a microfiber towel.
Start with a clean, microfiber towel. If the towel has been washed and dried, I will usually inspect each side to make sure there are no contaminants on the towel. Microfiber acts like a magnet and can easily attract and hold all kinds of things to itself that you don't want to rub against your car's paint... so take a moment to visually inspect your polishing towels.
If you're working on a show car finish, even if the show car finish is on your daily driver, make it a "Best Practice" to visually inspect the face of each towel before folding and using.
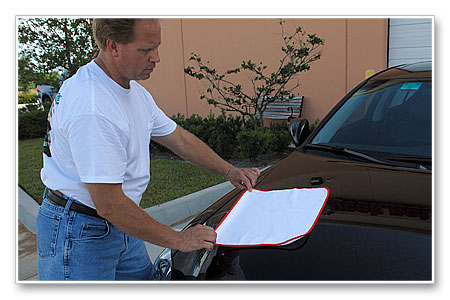
Clean, laundered Cobra Indigo Microfiber Towel
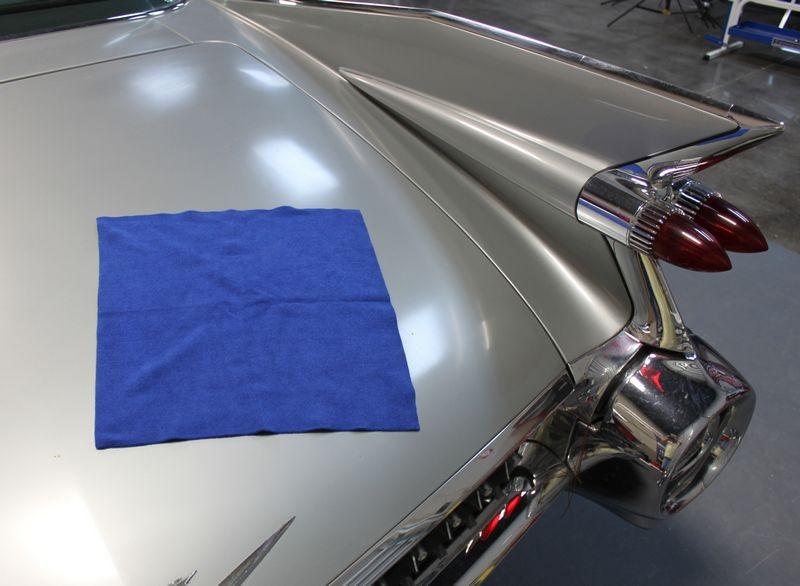
Fold the microfiber towel in half...
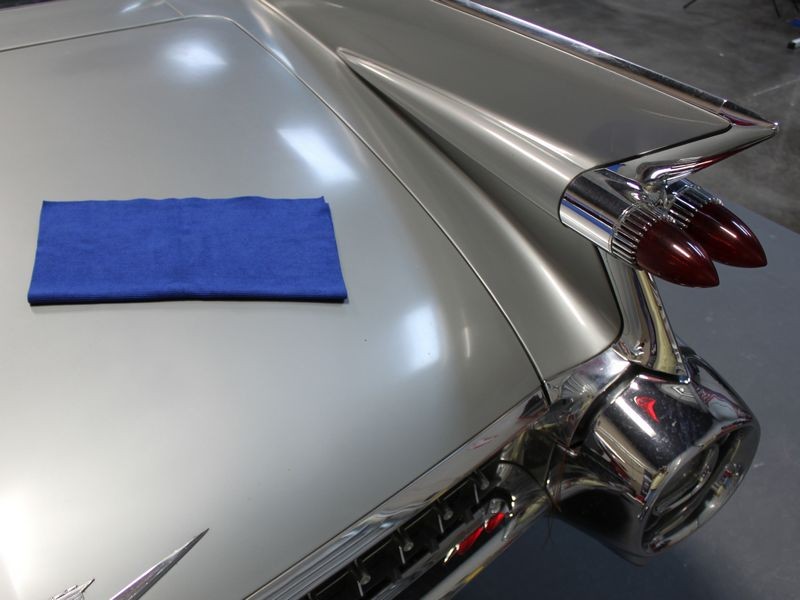
Then in half again...
Control over the towel
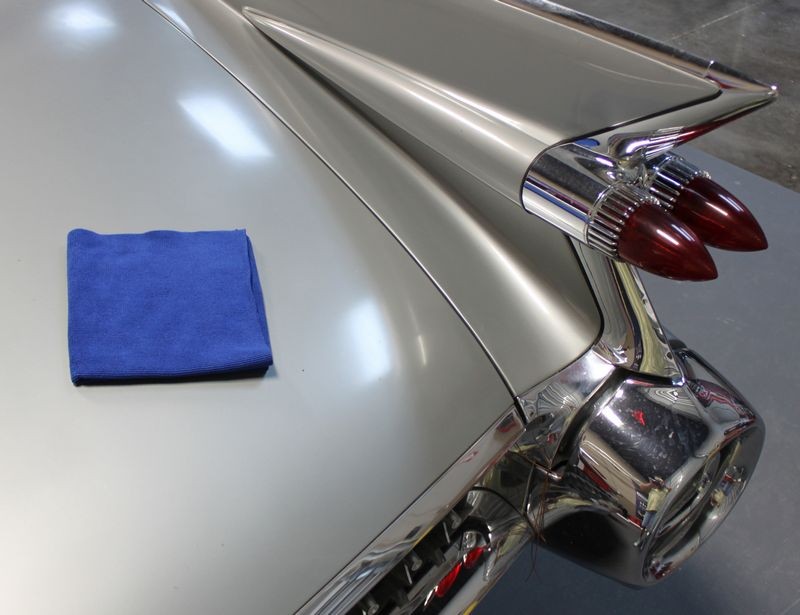
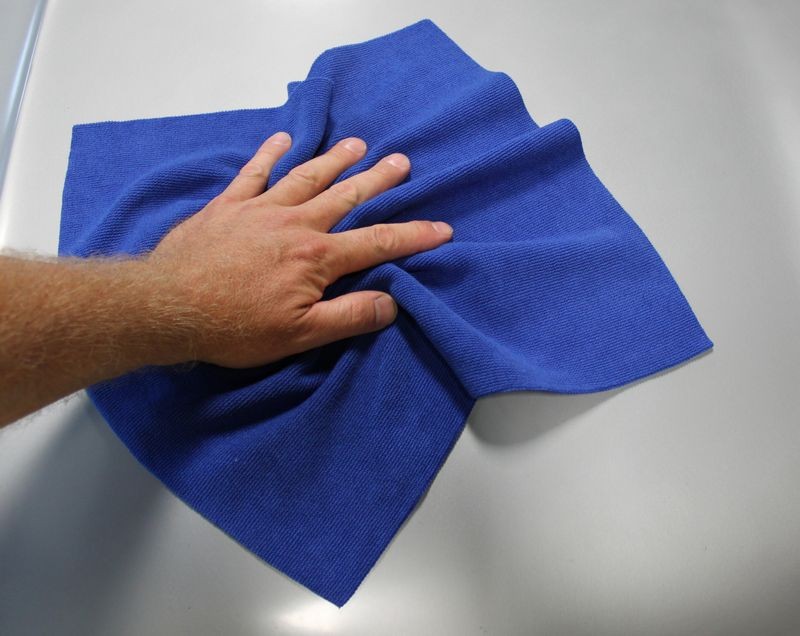
By folding your microfiber towels into quarters, you will now have 8, dedicated sides to wipe with and you have control over all 8 sides of the entire microfiber towel. When you simply lay a microfiber towel flat or scrunch it up into a wad, you don't have any control over the towel because it's too hard to gauge and remember how much of the towel has already been used.
Cushion to spread out the pressure from your hand
Folding your microfiber towel like shown above provides cushion to spread out the pressure from your hand, this provide two benefits,
1) Helps reduce the potential for fingermarks caused by excess pressure from your fingertips. 2) Helps to maintain even contact between the working face of the folded microfiber towel and the surface of the paint. This is important at all time but especially whenever you're working on any panel that is not flat. Folding your microfiber towel provides cushion to spread out the pressure of your hand plus gives you 8 dedicated sides to wipe with.
Not folding means less cushion and only two sides to wipe with...
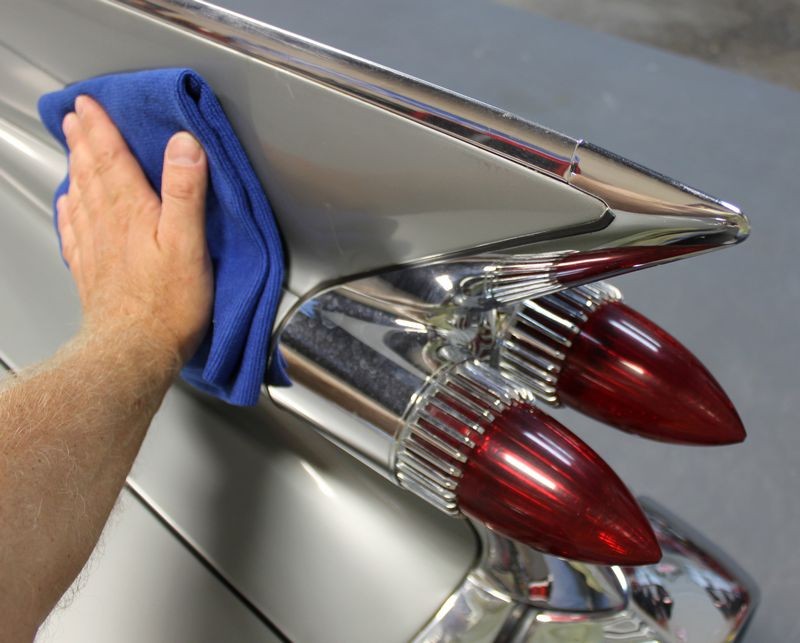
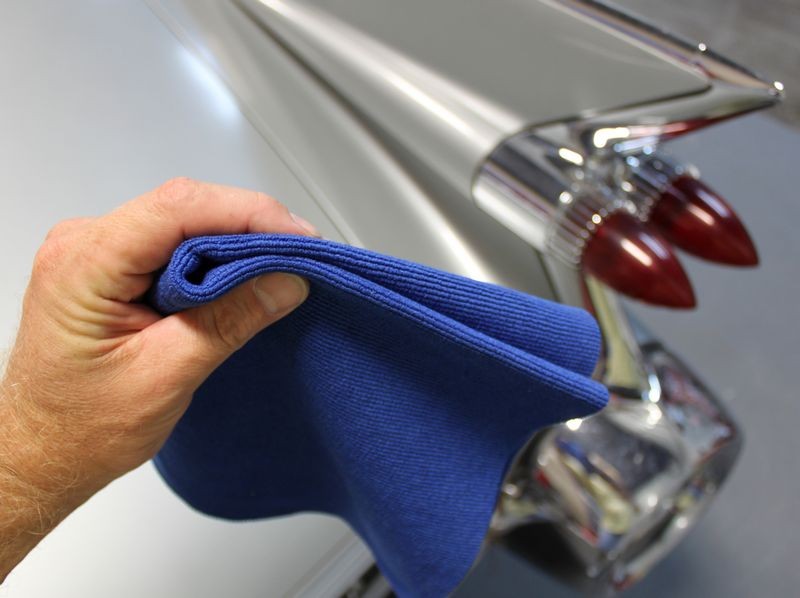
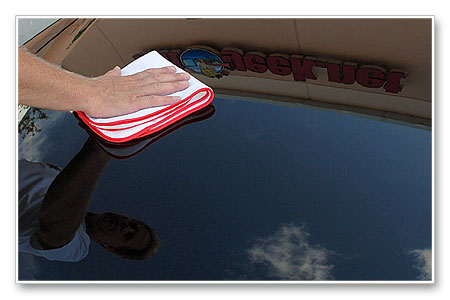
Correct Technique
Folded towels provide cushion, cushion enables you to work more carefully on your pride and joy plus even contact of a folded, flat microfiber towel against the paint helps you to remove product residues more effectively...
Incorrect Technique - Unfolded Microfiber Towel
Simply laying the towel flat against the paint increases the potential for swirls and scratches due to pressure points against the towel. Using a towel flat and unfolded offers little to no cushion and reduces even pressure between the cloth and the paint. I cringe when I see someone wiping a nice finish by simply placing the towel down flat on the paint and then placing their hand flat on the towel.
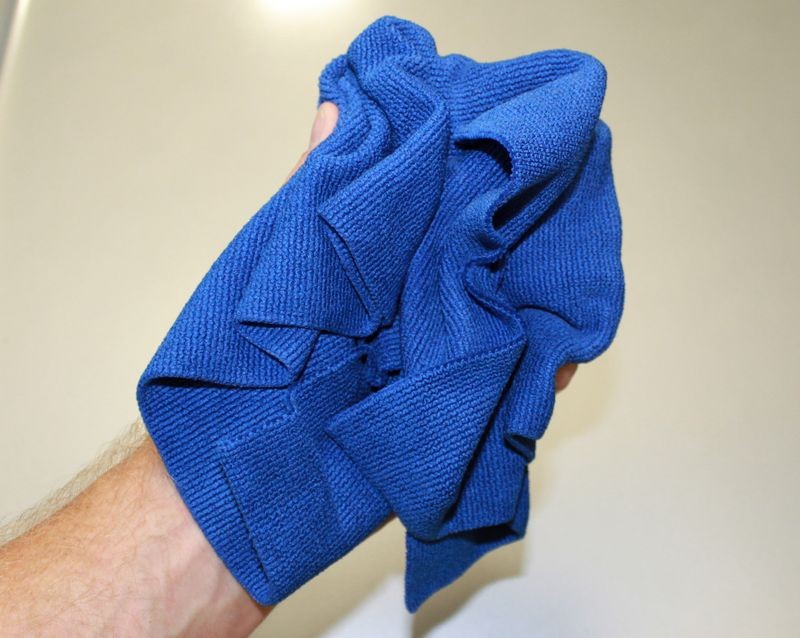
Incorrect Techniques - Scrunched-up Microfiber Towel
Here's another common method, or actually lack of method, for wiping product residue off paint and that's to simply scrunch up a microfiber towel into a wad of cloth and wipe using this wadded up towel. Not only do you have zero control over the surface of the towel but you now are introducing folds and edges of towel directly to the finish... under pressure!
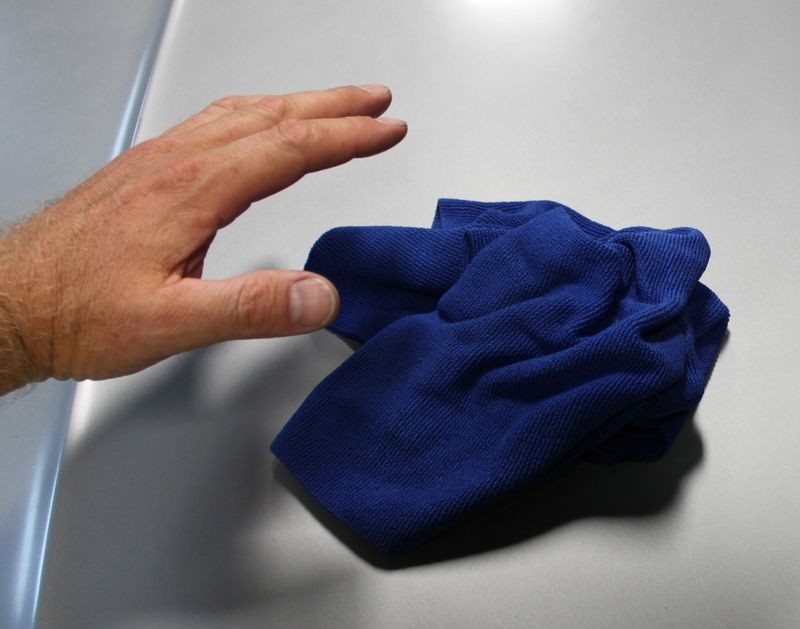

Argh!
There's nothing gentle about wiping paint with a wadded up towel...
Inspect and Fold
Make it a "Best Practice" to inspect the working face of your wiping cloths before using and adopt another "Best Practice" and that is to fold your microfiber towels 4-ways to give you 8 dedicated sides to wipe with and plenty of cushion to spread out the pressure from you hand while being gentle to your car's finish.
It should look like this...
-
Re: Black Paint
The Final Wipe Tips for creating a streak-free, show car finish
Note: The final wiping technique is not for the initial wiping-off of the wax or paint sealant, but instead is for after the majority of product has been already been removed and now all youre doing is giving the finish a final wipe.
Turning a diamond in the rough into a glistening gemstone
You started early in the morning by washing the car, then you clayed the paint, then removed all the swirls and scratches, then polished the finish to a super high gloss and after that you applied your favorite wax or paint sealant. Youve taken a diamond in the rough and turned it into a glistening gemstone. After removing the wax or the paint sealant its time to give the paint one last final wipe to remove any trace residues and showcase all your hard work.
Heres a tip to help you insure there are no streaks or smears left on the paint and a technique that on some hard to work on paints that might be just the ticket for creating the perfect finish in any lighting condition.
The Final Wipe
After all the work is done, when its time to give the paint the final wipe-down before you stand back and say to yourself it is finished, and then you take your pride and joy for a spin around the block or turn the keys back over to the owner, you usually want and need to give the paint a final wipe-down to insure you didnt miss any spots and to remove any trace residues off the paint that can stand out like a sore thumb in the right light at the right angle that will so easily distract everyones attention from the work of art youve created.
This technique can often times help you to remove any stubborn streaks or uneven looking areas on the paint, and its exactly opposite of what Ive often seen enthusiasts and detailers do my entire car detailing life.
The Technique
The technique is to wipe the paint down slowly using your best, premium quality microfiber polishing cloth using gentle, even pressure. Fold your polishing cloth 4-ways to provide plenty of cushion to help spread out the pressure from your hand as best as you can over the face of the folded microfiber.
Fold your microfiber polishing cloth to create plenty of cushion to help spread out the pressure from your hand and to give you 8 dedicated wiping sides.


The secret to this technique is purposefully moving your hand and wiping cloth s-l-o-w-l-y over the paint, not like a spastic crazy guy moving his hand at light-speed over the surface.

How it works
The way this works is really quite simple but let me break it down for you into simple terms so everyone can understand. When making the final wipe, your job is to remove all trace residues from the previously applied wax or paint sealant; thats your job. While to the human eye the surface of your cars paint looks smooth and flat, under a microscope its actually a landscape of hills and valleys, (which is high spots and low spots), as well as pits and pores and interstices. (Interstices = microscopic gaps and cracks in the paint)
Trace residues remain in the lower imperfections on the surface and when you move a polishing cloth over the surface the fibers of the polishing cloth grab onto and removes residues off the high points the easiest. Again, your job is to remove all the trace residues and do it in such a way that you do no harm to the highly polished surface at the same time, thus you need to use a premium quality microfiber, folded 4-ways to help spread out the pressure of your hand.
Now think about it, if youre moving the microfiber quickly over the surface how much time do the residues on the surface have to transfer to the cloth? Seconds? Milliseconds? Thats not very long.
Thats why wiping like a mad man wont remove streaks or residues and could possibly inflict swirls and scratches back into the finish.
Slow down to speed up
Instead, how about moving the polishing cloth slowly over the surface and enabling the microscopic sized fibers to get into the low portions where once they make contact with any remaining wax or polymers, the residue will have time to transfer from the paint to the cloth?
This is called the final wiping technique and most people would agree it makes sense. It also works most of the time for stubborn streaks that sometimes show up on dark colored paints but its also just a good technique when working on highly polished surfaces where your or your customers expectations are high.
If youve ever spent upwards of 8 hours and/or longer polishing out the paint to perfection on your car, or a customers car then you know how much work goes into,
- Washing the car.
- Evaluating the surface.
- Claying the paint.
- Taping off trim, body lines, emblems and badges as well as hard, thin edges.
- Removing swirls, scratches and other paint imperfections.
- Polishing the paint to a high gloss.
- Applying the wax or paint sealant.
- Removing the tape and carefully wiping off any left-over residues around body lines and trim.
- Removing the first and subsequent coats of wax or paint sealant.
Now its time for the final wipe and the last thing you want is to do anything that could potentially instill any new swirls or scratches into the now pristine finish.
Thats why as you progress through the process, after each step you have to be more and more careful when wiping off any compounds or polishes and usually as you progress through the process the quality of your wiping cloth increases along with your carefulness as thats how show car finishes are achieved. You cant just wipe with any old towel and do it in any old way. Show car work demands focusing on the task at hand and using your best skills and your best tools to reach the goal of a flawless show car finish.
Rushing at the very end doesnt make sense and if you instill swirls and scratches because youre wiping off the car like a lunatic or not using your best quality polishing cloths, then thats working backwards in the process.
Simply put, sometimes you have to slow down to speed up.
That is, sometimes using a slow wiping motion, or slow rate of travel, will be more effective at removing all trace residues and enable to reach your goal versus moving your hand and polishing cloth quickly over the paint. Sure at the end of the process youre tired and ready to clean-up and be done with the car but the technique you use for your final wipe-down of the paint needs to be calculated, methodical and precise. And after you make the final pass and you lift your hand and polishing cloth off the paint you can stand back and admire your work and then say, It is finished.
The Final Wipe is also demonstrated in this video...
How to remove shallow RIDS and how to machine
apply both a paint sealant and a finishing wax
This how-to video also covers,
- RIDS - Random Isolated Deeper Scratches
- Removing watches and any jewelery
- Using a DA Polisher without the handle
- Placing cord over shoulder
- Priming the pad on a DA Polisher
- Speed settings for removing isolated defects
- Downward pressure needed for removing isolated defects
- How to clean a pad on the fly
- Where and why to mark your backing plate with a black mark
- Rotating the body of the tool to keep the pad flat to a panel
- Why to allow the pad to stop spinning before lifting the pad off the paint
- How to swap backing plates from a 3.5" to a 5"
- Machine waxing using 5.5" Hydro-Tech Crimson Finishing pads with Menzerna Power Lock
- The "Kissing the Finish" Technique
- How to do the Swipe Test to check if a wax or paint sealant is dry
- How to remove dried paint sealant using a microfiber bonnet on a dry pad on a DA Polisher
- How to clean a microfiber bonnet on the fly with your fingernails
- How to apply a paste wax by machine - Souveran Paste Wax
- How to carefully wipe a WOWO wax off by hand using Microfiber Gloves and plush Microfiber Towels
- How and why to fold a microfiber towel 4-ways to wipe wax off
- How to break-open a coat of wax and then creep out to carefully wipe off a coating of wax
- How to do the "Final Wipe"
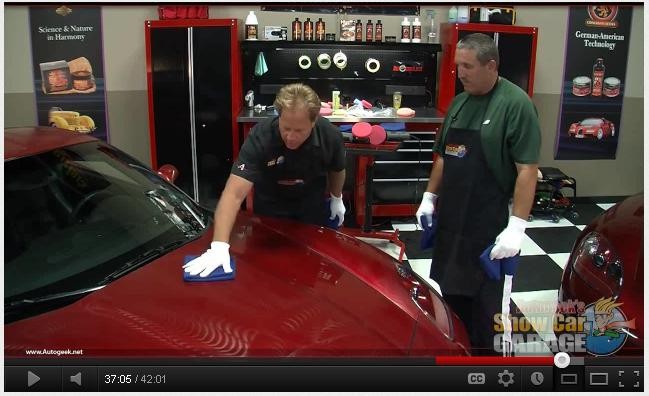
Screenshots
Mike Phillips demonstrating the "Final Wipe Technique"
-
Junior Member

Mike,
Your replies are worth their weight in gold x1000000
I've always wanted to do a parody of how Mike Phillips goes about brushing his teeth, with different toothpaste compounds & techniques.
Respect!
Sent from my iPhone using AG Online
-
Super Member

Re: Black Paint
Originally Posted by Paul Lonergan
Mike,
Your replies are worth their weight in gold x1000000
I've always wanted to do a parody of how Mike Phillips goes about brushing his teeth, with different toothpaste compounds & techniques.
Respect!
Sent from my iPhone using AG Online
That sounds hilarious!
-
Super Member

Re: Black Paint
Liquid Souveran wouldnt be my choice on black. Its a good wax, but I believe it was originally designed for light colors. I would reccomend and easy to use paste wax like P21S 100%, Fuzion, or Dodo Purple Haze Pro. All those are very easy to work with and don't really streak (unless you apply to much). Sometimes it's hard to tell how much wax you are applying because it's hard to see on the paint. Fuzion is super easy to use. Dodo is purple, it's a little easier to see on the paint.
-
Junior Member
From the creator of the "How to use a Porter Cable" Mike Phillips now presents... How to use a toothbrush for that showroom shine!
Including ...
2 glass wash
Clay barring your teeth
Single stage or enamel coating?
Masking off
Hand or machine polishing?
Priming your brush
Correct brushing techniques
Recognising and dealing with hard water and mineral deposits
Chemical washes
Working clean
False teeth ... The absolute tooth
And many more!
Sent from my iPhone using AG Online
-
Super Member

Re: Black Paint
I can tell you what NOT to use ... Turtle Wax Black Box. It's costly, messy, and doesn't live up to the hype in my experience.
I'm using DP Polyseal topped with a coat of DP Max Wax the next day. That's what I have, when I run out, I might try something else. At present, I'm satisfied with the results. I do this at least twice a year, but usually three to four times. I've been using ONR for washes, and ONR (properly diluted) for a quick detailer.
Similar Threads
-
By Silvaria in forum Auto Detailing 101
Replies: 25
Last Post: 06-27-2019, 05:26 AM
-
By morphiasx in forum Auto Detailing 101
Replies: 14
Last Post: 06-02-2017, 09:17 AM
-
By Scott@IncrediblyDetailed in forum Show N' Shine
Replies: 15
Last Post: 06-28-2014, 01:18 PM
-
By WRXINXS in forum Auto Detailing 101
Replies: 2
Last Post: 05-30-2013, 09:35 AM
-
By Detailing by M in forum Show N' Shine
Replies: 20
Last Post: 04-23-2013, 04:02 PM
 Members who have read this thread: 0
There are no members to list at the moment.
Posting Permissions
- You may not post new threads
- You may not post replies
- You may not post attachments
- You may not edit your posts
-
Forum Rules
|
| S |
M |
T |
W |
T |
F |
S |
| 28 | 29 | 30 |
1
|
2
|
3
|
4
|
|
5
|
6
|
7
|
8
|
9
|
10
|
11
|
|
12
|
13
|
14
|
15
|
16
|
17
|
18
|
|
19
|
20
|
21
|
22
|
23
|
24
|
25
|
|
26
|
27
|
28
|
29
|
30
|
31
| 1 |
|


 Reply With Quote
Bookmarks