 Dislikes: 0
-
-
Re: Foam Pad after using BF One Step
 Originally Posted by Thomkirby

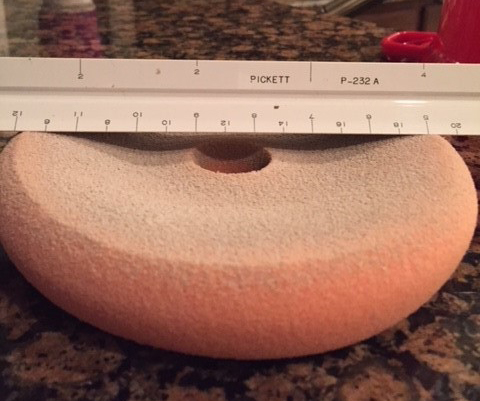
Does the concave shape indicate I was using too much product?
Hi Kirby,
When foam depresses like shown in your picture, that's normally a sign of excessive heat over time. The heat collapses the foam and gives it a bowel shape.
I'll send the link to this thread to my buddies at LC and see if they can chime in...

-
Regular Member

Re: Foam Pad after using BF One Step
Hey Kirby, This type of concave is typically caused by excessive heat. It can be related to down pressure, pad contamination/clogging, and or too long without cleaning or switching between pads.
I noticed that this appears to be a Force orange pad. What type of tool was used when this happened?
Thanks
Dave
-
Super Member

Re: Foam Pad after using BF One Step
Originally Posted by Mike Phillips
Hi Kirby,
When foam depresses like shown in your picture, that's normally a sign of excessive heat over time. The heat collapses the foam and gives it a bowel shape.
I'll send the link to this thread to my buddies at LC and see if they can chime in...
Bowel shape, eh?
-
Re: Foam Pad after using BF One Step
Originally Posted by Thomkirby
Mike,
I used this Lake County Orange pad with BF One Step on the roof of a Camry.
Does the concave shape indicate I was using too much product?
Pad dipped down rather than staying flat, a concave shape with the product as a light grey in color. Was cleaned during use by brush and towel method.
From my experience, the depression in the face of the pad is caused by heat and time.
Originally Posted by Thomkirby
For the BF-One Step you have suggested to use a polishing pad I believe but as to amount of product, go light or keep adding to prevent going dry?
The pad in your picture is a Lake Country Force Hybrid Foam Cutting Pad.
I recommend for most people to stick with less aggressive pads when using a one-step because on cars with softer paint a foam cutting pad can leave behind pad haze, that is the foam itself is marring the paint.
Now follow me, if a pad cause pad haze and you have to re-buff the car to remove the haze, you're no longer doing a one-step but a two step process. If you're detailing for money, you're going to lose money. If it's your own car, might as well start with a compound and then follow with the cleaner/wax and use a foam cutting pad with the compound and a polishing pad with the cleaner/wax.
Here's a few related articles....
Good rule of thumb when using an AIO - stick with foam polishing pads by Mike Phillips
How to correctly use an AIO or Cleaner/Wax by Mike Phillips
How many pads do I need to buff out my car?
Hope the above helps....
-
Re: Foam Pad after using BF One Step
Tool used was new Griots G6 and ran between speeds 5-6 when doing passes. Roof metal never felt that warm during the process.
Does storing pads in a warm garage have any impact to the life of the pads? Stored here in Houston home/garage but not that excessive this summer. This was only the real use of that pad.
I switched over to a Griots Yellow on the final section. Would my LC-White polishing Force Hybrid be similar to the Griots yellow? I have more LC-pads at this point.
Thanks Mike for links, I have more of that car to do as time allows.
Thank you David for the questions and everyone’s thoughts.
-
Super Member

Re: Foam Pad after using BF One Step
How much of the vehicle did u use the pad for and what speed were you running the machine on? Even tho the paint doesnt feel hot, the pad and backing plate can get hot. Especially when a pad becomes more saturated. It is why you see the suggestion to change pads often on the forums!
-
Post Thanks / Like - 0 Thanks, 1 Likes, 0 Dislikes
-
-
Newbie Member

Re: Foam Pad after using BF One Step
Force Pads are designed for forced rotation machines, particularly the Flex 3401 in mind. So being geared for that machine, there are design elements that are not ideal for lower power DA's and long stroke DA's. Two particular elements of the Force pad line are closed cell foam, and being thick. The Flex 3401 is a workhorse in that it is forced, yet a smaller orbit than long throw machine. Therefore, the closed cell reduces saturation, and puts the compound to work keeping it between the surface and the pad rather than in the pad. The thinker pad is due to the transmission of power on "the beast". Now, what does this mean when you put these pads on machine sit wasn't designed for?
1) On lower powered machines the thick pad doesn't rotate, the orbiting creates heat but it is not dispersed with the lack of rotation, couple that with closed cell foam, and he heat generation is higher. Think about standing in the sun with no breeze, then in the same with a breeze, cooler with a breeze. Same applies with rotation. You may not have a lot of heat on the surface, but internally in the pad it's getting hot.
2) Thicker pad is harder to get up to speed on lower power machines, more stall, less or no rotation, and then you're back to #1 above
3) On long throw machines, as we know the long throw is fast correction, but it also generates a lot of heat, see #1 above. Closed cell foams don't disperse heat well, so when you add pressure, the fibers are compressed and in many cases flat rubbing other fibers of other cells, with is increased friction, and heat, internally in the pad, and it breaks down, so a thermal and mechanical breakdown.
So if you're not getting the results you desire, it's common to crank up the machine, and add pressure. Both which in the scenarios above make the situation worse, when using a less than ideal pad for the machine. Then you can mix in the variables in amount of compound/polish.
We make great pads, but there are some, particularly the Force pad line that are really specific in their design intent. Because of the quality of our pads, people buy them on name alone, not knowing design elements or features can exist in a piece of foam. We truly do test and design pads for specific applications. Foam isn't just foam. Then there are videos on the internet stating "always use a thick pad", "always use a thin pad", and they have not even researched the first thing about the pad itself, or it's intended use. If you look at our new catalog, you will see a tool guide with little number icons, and for each product line page, it lists the tool type the pad is meant for based on the number icons. Can you slap a pad on any machine and use it, you certainly can, but you may be cutting yourself short on work to achieve it, the time to achieve, and maybe more importantly getting the proper durability out of the pad.
Here is a link to our catalog, that also is a guide to what pads for what machines:
http://lakecountrymfg.com/LC-FullCat-8-03-18.pdf
I hope this info is helpful!
-
Post Thanks / Like - 2 Thanks, 0 Likes, 0 Dislikes
-
Re: Foam Pad after using BF One Step
How much of the pad conditioner did you use? And often 1-2 sprays are enough. Then you have the pad primed too with it. So just apply the One Step and polish. Since you use a cutting pad the paint would be swirled up and maybe a little dirty with embedded contaminants on the paint. So with the pad and AIO combo you are correcting effective. That means the pad get faster clogged up with clearcoat and contaminants. And is not easy to get that off the inside of the foam pad. You often get the topical off the pad and some of the wet product in the pad. You can test after you have done about 3-4 with cleaning the pad between each section. And take the pad off and compare the weight of it to a fresh clean pad. Also do a little testing with different amounts of the One Step applyied on the pad. And also look at the total area the section you are going to polish. There you can also adjust the amount of polish on the pad.
When you take off the pad you feel the velcro side of both the pad and backing plate for the amount of heat. And in the center of them it's the Most heat build up. But think when you dial in the amount of One Step applyied. And maybe skip the pad conditioner. To let the foam has it's ventilation properties opened. And don't do to much sections with 1 pad. You will have a great pad for a longer time. Cause it's goes fast when the pad gets overheated and melts down in between of the velcro and foam. So it's safer to work with more pads and in the longrun saves you some money too.
-
Post Thanks / Like - 0 Thanks, 1 Likes, 0 Dislikes
Similar Threads
-
By CC268 in forum Boat & Marine Craft Detailing
Replies: 6
Last Post: 07-30-2020, 07:52 PM
-
By gportiz in forum Auto Detailing 101
Replies: 4
Last Post: 11-29-2018, 09:30 PM
-
By pbalias in forum Boat & Marine Craft Detailing
Replies: 11
Last Post: 04-28-2018, 11:57 AM
-
By silverfox in forum Auto Detailing 101
Replies: 9
Last Post: 11-21-2010, 12:28 PM
-
By kc's in forum Show N' Shine
Replies: 4
Last Post: 07-16-2010, 01:19 PM
 Members who have read this thread: 0
There are no members to list at the moment.
Posting Permissions
- You may not post new threads
- You may not post replies
- You may not post attachments
- You may not edit your posts
-
Forum Rules
|
| S |
M |
T |
W |
T |
F |
S |
| 28 | 29 | 30 |
1
|
2
|
3
|
4
|
|
5
|
6
|
7
|
8
|
9
|
10
|
11
|
|
12
|
13
|
14
|
15
|
16
|
17
|
18
|
|
19
|
20
|
21
|
22
|
23
|
24
|
25
|
|
26
|
27
|
28
|
29
|
30
|
31
| 1 |
|


 Thanks:
  Likes:


 Reply With Quote
Bookmarks