|
-
Re: 1976 Corvette Original Single Stage Paint - Paint Correction and Waxing
I had a 1975 Bronze colored 'Vette that I bought from my brother who purchased it new. He sold it to me and purchased a 1965 yellow coupe. My '75 was a dog, I think it had around 195 hp. My '19 'Vette GS has 460 horses
Rich
-
Super Member

Re: 1976 Corvette Original Single Stage Paint - Paint Correction and Waxing
Incredible turnaround. I agree with Aaryn, and probably everyone else, but give me the original car. Original paint is only original once.
2017 Jeep Wrangler Unlimited Rubicon
1999 Camaro Z28
-
Post Thanks / Like - 0 Thanks, 1 Likes, 0 Dislikes
-
Re: 1976 Corvette Original Single Stage Paint - Paint Correction and Waxing
 Originally Posted by Mike Phillips

The polish is actually the BLACKFIRE One Step - I apply to the entire car and let it fully dry before removing.
Mike do you do this with most of your AIO's or is this unique to One Step?
-
Super Member

Re: 1976 Corvette Orignal Single Stage Paint - Paint Correction and Waxing
Mike,
I'm with craigv. How come you didn't use the Meguiar's #7 approach this time around? Also do you have an article on how to select the correct products and pads to correct the paint? What would you have done had there been coloration on the clay? Is there a cure time for the BlackFire One Step, and could you add another layer of protection with a product like Beadmaker? I noticed that you used the Tornador air gun as a pad cleaning tool. That's a slick trick! Let me just say that the paint looks absolutely fabulous! Any response you can give is much appreciated in advance. Take it easy Mike, and keep on shining! 
-
Super Member

Re: 1976 Corvette Original Single Stage Paint - Paint Correction and Waxing
Mike, interested in that question as well why was Megs #7 not used? Very interested as well as to how you restored the tires.
Bill Strobel
Owner Independent Towing & Repair
Fayetteville, NC
Do It Right or Don't Do It At All
-
Super Member
 Re: 1976 Corvette Original Single Stage Paint - Paint Correction and Waxing Re: 1976 Corvette Original Single Stage Paint - Paint Correction and Waxing
Originally Posted by theamcguy
Mike, interested in that question as well why was Megs #7 not used? Very interested as well as to how you restored the tires.
You know I did think about it some. Perhaps the paint just wasnt in a condition where it needed that step. I mean I didn't see a lot of if any oxidation. Plus the paint was thin as well so perhaps it could not hold up to the additional step of Meguiar's #7. There were mostly just scratches and swirl marks, which compounding would remove no problem. Did you see that one patch? It was really scratched up.
-
Super Member

Re: 1976 Corvette Orignal Single Stage Paint - Paint Correction and Waxing
Originally Posted by Red&BlackJacob
Mike,
I'm with craigv. How come you didn't use the Meguiar's #7 approach this time around?)
I thought for sure he was gonna do this.
Solid 10 footer results.
-
Re: 1976 Corvette Original Single Stage Paint - Paint Correction and Waxing
Originally Posted by craigv
Impressive result Mike. You are a magician with a buffer in your hands.
Thank you. It was nerve-wraking buffing out this car simply because of all the thin spots. But it was
A: Compound it.
B: Repaint it.
I could as a couple of local restoration shops what they would charge to re-paint this car the RIGHT way, and by the "right way", I mean, do whatever it takes to get the body panels and paint right. Never mind rebuilding any of the mechanicals, just the paint.
My guess would be in the range of $30,000.00
And for a lot of people, myself included, before I dumped even half that into a paint job I would do what I did, that is buff it out. Cross your fingers, use great abrasive technology and then be damn careful.
Originally Posted by craigv
The paint looked pretty old and hammered. Surprising that you used a compound. You are more brave than I would have been. I would have bailed and just used Blackfire One Step twice. Just kinda snuck up on it.
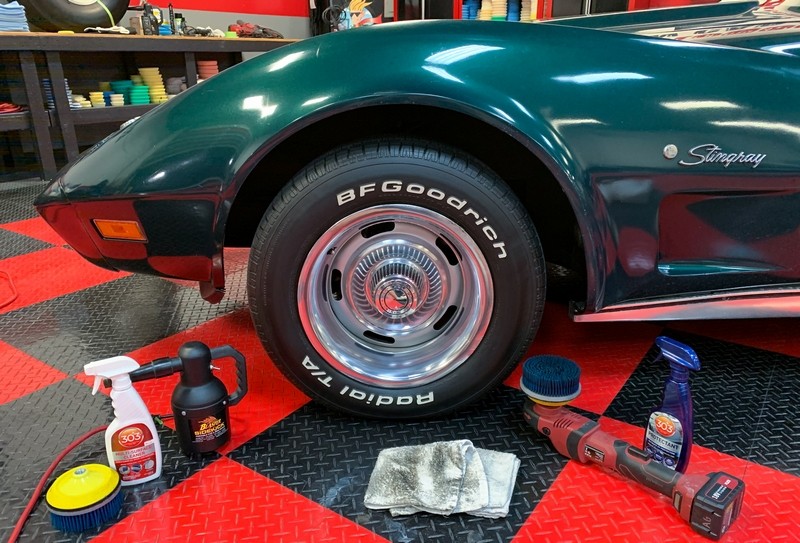
That was the original plan, JUST use BLACKFIRE One Step. This would be a very safe approach. I tested the BF One Step on the passenger side roof panel and it simply didn't remove enough of the damaged paint to make a "wow" difference. In fact, if all I used was the BF One Step, it was going to look like shiny dull/cloudy/whitish paint. In other words, it was still going to look like crap.
The 2 pads in the back left you see in this picture, these were my Test Spot pads using only BF One Step. One is the RUPES wool polishing pad the other a LC Hybrid polishing pad. Neither did enough correction to make the kind of before and after difference you see in the after pictures. I tried the least aggressive approach, I HOPED it would work - but it simply wasn't enough.

Originally Posted by craigv
I have seen you use Meguirs #7 Glaze before on that condition of paint to give the paint some nourishment. Why not this time?
Good question. I get this question a lot for different projects I tackle with either original paint or antique paint. I'll answer below because others are also asking.
Originally Posted by craigv
Lastly, I see you used my favorite lubricant to clay with. Sonax Glass Cleaner. Love the dual role it plays on the paint. Lubricate and CLEAN the dirt and grim off the surface.
Yeah it's one of my favorite products. It's truly a great glass cleaner but I use it as a rinseless wash and a waterless wash. When using as a rinseless wash I simply dump half a bottle into about 3 gallons of water. I did this for the 1967 Camaro convertible for both the vinyl top and the paint, glass and chrome.
Review: Machine applying RaggTopp Vinyl Cleaner and Protectant - 1967 Camaro Convertible
Click this link and I show how I used the SONAX Glass Cleaner as a wash.
Mike Phillips - Rinsing without running water
Originally Posted by craigv
As always....thanks for your time and efforts to inform and educate myself and the car detailing community.
Craig
Thank you, I'm always thankful to have a job I love.
Just to comment, we've tried 2 TV shows to showcase car detailing, and the one thing I always noticed about them is that unlike all the other "Car Guy" TV shows - none of them ever have a platform where they share their knowledge and also answer questions for their audience. For example, name one Car Guy TV star and include the link to where you can go to ask them questions and get their answers? Or read their articles, reviews or write-ups? Maybe that's why the shows didn't make it.
Originally Posted by Red&BlackJacob
Mike,
I'm with craigv. How come you didn't use the Meguiar's #7 approach this time around?
I'll answer this in a dedicated reply, not this multi-quote reply. Good question and as I shared above, I get this question a LOT when it comes to working on original and/or antique paint.
Originally Posted by Red&BlackJacob
Also do you have an article on how to select the correct products and pads to correct the paint?
Yes. This recent article answers your question, but not with specific product recommendations but instead, a big picture point of view. The key when working on car paint is to always use GREAT abrasive technology. If you use crap for products you'll get crap for results.
The two reasons WHY you should always do a Test Spot before buffing out any car
And anyone reading this into the future, if you haven't read this article, I recommend it.
Abrasive Technology - THE most important factor when it comes to polishing paint
Originally Posted by Red&BlackJacob
What would you have done had there been coloration on the clay?
There was discoloration. It's the color green and it's dead paint coming of the car, just not tons of it.

Here's a single stage paint Bronco I detailed back in 2004, just 16 years ago, look at the amount of paint coming off the Bronco and onto the clay.
1986 Ford Bronco II - Extreme Makeover
Before

After just one half of the hood.

Back in 2004 - Nanoskin towels had not been invented yet. All we had was clay. After claying the Bronco the clay was so contaminated it was thrown away.
Originally Posted by Red&BlackJacob
Is there a cure time for the BlackFire One Step, and could you add another layer of protection with a product like Beadmaker?
The cure time for BF One Step is the same for ALL products. After application and wipe-off, wait for a WINDOW OF TIME for 12 to 24 hours before disrupting the finish. Give whatever Magic Voodoo Juice is in the product the time to do it's thing, whatever it's "thing" is,
Polymerize, Bond, Crosslink, Hydrogen Bond, Set-up, Dry, etc.
And yes you could do what's called Topping. This article dates back to 2011, that's 9 years ago as I type today.
Topping - Definition - How to Top also called Topping
I wouldn't use a product like the Beadmaker though, I would use something more substantial like the BLACKFIRE BlackIce, which I have shown as a topper for the BF One Step. But any NON-CLEANING wax or sealant could be used including SONAX PNS.
Originally Posted by Red&BlackJacob
I noticed that you used the Tornador air gun as a pad cleaning tool. That's a slick trick!
While the Tornador Blow Out Gun is great for cleaning microfiber pads I would never use it to clean foam pads. I don't use a lot of micorifber pads because I don't like how they feel when buffing and most of the time they inflict their own scratches called micro-marring. I've explained this hundreds of times n this forum but here's the short version.
Fibers are abrasives
On soft and even medium hardness paint - each one of the fibers in a microfiber pad will CUT the paint leaving tiny scratches in it and when using any brand of orbital polisher, these tiny scratches are called micro-marring.
It's okay to micro-mar the paint if you're going to do a follow-up step using foam, (uniform texture, not individual fibers), but if you're NOT going to so a second step - then you're leaving micro-marring in the paint.
I think I recently posted somewhere I've been using microfiber pads since before the world knew about them so it's not that I'm not WISE to their capabilities, I just prefer to buff with foam. And I can really go DEEP on this topic if anyone wants me to.
See this article I wrote just a few weeks ago and specifically post #2
Fibers are a form of abrasive - Foam Pads vs Microfiber Pads by Mike Phillips
Originally Posted by Red&BlackJacob
Let me just say that the paint looks absolutely fabulous! Any response you can give is much appreciated in advance. Take it easy Mike, and keep on shining!
Thanks for asking your questions, I'll answer about the #7 below.
Originally Posted by theamcguy
Mike, interested in that question as well why was Megs #7 not used?
Good question - I'll answer below.
Originally Posted by theamcguy
Very interested as well as to how you restored the tires.
Ask and you shall receive...
Review: 303 Multi-Surface Cleaner as a Tire Cleaner + 303 Protectant as a Tire Dressing by Mike Phillips
Originally Posted by Red&BlackJacob
You know I did think about it some.
Perhaps the paint just wasnt in a condition where it needed that step.
I mean I didn't see a lot of if any oxidation.
The above is correct.
Originally Posted by Red&BlackJacob
Plus the paint was thin as well so perhaps it could not hold up to the additional step of Meguiar's #7. There were mostly just scratches and swirl marks, which compounding would remove no problem. Did you see that one patch? It was really scratched up.
I'll post in my follow-up why I didn't use #7 for this project.
Thanks for all the great questions....
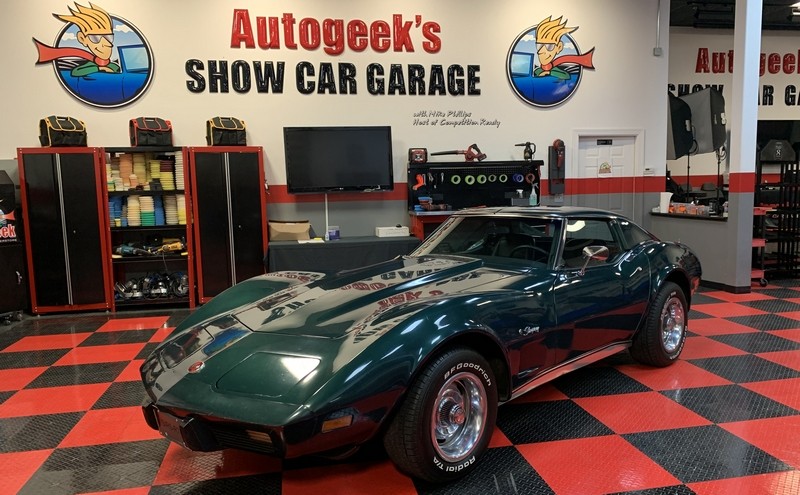
Like I always say, the opportunity to work on any car with the original antique paint is RARE.
-
Post Thanks / Like - 1 Thanks, 2 Likes, 0 Dislikes
-
Re: 1976 Corvette Original Single Stage Paint - Paint Correction and Waxing
More....
Here's the short answer to the question about why I didn't use the #7 Rub Down Technique for the paint on this car.
It didn't have chalky oxidized paint.
The #7 Rub Down Technique is for a car that has the original, antique paint that has turned chalky. The chalkiness is oxidation.
A hard shine
Yes this paint was oxidized but it still has a hard shine to it. This is a picture I took after the car arrived and BEFORE I did anything to it. See the hard shine to the surface?
The paint is NOT chalky. In fact, the surface was almost case-hardened with time. There was light oxidation, you can see a little green paint came off the car and onto the clay bar, but there was not tons of green paint i.e. oxidation coming off when I clayed it.
The paint was simply aged, stained, spotted and filled with swirls and scratches.
The #7 would not have done anything to bring the paint back to life so I first tried the very safe BLACKFIRE One Step and when that wouldn't cut through the years of hardening, I resorted to the Pinnacle Advanced Compound.
I guess it's a judgement call as to when to use the #7 technique or not and the judgment comes from years of experience buffing out just about everything under the sun.
-
Post Thanks / Like - 2 Thanks, 3 Likes, 0 Dislikes
-
-
Post Thanks / Like - 0 Thanks, 1 Likes, 0 Dislikes
Similar Threads
-
By Mike Phillips in forum PICTURES: Wednesday Night Detailing Classes
Replies: 15
Last Post: 03-19-2019, 08:24 AM
-
By Mike Phillips in forum How to articles
Replies: 6
Last Post: 06-27-2017, 07:32 AM
-
By Mike Phillips in forum Wednesday Night Detailing Classes - Info & Dates
Replies: 3
Last Post: 07-07-2016, 03:33 PM
-
By Shark Politur in forum Show N' Shine
Replies: 40
Last Post: 04-05-2016, 01:41 PM
-
By Mystic195 in forum Show N' Shine
Replies: 18
Last Post: 03-09-2015, 02:53 PM
 Members who have read this thread: 1
Posting Permissions
- You may not post new threads
- You may not post replies
- You may not post attachments
- You may not edit your posts
-
Forum Rules
|
| S |
M |
T |
W |
T |
F |
S |
| 28 | 29 | 30 |
1
|
2
|
3
|
4
|
|
5
|
6
|
7
|
8
|
9
|
10
|
11
|
|
12
|
13
|
14
|
15
|
16
|
17
|
18
|
|
19
|
20
|
21
|
22
|
23
|
24
|
25
|
|
26
|
27
|
28
|
29
|
30
|
31
| 1 |
|


 Thanks:
  Likes:
  Dislikes:


 Reply With Quote

Bookmarks