Mister B
New member
- Jun 16, 2009
- 594
- 0
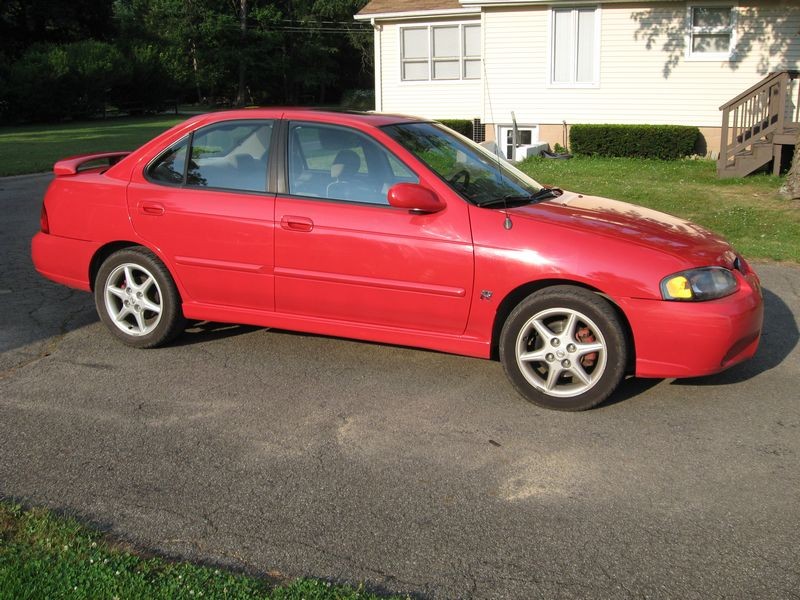
2002 Nissan Sentra Extreme Makeover - [Exterior Only].
This was my first major detail for cash. The 5 or 6 years leading up to this was mostly spent detailing my own vehicles or the occasional family members vehicle.
It all began when I was at a pig roast over the 4th of July weekend when a friend of mine noticed how shiny my red truck was and asked if I thought I could do something with his Red Nissan Sentra with 106,000 miles. He said the paint was dead and had very little shine to it. So I told him sure, bring it over some time and I will see what I can do with it.
About a week later he dropped the car off to me and said I could keep it for the entire week since they would be away on vacation. I thought great! That will give me plenty of time to work on it a little bit each night at my own pace without trying to rush through it all at once. It was late when he dropped the car off, so I parked the car in my garage and shut off the lights and locked up for the night.
Later the next day I pulled the car outside and washed it. I sprayed all of the lower panels with Meguiar’s Body Solvent, let it dwell for 10 minutes or so and then mixed up a bucket of wash water with Meguiar’s Gold Class Soap and began to wash the car. The front bumper had a lot of accumulated bugs and some of the lower panels had some old stubborn tar that two applications of Body Solvent did not touch, so I used my Sure Scrub Sponge (similar to Pinnacle Safe Scrub Sponge) which made quick work of the remaining contaminants.
Now that the car was washed I took a few pictures to show how faded the color is.

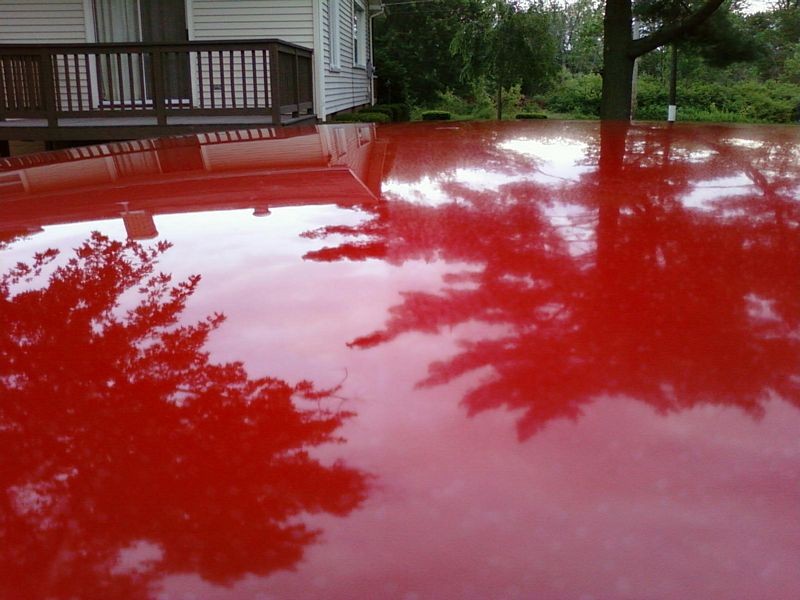
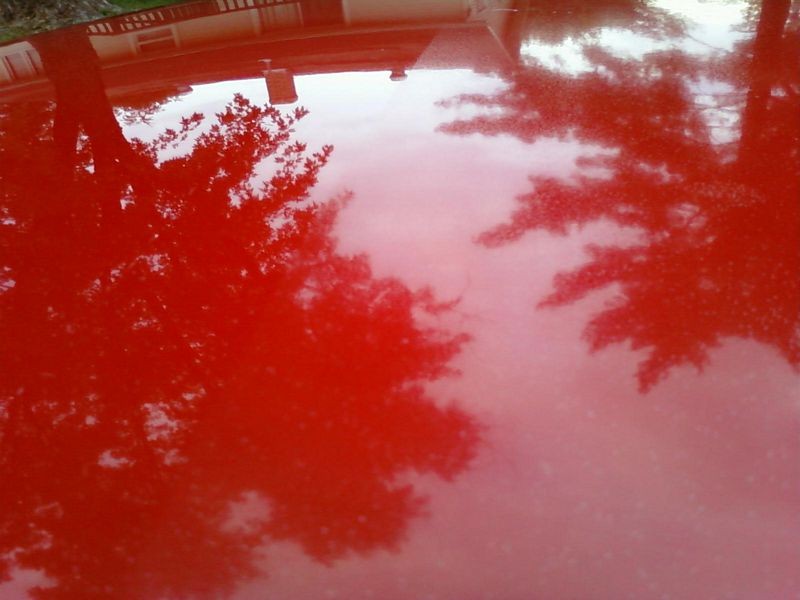
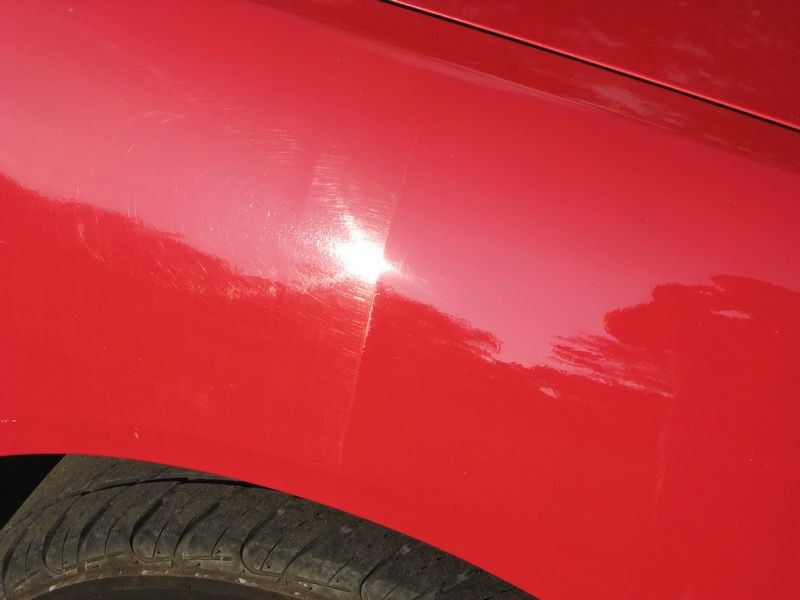
Now it was time to get a better look at the true condition of the paint. I ran my hand across the roof and it was very rough to the touch. More so than what I normally feel from above surface bonded contaminates alone. So I started looking at the paint from several different angles while out in the sun and I noticed that the paint had a lot of pitting. I could also see small opaque white dots throughout the clear coat on all of the horizontal metal surfaces.
Here is a close up view showing how pitted the surface of the paint was.

Here is a photo showing the opaque white dots, which I believe is the beginning stages of clear coat failure.

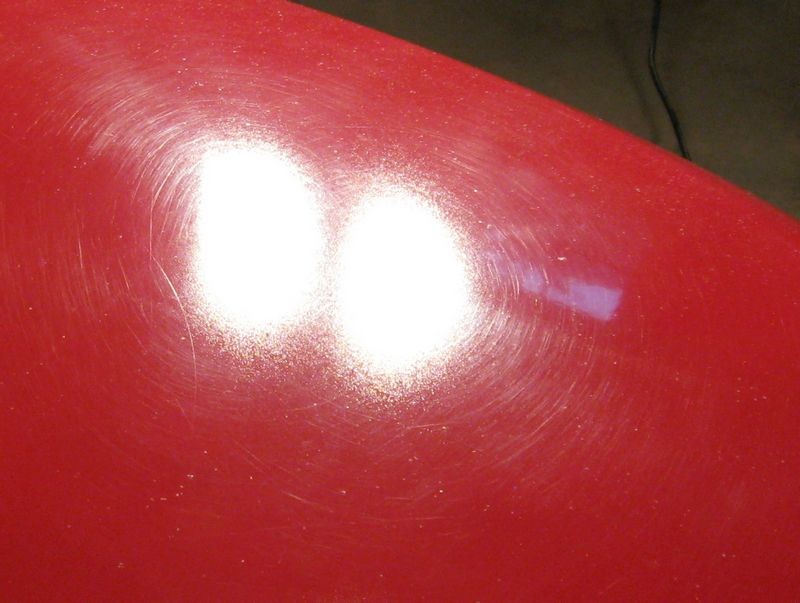
I then took the car into the garage to try a test spot on the roof with M105 on an Orange 5.5” CCS pad with my G100 set to speed 6. After doing 3 section passes with moderate to heavy pressure I was pleased with the results, so I followed that up with a couple passes of M205 on a Meguiar’s 6.5” finishing pad. Then I took the car back outside to inspect the results in better light.
The right side shows the hazy and pitted texture that was across the entire roof. The left side is my test spot. You can see that most of the pitted texture has been removed and the paint is much clearer as can be seen by how much crisper and defined the reflections look as compared to the unpolished right side.
Satisfied with the results from my test spot, I pulled the car back into the garage and got to work on polishing out half of the hood with the same process as above.
Here is a 50/50 shot with my dual halogens lighting the hood. You can see how swirled the left side is compared to the right side that I just finished polishing out with M105 and M205.

Here is a shot with the halogens on the trunk to show how swirled, pitted and hazed everything is.
It was now getting late, so I shut everything down and locked up for the night.
The next day after work, I went out into the garage and finished polishing out the rest of the hood and then jumped to the front bumper. The front and rear bumpers actually had a different look to them than the rest of the car did. The front and rear bumpers were more oxidized and pink looking without the pitting that the clear coat on the roof and hood had. I began by running a strip of tape down the middle of the front bumper and polished the right half of the center section of the bumper. After starting up the polisher and doing that one small section I noticed that my pad turned red. I knew I must be dealing with single stage paint here.
Here is a 50/50 shot of the front bumper. You can see how dull and oxidized the paint on the left is compared to the area on the right that I just polished.

I finished up polishing the right side of the bumper and then left the other side of the bumper for later because there was some damage I needed to fix first. I will show that later.
The next day after work I decided to work on the front fenders with the same process as above. I again began with a strip of tape down the center and then polished the right side out.
I pulled the car outside to take the 50/50 comparison shot of the fender. You can also see the damage to the front corner of the bumper that I was talking about.

Here is a close up. It is definitely looking a lot better!
Next, I pulled the car back into the garage and went to town polishing out the entire passenger side. That took me several hours and it was getting late so I did not take any pictures of the passenger side that night.
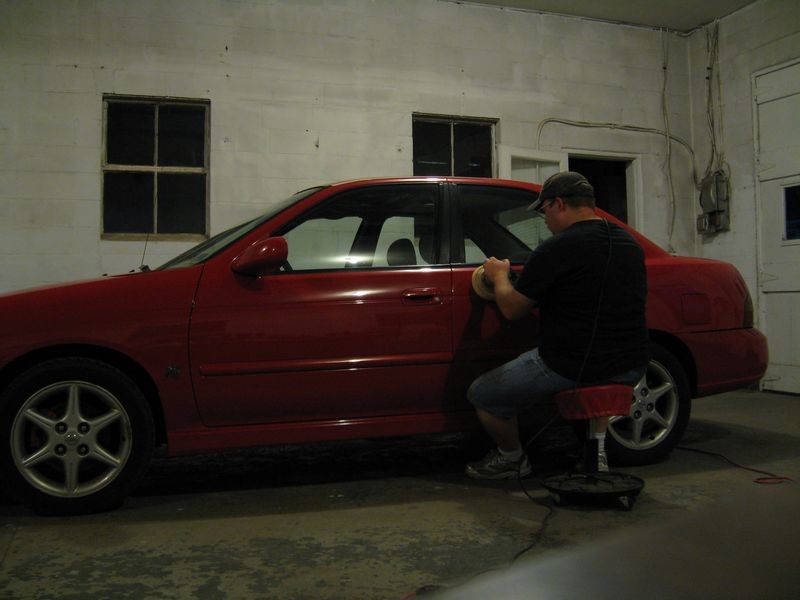
The next day I decided I wanted to try and speed things up a little, so I got out my rotary and wool pad and did a test spot with M105 and it immediately gummed up and dried out on me and made the rotary difficult to control, so I scrapped that idea and decided to try a Meguiars 6.5” polishing pad and M105 on the rotary instead. This combination worked much better. I then proceeded to tape off all of the panel joints, window trim, door handles, emblems and moldings on the entire drivers side of the car so that I would not accidentally burn an edge. I just wanted to be extra careful. Especially since I had only used the rotary on a few test panels before this and never a whole car.
Taping up the driver’s side.


After taping up the car I proceeded to buff the entire driver’s side and trunk with M105 on a Meguiar’s polishing pad on my rotary.
After buffing everything out with M105 on the rotary, I followed up with my G100 and M105 on a white 5.5” CCS polishing pad to get a little more correction as well as to make sure that I would not have any holograms left behind by the rotary buffer. Next I removed the tape from the car and proceeded to polish it out with M205 on my G100 and a white 5.5” CCS polishing pad to refine the finish and bring up the gloss a little more. Then I called it a night as it was getting late.
Buffing the Roof with M105 on the Rotary.

Polishing with M205 on the G100.
The next day I pulled the car outside to inspect the results. It’s really starting to look good. If you notice, I removed the rear spoiler so that I could buff the trunk area out easier.

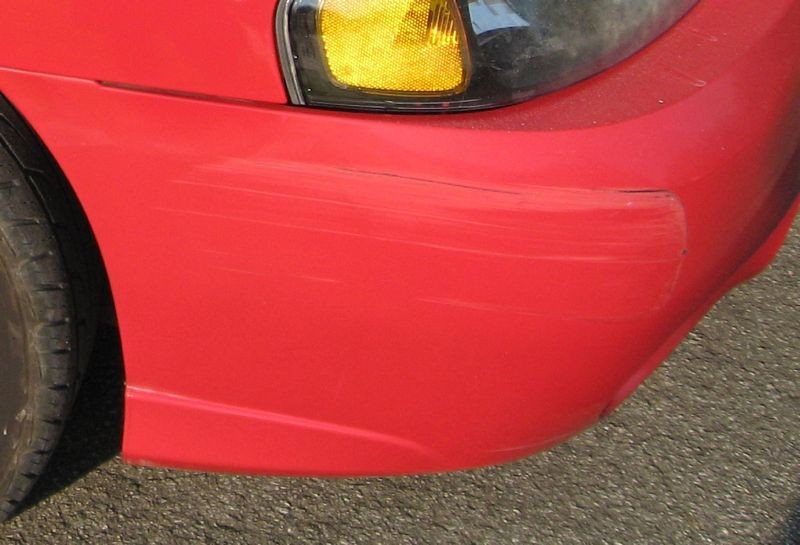
I pulled the car back into the garage and got to work on the front bumper again. I had skipped polishing the passenger side of the bumper initially due to some damage to the front corner. I wanted to try and wet sand that area a little to try and feather some of the scratches out a little before I started buffing.
Here is the scrape.
This is after wet sanding with 2000 Unigrit Wet Sanding Paper.

This is after polishing out my wet sanding scratches with M105 followed by M205. Obviously you cannot fix this type of damage by wet sanding alone, but I definitely improved its appearance some.

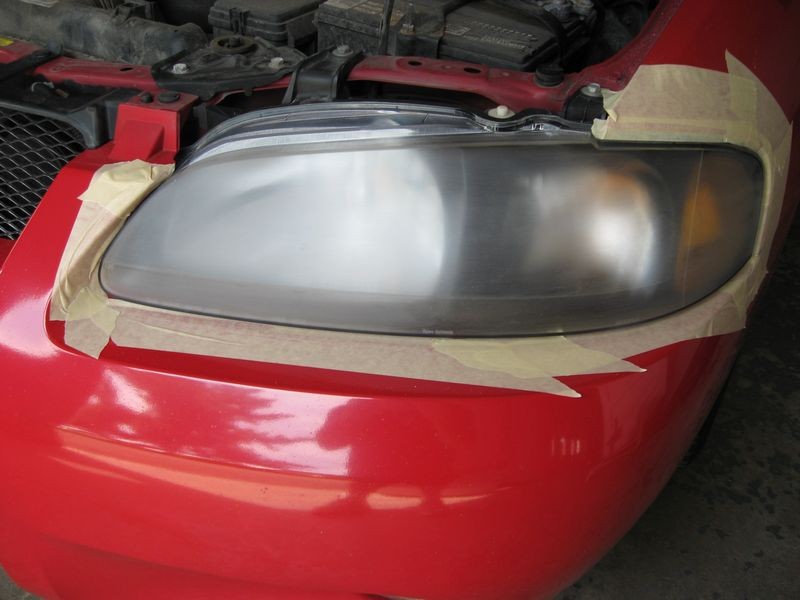
Next up I wanted to work on the headlights. You can see that the headlights are starting to oxidize and this will diminish your night time visibility as well as detract from the overall appearance of this car detail. Who wants to see a nice shiny car with ugly oxidized headlights?
Oxidized headlights.

My dad actually offers a headlight restoration service at the dealership he runs, so I had him bring me home one of their kits to use in restoring these headlights.
I began by taping off the surrounding paint to protect it. Next I started wet sanding the headlight lens with 400 grit wet sanding paper, followed up by 1000 grit wet sanding paper and then I finished off with 2000 grit wet sanding sandpaper.
You can now see the oxidation has been completely removed and now there is a uniform frosted finish to the headlight lens.
Next I was ready to apply the sealant that came with the headlight restoration kit. I applied a liberal amount of the sealant to a foam brush as per the instructions and then made 3 overlapping horizontal passes across the headlight lens until I had fully covered the entire lens.
After the lights fully dried I removed the masking tape and here are the final results. Nice! Big improvement.

I left the car sit for several hours to allow the sealant to fully set up.

Later in the day I washed down the car and wiped down the door jams to remove any dust from my compounding and polishing process and after everything was dry, I applied a coat of Meguiar’s M26 Hi-Tech Yellow wax via G100 and Meguiar’s 6.5” finishing pad. I left the wax dry to a haze and then I removed it with a Supreme Shine microfiber towel. Next I cleaned the windows with Meguiar’s Glass Cleaner Concentrate and then gave the car a final wipe down with Meguiar’s Ultimate Quik Detailer and then pulled the car outside for some after pictures.
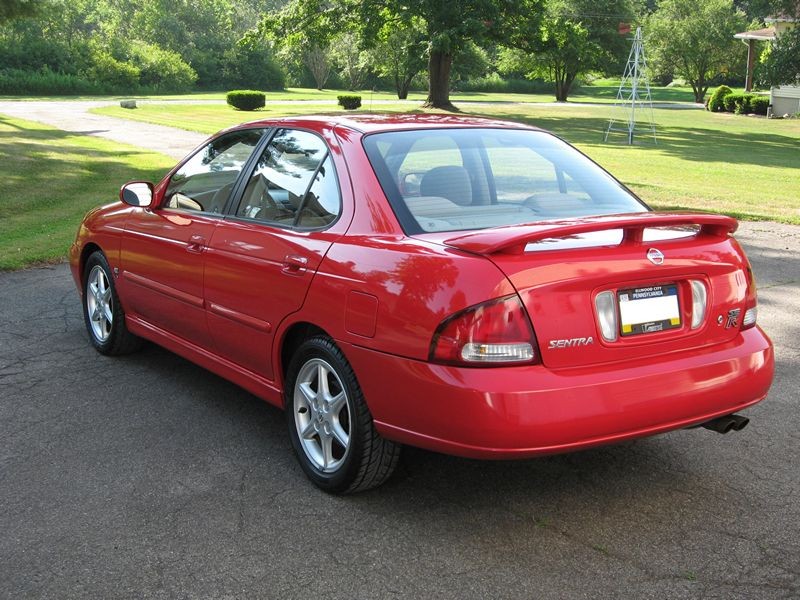
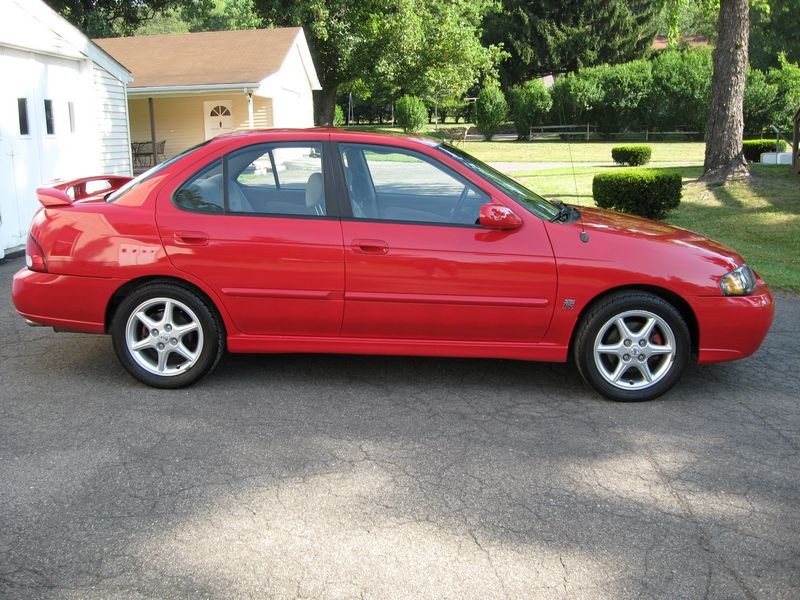
Here is the finished product.


I probably had between 15 and 20 hours work into this car spread out over 5 or 6 days. I'm sure I spent way too many hours on it, but in the end it was worth it to me.
I am very happy with how everything came out considering the condition that the paint was in when I started. My friend was amazed how good it looked when he came to pick it up. He could not believe it was the same car.
Products Used:
Meguiar’s Gold Class Wash
Meguiar’s Body solvent
Poorboy’s Bug Squash
Meguiar’s All Wheel Cleaner
Meguiar’s APC+
Meguiar’s M105
Meguiar’s M205
Lake Country 5.5” Orange CCS Pad
Lake Country 5.5” White CCS Pad
Meguiar’s 6.5” Polishing Pad
Meguiar’s 6.5” Finishing Pad
Meguiar’s Last Touch
Meguiar’s #39 Heavy Duty Vinyl and rubber Cleaner
Meguiar’s Glass Cleaner Concentrate
Meguiar’s #26 Hi-Tech Yellow Wax
Meguiar’s #40 Vinyl and Rubber Cleaner/Conditioner (Used on Tires)
Meguiar’s Ultimate Quik Detailer
Meguiar's Unigrit Wet Sanding Paper - 2000
This was my first major detail for cash. The 5 or 6 years leading up to this was mostly spent detailing my own vehicles or the occasional family members vehicle.
It all began when I was at a pig roast over the 4th of July weekend when a friend of mine noticed how shiny my red truck was and asked if I thought I could do something with his Red Nissan Sentra with 106,000 miles. He said the paint was dead and had very little shine to it. So I told him sure, bring it over some time and I will see what I can do with it.
About a week later he dropped the car off to me and said I could keep it for the entire week since they would be away on vacation. I thought great! That will give me plenty of time to work on it a little bit each night at my own pace without trying to rush through it all at once. It was late when he dropped the car off, so I parked the car in my garage and shut off the lights and locked up for the night.
Later the next day I pulled the car outside and washed it. I sprayed all of the lower panels with Meguiar’s Body Solvent, let it dwell for 10 minutes or so and then mixed up a bucket of wash water with Meguiar’s Gold Class Soap and began to wash the car. The front bumper had a lot of accumulated bugs and some of the lower panels had some old stubborn tar that two applications of Body Solvent did not touch, so I used my Sure Scrub Sponge (similar to Pinnacle Safe Scrub Sponge) which made quick work of the remaining contaminants.
Now that the car was washed I took a few pictures to show how faded the color is.
Now it was time to get a better look at the true condition of the paint. I ran my hand across the roof and it was very rough to the touch. More so than what I normally feel from above surface bonded contaminates alone. So I started looking at the paint from several different angles while out in the sun and I noticed that the paint had a lot of pitting. I could also see small opaque white dots throughout the clear coat on all of the horizontal metal surfaces.
Here is a close up view showing how pitted the surface of the paint was.
Here is a photo showing the opaque white dots, which I believe is the beginning stages of clear coat failure.
I then took the car into the garage to try a test spot on the roof with M105 on an Orange 5.5” CCS pad with my G100 set to speed 6. After doing 3 section passes with moderate to heavy pressure I was pleased with the results, so I followed that up with a couple passes of M205 on a Meguiar’s 6.5” finishing pad. Then I took the car back outside to inspect the results in better light.
The right side shows the hazy and pitted texture that was across the entire roof. The left side is my test spot. You can see that most of the pitted texture has been removed and the paint is much clearer as can be seen by how much crisper and defined the reflections look as compared to the unpolished right side.
Satisfied with the results from my test spot, I pulled the car back into the garage and got to work on polishing out half of the hood with the same process as above.
Here is a 50/50 shot with my dual halogens lighting the hood. You can see how swirled the left side is compared to the right side that I just finished polishing out with M105 and M205.
Here is a shot with the halogens on the trunk to show how swirled, pitted and hazed everything is.
It was now getting late, so I shut everything down and locked up for the night.
The next day after work, I went out into the garage and finished polishing out the rest of the hood and then jumped to the front bumper. The front and rear bumpers actually had a different look to them than the rest of the car did. The front and rear bumpers were more oxidized and pink looking without the pitting that the clear coat on the roof and hood had. I began by running a strip of tape down the middle of the front bumper and polished the right half of the center section of the bumper. After starting up the polisher and doing that one small section I noticed that my pad turned red. I knew I must be dealing with single stage paint here.
Here is a 50/50 shot of the front bumper. You can see how dull and oxidized the paint on the left is compared to the area on the right that I just polished.
I finished up polishing the right side of the bumper and then left the other side of the bumper for later because there was some damage I needed to fix first. I will show that later.
The next day after work I decided to work on the front fenders with the same process as above. I again began with a strip of tape down the center and then polished the right side out.
I pulled the car outside to take the 50/50 comparison shot of the fender. You can also see the damage to the front corner of the bumper that I was talking about.
Here is a close up. It is definitely looking a lot better!
Next, I pulled the car back into the garage and went to town polishing out the entire passenger side. That took me several hours and it was getting late so I did not take any pictures of the passenger side that night.
The next day I decided I wanted to try and speed things up a little, so I got out my rotary and wool pad and did a test spot with M105 and it immediately gummed up and dried out on me and made the rotary difficult to control, so I scrapped that idea and decided to try a Meguiars 6.5” polishing pad and M105 on the rotary instead. This combination worked much better. I then proceeded to tape off all of the panel joints, window trim, door handles, emblems and moldings on the entire drivers side of the car so that I would not accidentally burn an edge. I just wanted to be extra careful. Especially since I had only used the rotary on a few test panels before this and never a whole car.
Taping up the driver’s side.
After taping up the car I proceeded to buff the entire driver’s side and trunk with M105 on a Meguiar’s polishing pad on my rotary.
After buffing everything out with M105 on the rotary, I followed up with my G100 and M105 on a white 5.5” CCS polishing pad to get a little more correction as well as to make sure that I would not have any holograms left behind by the rotary buffer. Next I removed the tape from the car and proceeded to polish it out with M205 on my G100 and a white 5.5” CCS polishing pad to refine the finish and bring up the gloss a little more. Then I called it a night as it was getting late.
Buffing the Roof with M105 on the Rotary.
Polishing with M205 on the G100.
The next day I pulled the car outside to inspect the results. It’s really starting to look good. If you notice, I removed the rear spoiler so that I could buff the trunk area out easier.
I pulled the car back into the garage and got to work on the front bumper again. I had skipped polishing the passenger side of the bumper initially due to some damage to the front corner. I wanted to try and wet sand that area a little to try and feather some of the scratches out a little before I started buffing.
Here is the scrape.
This is after wet sanding with 2000 Unigrit Wet Sanding Paper.
This is after polishing out my wet sanding scratches with M105 followed by M205. Obviously you cannot fix this type of damage by wet sanding alone, but I definitely improved its appearance some.
Next up I wanted to work on the headlights. You can see that the headlights are starting to oxidize and this will diminish your night time visibility as well as detract from the overall appearance of this car detail. Who wants to see a nice shiny car with ugly oxidized headlights?
Oxidized headlights.
My dad actually offers a headlight restoration service at the dealership he runs, so I had him bring me home one of their kits to use in restoring these headlights.
I began by taping off the surrounding paint to protect it. Next I started wet sanding the headlight lens with 400 grit wet sanding paper, followed up by 1000 grit wet sanding paper and then I finished off with 2000 grit wet sanding sandpaper.
You can now see the oxidation has been completely removed and now there is a uniform frosted finish to the headlight lens.
Next I was ready to apply the sealant that came with the headlight restoration kit. I applied a liberal amount of the sealant to a foam brush as per the instructions and then made 3 overlapping horizontal passes across the headlight lens until I had fully covered the entire lens.
After the lights fully dried I removed the masking tape and here are the final results. Nice! Big improvement.
I left the car sit for several hours to allow the sealant to fully set up.
Later in the day I washed down the car and wiped down the door jams to remove any dust from my compounding and polishing process and after everything was dry, I applied a coat of Meguiar’s M26 Hi-Tech Yellow wax via G100 and Meguiar’s 6.5” finishing pad. I left the wax dry to a haze and then I removed it with a Supreme Shine microfiber towel. Next I cleaned the windows with Meguiar’s Glass Cleaner Concentrate and then gave the car a final wipe down with Meguiar’s Ultimate Quik Detailer and then pulled the car outside for some after pictures.
Here is the finished product.
I probably had between 15 and 20 hours work into this car spread out over 5 or 6 days. I'm sure I spent way too many hours on it, but in the end it was worth it to me.
I am very happy with how everything came out considering the condition that the paint was in when I started. My friend was amazed how good it looked when he came to pick it up. He could not believe it was the same car.
Products Used:
Meguiar’s Gold Class Wash
Meguiar’s Body solvent
Poorboy’s Bug Squash
Meguiar’s All Wheel Cleaner
Meguiar’s APC+
Meguiar’s M105
Meguiar’s M205
Lake Country 5.5” Orange CCS Pad
Lake Country 5.5” White CCS Pad
Meguiar’s 6.5” Polishing Pad
Meguiar’s 6.5” Finishing Pad
Meguiar’s Last Touch
Meguiar’s #39 Heavy Duty Vinyl and rubber Cleaner
Meguiar’s Glass Cleaner Concentrate
Meguiar’s #26 Hi-Tech Yellow Wax
Meguiar’s #40 Vinyl and Rubber Cleaner/Conditioner (Used on Tires)
Meguiar’s Ultimate Quik Detailer
Meguiar's Unigrit Wet Sanding Paper - 2000
Last edited:
")