 Thanks: 0
 Likes: 0
 Dislikes: 0
-
Super Member

How To Use GIMP to Crop and Resize Pictures - Free Software
How To Use GIMP to Crop and Resize Pictures - Free Software
From Wikipedia:
"The GNU Image Manipulation Program, or the GIMP, is a raster graphics editor application with some support for vector graphics. The GIMP can be used to process digital graphics and photographs.
Typical uses include creating graphics and logos, resizing and cropping photos, changing colors, combining images using a layer paradigm, removing unwanted image features, and converting between different image formats. The GIMP can also be used to create animated images using an improved layers method. The full capabilities of the GIMP extend much further, however, and include advanced image editing, manipulation, and professional graphics creation."
GIMP is provided free of charge under the GNU General Public License.
Install Program
(For Linux users, see your distribution file/program list. The GIMP is included with most Linux distributions.)
For Windows users, download and install the desired package from: GIMP - Windows installers
To Crop an Image (image height/width by pixels)
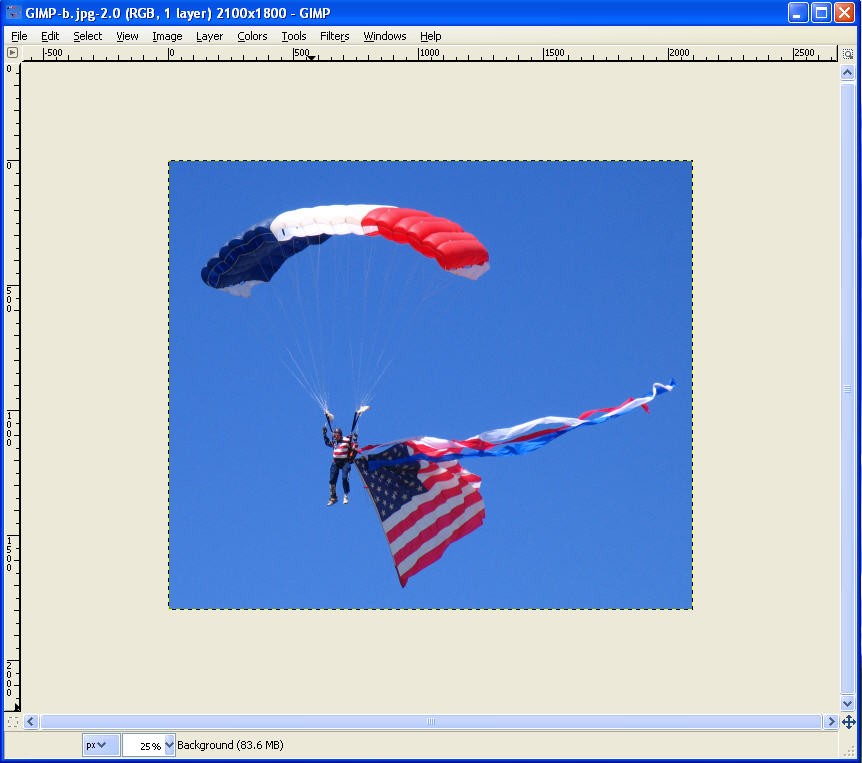
There is no rule that says you must keep your image at the ratio set by your camera! Cropping an image sets the focus point and removes extraneous visual information. Here we will crop the sample image to eliminate some sky.
Original

Cropped
There are two methods to crop an image:
1) Set the Canvas size height and width and move the image into the area
2) Select the desired area with the Rectangle Select tool (from the Toolbox floating tool bar)
Crop by Canvas Size
From the menu bar select Image > Canvas Size..., the Set Image Canvas Size windows opens.

Click on the chain icon to the right of the Width and Height spin buttons to break the link chain - this allows for specific width and height sizes (the link chain sets proportional sizing). Enter your desired width and height.

With your mouse, click on the image and drag it image in the resized box to the desired position. When positioned as you desire, click the Resize button.

From the menu bar click Image > Flatten Image.

Name and save your edited image (see Saving the Image File below).
Crop by Rectangle Select Tool (drag to outline selected area)
From the Toolbox floating toolbar select the Rectangle Select Tool.
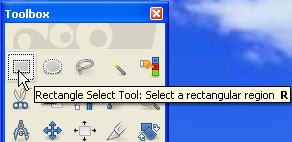
Start at a desired corner, click and drag the rectangle on the image to define the desired area and release the mouse button.

On the menu bar click Image > Crop to Selection.

Name and save your edited image (see Saving the Image File below).
To Scale an Image (image size by pixels)
Open your image from the GIMP tool window: File > Open then navigate to your image. Select it (click on it) in the Name frame then click the Open button (or double-click on the image name). Your image will open in a new window.
- OR -
Open the GIMP. Open a Windows Explorer session and navigate to your image file. Drag and drop the file onto the GIMP image window.
On the image window menu bar click on Image > Scale Image. The Scale Image dialog window will open.
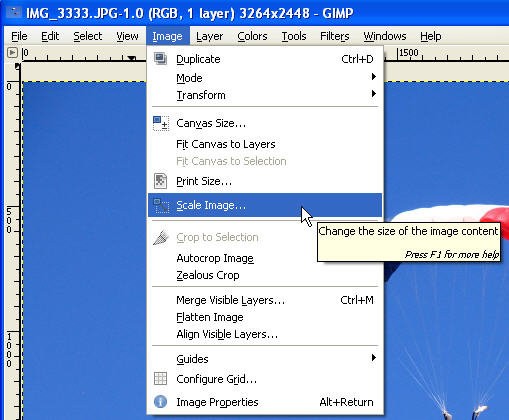
Check that the Image Size section has a "chain" linking the Width and Height boxes (this scales the image proportionally). Check that the value pixels is displayed (if not, click the drop-list arrow and select pixels from the list).

> If the Width is the Longest Side (landscape mode), double-click your mouse in the Width box which will select the value in the box. Type in the desired width.
> If the Height is the Longest Side (portrait mode), double-click your mouse in the Height box which will select the value in the box. Type in the desired height.
Click the Quality Interpolation drop-list arrow and select Cubic (Best) if it is not already selected.

Click the Scale button.
Your image has been proportionally scaled to your selected value.

Saving the Image File (save to a file size)
The GIMP allows you to save your image and tightly control the file size by selecting a balance of compression "quality", sub-sampling (part of the compression calculation), "smoothing" and other advanced options (such as saving EXIF data and including a thumbnail image). This short How-To will not explain these setting but will give preferred setting to maximize image quality within a maximum file size value.
On the image window menu bar click on File > Save as... The Save Image dialog window opens.

> If you are NOT working with a JPEG (jpg) image but want to save as a JPEG (jpg), click the "+" in front of Select File Type (By Extension) and scroll down the File Type and select (click on) JPEG image.
Click your mouse in the Name box and type in the name of the file (do not include the .jpg extension).
> Note the location of the Save in folder so you can find your image or click the Save in folder drop-list arrow and navigate to the location where you want to save the file.
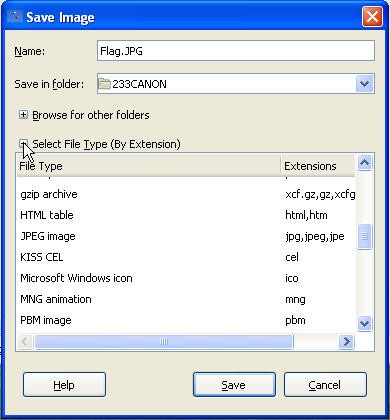
Click the Save button. The Save as JPEG dialog window opens.

Click (check) the box in front of Show Preview in image window. After checking the box you will see the File size displays with the current Advanced Options selections and values (displayed above the Show Preview in image window check box).

Click the "+" in front of Advanced Options. The Advanced Options expands with program default values.

Preparation to set quality and smaller file size:
> check Optimize
> check Progressive (some sites may not like this setting)
> uncheck Save EXIF data
> uncheck Save thumbnail
> set the DCT method to Integer or Floating-Point from the drop-list
From here you need to experiment with several values to balance image quality with file size. Changing a value will change the file size; some settings yield larger file size changes over other settings. The Save as JPEG window shows the File size on the top left just below the Quality slider.
Begin at the top of the Save as JPEG dialog window by changing the Quality value. Move the slider or click on the up/down spin buttons to change the Quality value until the File size is just above or just below the desired file size.
Next decide on a Sub-sampling value (select the value from the drop-list):
> 2x2,1x1,1x1 yields the smallest file size because of highest compression formula (most affect on the image)
> 2x2,1x1,1x1 (4:2:2) yields a slightly larger file size with a little less compression formula (more affect on the image)
> 1x1,1x1,1x1 yields the largest file size with the least compression formula (least affect on the image)
Re-adjust the Quality value (at the top of the window) - the goal is a high Quality value with an acceptable sub-sampling algorithm. You can exceed the desired limit by .2kb (point 2kb) and then use the Smoothing setting to lower the file size BUT THIS WILL SOFTEN THE IMAGE slightly. Click the UP spin button to increase the smoothing by 0.01 per click. Do not exceed a value of 0.10 or the image will become too soft - unless you are softening deliberately (but there are better ways to do that). You can watch the Smoothing effect on the image as you change values (it will preview the image as you make changes).

Click the Save button.
Final image, cropped and sized
(If you find errors or confusing information, please PM me and I'll make revisions.)
Regards,
GEWB
Last edited by gewb; 03-09-2010 at 01:06 PM.
Linux Reg. User #206357 (Feb. '99)
"Can't get there from here."
-
Similar Threads
-
By Mike Phillips in forum How to articles
Replies: 12
Last Post: 01-30-2022, 02:44 PM
-
By richy in forum Off-Topic
Replies: 11
Last Post: 09-18-2017, 08:31 PM
-
By Frank787 in forum Tips, Techniques and How-to Articles for Interacting on Discussion Forums
Replies: 7
Last Post: 03-09-2010, 07:47 PM
-
By kb2ehj in forum Tips, Techniques and How-to Articles for Interacting on Discussion Forums
Replies: 2
Last Post: 03-07-2010, 11:09 PM
-
By Mike Phillips in forum Tips, Techniques and How-to Articles for Interacting on Discussion Forums
Replies: 2
Last Post: 03-05-2010, 12:36 PM
 Members who have read this thread: 0
There are no members to list at the moment.
Posting Permissions
- You may not post new threads
- You may not post replies
- You may not post attachments
- You may not edit your posts
-
Forum Rules
|
| S |
M |
T |
W |
T |
F |
S |
| 31 |
1
|
2
|
3
|
4
|
5
|
6
|
|
7
|
8
|
9
|
10
|
11
|
12
|
13
|
|
14
|
15
|
16
|
17
|
18
|
19
|
20
|
|
21
|
22
|
23
|
24
|
25
|
26
|
27
|
|
28
|
29
|
30
| 1 | 2 | 3 | 4 |
|


 Reply With Quote


Bookmarks