 Thanks: 0
 Likes: 0
 Dislikes: 0
-
Super Member

23 YEAR OLD swirls on top of swirls - 88' Red Honda Civic pix/vids

Do i have everyone's attention now? This was by far the most swirled car we've ever touched. And just as a little insight, the Flex 3401 and D300 earned their keep with this poor thing. But lets start with the beginning.
A lady emailed me wanting her car detailed. She was mostly just interested in a wash and wax on the outside and a full interior. We swung by her house after finishing another one of our jobs to take a look at it. She informed us it was a 1988 Honda Civic, very low miles for the age but needed some love.
So at first mainly what we were looking at was the interior:

the dark colored carpet and seats hide the fact that there was a full sized poodle that was strewn across the entire interior...literally...she had a full size poodle...and as much fur as my sis was able to get out of these seats and carpets was amazing, coulda made a whole new poodle. When we went to empty out the shop vac it was just this HUGE blob...kinda crazy.
Anyway, after checking it out...she made a comment about "I'd have more done to the outside but I think it is beyond repair and not much can be done for it". To use that raised a red flag that said CHALLENGE! We told her that we could do more for it than she may think and asked her to let us have a go at it. She agreed.
So by the time the day of the detail came around, she decided to go ahead and have us do the engine as well.
SO, on the menu for the day was:
wash/clay/single pass and seal on the exterior
full interior
engine detail
Long day needless to say. So we started off with the engine. I tackled it while my sis was working on removing the poodle!
Heres how the engine looked like...i call this...23 years of Arizona!

Yeahh it was dirty. NOT greasy though, so that helped a lot. Only light grease in spots...so that was a time saver. After about an hour or so of spraying it with Megs Degreaser, agitating the dirt with different brushes, spraying it clean and wiping off excess water, and finally dressing it with Meguiars Hyperdressing 2:1 - here is what we came up with:

Doesn't even look like the same engine does it?
Another before and after:

Turned into:

And a nice close up look revealed:

More beauty of course!
Back to the interior, here again is what my sis was working with:

A LIGHT coat of dust as you can see *haha*
Here is how it turned out after vacuuming (and more vacuuming), extracting, steaming and dressing the full interior:

Gotta say that old red interior looked very very good when she was done.
Here is a before from the drivers side
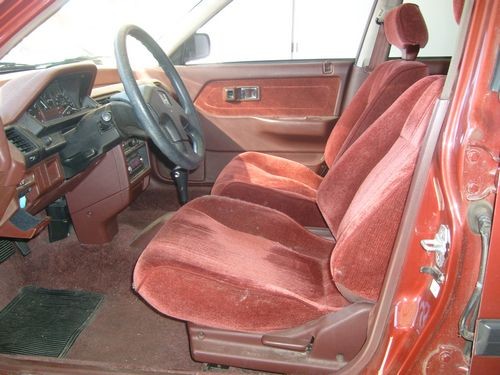
and after...

The back seats...aka "Poodle-Land" (actually got to see the poodle, very cool dog  ) )
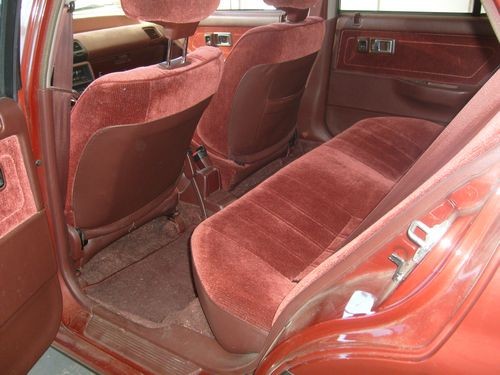

And a shot of the door:

Meguiars #40 brought that vinyl back to life.
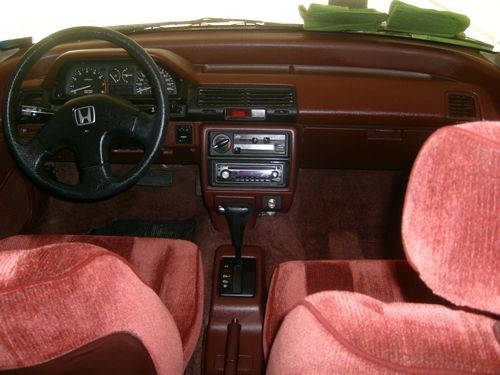
Cool cockpit shot!
This was a small car but doing all that interior took a LOT of time. Put it this way, was able to do the engine, clay the car (after both of us washed it) and finish about 3/4 of HARD CORE compounding by the time she finished the interior. But i must say, it was well worth it when you look at how it turned out.
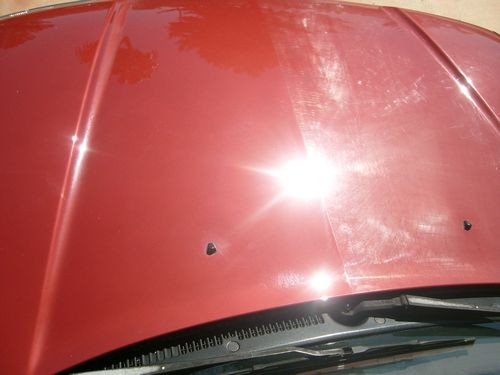
Now the the horror project of the show...the paint. Heres a full shot of the car before we started:

The extreme dirt was the least of its problems i can tell ya that! The paint was seriously SERIOUSLY swirled. But hey, if it wasn't for those little suckers we wouldn't have a job.
Heres another close up.

Yeah, did i mention it had water spot etching too? Well...it had water spot etching lol.
So originally I was going to hit it with D151 and a LC white pad. BUT after seeing the extent of the damage D151 never made it out of my bag. I went straight for Meguiars D300 and the cutting pad.
So like i said, I seriously had my work cut out for me. But to this i say....Bring It!

I didn't even bother with the Griots on this one either. Straight for the Flex 3401...put my MF cutting pad on it, primed it and did a test spot. The Flex HAS WORKED for me so far with D300, i know some say it hazes...well so far not for me...just a side note.
After doing my test spot i was speechless to say the least.
Brinkmann before:

And after:

No you're eyes are not fooling you, it came out THAT nice. I was so impressed, even though i knew it would take extra time, i taped the hood right down the middle and decided i'd do a little extra photo shooting.
I did 1/2 the hood and left the other 1/2 alone....and ended up with the best pictures of my detailing career, yes...on an 88' Honda Civic.


More of a close up...

And...the prize for BEST photo thus far goes to....this little guy right here:
Anyone who may still be on the fence of trying D300, try it and love the results. I really liked D300 before, but after this detail I have even more respect for it...and hey I'm going to give myself some credit here too. I DID end up going over some spots 2x's even though it was a single pass. And D300 was HARD to remove on some spots, I'm thinking because the paint was super super dry.
One trick i found, product removes like product. I had a little hand foam pad with me to hand rub some areas out, and when i came across spots after using the Flex and the compound was hard to take off, i used the hand pad to slightly re-wet the compound left from the flex, and then it wiped off much easier. Just a little tip...but this was the ONLY time D300 was difficult to remove so far.
So after seeing that i was basically getting 100% correction with a single pass (with the exception of a couple of spots), i was pretty fired up. I kept working my way around the car while my sis finished up the interior.
When she finished up she treated the trim with some Ultimate Protectant and then cleaned the rims and dressed them with some Hyper Dressing. By the time she finished up with that i was able to start applying the sealant.
NORMALLY I'd just go with D301, but i wanted to give the paint a little bit more of a long term sealant so i went with Megs #20. I swear the more i use it the more i like it. I'll usually apply it, then go around and do little touch up things like the tires or windows or whatever just to let some time pass. If you let it set about 30 or 40 minutes it wipes off like butter. And the paint...it's left SOOO smooth, its just awesome. D301 leaves it smooth, but #20 beats it out in smoothness in my opinion.
So here is the sealant all spread:

Sorry but i just thought that looked so cool . I went ahead and did the windows and windshield...being warned by my sis to NOT mess up her rows on the seats or carpets! Then started to help pack some stuff up...and finallywent and removed the sealant. Man the paint looked SO awesome. I seriously could not believe it was the same car, and it was my crazy self that had just buffed it out.
So everyone...the time has come...are you ready?
-
Super Member
Re: 23 YEAR OLD swirls on top of swirls - 88' Red Honda Civic pix/vids

Lets roll it out and take a final look...

If that doesn't look BETTER than new, i seriously don't know what does. I kept circling it just amazed at how well it turned out. Lets take a look at a few other angles

I liked this next shot, you could see the nice reflection along with the super clean interior:

And of course it looked super nice from the back as well

I really liked this sun shot on the roof as well

NO swirls here folks

Here either:

And of course we already have seen the hood..but heres another look at it completely finished. You will notice if you look VERY closely, little tic marks on the hood. The clear on this thing was actually starting to fail...so hopefully the sealant will help get some extra life out of it. But the swirls were 100% removed...just remember this is what we started with:

and ended up with...


A few reflection shots...this one off the roof:

And this one was really cool...i put the hood up...then did a reflection shot:

And one more very cool reflection shot, i love reflection pictures with lots of color and you can see how crisp the reflections are here:

The owner had to go to work which was about a mile or so away, so i called her up and told her we'd deliver her car to her so she could see it in the day light while it was still nice and fresh.
We pulled up and i swear i thought she was going to break into tears. She just kept saying "oh my God, oh my God" lol. All of it was amazing to her, the engine, the interior and of course the paint were all better than new. She told us she'd NEVER let it go back to how it was before and insisted upon a maintenance wash set up to keep it looking good.
One of the first things she said was "You guys didnt charge me enough!"...in a word...NO, we didn't lol. But we chose to go the extra mile. Honestly once i saw the potential paint correction we were getting after the test spot, i sort of took it as a personal challenge to get as much of the rest of the car to have 100% correction, and i'd say i got about 98% of the car to that point. There were some very deep scratches in spots that i couldn't get, but the SWIRLS, were GONE.
So, here is one last shot, hood up...lookin super sharp:

Also if you'd like to see the full video transformation of this baby take a look here:
So the story of the 23 year old swirls has a happy ending . Thanks all for reading (and watching...the vid turned out good, really suggest you take a look) and here's hoping i stay super busy and can update with another write up soon!
-
Re: 23 YEAR OLD swirls on top of swirls - 88' Red Honda Civic pix/vids
Niceeeeeeeeeeeeeeeee!!!!! 
What did you use on the interior carpet and seats?
-
Re: 23 YEAR OLD swirls on top of swirls - 88' Red Honda Civic pix/vids
-
Newbie Member

Great job!! That car looks amazing!
-
Super Member

Re: 23 YEAR OLD swirls on top of swirls - 88' Red Honda Civic pix/vids
That's just beautiful work my man!! 
So the D300 was the only thing you used for that correction? And it finished down THAT nice, without another polishing step? Boy, that stuff sure could save me some time in the future!!
-
Re: 23 YEAR OLD swirls on top of swirls - 88' Red Honda Civic pix/vids
Awesome job! Yeah, what did you use on the seats and cloth and stuff? I want to do my parents Tahoe, which is their dog mobile. Any tips for dog hair? Again, looks great! I want a Flex now haha.
-
Regular Member

Re: 23 YEAR OLD swirls on top of swirls - 88' Red Honda Civic pix/vids
That is an incredible transformation You, sir, are an artist.

2010 Camaro SS
-
Junior Member

Re: 23 YEAR OLD swirls on top of swirls - 88' Red Honda Civic pix/vids
-
Re: 23 YEAR OLD swirls on top of swirls - 88' Red Honda Civic pix/vids
Another one of my favorite type storys. Awesome job.
Similar Threads
-
By dabikeman in forum Auto Detailing 101
Replies: 4
Last Post: 08-06-2017, 10:14 AM
-
By daimler in forum Show N' Shine
Replies: 9
Last Post: 05-20-2016, 02:00 PM
-
By Mike Phillips in forum How to articles
Replies: 13
Last Post: 10-29-2014, 06:21 AM
-
By Mike Phillips in forum How to articles
Replies: 7
Last Post: 05-29-2014, 07:48 AM
-
By david11g35 in forum Show N' Shine
Replies: 44
Last Post: 07-10-2012, 12:51 PM
 Members who have read this thread: 0
There are no members to list at the moment.
Posting Permissions
- You may not post new threads
- You may not post replies
- You may not post attachments
- You may not edit your posts
-
Forum Rules
|
| S |
M |
T |
W |
T |
F |
S |
| 31 |
1
|
2
|
3
|
4
|
5
|
6
|
|
7
|
8
|
9
|
10
|
11
|
12
|
13
|
|
14
|
15
|
16
|
17
|
18
|
19
|
20
|
|
21
|
22
|
23
|
24
|
25
|
26
|
27
|
|
28
|
29
|
30
| 1 | 2 | 3 | 4 |
|


 Reply With Quote
Bookmarks