 Dislikes: 0
-
Super Member

Re: Well, first day using random orbital polisher, and I failed
 Originally Posted by oneheadlite

TJ:
Looking at the pictures of that machine, it looks like the “3000 RPM” setting is only speed 1 - on any random orbital machine you’ll need more than that to get pad rotation. Especially on a 3” machine.
Look for videos from threads on here, especially from Mike Phillips for how to do machine correction. Big thing as Mark mentioned is putting a sharpie/paint mark on your backing plate so you can watch the pad rotate, not just oscillate.
I would strongly consider picking up a Griot’s G9 or look for a deal on their 3rd gen 6” model. You’ll be set up with a machine that will have plenty of power to accomplish pro quality work, then just keep your 3” machine for tight spaces.
I’d also consider a chemical change. I could be mistaken, but when I hear “rubbing compound”, I think old school; the modern products have come a long way in regards to speed, ease of use, and results. I remember wearing my arm out as a kid starting off wiping off polish/compound; nowadays it’s a breeze. And there are a lot of “compounds” that finish off Last Step Product ready on many finishes.
Well said!
-
Post Thanks / Like - 2 Thanks, 0 Likes, 0 Dislikes
-
Super Member

Re: Well, first day using random orbital polisher, and I failed
Originally Posted by TrustJesus
Mark, remember I’m new to this detail thing, I don’t know what I’m doing. That don’t discourage me I’m trying to learn by me self, I expect to fail. It’s a 3” random orbital polisher I got (way before) I joined this site. It’s not a Griots, a cheap china brand model.
It came with 3 pads, microfiber-yellow foam pad-black soft pad. I tired microfiber and yellow pad, did everything and panel got hot but no correction. I understand the nail catch method for scratches, however these were very minimal scratches.
I commend, and praise you for trying. Experience is the best teacher, but it can be a bit harder teacher when you're not receiving anything in the way of help of someone personally showing and teaching you some hands on methods, and what the problems are to then rectify them.
I was a beginner, we all were here. Nobody here picked up a tool such as these, and was a master in an afternoon. That includes Mike Phillips our forum master detailer and host.
There's so many videos on the internet, and also here to be studied, they're countless in number.
I'm no expert at posting links to vids, but someone else might? Search for videos here about Pad Rotation, marking the Backing Plate.
Study the basics of Random Orbital Polisher Operation, the priming of Pads, the Section Pass, and Hand Speeds, downforce pressure, etc.
The Random Orbital Polisher you have may be fine, but I'll assume there are selectable speed settings, and the lower settings might be fine for applying a wax or sealant to a vehicle, but not for correction purposes. The Griots 3" DA I spoke of earlier often will need to run full tilt at the very highest speed, and can still be difficult to efficiently correct swirls, marring etc. Reason why? This older machine they made did lack some power.
Don't be discouraged by your trial and error attempts, and some disappointments along the way. One must walk before they can run, and be it a hobby, a martial art, a musical instrument, and car detailing as well.
I've had some disasters in my day, like once burning through the paint on a person's car with a Rotary Polisher, thankfully it was not a fancy new vehicle, I was lucky the person did not much mind what happened. That could've been a quite costly mistake. DA Polishers are generally very safe to use, versus a rotary which can generate a whole lot of heat.
The paths to successes and achievement are all different in length and time for different people. One Gung Fu Martial Artist Student might achieve a Yellow or Purple Sash in 6 months, but then never go no further. Another student might still only be a white Sash in the same period of time, but with diligence and perseverance, may take longer, but can sometimes surpass the proficiency of the first student I previously mention.
-
Post Thanks / Like - 1 Thanks, 1 Likes, 0 Dislikes
-
Re: Well, first day using random orbital polisher, and I failed
Originally Posted by oneheadlite
Looking at the pictures of that machine,
I'm not seeing any pictures?

-
Post Thanks / Like - 1 Thanks, 0 Likes, 0 Dislikes
-
-
Post Thanks / Like - 1 Thanks, 0 Likes, 0 Dislikes
-
Super Member

Re: Well, first day using random orbital polisher, and I failed
Originally Posted by Mike Phillips
I'm not seeing any pictures?
They didn't try to post any.
Trying to help a feller out, I went to the dark site and looked at the sales posting of the polisher. Looks like a GG3 clone, except 8mm throw. 380w motor (I think I can, I think I can...), lists RPM next to the speeds on a sticker on the back of it.
-
Post Thanks / Like - 1 Thanks, 0 Likes, 0 Dislikes
-
Re: Well, first day using random orbital polisher, and I failed
More....
Regardless of what type of ORBITAL polisher you have, assuming it's an orbital polisher, (I hate assuming but sometimes there's not enough information in a post to "know"), but again, assuming it IS and orbital, what I show in the below video goes over exactly how to use a Porter Cable and the tips and techniques will apply to ANY brand and type of orbital polisher.
How to do a Test Spot and then buff out your car! Video Explanation by Mike Phillips
This is my opinion is one of the best videos Yancy and I have ever made together and also one of the easiest to follow, understand and then implement the techniques video on the topic.
:
-
Post Thanks / Like - 1 Thanks, 0 Likes, 0 Dislikes
-
Re: Well, first day using random orbital polisher, and I failed
And then there's this......
DA Polisher Trouble Shooting Guide
When you're first starting out machine polishing and learning to use a DA Polisher it's common to have questions about your results and your results are directly tied to your technique.
Here's a list of the most common problems,
1. Trying to work too large of an area at one time.
2. Moving the polisher too fast over the surface.
3. Using too low of speed setting for removing swirls.
4. Using too little downward pressure on the head of the polisher.
5. Using too much downward pressure on the head of the polisher so the pad quits rotating.
6. Not holding the polisher in a way to keep the pad flat while working your compound or polish.
7. Using too much product or using too little product.
8. Not cleaning the pad often enough.
Here's a list of the solutions in matching order,
1. Trying to work too large of an area at one time.
Shrink the size of your work area down. You can't tackle to large of an area at one time.
The average size work area should be around 20" by 20". Most generic recommendations say to work an area 2' by 2' but for the correction step, that's too large. You have to do some experimenting, (called a Test Spot), to find out how easy or how hard the defects are coming out of your car's paint system and then adjust your work area to the results of your Test Spot. The harder the paint the smaller the area you want to work.
2. Moving the polisher too fast over the surface.
For removing defects out of the paint you want to use what we call a Slow Arm Speed. It's easy and actually natural for most people new to machine polishing to move the polisher quickly over the paint but that's the wrong technique.
One reason I think people move the polisher too quickly over the paint is because they hear the sound of the motor spinning fast and this has psychological effect which causes them to match their arm movement to the perceived fast speed of the polisher's motor.
Another reason people move the polisher too quickly over the paint is because they think like this,
"If I move the polisher quickly, I'll get done faster"
But it doesn't work that way. Anytime you're trying to remove swirls, scratches, water spots or oxidation using a DA Polisher you need to move the polisher s-l-o-w-l-y over the paint.
3. Using too low of speed setting for removing swirls.
When first starting out many people are scared of burning or swirling their paint, so they take the safe route of running the polisher at too low of a speed setting but this won't work.
The action of the polisher is already g-e-n-t-l-e, you need the speed and specifically the pad oscillating and rotating over the paint as well as the combination of time, (slow arm speed), together with the abrasives, the pad aggressiveness, and the downward pressure to remove small particles of paint which is how your remove below surface defects like swirls or scratches.
Removing below surface defects is a leveling process where you need the abrasives to take little bites out of the paint and to get the abrasives to take these little bites with a tool that uses a Free Floating Spindle Bearing Assembly you need all of the above factors working for you including a high speed setting.
4. Using too little downward pressure on the head of the polisher.
For the same reason as stated in #3, people are scared, or perhaps a better word is apprehensive, to apply too much downward pressure to the polisher and the result of too little pressure is no paint is removed thus no swirls are removed.
5. Using too much downward pressure on the head of the polisher so the pad quits rotating.
If you push too hard you will slow down the rotating movement of the pad and the abrasives won't be effectively worked against the paint. You need to apply firm pressure to engage the abrasives against the paint but no so much that the pad is barely rotating.
This is where it's a good idea to use a permanent black marker to make a mark on the back of your backing plate so your eyes can easily see if the pad is rotating or not and this will help you to adjust your downward pressure accordingly.
Correct technique means finding a balance of applying enough downward pressure to remove defects but not too much downward pressure as to stop the rotating movement of the pad.
This balance is affected by a lot of factors like the lubricity of the product you're using, some compounds and polishes provide more lubrication than others and this makes it easier to maintain pad rotation under pressure.
Another factor that can affect pad rotation are raised body lines, edges and curved surfaces as anytime you have uneven pressure on just a portion of the face of the pad it can slow or stop pad rotation. This is where experience comes into play and experience comes from time spent behind the polisher.
6. Not holding the polisher in a way to keep the pad flat while working your compound or polish.
Applying pressure in such a way as to put too much pressure to one edge of the pad will cause it to stop rotating and thus decrease abrading ability.
7. Using too much product or using too little product.
Too much product hyper-lubricates the surface and the result is that abrasives won't effectively bite into the paint but instead will tend to skim over the surface.
Overusing product will also accelerate pad saturation as well increase the potential for slinging splatter onto adjacent panels.
Too little product will means too little lubrication and this can interfere with pad rotation.
Again there needs to be a balance between too much product and too little product and finding this balance comes from reading articles like this one, watching videos an most important, going out into the garage and putting in time behind the polisher and as you're buffing with specific product and pad combinations, pay attention to pad rotation.
8. Not cleaning the pad often enough.
Most people simply don't clean their pad often enough to maximize the effectiveness of their DA Polisher. Anytime you're abrading the paint you have two things building up on the face of your buffing pad,
As these to things build up on the face of the pad they become gummy and this has a negative affect on pad rotating plus makes wiping the leftover residue on the paint more difficult.
To maintain good pad rotation you want to clean your pad often and always wipe-off any leftover product residue off the paint after working a section. Never add fresh product to your pad and work a section that still has leftover product residue on it.

-
Post Thanks / Like - 1 Thanks, 0 Likes, 0 Dislikes
-
Re: Well, first day using random orbital polisher, and I failed
And 2 more things before I have to move on to other projects.
1: Whatever it is? (the polisher), if the pad is NOT rotating you are not doing anything. In other words, you're wasting time. In order to remove swirls and scratches you MUST REMOVE PAINT. You or more specifically, a free spinning, random orbital polisher - removes paint by both oscillating and rotating a pad against the paint surface. It will not remove paint if it's only jiggling or vibrating.
To help others "see" with their eyeballs if the pad is rotting or not, here are 2 articles on this topic.
Video: Mark your backing plate to make it easy to see pad rotation
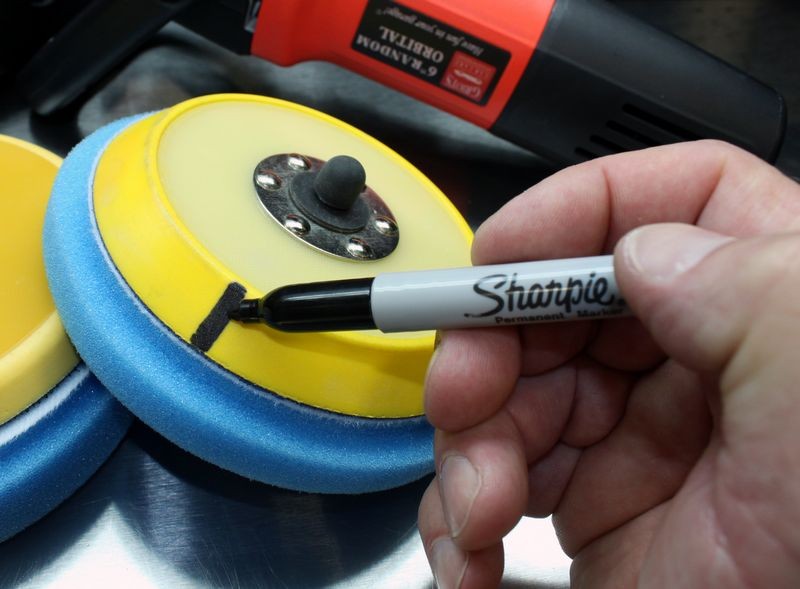
Here's a quick video that show how and why to mark your backing plate to see and monitor pad rotation while doing any correction or polishing steps.
How to Monitor Pad Rotation? Mark Your Buffing Pads
Anytime you're using a free spinning orbital polisher there is the chance that the buffing pad can slow down and if stall out to the point where there's simple no pad rotation. When this happens you are no longer removing paint defects at an effective rate, if at all. Paint defects like swirls, scratches, water spots and oxidation are removed best, fastest and most effectively when the pad is both rotating and oscillating against the surface.
It used to be you could simply place a mark on the back of the backing plate and by doing this your eyes could easily monitor pad rotation by looking at the backing plate. Now days a lot of tools have dark or black backing plate making it hard to mark and hard to see. Some backing plates are very thin or exact fit and there's simply very little backing plate surface area to mark and thus monitor. And some tools have a protective cover or shroud over the top of the backing plate covering up the majority of the backing plate blocking your view.
Here's a very simple fix - mark your buffing pads
Use a combination of Sharpie Markers, both Black and Silver and also touch-up paint can be used.
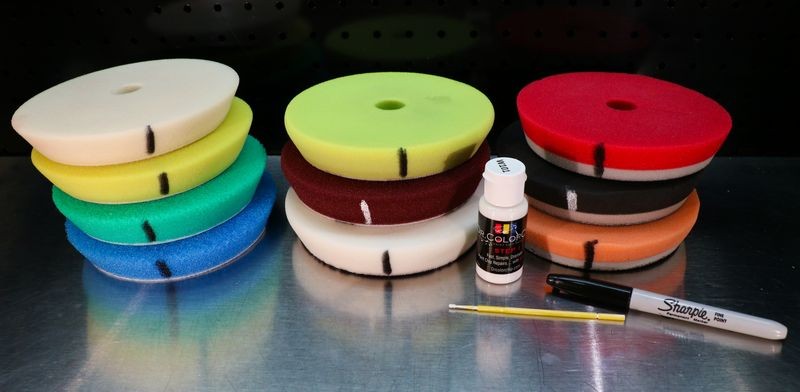
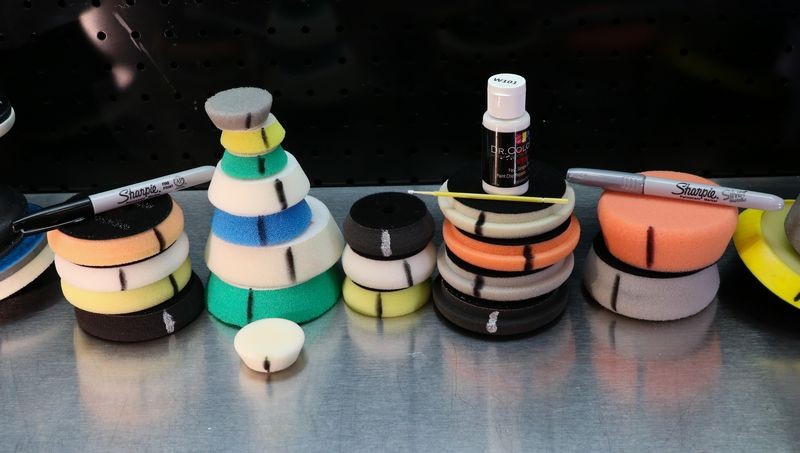
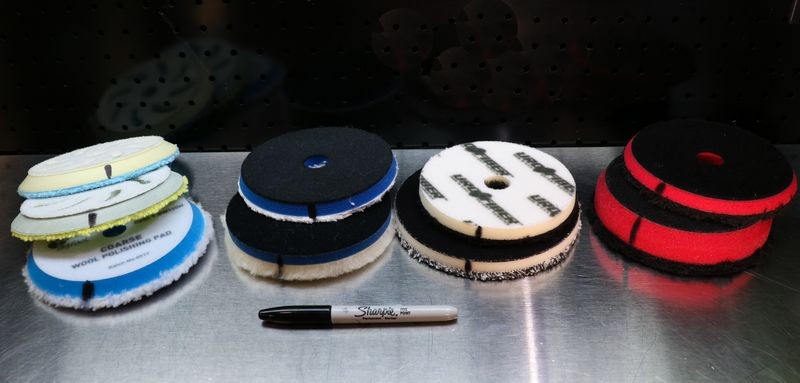
Here are some very popular free spinning orbital polishers with the pads marked.

-
Post Thanks / Like - 1 Thanks, 0 Likes, 0 Dislikes
-
Re: Well, first day using random orbital polisher, and I failed
And last but not least,
If you polisher looks like this, ANYTHING like this,
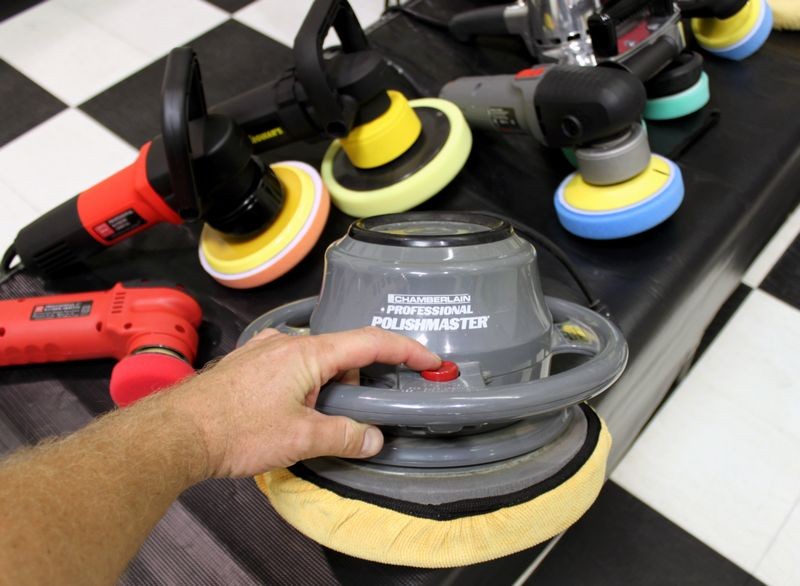
It won't work. That is it won't remove swirls and scratches. You can lay down a coat of wax with it or give a buddy a back massage but that's about it. I explain all in my article here,
The Traditional Orbital Buffer aka The Wax Spreader
-
Post Thanks / Like - 1 Thanks, 0 Likes, 0 Dislikes
-
Super Member

Re: Well, first day using random orbital polisher, and I failed
Thanks guys, I read all of it and get back with you all later. Thanks and take care
Similar Threads
-
By pjoseph24 in forum Auto Detailing Tools and Accessories
Replies: 12
Last Post: 04-16-2014, 10:12 AM
-
By Jersey John in forum How to Articles
Replies: 7
Last Post: 03-02-2014, 05:47 PM
-
By Coopers ST in forum Porter Cable 7424XP Dual Action Orbital Polisher
Replies: 10
Last Post: 11-24-2013, 10:40 AM
-
By 2shiny in forum Rotary Buffers
Replies: 5
Last Post: 06-03-2013, 10:50 AM
-
By torque1989 in forum Ask your detailing questions!
Replies: 10
Last Post: 07-01-2011, 10:11 AM
 Members who have read this thread: 1
Posting Permissions
- You may not post new threads
- You may not post replies
- You may not post attachments
- You may not edit your posts
-
Forum Rules
|
| S |
M |
T |
W |
T |
F |
S |
| 31 |
1
|
2
|
3
|
4
|
5
|
6
|
|
7
|
8
|
9
|
10
|
11
|
12
|
13
|
|
14
|
15
|
16
|
17
|
18
|
19
|
20
|
|
21
|
22
|
23
|
24
|
25
|
26
|
27
|
|
28
|
29
|
30
| 1 | 2 | 3 | 4 |
|


 Thanks:
  Likes:


 Reply With Quote
Bookmarks