 Thanks: 0
 Likes: 0
 Dislikes: 0
-
 Review: Newbie's Perspective on Pinnacle Black Label DSC Review: Newbie's Perspective on Pinnacle Black Label DSC
Coatings for the masses... years ago it would have sounded something like an oxymoron, but perhaps the day we see semi-permanent coatings popping up on Wal-Mart store shelves is closer than we think.
Not that my goal is to compare Pinnacle's Black Label (PBL) line with something that rears its head in your local Wally World. No, the Black Label products are far too good for mass commercial distribution. Rather, the Black Label line's overall ease of use approaches that of products found in the "average Joe" consumer car care market (perhaps with the exception of the surface cleansing polish, but more on that later). As an out of practice former detailer that's never used a coating up until now, I feel that I made a fantastic choice with Pinnacle's Diamond Surface Coating (DSC) for that very reason. Combined with its incredible level of performance, it was exactly what I needed. In fact, the old cliché fits perfectly: it really was worth every penny.
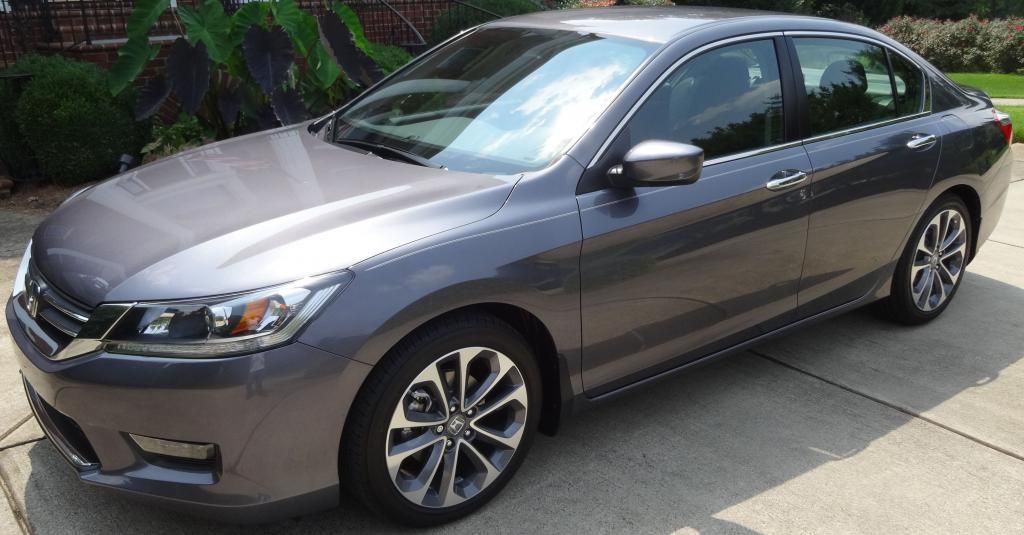
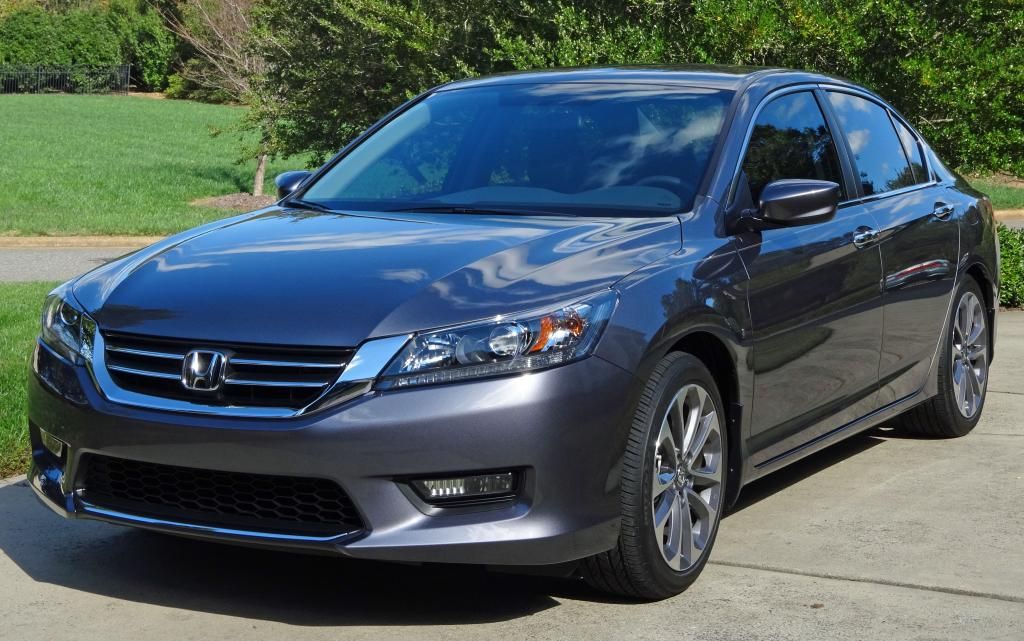
Recently, I purchased a new workhorse 2014 Honda Accord Sport sedan, and want to keep it in as-close-to-prime condition for about 5 years for resale. As a side note, for those of you that are looking for a good value brand car, it's a fantastic buy, with a projected 5 year cost of ownership that rivals most value CPO used cars. Long story short: while I do have the time to pamper it now, I won't have any extra time starting in about 3 months or so.
So I was faced with a difficult paradox: how do you keep the exterior of the car protected from as many of the horrors that cars face in the "I don't care about nice things" environment of college towns as possible, by doing as little as possible? That meant I needed a sealant or coating that would: last for at least a year (ideally three), protect against the usual environmental hazards when left outdoors 24/7, protect against scratches, make the car easier to clean, and that could even stand up to the chemicals found in a touchless car wash (if I had to bite the bullet and resort to one). After a bit of catching up with modern detailing, I found that a coating was the way to go, hands down.
Originally, I was considering Opti-Coat 2.0, and was on the cusp of ordering a syringe the Thursday before it was stripped from the shelves, but decided to wait and think on it. Three days later, when I logged back on to buy it, I found out that I was back to square one. Whoops!
Perhaps it was for the best, as I hadn't detailed a car to the level of perfection that a coating demands in over 6 years. I was out of practice, so many things had changed (a.k.a. coatings hit the market!), and the learning curve on a coating, even opti-coat 2.0 with its long working time, seemed daunting. I'd have to buy new tools from scratch to compound it off if things went wrong. I was about to give up and scrounge up the $1K or more to have a pro do it all for me. Then I saw that a dark horse on the list, the PBL collection, was on a super sale. Perfect timing! More than that, the one thing that attracted my attention was the advertised 3-year coating life. From reading reviews, the application learning curve seemed to be less strenuous than its competitors. DSC is expensive, but the multi-surface versatility made up for the price gap. I reasoned that having some extra gloss on the paint would be a nice plus as well... so considering all of the above, I went for it. The order arrived 12 days later, full of goodies, but the most exciting amongst them: PBL DSC, Coating Booster, SCP, and Diamond Paint Sealant (for a family member's car).
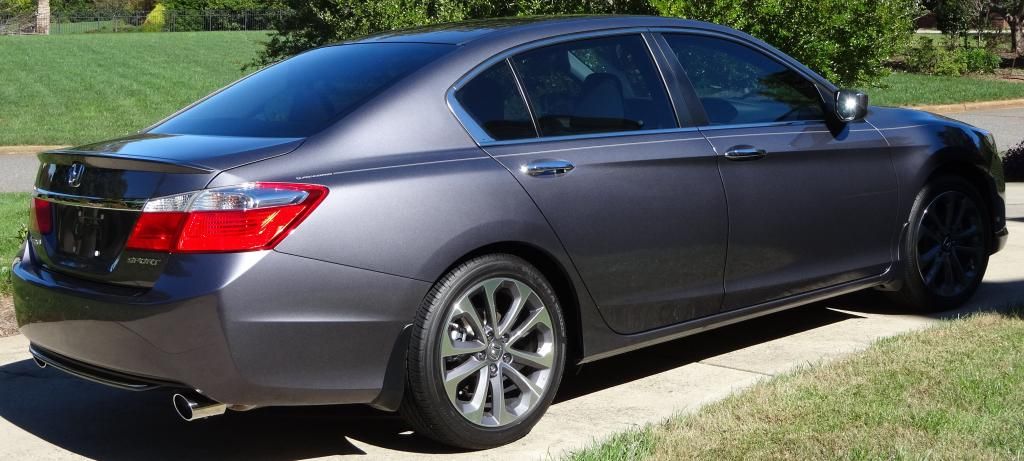
Now, the car's paint color, modern steel metallic (MSM), is a somewhat drab medium grey, made of several colors of metal flake. Sadly, it only begins to look good in low lighting conditions... otherwise it's just ugly and washed out in direct sunlight. I only chose the color because it basically acts like dazzle camouflage for paint defects, dings and scratches (and the fact that the other color choices, except for black and pearl white, were horrible... almost got the Mazda 6 just for its Soul Red). I learned just how good it was at hiding defects the hard way, as I didn't find many of the problems present from the factory and delivery until after its first hand washing three days after delivery. Plus, I purchased it at dusk, which was a huge mistake.
The paint came complete with these great nightmares: severe orange peel, covered welding slag, what looked like pinpoint fisheyes, very fine RIDS, rail dust and overspray. It might as well have been taken apart, reassembled by children, and painted by cans back at the Honda factory. Its mediocre character and host of problems made the detailer and car enthusiast inside of me die a little. However, it was for the best, as it was a value car, and the color could hide the abuse and eventual neglect it would receive over the next 5 years.
Here's a before shot, taken after I had given the car a proper hand washing, and a coat of Meg's ultimate wax:
From a distance, she looks just fine! The imperfections are easily drowned out, and reflections are fairly bright, yet blurry from orange peel. Ultimate Wax added a nice depth to the paint color. I still felt that the color lacked contrast and warmth... making the sexy body lines disappear into the grey abyss.
So, once the weather was right, I set off on the coating saga. First was washing & stripping, decontaminating with IronX, NanoScrub and a thorough inspection. Through a long and unfortunate series of events, the car was left with hundreds of extremely fine deep scratches before I got a hold of it. After test compounding, I found they likely extended 75% or so through the clear coat, but narrow enough to only catch light under intense illumination. I made the choice to polish only, leaving the scratch edges slightly feathered, which helped to hide them a bit. I like the idea of having a clear coat, and they were really only barely visible under specific conditions to a trained eye (which would have made bringing the car back to the dealer for a refund a hard task). Plus, they could always be cut down later if they were that offensive.
After correction, finishing up with M205, the car looked great, except for that orange peel... but again, I was scared of removing too much clear coat via wet sanding or orange peel removal pads.
I had to stop for a few days, so I topped with whatever easy to strip wax I had on hand for some protection, which happened to be Meg's Deep Crystal Carnauba.
Here's the car with some nice Carolina blue sky to give you an idea of its reflectance at that point:
Looking good! Couldn't wait for it to get better!
On the next detailing day, the car was stripped with chemical guys citrus wash, dried well and polished again with M205 for good measure. All aluminum pieces were polished, headlamps were inspected and polished and the car was ready for paint cleansing:
My first experience with the SCP was dismal. After machine application, I found the polish would adhere to the surface and clump into unmanageable dough-like rolls of product when trying to remove the residue:
Hand application was marginally better, but a few clumps were still popping-up, and areas of adhered product would form at the edges of a microfiber wipe pattern that were nearly impossible to remove without wetting with distilled water or more product. This was not the easy WOWO method described on the label and in Autogeek's product copywriting. I even used it incredibly sparingly, shook well and tried multiple combinations of application methods. After consulting the awesome collective knowledge of the forum, I found that I could get better results by priming a hand applicator foam pad with a spray of water, and working small sections... removing immediately afterwards with a quality microfiber (and sometimes with a spray of water on the panel itself before removal). As Autogeek references, the product is water miscible, so it makes sense that distilled water would help! Do make sure to use de-ionized or distilled water, as there is a chance that minerals and chemicals left behind in tap water could potentially complicate coating adhesion.
In the end, my best results were achieved with using the "brick" like extra large microfiber applicator pad.
Priming was achieved by first spraying a bit of distilled water on the pad surface, applying about 9 'flat' 1/8" drops of product, and spreading on the pad using a gloved finger until the product was visibly absorbed into the microfiber (no more white spots). Then, follow up passes would require another spurt of water, and about 6 more drops of product. Section passes were about 2 to 3 sq. ft. Complete removal was made easier with first using the short nap of a wax removal microfiber, followed by a short buffing using a medium nap. Even with the successful method, the extra elbow grease meant it took 4 to 5 hours to clean the entire car by myself. I'd highly suggest using a machine application technique, tweaking the priming method to make removal easier. Plus, work fast, as things dry easily. The polish effectively cleaned all aluminum, Lexan, and paint surfaces in preparation for coating. I decided to save the wheels and glass for another time, as I wanted to take my time with those.
Finally, it was time to coat the entire car:
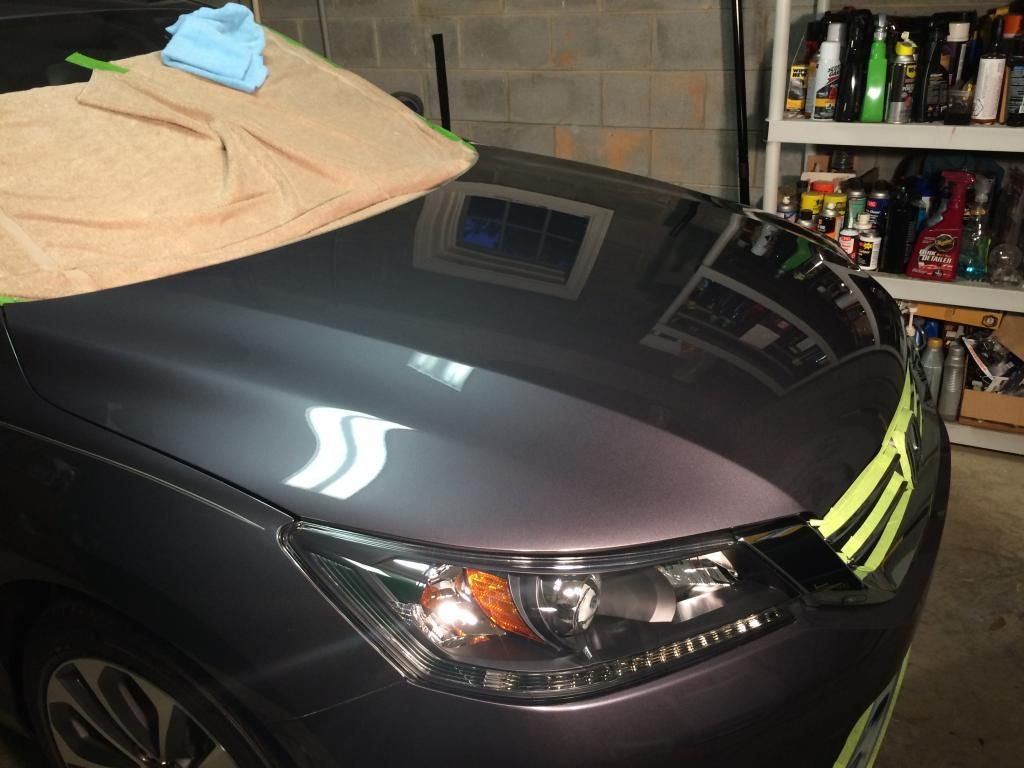
I laid down a bit of masking using 3m automotive performance tape, but in the end, the coating really didn't dramatically change the look of plastic trim pieces that were accidentally hit, as long as the areas were buffed-off quickly.
Next, I primed a Lake Country Coating applicator, and went to town on the roof. Watching some of the DSC spray miss the pad was like watching handfuls of quarters fall down a well... but I tried not to think about it. At $129.99 retail (before FL tax if appl. + shipping), DSC costs you a whopping 55 cents per milliliter, or around $16.30 per fl. oz. However, a little bit REALLY does go a long way. Bob McKee was not kidding about producing a line of extremely concentrated products (See the intro message here). Not sure how much product is dispensed per trigger squeeze (probably 5ml or so), but two sprays were more than enough to prep a coating applicator and coat up to about 3 sq. ft. without incurring much in the way of high spots or under-application. After prepping, 1 to 2 sprays per small panel did the trick.
I also tried spraying DSC onto the panel of choice directly and then spreading, but there was a high risk of overspray using the direct-to-panel method. However, you would likely get much more coverage out of each spray, making it the method of choice for areas that can be completely coated (given some practice). Another pro of the direct-to-panel method... less high spots, as it was extremely hard to judge how much DSC was left in the pad after finishing a section. I consistently overloaded the applicator for the first panel or two.
In the end, I used a bit more than I thought I would, so it's hard to see how the bottle could actually coat 25 average cars (I would think the Honda Accord would count as an 'average' sized car in terms of surface area). It is extremely hard to estimate how much is left, but I'd say I used around 1/10th of the bottle. Perhaps it was partly due to my overuse at first, so I would imagine you could up the coverage to at least 15 cars, if not a bit more.
The coating must be spread quickly, as the product will become difficult to distribute within about 45 sec. to 1 min. at around 70 degrees and 45% RH in a garage environment. So, I found myself working in 1 to 2 sq. ft. patches around the sedan.
A simple crosshatch method worked well to spread the product, but at times I did find myself going over the area a third time (especially if I accidentally overapplied product to the applicator).
High spots on the MSM paint were easy to find with ample ambient lighting. I found that direct, high intensity lighting from a 1000W flood lamp would shine straight through the excess product, and "wash out" the characteristic streaking. This is perhaps my only complaint about the process, as my garage space is extremely tight, not allowing for proper illumination. However, pros with a large dedicated space, and plenty of lighting options should have no problems at all.
For me, on the panels that were properly lit with overhead fluorescent lighting, the high spots showed immediately, and could be leveled with an additional pass or two of the applicator. It was incredibly forgiving! Stubborn high spots eventually popped up (especially after overloading the applicator) and were completely removable using a few passes of a microfiber and a bit of elbow grease. This made me wonder if I had actually removed the entire coating from that area, but as I would find the next day, the coating was alive and well in places that had been heavily buffed.
As for the majority of the panels and metal parts, it was nearly impossible to tell if the coating was streaking or not, which meant that I had to buff each of those panels meticulously using a clean microfiber. Again, this should not be a problem given the right lighting.
Now, I chose to use a few non-marring but 'cheaper' sacrificial microfibers to buff, just in case the coating cured in or onto the fibers. During a test panel application, the microfiber was given 10 minutes or so to dry before it was dunked into a pre-soak, and it came out of the wash with no noticeable performance hit! The same can be said for the lake country applicator, which was cleaned immediately after use (10 minutes on the test panel). I'll be revisiting the tools used on the whole car in a day or two, so if anyone has any questions about how they fared, don't be afraid to ask.
Looks like this is a big plus over other coatings such as cquartz! I would imagine that you'd find some cured product clogging the splits in the microfiber strands on the microscopic level, but as far as I can tell, it doesn't alter the overall performance of the application tools, so they are effectively reusable. Great, economical plus!
While I'm on the topic, a few pieces of microfiber lint were left on the surface, but it did not seem to effect the coating process in any way, and all lint was removed from the coated surface with ease before and even after curing. From just a simple observational point of view, it almost seems as though the coating adheres so well to fresh paint, and is so thin, that the lint is re-deposited on top of properly coated areas towards the end of a section pass, posing no danger.
I was shocked at how thin the layer of properly applied coating actually was. Perhaps I was subconsciously expecting something crazy thick like a pourable catalyzed wood coating. It almost seemed like no product was being applied to the paint at all. My first confirmation that things were going as planned was the contrast between the huge amount of initial grab of the Lake Country on the clean paint, contrasted with a somewhat smooth stroke on the second cross-hatched pass. Once I saw the first high spot appear, I knew that all was well!
It's amazing how much the coating altered the paint's reflectance right on application. Just like the other reviews state, the paint took on a glassy "wet" look as the coating applicator moved along. The real treat was opening up the garage door for the first time and moving the car out into the sun. Bam! Reflection explosion! I never knew such a drab color could look so deep and reflective. Between the polishing and coating steps, the MSM was simply brought to life. Don't worry, the pictures are coming.
As with all coatings, the DSC hides no sins. Most of the aforementioned scratches were still visible under intense scrutiny and lighting. Interestingly, the increased reflectance with the coating does distract a bit from the one larger scratch on the car. I thought it would have the opposite effect, but on the MSM color, it seems to help hide things a bit! Detailing really is more of an artform sometimes.
Regarding the coating's durability, it's quite early to tell. However, I used the trunk lid as a test panel, from A to Z, and found that the coating was indeed still in place after application of the citrus wash. Perhaps it looked slightly duller than the day after it was applied, but it was very subtle if anything.
I hope it has a relatively high hardness level, as there really isn't anything out there to back things up on its scratch resistance. I haven't seen any scratch tests out there yet, so if anyone has the means to do one, it would be an awesome service to fellow detailers. Makes me want to pick up a junkyard panel to find out.
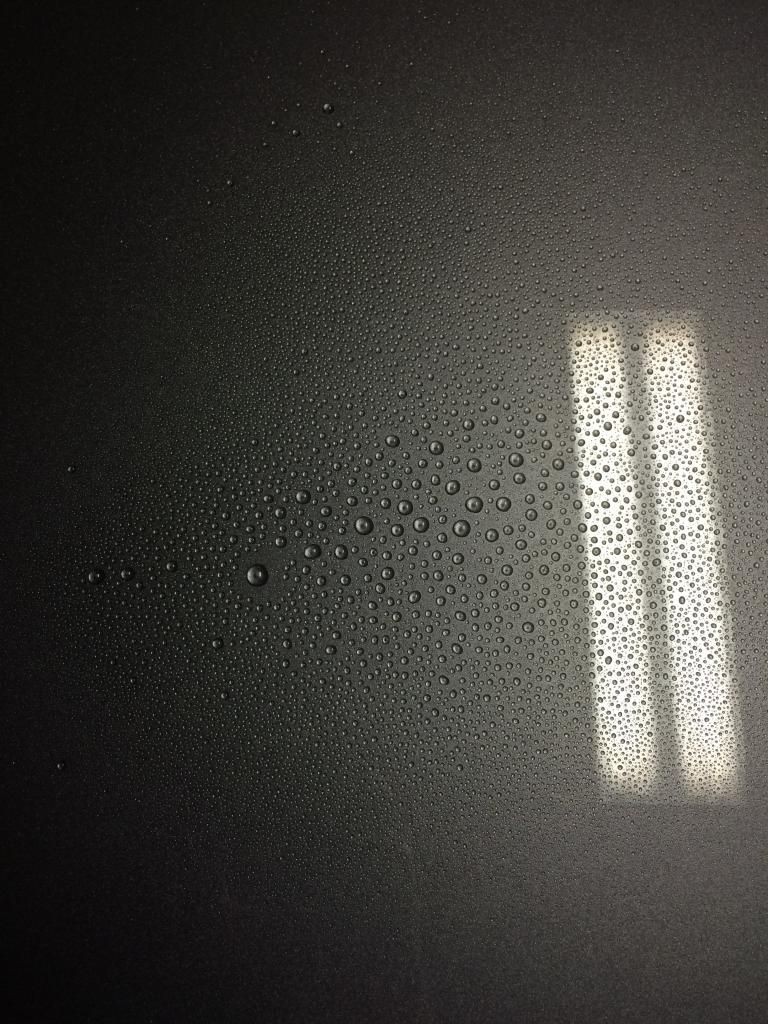
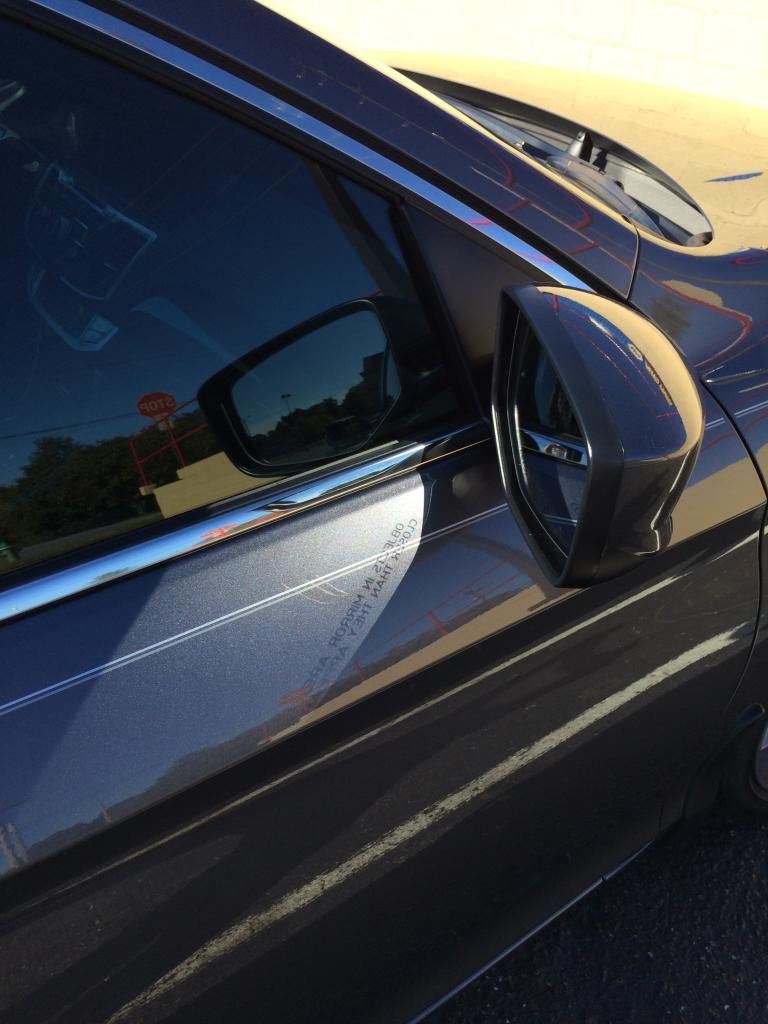
As far as its surface tension goes, it's unreal. Everything that was coated is beyond glassy smooth to the touch. Mundane things such as using the door handles are now experiences that take you aback and make you think twice about the machine you're about to operate. The sensation is hard to describe, things almost feel soft. It goes beyond anything a wax or synthetic sealant could ever do. Test (spray bottle) water beading is nuts:
Cleaning of coated surfaces isn't exactly revolutionary, although far less sticks than beforehand. After a 300 mile round trip on the Blue Ridge Parkway the other day, the car looked like Jackson Pollock painted my car with random bug parts. Blackfire waterless wash (picked up on BOGO!) paired with a high quality microfiber took care of most of it. However, it took about 2 to 3 extra passes to get all of the bug guts off of the coated aluminum grille piece. Not sure why, but could have to do with the angle of impact. Oh well!
So, that brings me to the conclusion, and a bunch of awesome pictures from: before coating, after coating, and awesome photoshoot shots from the epic mountain journey!
Before-
After-
(This one's subtle!)
(this one's not so subtle!):
Partial Sun:
Head-on:
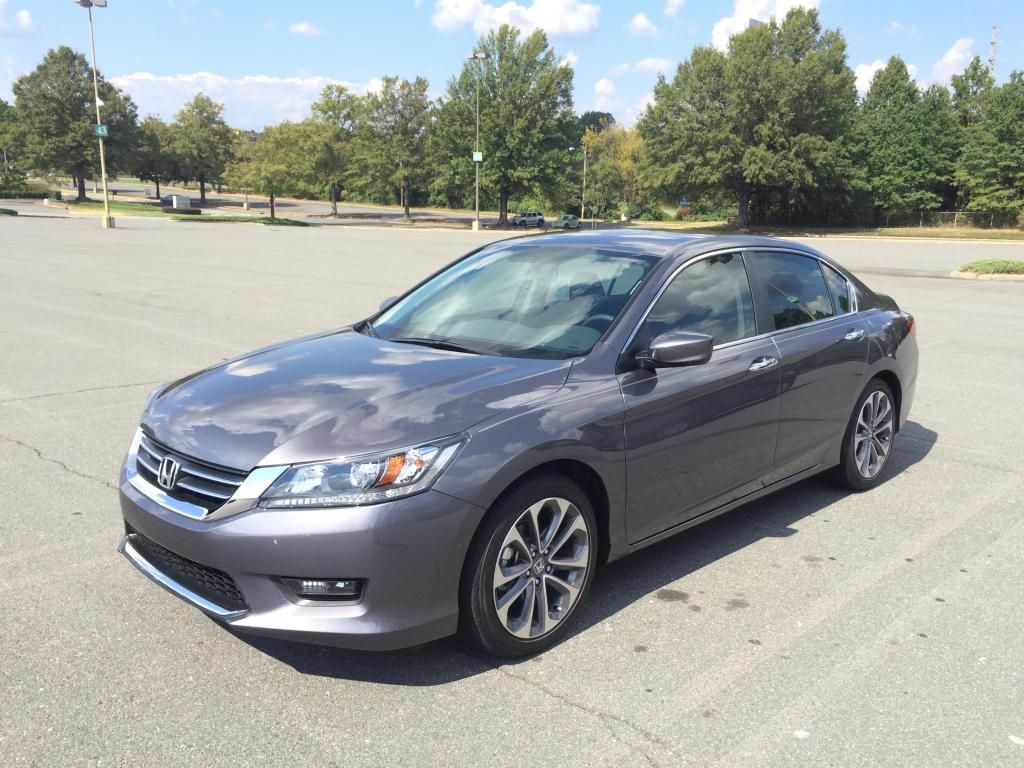
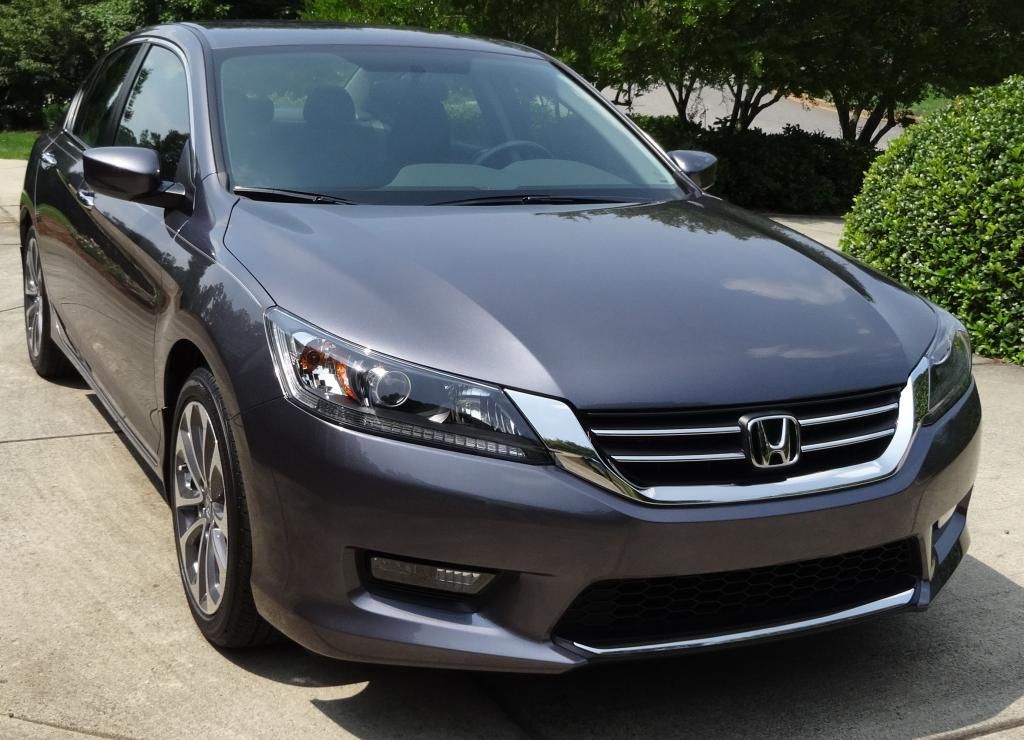
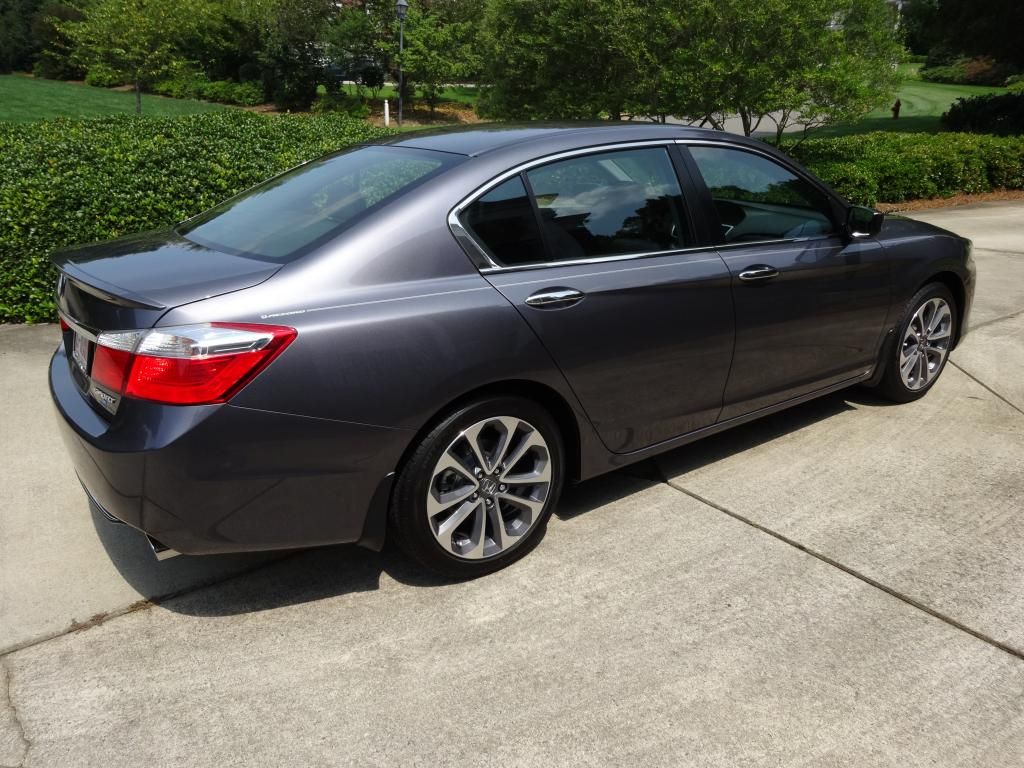
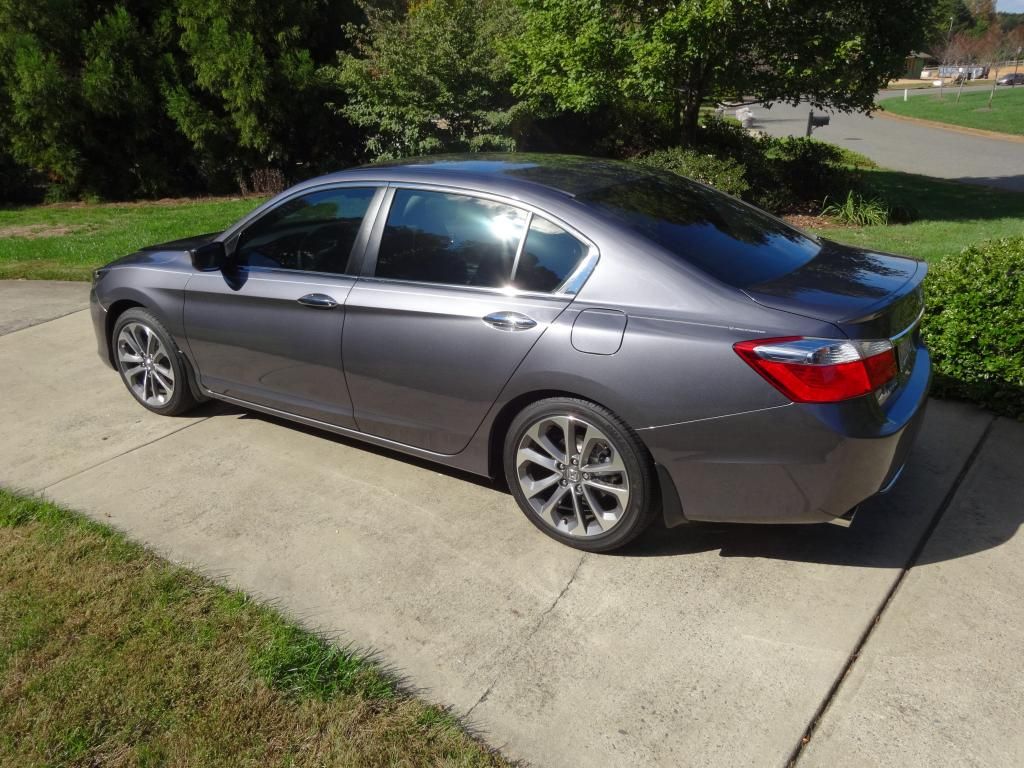
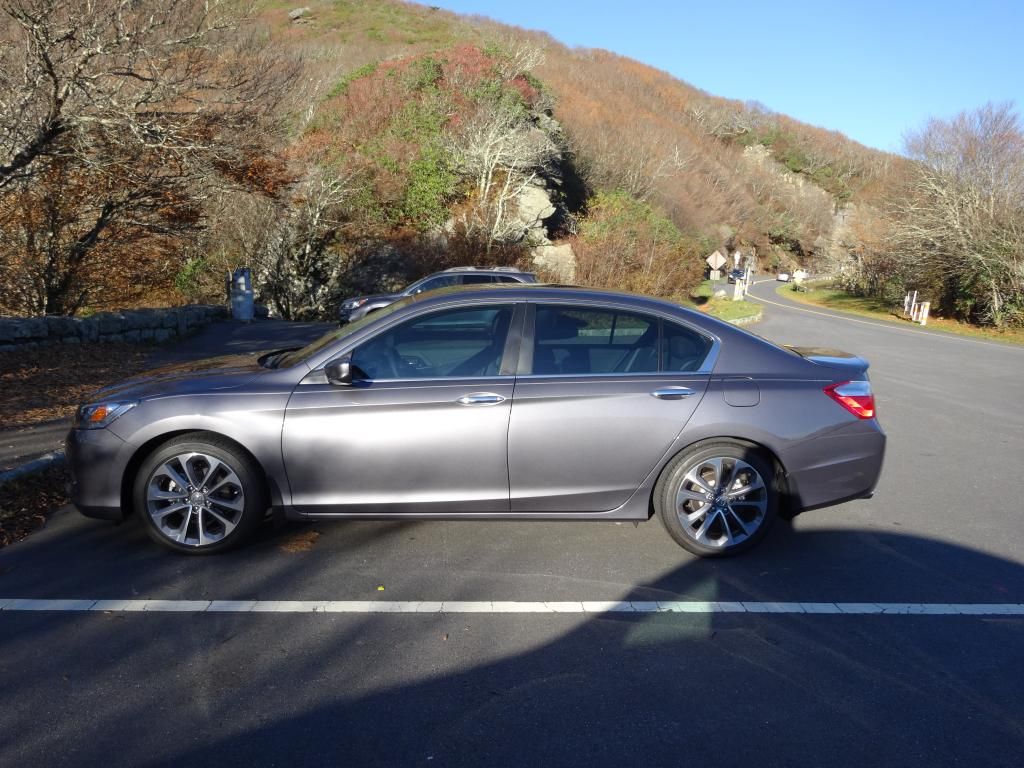
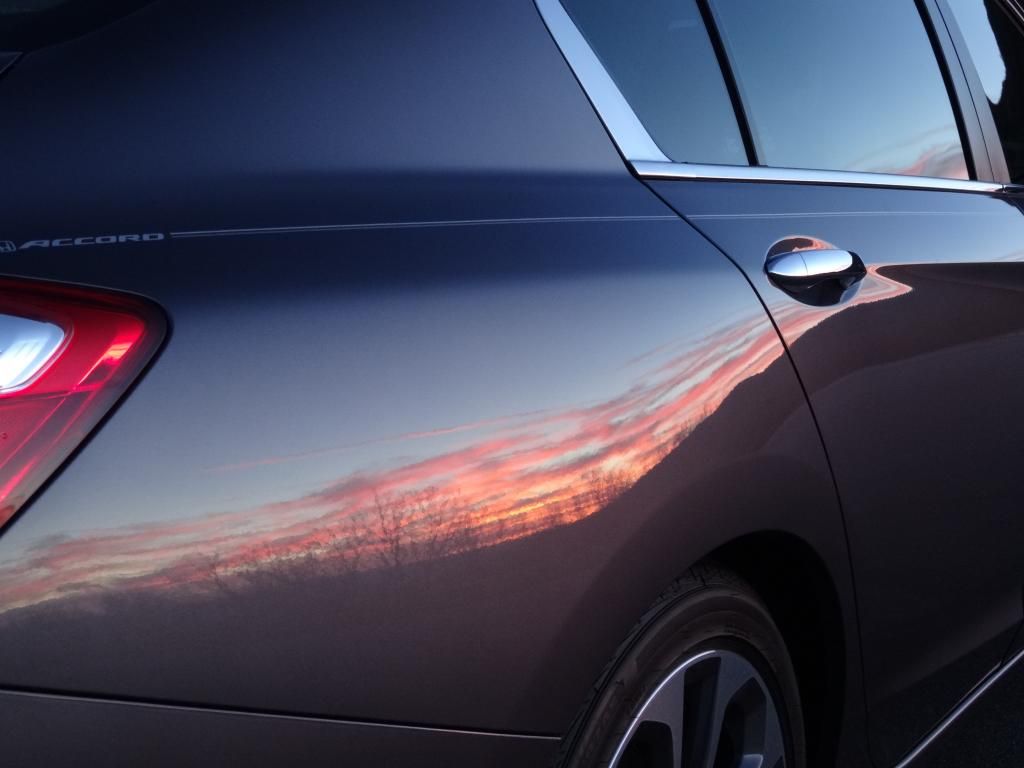
Trunk Lid. Judging from the before and after, I would say that the polishing and coating combined act to darken the color a bit through the gloss increase, and bring out more of the large silver flakes in the metallic color layer. The car hardly ever has the light grey appearance anymore, which I love! Now, it's more like a nice anthracite grey.
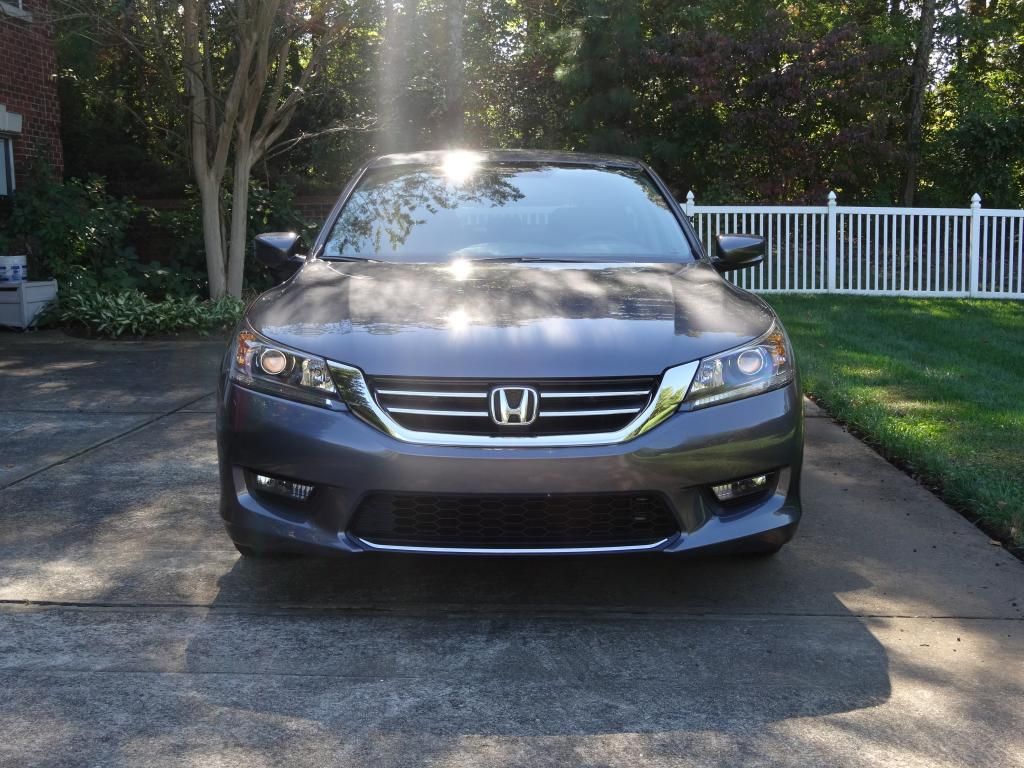
Intense sun, in a parking lot... DSC makes reflections seem more epic than they actually appear. Just check out the reflections on the A pillar and side view mirror... can you tell it's a NAPA above that wall?
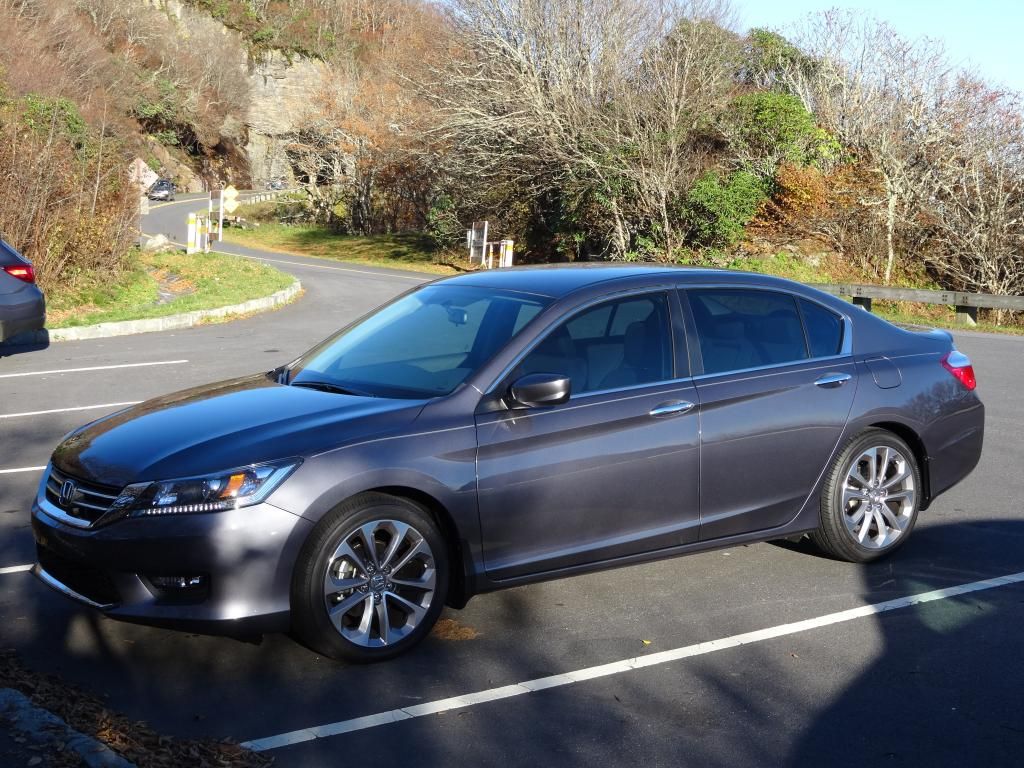
In the mountains-
Intense Partial Sun:
That was by a tunnel:
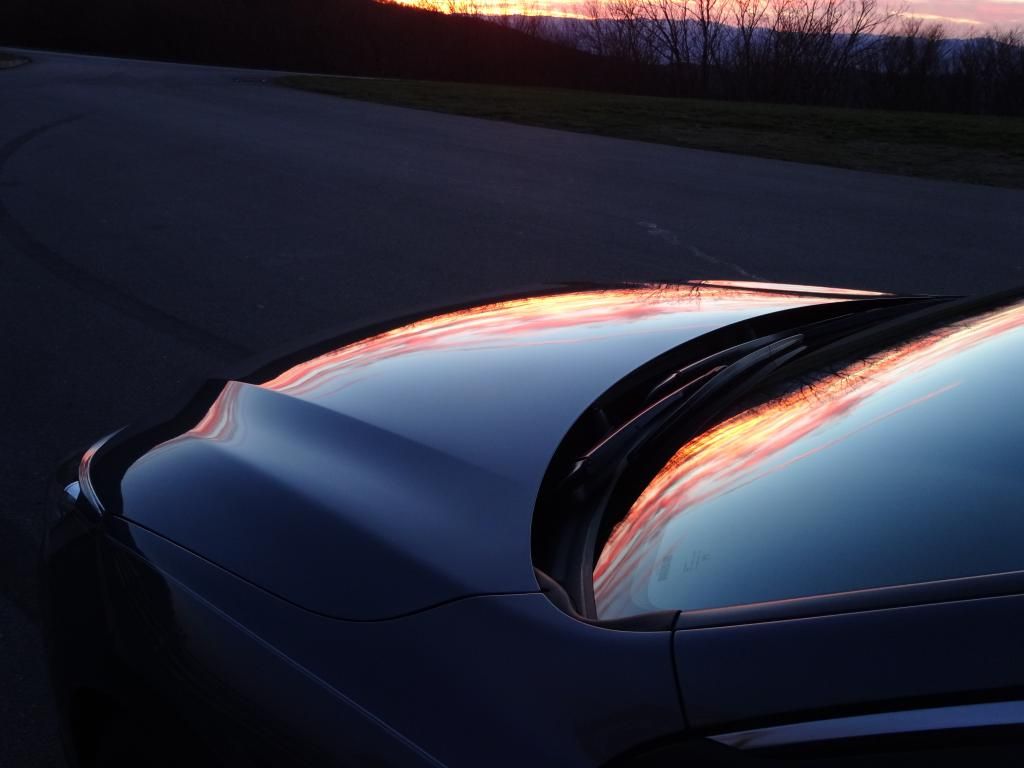
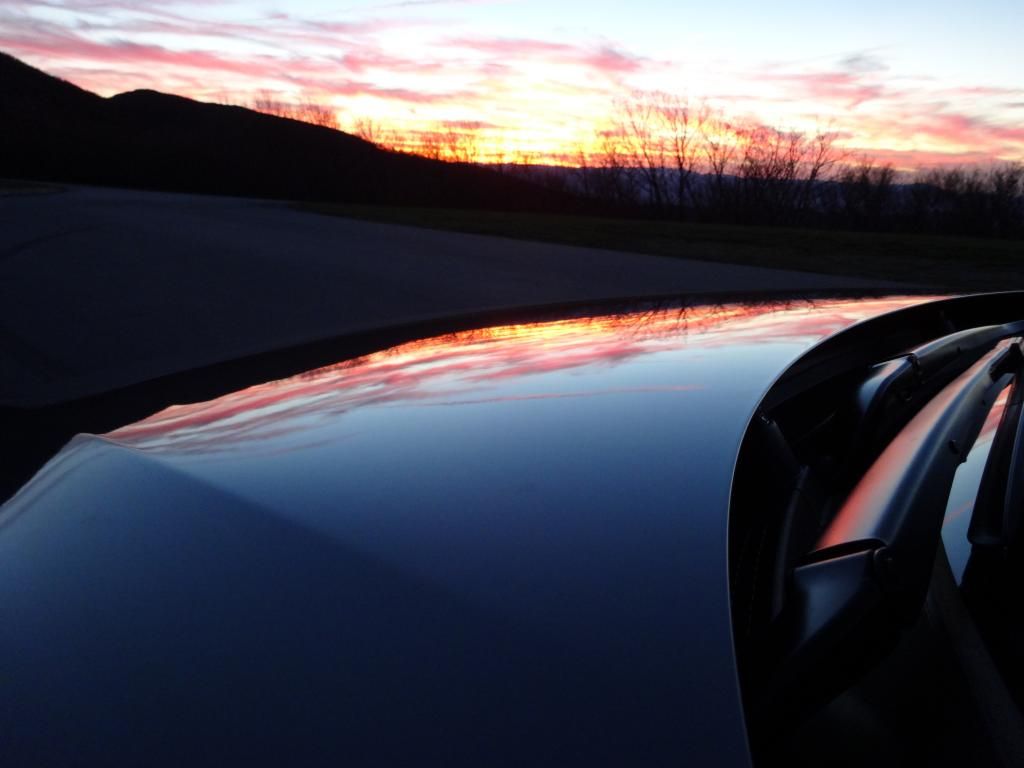
Later, with the sun getting lower on top of Mt. Mitchell, highest peak in the eastern US:
My GF (no, not the car, lol) and I were treated to an amazing sunset:

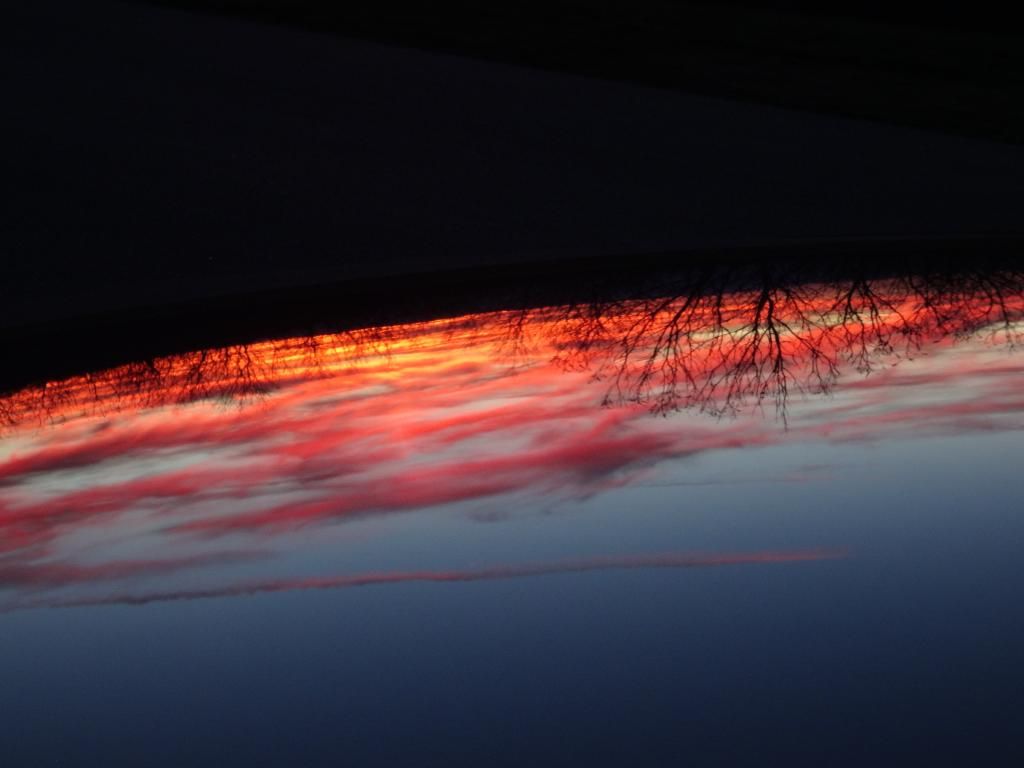
Check out the colors reflected, even in low light:
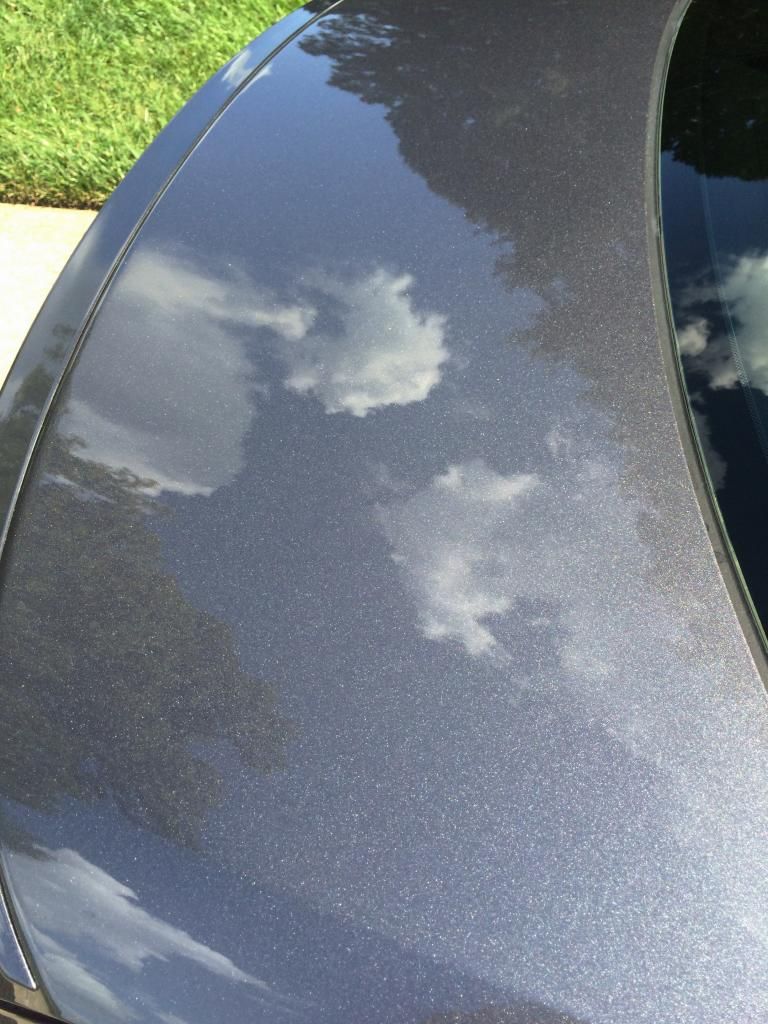
Closeup of reflection (orange peel still gets in the way of perfection, but it looks darn good!):
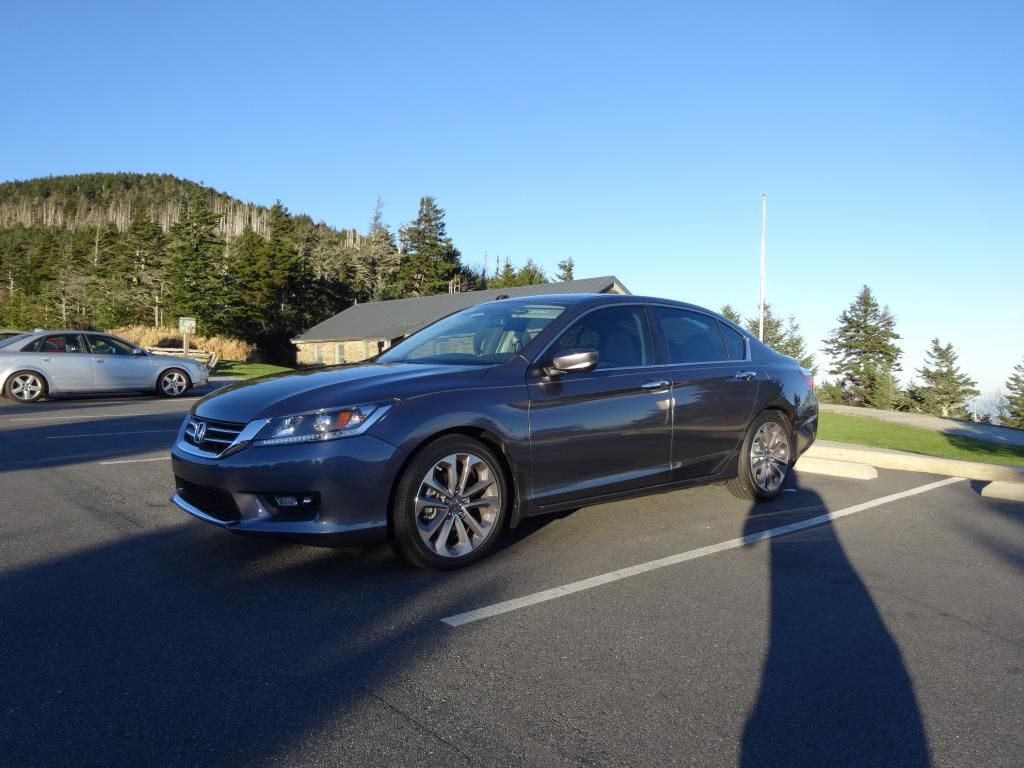
Hood looks great:
Intense reflections:
So, as you can see from the pictures, I think it's safe to say that Pinnacle Black Label's Diamond Surface Coating brought life to an otherwise drab paint job. Adding the coating gave the paint a nice amount of wetness, which brought out a new level of depth and definition on the sharp body lines of the 9th generation Honda Accord. Even with a surface preparation that was far from Concours-winning, the DSC made the car look dazzling. Not only that, but it was a dream to apply. Will it do the same for you? Likely so!
-Michael A.
Acknowledgements:
A very special thank you is in order to all of the people on the Autogeekonline forum that helped me in the struggles encountered along the way! Couldn't have done it without you guys.
-
Super Member

Re: Review: Newbie's Perspective on Pinnacle Black Label DSC
Fantastic Review!!  Thanks for taking the time to write it. I do love that shade of grey, although I am partial to it. Looks great. Thanks for taking the time to write it. I do love that shade of grey, although I am partial to it. Looks great.
-
Re: Review: Newbie's Perspective on Pinnacle Black Label DSC
 Originally Posted by JHL88

Fantastic Review!! Thanks for taking the time to write it. I do love that shade of grey, although I am partial to it. Looks great.
Thanks!!! It only felt right writing a detailed review after not seeing much out there from the enthusiast's perspective when first researching it.
I'm starting to love this color too, especially now that the DSC's on top. I might try investing in a decent carnauba to top it off for events and such... can't wait to see what that will do to it!
PS: Next time I do a full wash on the car, I'll take some slow motion videos of the water sheeting action! Already looks like it'll be up there with any other coating from video's I've seen and the test patch.
-
Junior Member

Re: Review: Newbie's Perspective on Pinnacle Black Label DSC
Great review, enjoyed reading it! Welcome back 
Similar Threads
-
By Mike Phillips in forum Product Reviews by Mike Phillips
Replies: 0
Last Post: 10-05-2020, 10:06 AM
-
By Eldorado2k in forum Product Reviews
Replies: 25
Last Post: 05-18-2019, 08:11 AM
-
By The Guz in forum Product Reviews
Replies: 2
Last Post: 11-29-2015, 10:45 PM
-
By richzak in forum Pinnacle Wax
Replies: 70
Last Post: 04-14-2014, 09:33 AM
 Members who have read this thread: 0
There are no members to list at the moment.
Posting Permissions
- You may not post new threads
- You may not post replies
- You may not post attachments
- You may not edit your posts
-
Forum Rules
|
| S |
M |
T |
W |
T |
F |
S |
| 31 |
1
|
2
|
3
|
4
|
5
|
6
|
|
7
|
8
|
9
|
10
|
11
|
12
|
13
|
|
14
|
15
|
16
|
17
|
18
|
19
|
20
|
|
21
|
22
|
23
|
24
|
25
|
26
|
27
|
|
28
|
29
|
30
| 1 | 2 | 3 | 4 |
|


 Reply With Quote
Bookmarks