 Dislikes: 0
-
Super Member

Review: Rupes Bigfoot Nano iBrid Polisher
Review: Rupes Bigfoot Nano iBrid Polisher
Short Neck: Rupes Bigfoot Nano iBrid Short Neck Kit
Long Neck: Rupes Bigfoot Nano iBrid Long Neck Kit
Description: (Taken from Autogeek's website)
Small tool, BIG results!
Since making their official debut in the U.S. market in 2011, Rupes has taken the detailing world by storm by continuously introducing new polishing systems that redefine the detailing industry. This ambitious Italian toolmaker shows no signs of stopping anytime soon! We, along with Rupes, are excited to introduce the all-new Bigfoot Nano with iBrid Technology, another revolutionary polishing system and arguably the biggest step forward the industry has ever witnessed. This compact, lightweight polisher relies on advanced battery technology to enable you to accomplish polishing tasks you never thought possible.
The Rupes Bigfoot Nano with iBrid Technology makes it possible to accomplish the most challenging tasks in detailing, from polishing panels as small as 1-inches wide, to gently removing grease and grime from recessed areas of your car or motorcycle using a series of available brush attachments. Rupes Bigfoot Nano with iBrid Technology sets the new standard for innovation.
What exactly is the Rupes Bigfoot Nano with iBrid Technology? First and foremost, the Bigfoot Nano, available in short and long neck versions, enables you to CUT THE CORD and instead rely on Li-ION rechargeable batteries (either configuration includes two batteries). If you forget to charge one battery while the other is being used, you still have the option of plugging in the tool so you can continue to use it.
Secondly, the Rupes Bigfoot Nano with iBrid Technology gives you the option to switch between rotary, 3mm random orbital, and 12mm random orbital actions quickly and easily. In a nutshell, the Rupes Bigfoot Nano accomplishes the same task as 3 other tools, if such individual polishing options even existed in the first place! The Rupes Bigfoot Nano with iBrid Technology will forever change the way you detail.
The Rupes Bigfoot Nano with iBrid Technology is loaded with advanced features. For example, the Bigfoot Nano includes two Li-ION battery packs and a battery charger. 22-24 minutes is all you will need to charge the battery and each charge provides 30 minutes of run time under full load. The two battery packs allow you to use one in the tool, while charging the other. You will always have a battery charged and ready to switch out. Changing the battery is as easy as changing a backing plate. There are two buttons on the base of that unit that release the battery when depressed. Pull the old one out and slide the new one in – it’s that simple! LED indicators on the unit and the battery charger will keep you informed on how much power you have left in the battery pack.
The Rupes Bigfoot Nano with iBrid Technology is available exclusively in a money-saving kit that includes everything you need to get started.
Price:
$560 for the Nano iBrid Short Neck Kit
$590 for the Nano iBrid Long Neck Kit
Introduction:
Have you ever encountered a situation wherein you're trying to polish a very tight area only to find out that your 3 inch DA setup is too big for the area you're working on? If you encounter lots of situations like this, then you will love this product!
Ever since the introduction of the long throw big foot orbital polishers, Rupes has taken the detailing world by storm. I remember the day I switched to my first Rupes polisher - I was so amazed at how smooth the tool is and how easy it is for it to remove defects. The company designed and innovated the long throw polishers and continued to do so as time went on. They eventually presented us with various offerings such as the Duetto and the mini 75E. This innovation continued and last year, Rupes unveiled a brand new polisher, the Nano iBrid.
Review:
Upon opening the box the polisher kit comes with, I'm greeted with this carrying case that says it's the Rupes Bigfoot Nano iBrid. The case is a lot bigger than I would have imagined based on the pictures I saw online. This thing is massive.

Now let's talk about the features of this tool case that's included in the Nano iBrid kit. The quality of the case's exterior is top notch. The fabric seems very sturdy and looks like it will take a lot of beating. I'm sure this case will protect the contents of it.

The case features a very sturdy rubberized grip on top. This makes carrying it an easy and a comfortable endeavor.

The case also features a clip on the side as shown:

This clip is used to attach the shoulder strap included in the kit. The shoulder strap includes a padded section so it makes it very comfortable to use on your shoulder. I'm sure it will help reduce the heaviness of the case and its contents.

The case has a couple of rubber stoppers at the bottom of the case as well:

Overall, the case looks and feels luxurious and high quality. It should be as it commands a $105 price tag when purchased separately.
Now let's open the case and see what's inside!!!

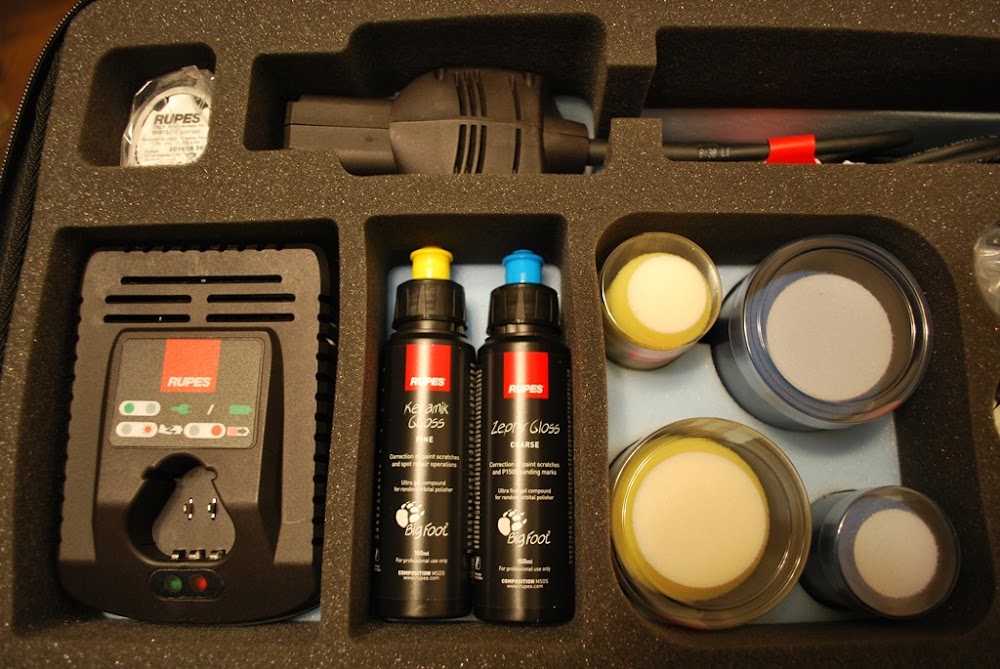


On the top cover, there is a pocket held securely by a velcro strap. Inside this pocket are a few microfiber towels, instruction documentation and the 2000 and 3000 grit sanding attachments.

Now let's examine each component closer.
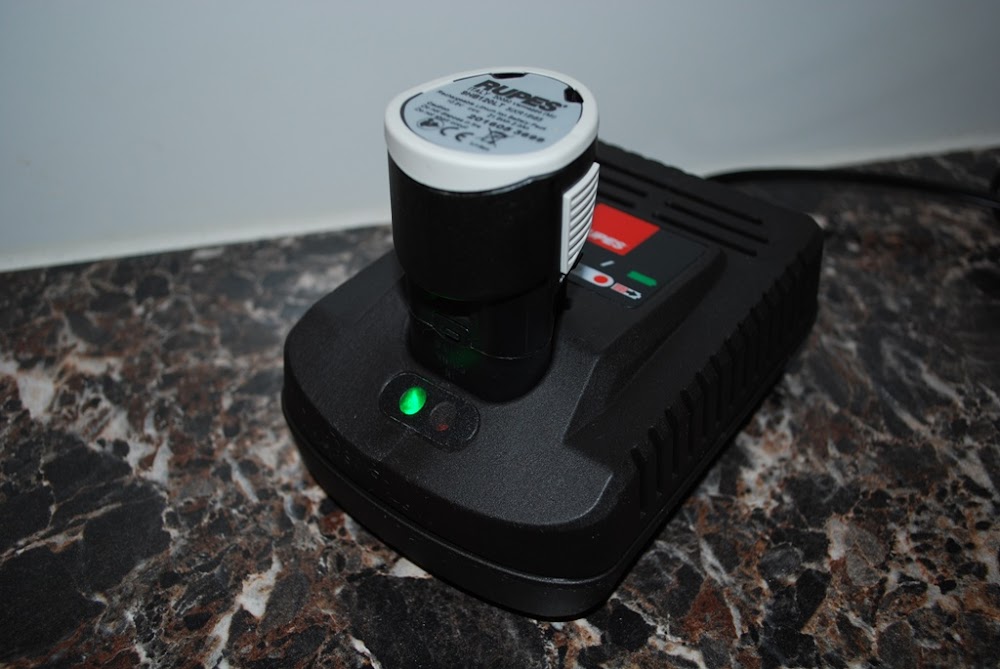
Here's the extra battery and the charger:

Here's the explanation that shows what each status light color means. Green when it's plugged in (without a battery attached) or when the battery is fully charged. Red when it's charging. I'm guessing blinking red means there's an error.

Here's how the charger looks like when it's charging the battery. Notice the red LED status light.

When the battery is full, the status LED light turns green as shown:
The kit comes with an AC power attachment. This is used when you want to use the wall socket as the power source. Here's how it looks like attached to the nano polisher:

It comes with a pack of 40mm (1.5") blue and yellow foam pads (6 each) and a pack of 70mm (2.75") blue and yellow foam pads (4 each):

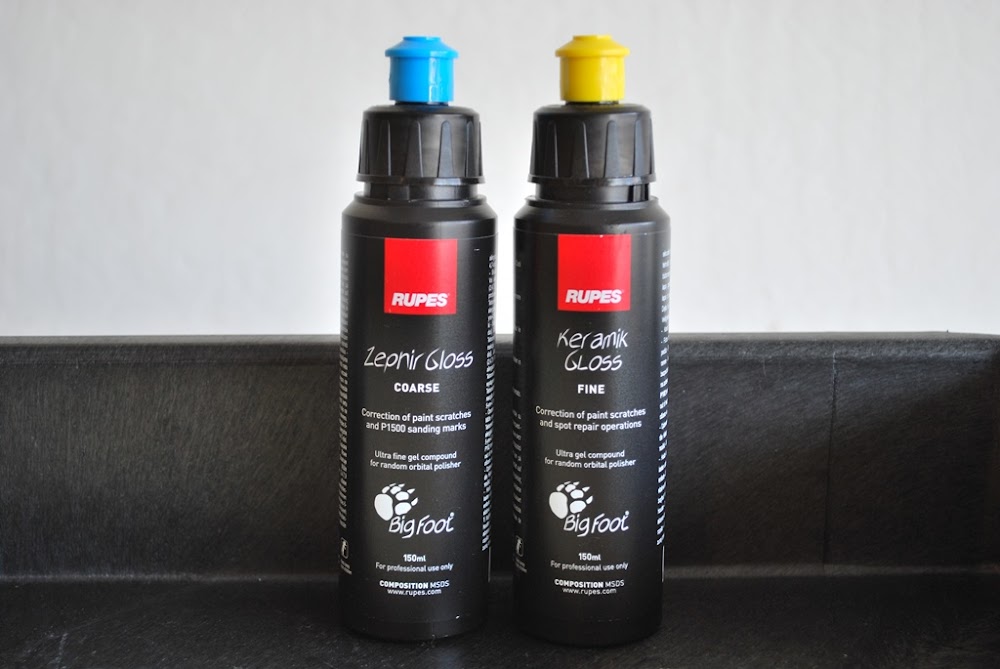
It also comes with the Zephir Gloss Coarse Gel Compound and the Keramik Gloss Fine Gel Polish both in 150ml bottles:
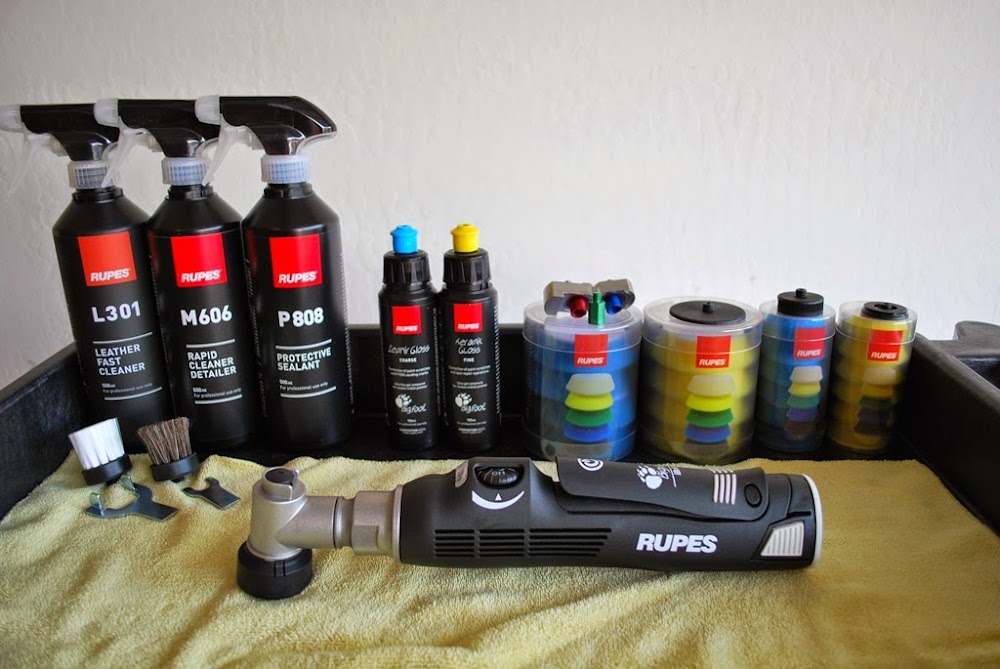
Here's a picture of all the attachments/accessories included in the kit:

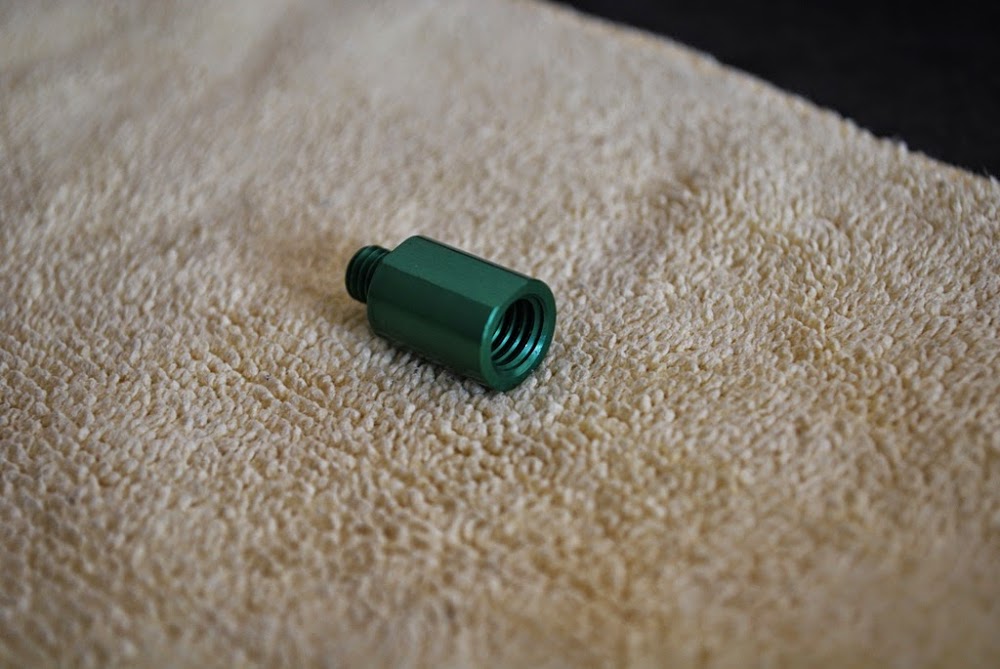
Here are some pictures of the rotary attachment tool:

Here are some pictures of the 3mm random orbital attachment:
Top view:

Side view:

Bottom view:

Here are some pictures of the 12mm random orbital attachment:
Top view:

Side view:

Bottom view:

I was pleasantly surprised at how well the rotary and random orbital attachments are constructed. The counter weight of the random orbital attachments are machined. The rotary attachment and the free floating spindle in the random orbital attachment are all anodized and they each have different colors. Even the inside where the threads are is anodized!!! Top notch build quality.
Here are a couple of pictures of the 50mm (2") backing plate, the 34mm (1.25") backing plate and the 34mm (1.25") sanding backing pad respectively.
Top view:

Bottom view:

As you can see, the normal backing plates have velcro at the bottom while the sanding backing pad is smooth and cushioned.
Here's a picture of the brush attachments that's included. To the left is a soft horse hair brush and to the right is a stiff nylon brush.

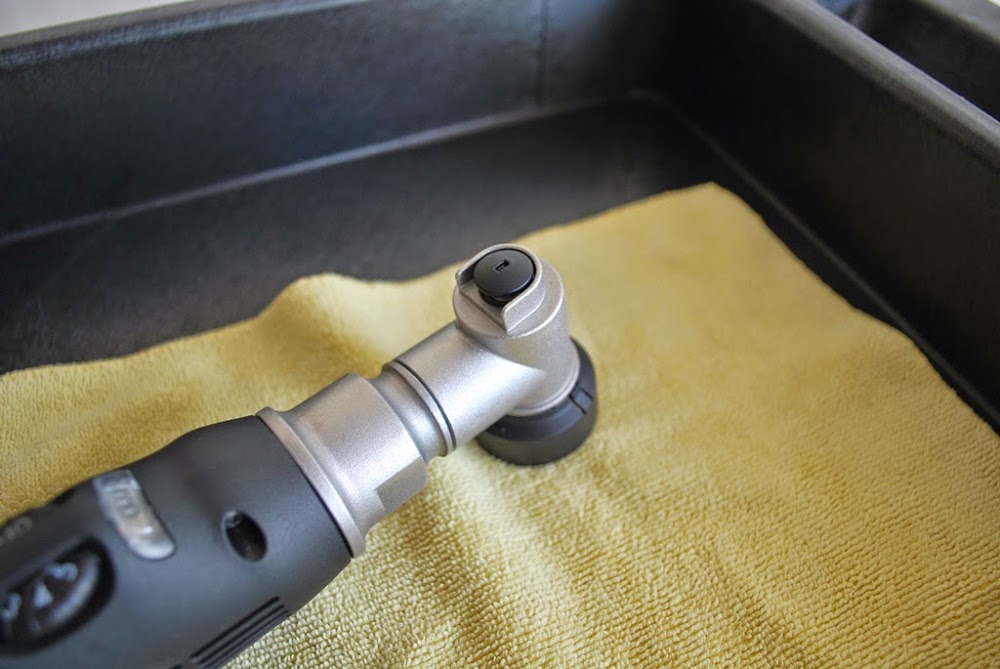
Here are a few beauty shots of the nano polisher:


2011 SEMA Meguiar's Car Crazy Showcase Team
2016 Competition Ready Barn Find Porsche Team
-
Super Member
Re: Review: Rupes Bigfoot Nano iBrid Polisher
How To Connect The Rotary and Random Orbital Attachments, Backing Plates and Other Accessories
I found this nifty little guide online and it shows what you can use for the rotary, 3mm random orbital and the 12mm random orbital attachments respectively:
In the following demonstration, I'm using the 34mm (1.25") backing plate to attach to the spindle. But you can attach the 50mm (2") backing plate, the 34mm (1.25") sanding backing pad, or the brushes instead.
Here's the procedure on how to configure the Nano as a ROTARY:
First, press the locking button on top of the polisher's head as shown:

Next step is to screw in the green rotary attachment to the Nano as shown:

Use the smaller wrench to tighten the green rotary attachment as shown. Make sure you still have the locking button depressed. If not, you won't be able to tighten the rotary attachment properly and may spell disaster down the road.

Next step is to attach the 34mm (1.25") backing plate to the rotary attachment as shown: Note: you may use any other backing plate or attachment at this point. Please use the guide above to see what attachments are recommended.

This is what it should look like once you're done configuring the Nano as a ROTARY.

Here's the procedure on how to configure the Nano as a RANDOM ORBITAL. In this example, I'm showing you how to connect the 3mm random orbital attachment. The same procedure can be used for the 12mm random orbital attachment as well.
First, press the locking button on top of the polisher's head as shown:
Next step is to screw in the 3mm random orbital attachment with the blue free floating spindle to the Nano as shown:

Use the larger wrench to tighten the 3mm random orbital attachment attachment with the blue free floating spindle as shown. Make sure you still have the locking button depressed. If not, you won't be able to tighten the random orbital attachment properly and may spell disaster down the road.

Next step is to attach the 34mm (1.25") backing plate to the rotary attachment as shown: Since the random orbital attachment has a free floating spindle, you need to use the smaller wrench to keep this free floating spindle from spinning around freely as you're securing the backing plate to the spindle. Note: you may use any other backing plate or attachment at this point. Please use the guide above to see what attachments are recommended.


This is what it should look like once you're done configuring the Nano as a RANDOM ORBITAL.

Now you can attach the 40mm (1.5") foam pad to the 34mm (1.25") backing plate as shown:


Here's a picture of the 70mm (2.75") foam pad attached to the 50mm (2") backing plate:

Testing:
For testing, I wanted to see if it can remove more than just swirls... I wanted to see if it can remove sanding marks. If this polisher can remove sanding marks then it should be able to remove swirls without a sweat. For this testing, I elected to use the Meguiar's 3000 grit unigrit sanding discs. My Honda's paint is notorious for clear coat failure so I hope I didn't compromise my clear by sanding it LOL! The things we do for detailing, *COUGH COUGH* errr science!!! 
First, clean off the surface with the RUPES M606 Rapid Cleaner Detailer is a gloss intensive detail spray designed to keep your car clean in between washes or any QD/WW of your choice.

Wipe the surface with a Gold Plush Jr. Microfiber Towel, gold detail cloth, buffing towel, microfiber buffing towel, micro fiber or any microfiber towel of your choice.

This is the 3000 grit Meguiar's unigrit sanding discs attached to the DA.

Here's how the test panel looks like after the wetsanding process. SCARY right?!?!

For this process, I used the Nano in the following configuration:
- 12mm throw random orbital attachment
- 50mm (2") backing plate
- 70mm (2.75") blue coarse foam pad
- Zephir Gloss Coarse Gel Compound
Here's the video on how I was polishing the 3000 grit sanding marks with the Nano:
Note: Notice how big the throw is from the video above.
Swirls on the paint originally

After 3000 grit sanding marks with a light source:


Here's the 50/50 shot:

50/50 with a light source:

Afters:


As you can see, it was able to easily remove the 3000 grit sanding marks with ease. And by the way, I didn't apply any pressure at all when polishing the surface. How amazing is that right? I'm letting the polisher's throw, compound and pad do all the work.
Versatility:
The Nano is so versatile because it can be used in so many different parts of the car!!!
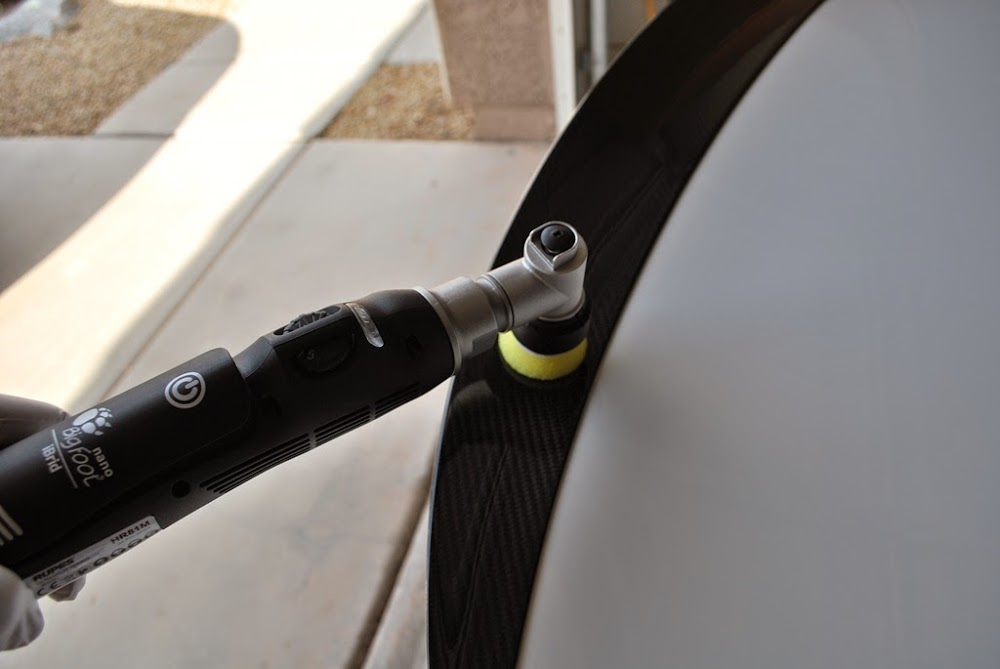
Decklid Carbon Fiber Spoiler:
Window Sills:

Door Handles:

Antenna:

Thin areas in the trunk:

Curved areas in the trunk (or any where for that matter):

The thin portion underneath the license plate. I normally hate polishing this area because the license plate eats up the pads when used with a normal DA. But with the Nano, not anymore!
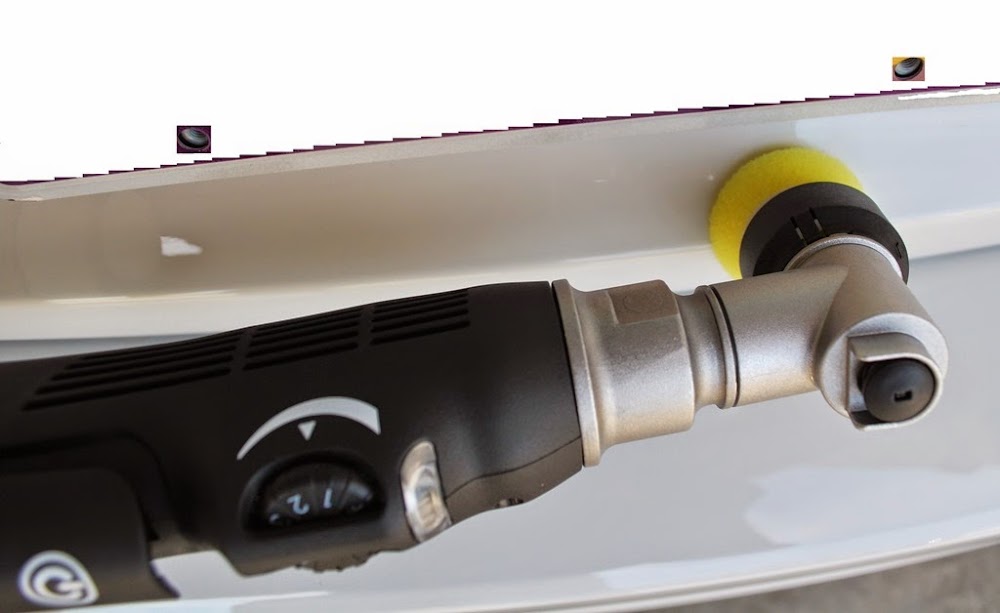
Thin section in between the grilles:

Perfect for the A-pillar. Gone are the days of using a normal DA that's too big for this area. The Nano is so perfect for this.

Side mirrors:

Headlights/Tailights:

Thin areas in the front bumper:

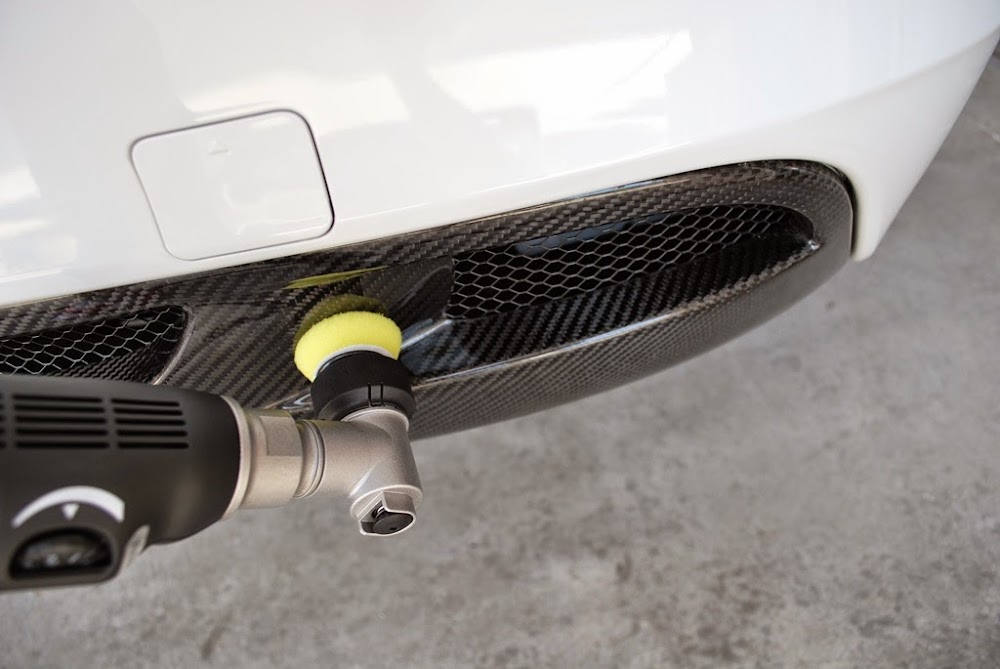
Thin areas in the carbon fiber rear diffuser:
The Nano can also be used to clean other things such as leather and plastics (use the brush attachment)


2011 SEMA Meguiar's Car Crazy Showcase Team
2016 Competition Ready Barn Find Porsche Team
-
Super Member
Re: Review: Rupes Bigfoot Nano iBrid Polisher
Here are some other cars I think the Nano will be beneficial for:
C7 Corvettes:
Z06 fender trim:

There's this thin painted part in between the side mirror and the door windows. No DA can fit in there until the Nano came along!

Same can be said in the thin painted part in between the intake vent in the rear quarter panel and the small rear side window:

Side intake vent air router (don't know what it's called LOL):

Hood vents:

Thin painted parts of the front bumper:

Thin painted part above the tailight and spoiler:

Porsche 911:
Rear engine cover vents:

Headlight surround:

Thoughts and Observations:
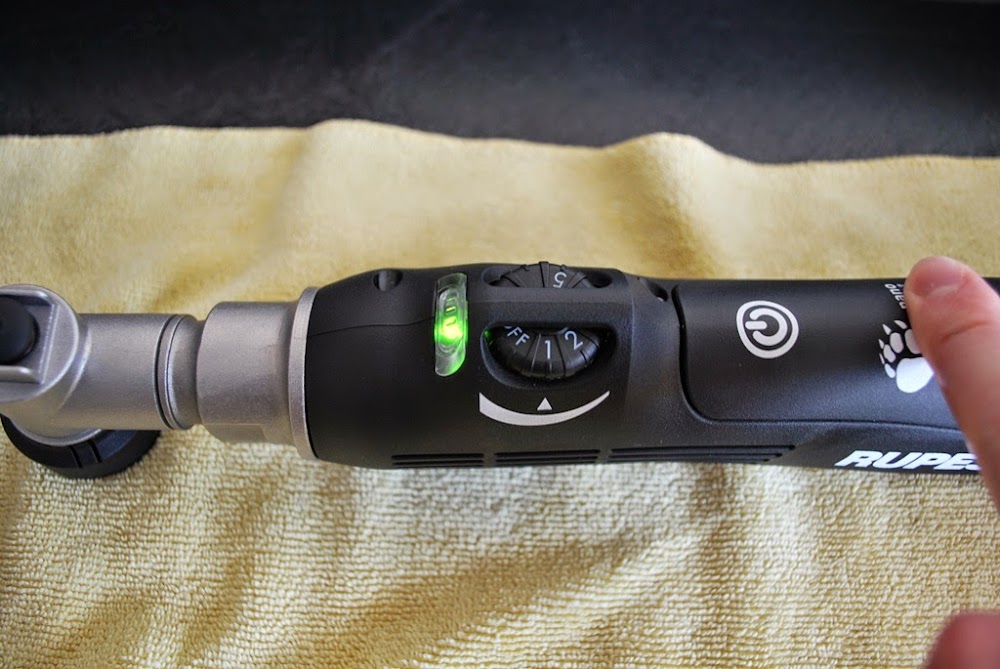
The speed dial has a hump in between the "OFF" and the "1" setting. When you go over this hump, you'll hear an audible clicking feedback. I'm assuming they built this so that you'll now when you go from the speed setting to the "OFF" position and vice-versa without looking.
The LED indicator turns green when you depress the power trigger. It only stays on for a second or two then goes away as you continue using the tool.
The power trigger can get awkward as you polish for long periods. In my experience, your thumb depressing that switch can cause accidental torquing movements on the tool while polishing. This causes the pad to not be flat on the surface momentarily. You have to be aware and keep in mind to keep the pad flat but sometimes, you deviate from this and I think it's because of how the power trigger needs to be depressed.
The polisher is very smooth to operate. I've tried both the 40mm and 70mm pads in both the 3mm and 12mm random orbital mode and it was a joy to use.
Noise levels were not annoying at all. It was actually quite tolerable. However, I was hearing some weird intermittent buzzing as I was using the polisher. I really hope there's nothing wrong with my tool.
The polisher got warm but it wasn't hot by any means (it's not like how hot the bigfoot polishers get). I think the heat level produced by the polisher is very acceptable for the time I used it.
This polisher was able to easily remove 3000 grit sanding marks so I have no doubt in my mind that it will be able to remove swirls/scratches with ease. Think about it. On the 70mm (2.75") pad, the 12mm throw is 17% of the pad's diameter. The Duetto's 12mm throw is 8% of the 150mm foam pad it uses. The 15ES polisher's 15mm throw is 10% of the 150mm foam pad it uses. So the throw of the Nano when used with the 70mm pad is HUGE!!! It's even moire if you consider the 12mm throw on the 40mm foam pads... In addition, the foam pads and polishing/compounding liquids are already proven with the Rupes system so you know it just WORKS.
The polisher is so versatile because you can now polish painted surfaces where no 3" DA polisher has ever been. This is HUGE!!! You can perform precision surgical buffing on areas that require it.
Why did I pick the short neck you might ask even if the long neck seems to be the popular choice? Let me show you an illustration:

The main difference between the long neck and the short neck is that the red arrow is longer on the long neck version of the Nano. Everything else is the same. But I don't think this dimension is the limiting factor when trying to polish tight spaces. I think the limiting factor is the height of the head as depicted by the blue arrow. If the height of the head is too tall for the space you're buffing, what does the extra neck going to do? And if the height of the head does indeed fit the space you're trying to get into, the next limiting factor is the body's height depicted by the green lines. In this situation, then the length of the neck as depicted by the red arrow matters. But if you need a longer neck, I think the area you're working on is too deep anyway and probably not visible from the outside.
Also, the short neck is $30 cheaper and available now! The long neck is back ordered and who knows when it will ship.
From using the tool, I think the action of depressing the power button (discussed more below) can cause a torquing motion that results in the pad's face not to be flat on the surface. This is probably not intentional but you can't avoid it. It's hard to concentrate on polishing when you have to always think about depressing the power button. I think this problem is exacerbated by the long neck version.
Suggestions for Improvement:
The tool is a great piece as it is. These are the only things I would suggest to change.
1. The more I used the polisher, the more awkward I found the power trigger to be. I know this trigger was carried over from the 75 pneumatic polisher so I know it works. But what if your thumbs get tired? What if you want to hold the Nano polisher in a different way? You have to stop the polishing and resume with a different grip. In my opinion, the force of keeping your thumb depressed for the power trigger can cause a torquing motion and could sometimes cause the foam pad to not be flat on the surface you're polishing. Depressing the power trigger button with the thumb also causes your mind to focus on 2 things. Polishing and keeping the trigger depressed. If we don't have to constantly depress the power trigger then we can concentrate on the polishing and keeping the foam pad flat on the surface. Like the 21ES, 15ES, Duetto and 75E polishers, they all have power trigger locking mechanisms.
I think it would be great if the power trigger was a button like the electric toothbrushes as shown:

This way, the power stays on after the button is pressed. Another suggestion is to put a trigger lock on the nano, like the ones in their big foot polishers.
2. Add a stability bar on top of the polisher like the Mark 2's. When I was removing backing plates from the random orbital attachments, I had to use one hand to spin the backing plate and the other hand to use the wrench to hold the free floating spindle from rotating. I was just trying to keep the Nano polisher flat on the surface as I'm doing so but since the Nano has a rounded shape, I had a hard time stabilizing it.
3. Increase the height of the free floating spindle assembly in the random orbital attachment or the rotary attachment. When I had the Nano configured with the 3mm throw random orbital attachment with the 34mm backing plate, I had a hard time sliding in the wrench to remove the backing plate. The clearance between the backing plate and the Nano's black plastic shroud was so little and sometimes, it was hard to lock in the spindle.
4. I would also suggest to offer a permanently corded option. I understand that having a cordless option is very convenient as you can take the polisher anywhere without the hassle of a cord behind you. However, we have been polishing all this time using corded polishers. I don't think it's really a problem to use a permanently corded Nano polisher. This will drive the price down if you remove the 2 batteries and the charger from the kit. This is interconnected to my next suggestion/improvement. IMO, the price of the kit is a little steep for lots of people especially hobbyists. I think it will be great if Rupes can sell the polisher by itself. This, along with the permanently corded change will definitely drive the price down. Right now, the bag itself costs $105. The charger costs $70 and each battery costs $50. That's a total of $275 right there! I know prices don't add up like that with the kit as you save more when bundling. But if you sell a corded polisher by itself, along with the necessary accessories like the backing plates, rotary/orbital attachments, wrenches and pads and price it somewhere in the $300 range, this will sell like hotcakes.
Just think about the ratio of people buying the big foot polishers compared to their respective kits. Same thing happened when the 75E first came out. They only sold them in kits but eventually, they sold the polisher by itself.
Conclusion:
This tool is another home run from Rupes!!! They continue to innovate new tools for us to benefit from. The Nano gives us versatility (polishing different small, thin and tight spaces) and interchangeability (rotary, random orbiltal, sanding, power source, etc). If your car has some tight areas where your 3" DA setup doesn't fit and you've been dying to polish that area, then this is the tool for you!!! I understand that the price is a little steep but I promise you it's WORTH IT especially if you'll use it a lot. If you're on the fence about getting this polisher, just add it to your cart and hit the checkout button. I promise you will not regret it.
Hope you enjoyed this review. Comments are appreciated.
2011 SEMA Meguiar's Car Crazy Showcase Team
2016 Competition Ready Barn Find Porsche Team
-
Post Thanks / Like - 1 Thanks, 1 Likes, 0 Dislikes
-
Super Member

Re: Review: Rupes Bigfoot Nano iBrid Polisher
BOOM! Damn it Marc, now you're making me wanna get one of these cute lil buffers. Epic review btw.
-
Super Member

Re: Review: Rupes Bigfoot Nano iBrid Polisher
Great review. I agree with what you wrote and that it's a great tool. I have enjoyed using it. The more time I put in with the tool, the more I figure out how to take full advantage of it.
I tried out the corded application and it works very well. The only thing it takes away from the fact that it's meant o be a portable polisher and now one has the extra cord. I had The mini, the 15 and this all plugged in and it can become a rats nest lol.
-
Super Member

Re: Review: Rupes Bigfoot Nano iBrid Polisher
 Originally Posted by fly07sti

BOOM! Damn it Marc, now you're making me wanna get one of these cute lil buffers. Epic review btw.
Yeah, I'm pretty much with you Don - I kinda wanted one before but wasn't fussed if I did or I didn't but thats one heck of a review . . . . a very good review indeed! Damn it.
Aaryn NZ. 
a DETAILS Blenheim New Zealand - IDA Member - C.Quartz Finest Authorized Installer 
-
Super Member

Re: Review: Rupes Bigfoot Nano iBrid Polisher
Excellent thorough review Marc!
It's on my wish list but your review makes me want to get one now.
Just thinking, how would it work with a rubber band wrapped around the power lever to keep it depressed constantly and just use the on/off power dial?
-
Re: Review: Rupes Bigfoot Nano iBrid Polisher
Damn Marc! What an informative review on a cool little polisher!
Thanks for taking the time to share.
Enjoyed the read.
-
Super Member

Re: Review: Rupes Bigfoot Nano iBrid Polisher
Very good review!!!! I want one now!!
David 2000 Ford F-350 DRW CCLB BLACK/GOLD
Wish list:
Everything Mike has in his garage for detailing 
-
Re: Review: Rupes Bigfoot Nano iBrid Polisher
This was one of the most well documented and thorough reviews I have seen, well done. Just two points of concern not directed at the OP but more toward Rupes. Please give clarity as to where the long neck will excel over the short neck and vice versa, preferably with pictures to show and tell as most out there can't see any benefits or trade off's going either route. It comes across as unprofessional as neither long or short product descriptions state which is better suited to a user. Second point that concerns me is the necks being of an aluminum/steel/metal structure where it in some instances can and will most likely hit paint or any other scratch sensitive area around it, why no plastic or rubberised cover/coating over?
I'm a huge Rupes fan but the above two queries seems to be avoided by Rupes which is a concern.
Edited to add: Point 4 by the OP would be most welcomed, cheaper corded version is a plus,hoping iBrid Nano MKII version will improve on some of the queries.
Similar Threads
-
By patricemougeot in forum RUPES BigFoot Oribital Polishers
Replies: 0
Last Post: 07-04-2018, 01:44 PM
-
By OrangeVee in forum How to Videos
Replies: 2
Last Post: 08-10-2017, 09:59 PM
-
By Mike Phillips in forum Company & Forum News Headlines
Replies: 3
Last Post: 03-28-2017, 01:38 AM
-
By AZ Mike in forum RUPES BigFoot Oribital Polishers
Replies: 10
Last Post: 06-09-2016, 11:54 PM
-
By apthai in forum RUPES BigFoot Oribital Polishers
Replies: 29
Last Post: 05-04-2016, 10:16 PM
 Members who have read this thread: 0
There are no members to list at the moment.
Posting Permissions
- You may not post new threads
- You may not post replies
- You may not post attachments
- You may not edit your posts
-
Forum Rules
|
| S |
M |
T |
W |
T |
F |
S |
| 31 |
1
|
2
|
3
|
4
|
5
|
6
|
|
7
|
8
|
9
|
10
|
11
|
12
|
13
|
|
14
|
15
|
16
|
17
|
18
|
19
|
20
|
|
21
|
22
|
23
|
24
|
25
|
26
|
27
|
|
28
|
29
|
30
| 1 | 2 | 3 | 4 |
|


 Thanks:
  Likes:


 Reply With Quote
Bookmarks