 Thanks: 0
 Dislikes: 0
-
Review: DP CR2 Ceramic Coating
Review: DP CR2 Ceramic Coating
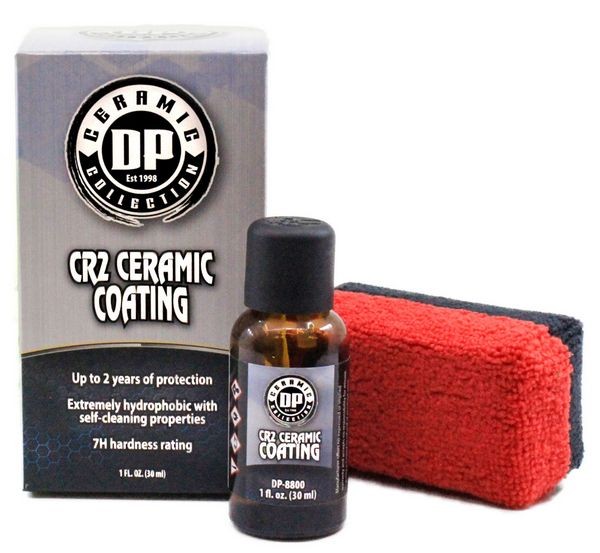
DP CR2 Ceramic Coating
What is it?
A nano-crystalline coating that protects automotive paints.
What does it do?
Seals automotive paints with a 7h hardness ceramic coating that can last up to 2 years.
When do I use it?
After washing, drying and claying your car's paint and also doing any needed paint correction and polishing work to remove defects and restore a factory looking appearance.
Why should I use it?
Protects your car's paint better and longer than conventional waxes and synthetic paint sealants. Creates a high gloss, slick finish that stays cleaner in-between normal washes. Makes future washing and drying faster and easier while giving your car's finish a self-cleaning effect anytime it rains.
From the manufacturer
DP CR2 Ceramic Coating
DP CR2 Ceramic Coating contains a 7H hardness rating that is designed to last for up to two years of protection. DP CR2 Ceramic Coating creates an extremely hydrophobic surface with self-cleaning properties. DP CR2 Ceramic Coating also provides a protective barrier against contaminants.
Ceramic coatings are some of the most well talked about products in the detailing world. With benefits like making your vehicle more resilient, easier to clean and enhanced gloss, it's easy to see why it's so highly regarded. So, if you're looking to capture these three features, look to DP CR2 Ceramic Coating.
DP CR2 Ceramic Coating features an impressive 7H hardness rating, meaning that this coating will help prevent against environmental contaminants from creating a hold on your paint and thus causing damage. It is protective against UV rays, industrial fallout and other environmental hazards. Not only that, but water, dirt and other lighter contaminants will slide off of the surface.
Besides being extremely protective and durable, DP CR2 Ceramic Coating is also extremely hydrophobic. This hydrophobic surface will allow water to bead up and roll off rather than stick around and create water spots in your paint. While it won't permanently rid your car of water spots, will help prevent them a great deal. Best of all, this protection will last up to two years!
Plus, DP CR2 Ceramic Coating is a nano-crystalline coating which means that it provides not only the protection mentioned, but also a slick, sleek shine. So, not only will your car look great, but it will stay that way!
DIRECTIONS
-Wash, dry, and correct paint if needed.
-Shake well before use.
-Use DP Coating Prep Spray to remove any oils that would prevent proper bonding.
-Apply several drops of product onto a microfiber applicator
-Apply to a 3 x 3 sq. ft. area in a back and forth, cross-hatch pattern.
-Allow for slight overlay to ensure even coverage.
-Allow area to set for approximately 30-60 seconds and then gently remove excess product.
-A second coat can be applied after approximately 1 hour.
-Keep coated surfaces dry for 24-48 hours for best results.
Real-World Redo
As anyone and everyone that's read any of my how-to articles and products reviews on this forum since July of 2009, you know I don't do mock-up. By the word mock-up I mean, I don't just place the product next to a car and take some nice looking pictures and then FAKE the write-up for the product. Nope... I actually use the product I write about so you get real information from real work done in the garage.
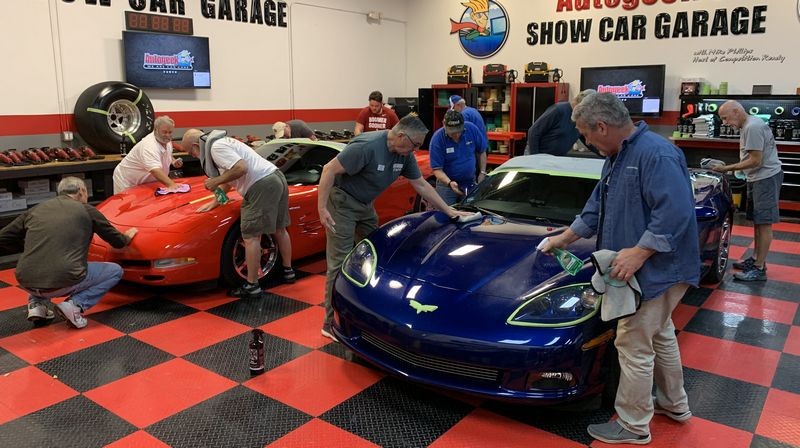
Just a little over a year ago as I type today on Monday, April 5th, 2021 - I taught a ceramic coating class for the local Corvette Club. There were two Corvettes in the garage, both belong to club members and it is these two Corvettes that after a class session on the products and process to clean, correct and coat a car, I turned the club loose to train on these two Corvettes.
2020 Stuart Corvette Club Ceramic Coating Class at Autogeek
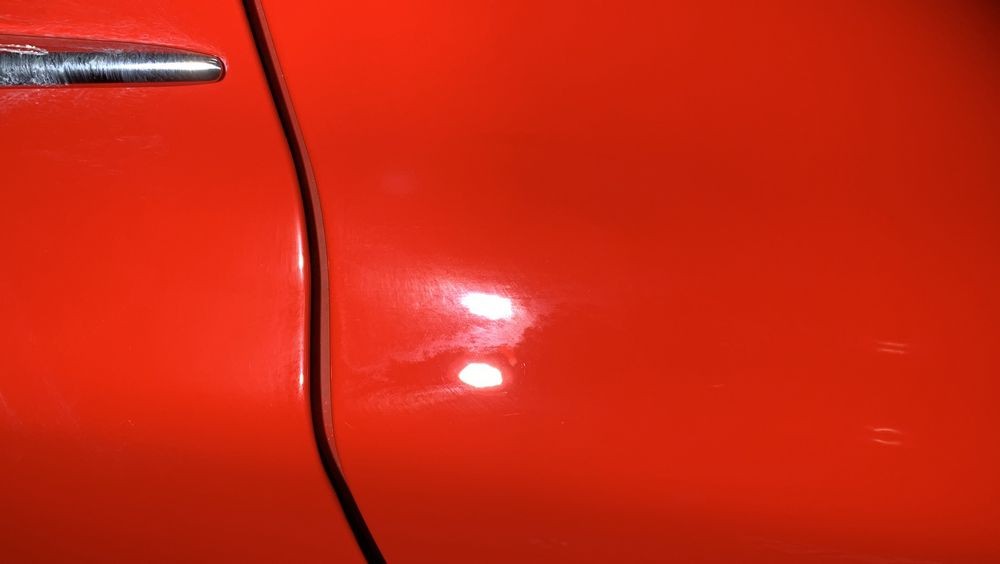
Fast forward to a few weeks ago, the owner of the red 2001 Corvette contacted me to let me know that a year ago, when this class took place, not all the ceramic coating applied that day to his Corvette was removed and now in good light there are HIGH SPOTS of coating visible on the drivers door as well as a few other areas.
What is a HIGH SPOT?
A high spot is simply a patch of coating that was not fully wiped off after the initial application of the coating. For most coatings you have somewhere between 30 seconds and 5 minutes to wipe a treated panel and remove any excess coating. If you wait too long or if you don't SEE a patch or smear of excess coating and it fully dries - then you can no longer simply wipe it off. You much compound and/or polish the area to remove the coating. This is why it's VITAL to closely inspect each panel you coat and make sure 100% of the coating has been removed before moving onto the next panel. This is also why in my opinion and experience - you MUST have a great hand held light to enable you to properly INSPECT each panel in order to see any high spots and if discovered, - remove them while you're still in the window-of-time where the coating is still liquid enough to wipe off.
I asked him to bring his Corvette to Autogeek so I could take a look at what we're dealing with. Here's a few pictures showing ceramic coating high spots on the Corvette.
High Spots or simply coating that was not fully removed
Here you can see what looks like a stain on the paint just behind the leading door gap on the driver's side of the car. What you see is dried ceramic coating. It will NOT simply rub off or wash off.
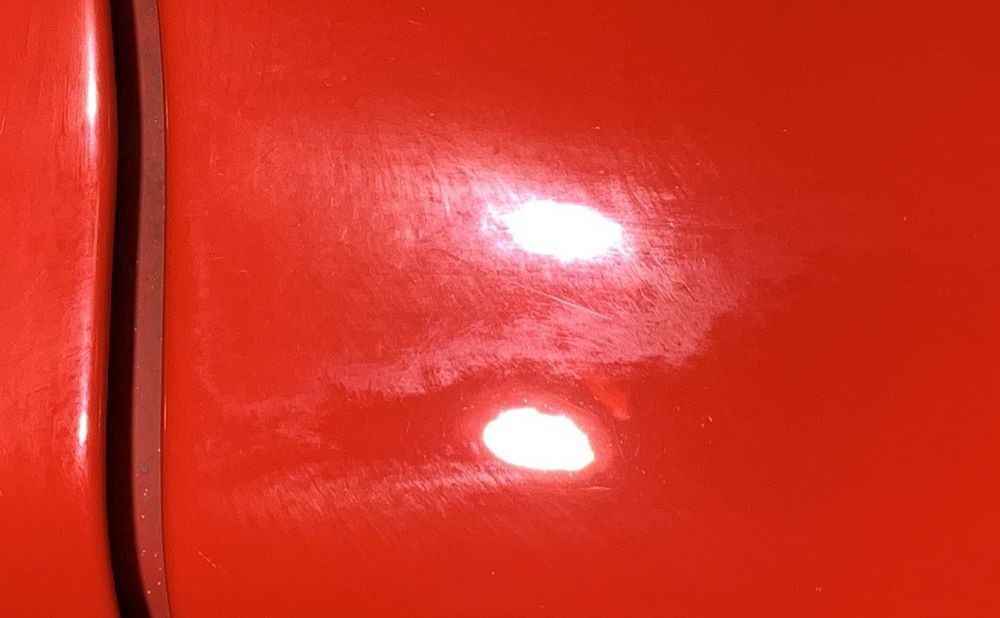
A little further back is some more patches of dried coating.

Then under the driver's side rear-view mirror - it looks like someone dripped coating down the side of the door and it hardened.

These drips of coating are like Super Glue on the paint. No matter how hard your rub - these drips or droplets of coating will not rub off or wipe off.

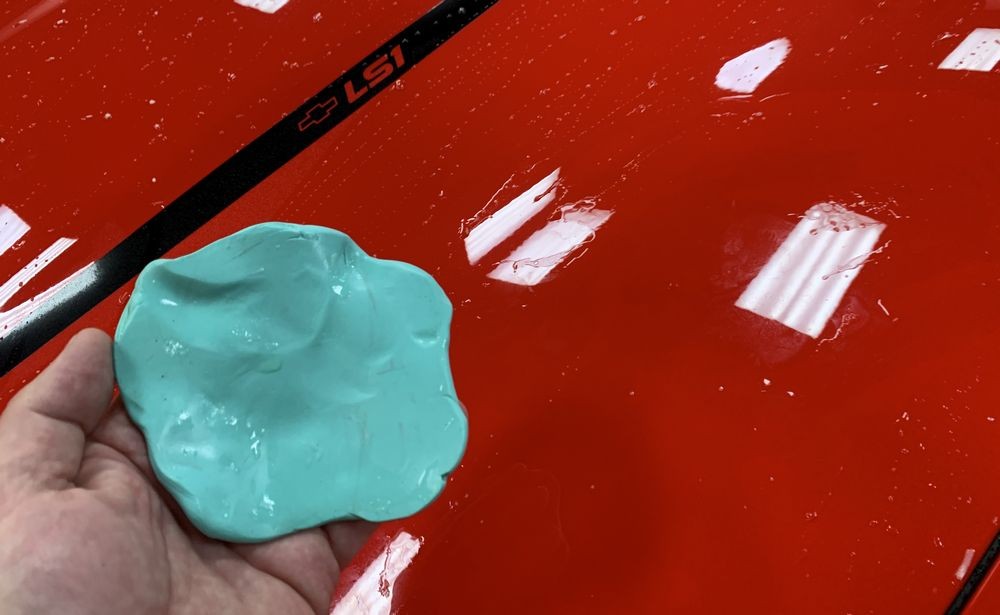
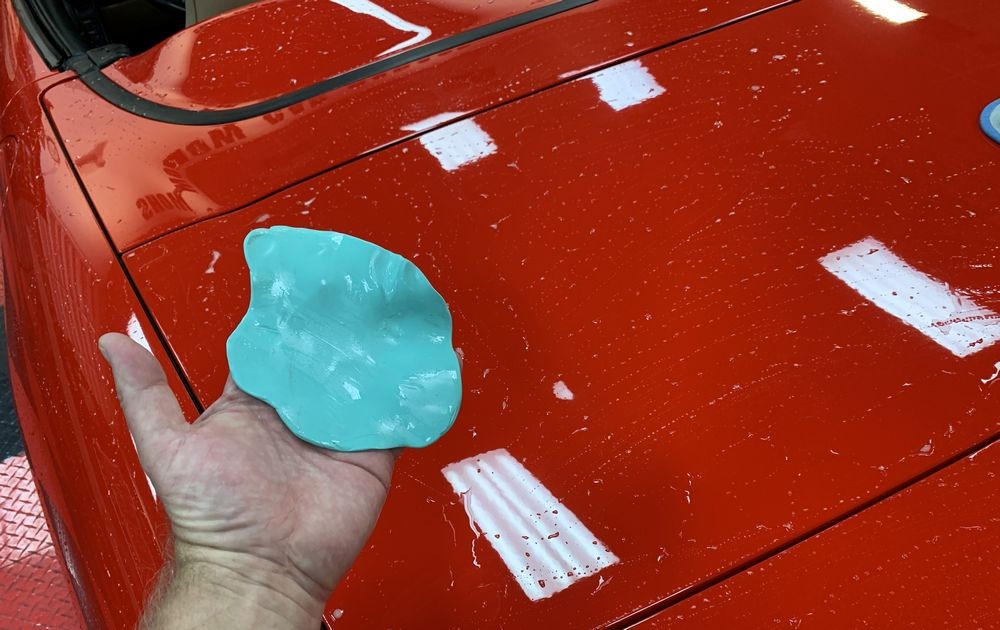
Above surface bonded contaminants - Detailing Clay
After doing a waterless wash and then the Baggie Test - I found enough contamination on the paint to warrant using some detailing clay to clay the paint and thus remove the above surface contaminants.
It's hard to see so just take my word for it - there was something on the paint. Machine polishing often times will NOT remove contaminants, especially if you're using foam pads on orbital polishers. The foam isn't aggressive enough to remove the bumps on the paint and instead simply glides over them making them shiny bumps. So if you do the baggie test to your car's paint and you feel little bumps all over the paint - then after washing and drying the car - take the time to clay the paint. Using detailing clay is the fastest, most effective and safest way to remove above surface bonded contaminants.

Tape-off and Cover-up
Before doing any of the polishing, I took some time to tape-off and cover the interior to protect any trim or the interior from any accidental splatter from the machine polishing step. You can skip this if you feel confident in your skill level. Me? I'd rather protect than clean-up after the fact.
These C5 Corvettes have some rubber gaskets surrounding the hood, while they are easy enough to wipe if you get any compound or polish splatter on them, I don't want the owner to ever complain about staining so I taped these areas off before staring in on machine polishing.

The LS1 cut out on the black graphics is a paint to dig polish splatter out of so again - I simply covered this area with some tape.

This is an Autogeek Cover-up Towel. I used it to cover the wiper arms and wiper blades and also all the plastic in this area - again simply to avoid having to clean it after the fact.


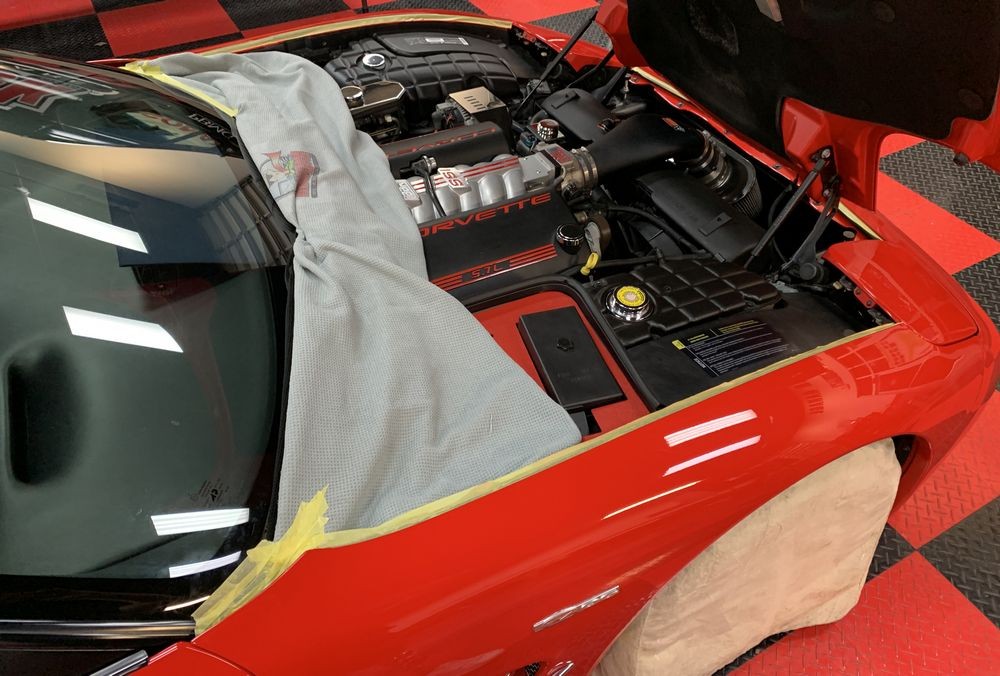
Because there's some painted section right behind the seats that I'm going to polish and coat, I asked the owner to put the top down. Then I used a few more Cover-up Towels and some tape to cover and protect the interior.
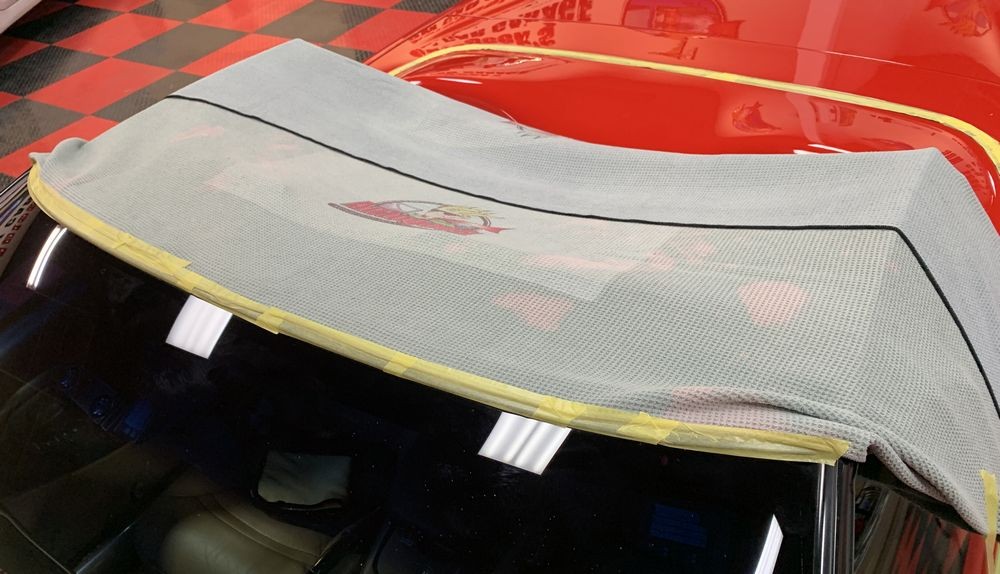
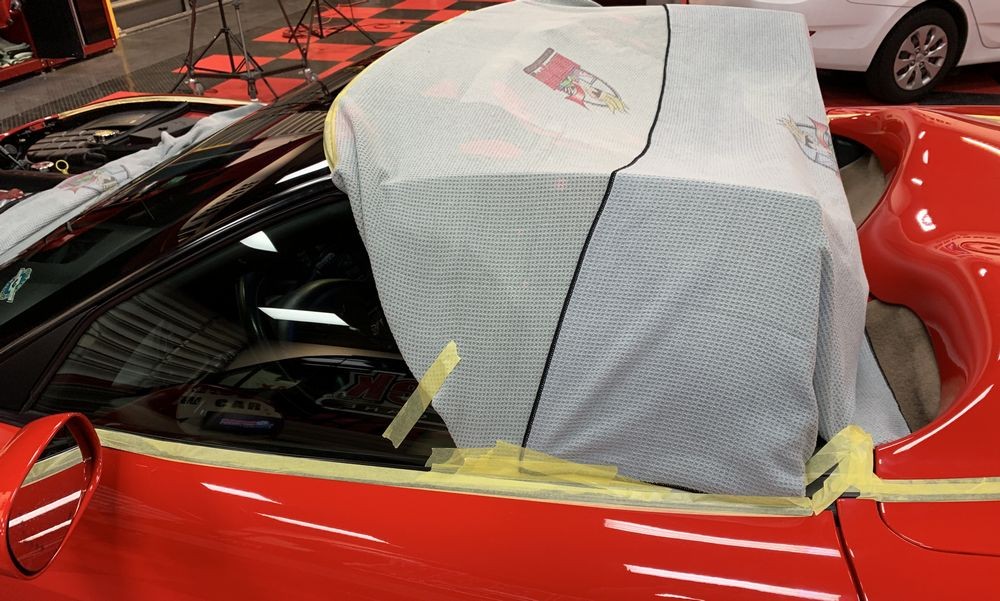
Please take my word for it - it's faster and easier to cover-up and protect areas like this than it is to try to clean little splatter dots of compound and/or polish after you're done detailing the car. By the time you have 8 to 12 hours into a project like this you're going to be tired and it isn't going to be fun or easy to remove splatter dots or residue.

A little tape can save you hours of using a tooth brush to remove compound and polish residues.

Then I placed some wheel maskers over the wheels and tires and this 2-door Plastic Fantastic is ready for paint correction.


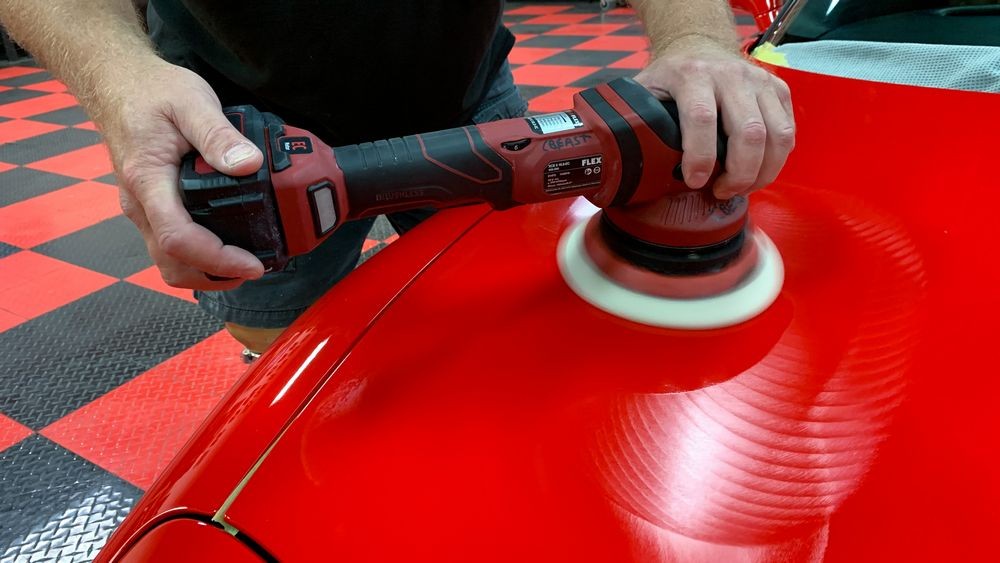
Machine Polishing to Perfect the Paint
In order to remove the high-spots I used a compound and a foam polishing pad. For the drips under the mirror I used a microfiber pad and a compound. After using a compound to remove all the high spots, I then machine polished the entire car to remove all the coating and to also perfect the paint and prep it for a new coating, the coating I'm reviewing in this article.

The FLEX CBEAST - Cordless 8mm gear-driven orbital polisher
Installing the coating
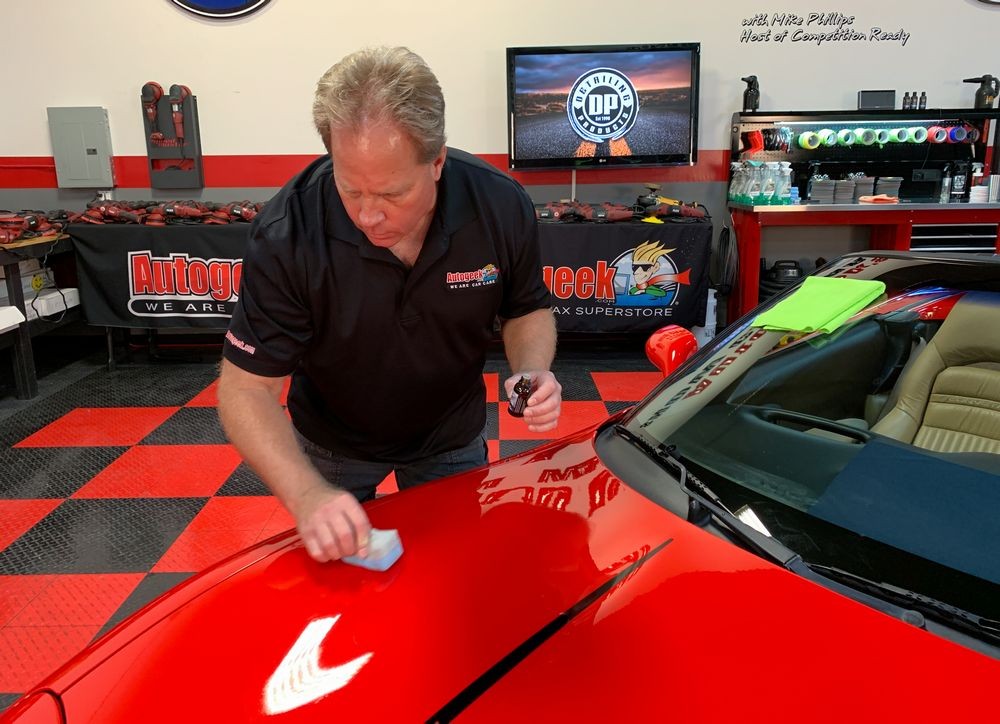
After meticulously machine polishing every square inch of the Corvette and then using a Panel Wipe to wipe down each body panel to remove any residual polishing oils, the paint was now ready to coat using the new DP CR2 Ceramic Coating.

To apply or "install" a ceramic coating, you simply dab some of the coating to a clean applicator. This new coating from DP will come with a different colored foam applicator block. At the time I was doing this project the applicators were not in stock yet so I used a generic foam applicator to install the new DP CR2 Ceramic Coating.


Priming your applicator - the initial application of coating
When first starting out with a DRY microfiber applicator I like to put enough coating on the face of the applicator so that I'm not fighting myself trying to apply and spread the coating. Once you prime the face like this, as you move around the car you'll find you only need to apply a few drips of coating. It's just the initial priming of the applicator that you want to apply more than normal. The reason why is if you only apply a few drips when first starting out, the dry portions of the applicator will try to REMOVE the coating you're trying to spread over the surface thus you end up fighting yourself. That's the nature of dry microfiber - it absorbs liquids. (think about it)

Overlapping Crosshatch Pattern
After priming your applicator pad, work one panel at a time. Apply the coating using an overlapping, crosshatch pattern. You can coat an area about 3' by 3' at one time. Make anywhere from 2 to 3 crosshatch patterns over each section of paint, this will ensure uniform coverage.
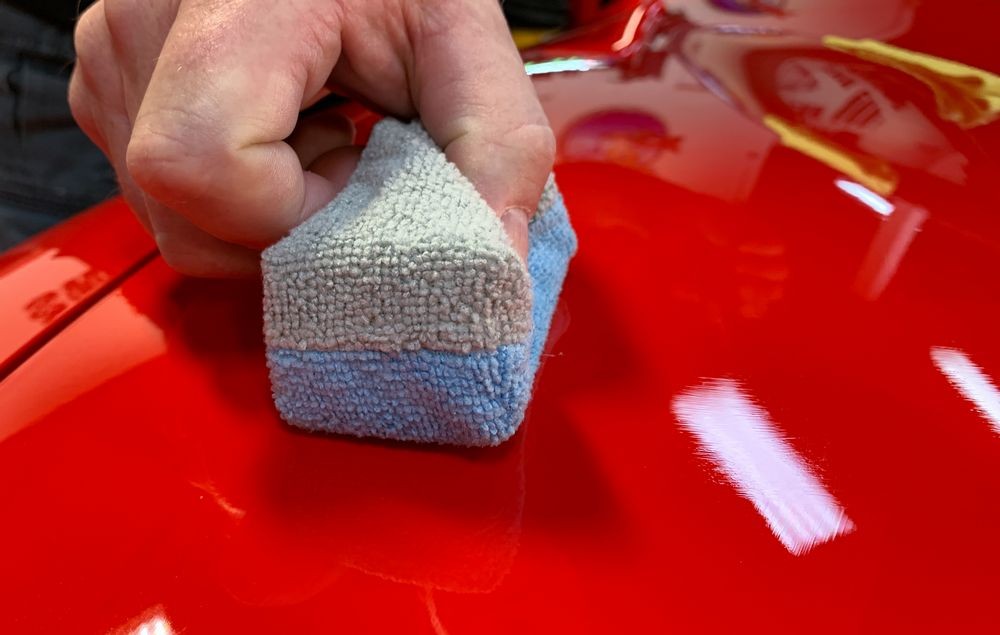
Wait 30 to 60 seconds and then gently wipe the treated section of paint
It's important to understand that when you wipe a section of paint that you just installed the coating to - the act of wiping the section is also part of spreading the coating over the paint like you did with the small microfiber applicator pad. It's this wiping of the paint using a clean, soft microfiber towel that ensures 100% uniform coverage PLUS it removes any excess for a perfect looking finish without any high spots.

It's important to use surrounding light to inspect the section of paint you're wiping to make sure you've removed 100% of the coating so that there are no high spots left on the paint.

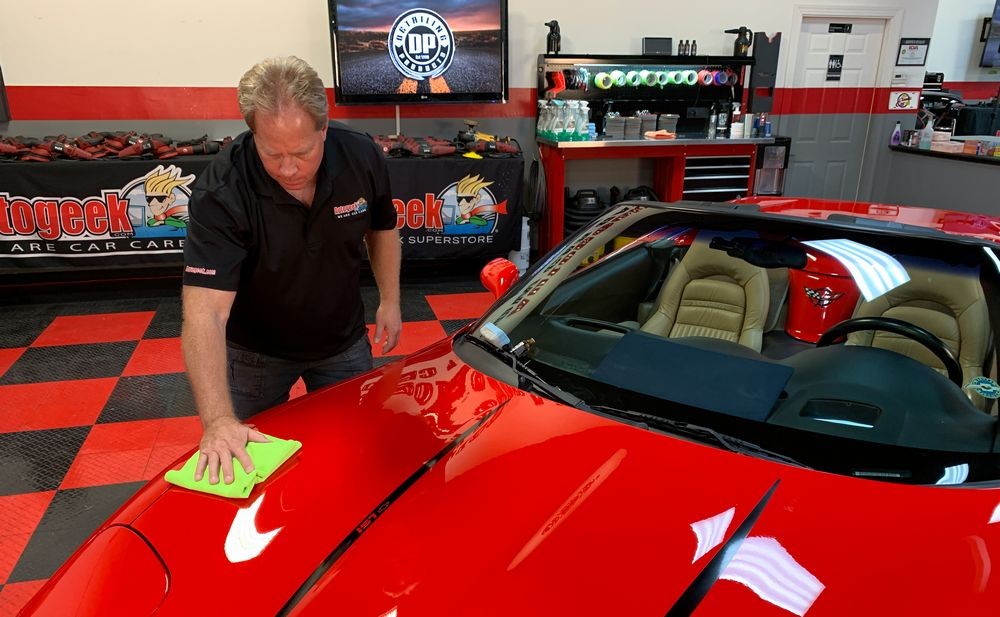
When a ceramic coating is correctly installed, the results are a deep, wet shine where the paint looks glassy, almost liquid!


Now this looks right...

Review
As far as coatings go, this is a very easy coating to use. It's really as simple as prime your applicator, apply using a crosshatch pattern to a section of paint, wait 30 to 60 seconds and then wipe that section thoroughly and then repeat to the rest of that panel and then working panel by panel, repeat to the entire car.
The product itself is a thin liquid, almost as thin as water. It's spreads over the paint super easy and when you look at the coating on the paint, after just a few seconds you'll see it start to flash. Flashing is the term used to describe the carrying agents evaporating leaving the solids behind on the surface. There's a slight rainbow coloring to the coating as this happens.
When you go to wipe the treated panel, any excess coating wipes off super easy, there's no struggling or having to physically rub the paint for this step, just a gentle wiping of the area just treated and the results are simply pure paint, nothing else to see. The feel to the paint is smooth, not rubbery feeling like most coatings feel after wipe-off and curing.
There's really nothing to installing this ceramic coating and the application process goes about as fast as you like to work. The real key to great results is all the prep work to prepare the car and the paint on the car for the application step, this is where you'll invest some time but this is part of a proper coating job. Keep this in mind and if you don't already own any type or brand of orbital polisher, you're going to need to make this investment sooner or later.
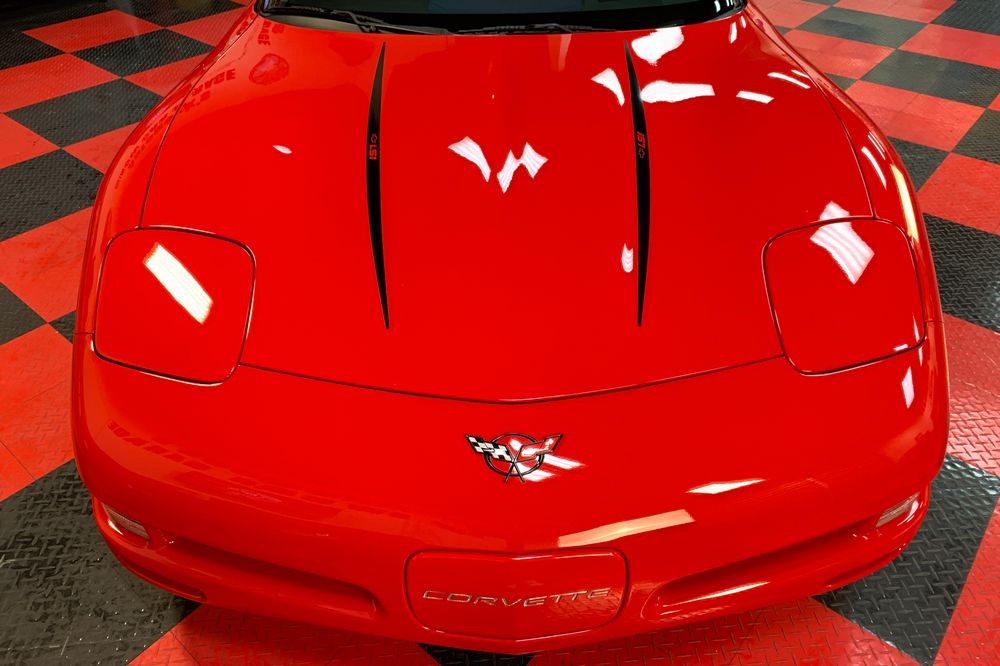
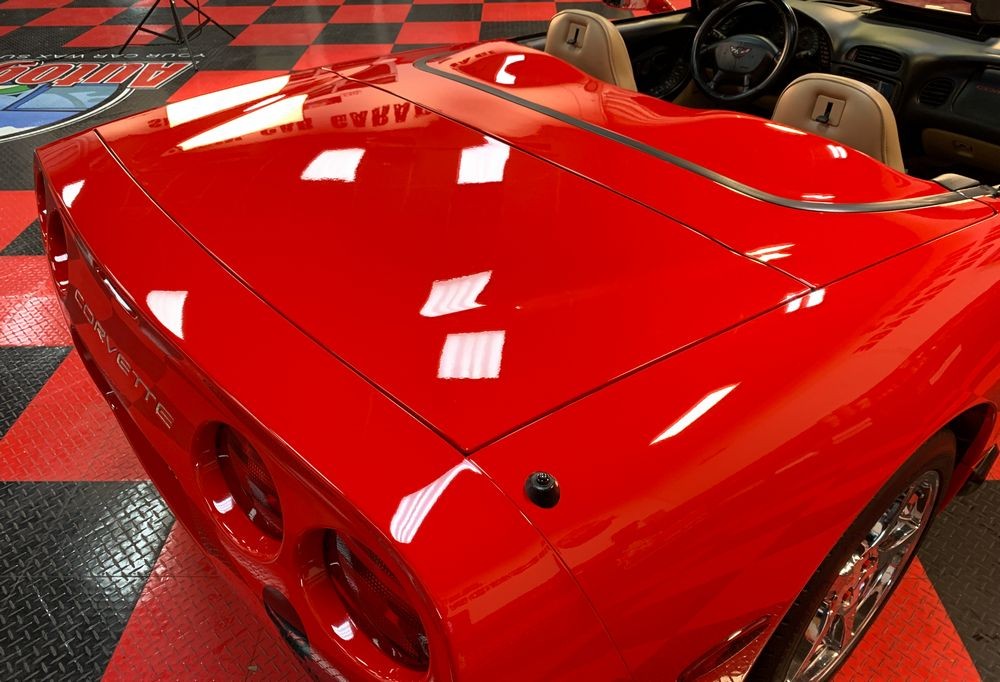
Crystal Clear Looking Paint
You can see by the pictures above, the DP CR2 Ceramic Coating created an amazingly crystal clear finish with insane gloss, shine and clarity. The paint feels slippery after wipe-off and I'm told it will feel even more slick and slippery after the coating fully cures and hardens, which takes about a week. Don't get the car wet for the first 24 hours, so don't drive in the rain or wash the car or even wipe the car with a spray detailer, (spray detailers have water in them), but after 24 hours has passed you can then put the car back into service.
Conventional waxes, like carnauba waxes and synthetic paint sealants are a lot easier to apply to your car's paint but they simply will not last as long as a true ceramic coating. Because they don't last as long they don't protect as well or as long. So while there's a little more prep work to switch over to a ceramic coating, the benefits for most people far outweigh the extra time to install a coating. PLUS - because this coating creates a super hydrophobic surface, water simply wants to GET AWAY from the paint however it can. This means washing and drying will be faster and anytime your car is caught in a hard rain, the dirt on the car will tend to wash off the car in the rain keeping your car cleaner longer in-between normal washing and drying.
If you're still using conventional waxes and sealants but have been thinking about testing the ceramic coating waters - this is a super easy coating to use when making the switch. You really can't go wrong as long as you inspect your work on each panel to ensure you've left no high spots behind. The easiest way to inspect vertical panels is by having and using a great hand-held swirl finder light and Autogeek's Customer Care Team can help you to get a great swirl finder light when you order your DP CR2 Ceramic Coating.
On Autogeek.com
DP CR2 Ceramic Coating
DP Coating Prep Spray
Speed Master Swirl Finder Detailer Light

-
Post Thanks / Like - 0 Thanks, 1 Likes, 0 Dislikes
-
Re: Review: DP CR2 Ceramic Coating

Now available!

Similar Threads
-
By Mike Phillips in forum Product Reviews by Mike Phillips
Replies: 14
Last Post: 03-07-2019, 05:13 PM
-
By JHL88 in forum Product Reviews
Replies: 26
Last Post: 05-30-2016, 08:24 PM
-
By Goodylax in forum Product Reviews
Replies: 12
Last Post: 04-02-2016, 06:21 PM
-
By jarred767 in forum Product Reviews
Replies: 40
Last Post: 05-27-2015, 11:35 PM
 Members who have read this thread: 0
There are no members to list at the moment.
Posting Permissions
- You may not post new threads
- You may not post replies
- You may not post attachments
- You may not edit your posts
-
Forum Rules
|
| S |
M |
T |
W |
T |
F |
S |
| 31 |
1
|
2
|
3
|
4
|
5
|
6
|
|
7
|
8
|
9
|
10
|
11
|
12
|
13
|
|
14
|
15
|
16
|
17
|
18
|
19
|
20
|
|
21
|
22
|
23
|
24
|
25
|
26
|
27
|
|
28
|
29
|
30
| 1 | 2 | 3 | 4 |
|


 Likes:


 Reply With Quote
Bookmarks