 Thanks: 0
 Likes: 0
 Dislikes: 0
-
How to restore a Barn Find - 1969 Ford Thunderbird - #7 Rub Out + FLEX = 3D products
How to restore a Barn Find - 1969 Ford Thunderbird - #7 Rub Out + FLEX = 3D products
Barn Finds
Seems like every time I turn around or turn on the TV and watch shows like Chasing Classic Cars with Wayne Carini, I hear someone in conversation talking about some classic car they discovered untouched sitting in a barn for years and even decades out of sight and out of mind.
Here's an example of such a find. Just down the road from Autogeek a gentleman purchased a house and according to the deal he received not only the house but the old car in the garage. The old car in the garage is a 1969 Ford Thunderbird that was parked there in 1992. As of the year I'm writing this article it's 2016 and that means this car has been sitting in the garage untouched for 24 years!
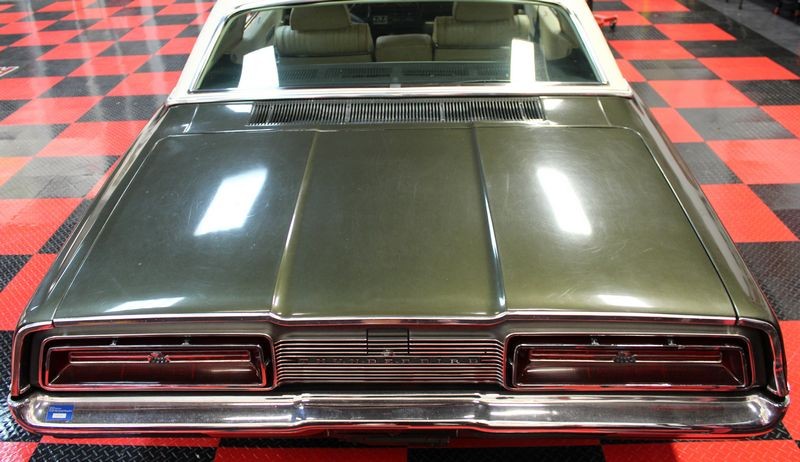
It's all original. Original engine, original transmission, original interior, original vinyl top and even the original single stage metallic enamel paint.
The new owner - not a car guy
The new owner contacted my personal friend and owner of Grasso Garage, a hot rod shop that specializes in both car restorations, hotrodding and customs builds with a focus on muscle cars and resto-rods. The owner, not being a car guy, asked Paul to take a look at and to get his opinion as to what to do with it. Paul inspected the car inside and out and said the first thing would be to check out the engine and drivetrain and see if she runs and if she runs well enough to put back on the road. Long story short, after changing all the fluids, belts and other normal wear parts the engine fired right up and purrs like a kitten. A 429 Ford Big Block Kitten that is! The transmission works fine but the entire brake system needed to be overhauled and after that was taken care the next step was to evaluate the appearance.
Interior
The interior looks like it had not been cleaned since the car was delivered to the dealership from FOMOCO. It's more than just dirty it's gross.
Vinyl top
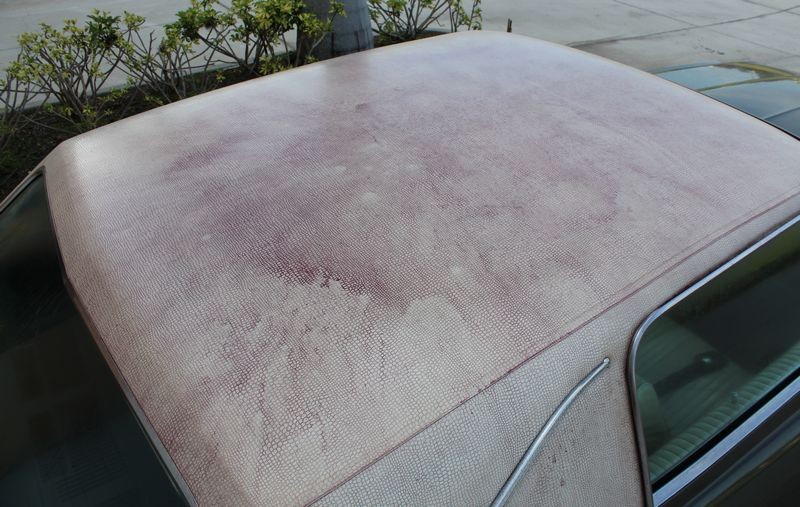
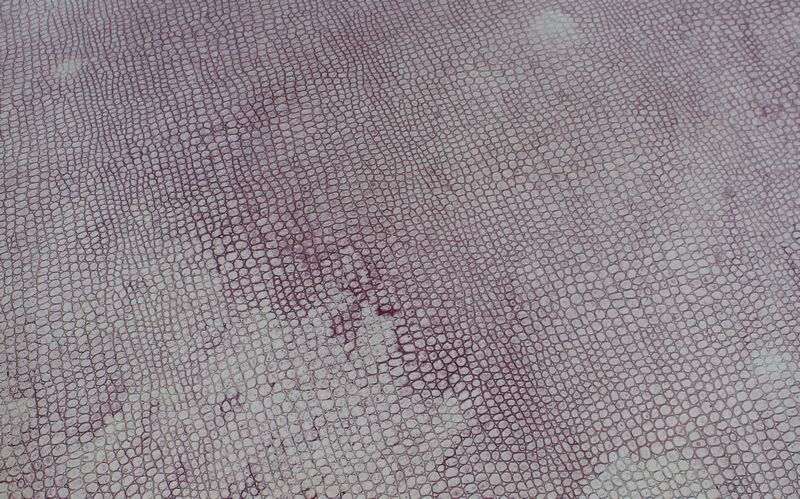
Just like the interior, the original vinyl top was originally white but now it looks tan and even brown with years of dirt accumulation staining and lack of even minimal care.
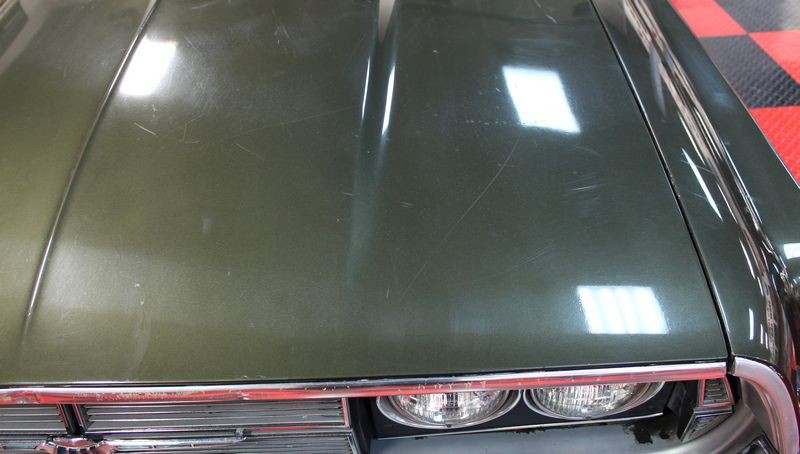
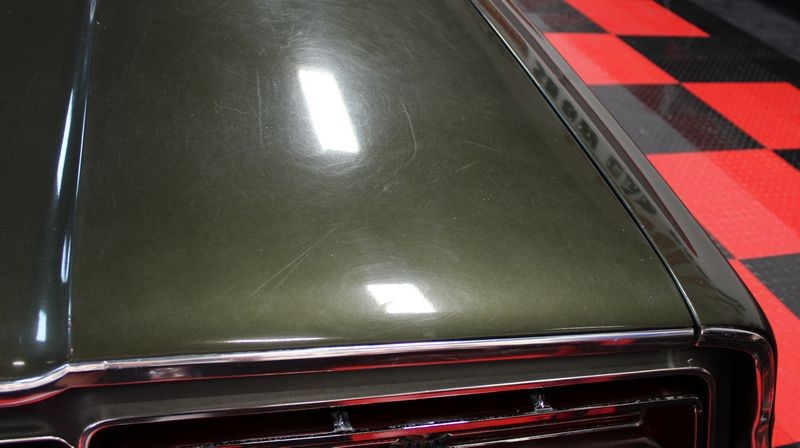
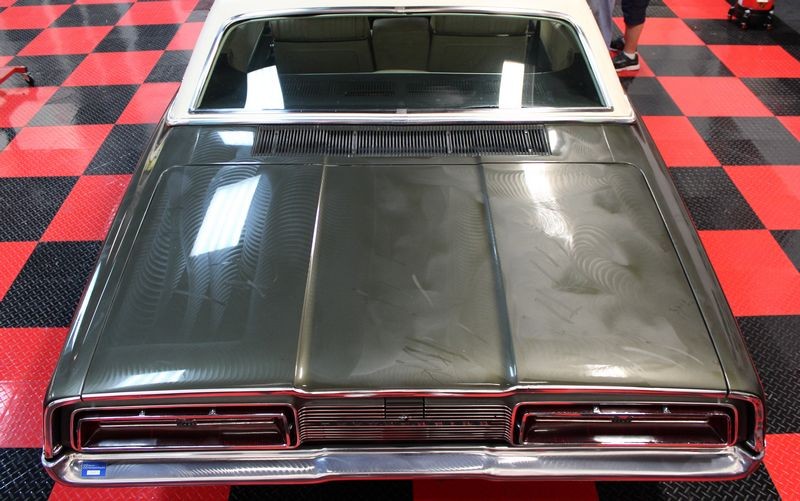
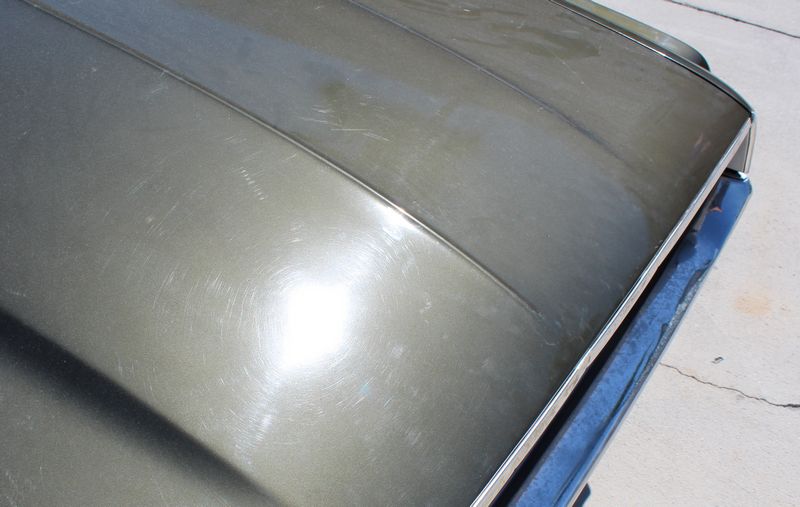
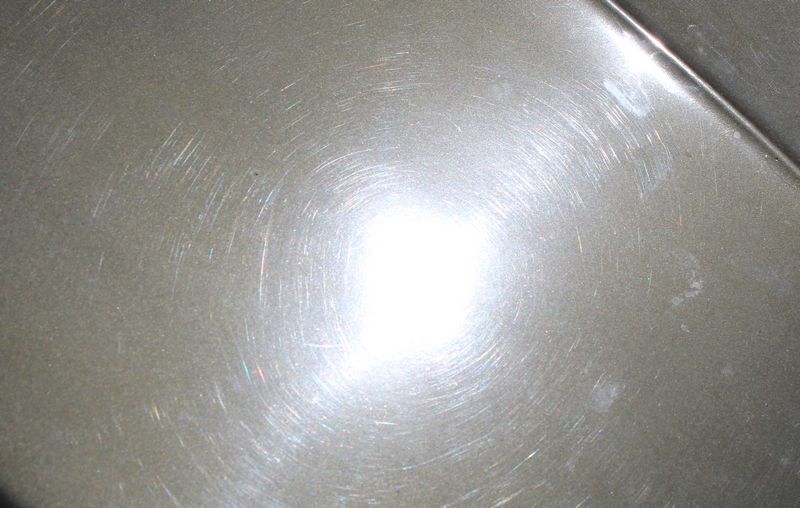
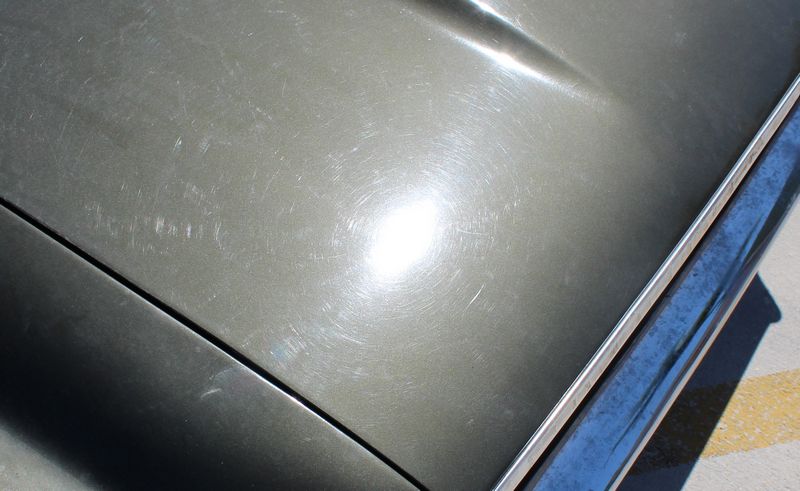
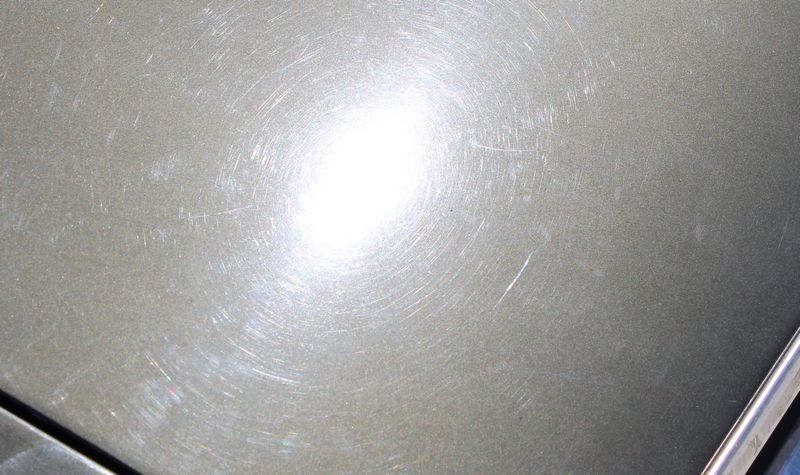
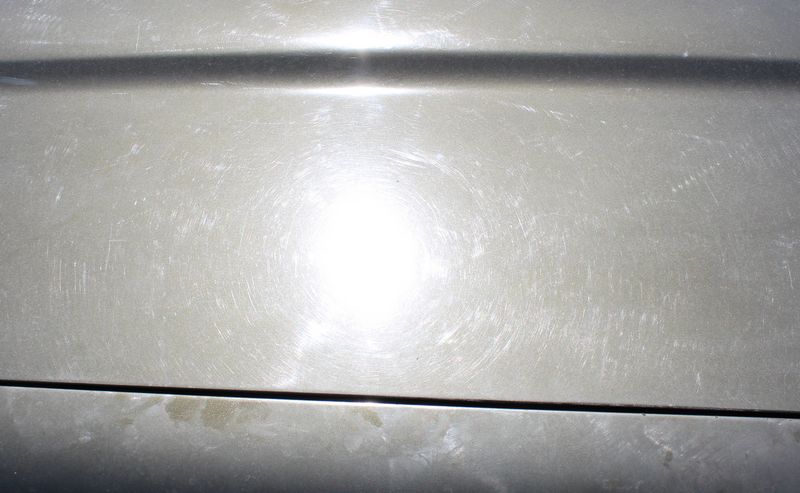
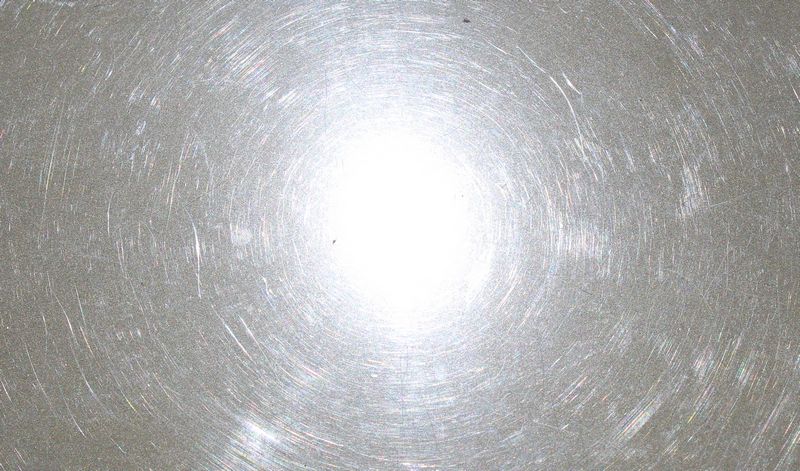
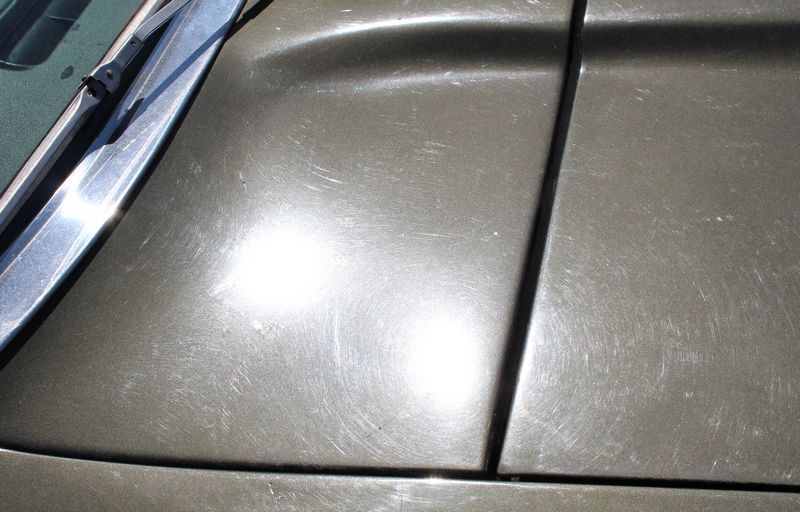
PaintThe paint while intact shows zero sign of care or regular maintenance. Every square inch is filled with swirls, scratches and oxidation. The scratches and swirls are so bad it looks like someone washed it with a garden rake.
Ring ring!
A few weeks ago my phone rings, it's Paul and with some excitement in his voice he asks me if I'd be interested in a barn find car that needs cosmetic restoration for one of my detailing classes. Paul is actually an alumni student of my 3-day detailing classes here at Autogeek in Stuart, Florida. He also knows I have a passion for restoring antiques, classics and muscle cars with the original paint still intact. Of course I asked him what kind of car and some history and a few minutes later I was on the road driving over the Grosso Garage to check it out.
That's one ugly Ford!
After arriving to Paul's shop I met Paul and had my first look at the old Tbird. Now I like classic cars and I'm fond of some variations of the Ford Thunderbirds but in my opinion this 1969 Tbird with the dark green metallic paint and white vinyl top and interior was nothing short of ugly!
I don't think there's anything even the famous Chip Foose could do to this car to make it look even a smidgen better looking. I mean this car is just plain flat-out ugly. What was Ford thinking in 1969?
Be that as it may... I do love a challenge and barn finds with the original paint are my favorite. So after inspecting the paint, the interior, the top, the chrome and even the factory original hubcaps, I said "yes" I would be happy to take the car on for one of my detailing classes.
While my classes focus on all aspects of the car detailing industry, I know from experience my students love the opportunity to work on these old classics because they don't come along very often. Plus the challenge to take a diamond in the rough and turn it into a glistening gemstone makes the hard, arduous process to undue decades of damage and neglect very rewarding.
It's a date!
Before leaving the shop Paul and I set a date for Paul to bring the car to Autogeek and upon returning to the office I created a sign-up thread on the AutogeekOnline.net discussion forum and as usual, it filled up quickly with local car guys and even a few people from other states all eager to be a part of my competition ready extreme makeover team.

-
-
Re: How to restore the original paint on a 1969 Ford Thunderbird - #7 Rub Out + FLEX = 3D products
The restoration process
As the saying goes, there's all kinds of ways to skin a cat. I'm not sure about that saying? I don't know off hand where it comes from but I know for sure... I don't want to skin a cat. But when it comes to bringing barn finds back to life - well that I like to do and there are all kinds of ways to do it the key most important thing however is to above all... use quality products and proper techniques.
I don't wash classic cars
As a rule, I don't wash classic cars. The reason why is because as someone that has restored a few classic cars in my life I know the number one issue and money pit when it comes to restoring an old cars is the issue of rust. Rust is your enemy when it comes to your wallet and time. So as my own professional practice and as a professional courtesy to the owner of a car I don't wash classics with running water. That is the traditional method of washing a car where you get out the water hose and a bucket and wash the car. Instead for classics, customs and muscle cars I tend to use high quality waterless wash products with lots of microfiber towels.
Exception to the rule
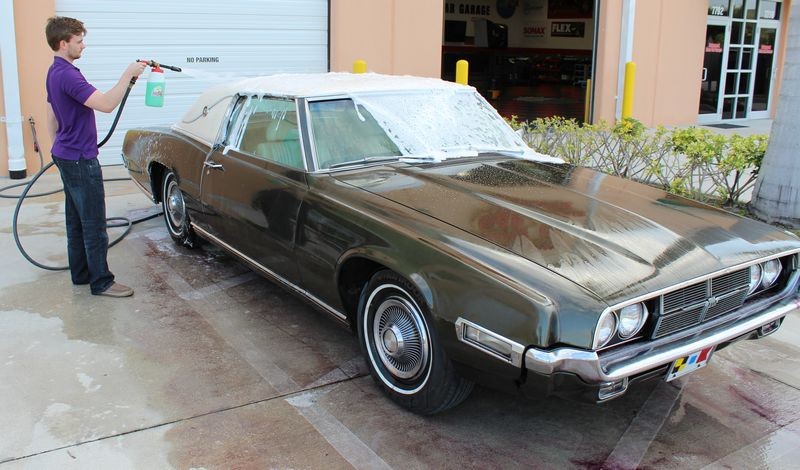
Alas to say, this car would be an exception to the rule because it was just so dang dirty! Plus I was concerned due to the complete lack of care that over the years it had probably been subject to all types of contamination including iron contamination so I for this reason I chose to wash this car using the traditional method of using running water but instead of using a wash mitt and a bucket I would use my favorite option and that is a foam gun and a wash mitt.
Iron contamination and the bleeding effect
There are two ways to decontaminate a ar.
1. Chemical
2. Mechanical
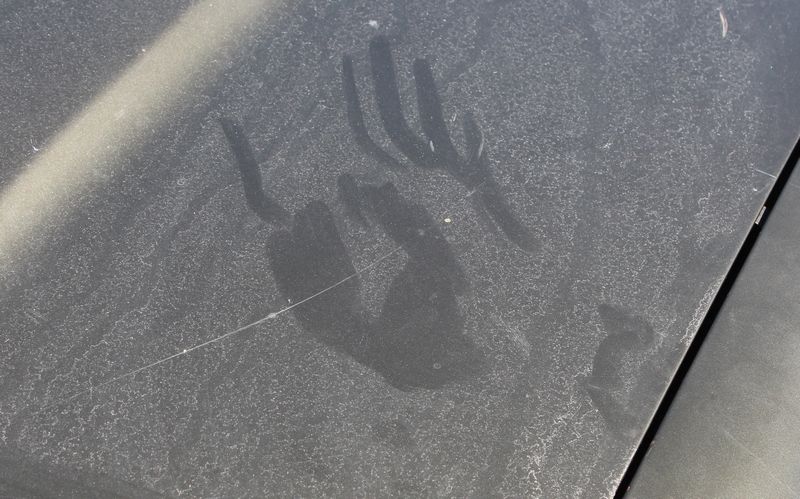
Chemical decontamination includes spraying the exterior down with one of the many fallout removers and/or iron contamination removers. These products are formulated to dissolve multiple types of contaminants so they can be washed and flushed off the surface. One of my favorites is a product from CarPro called Iron X. This product is not specifically for vinyl tops or car paint so call me a rule breaker and use at your own risk. The way it works is you spray it onto a surface and allow it to dwell for a few moments to a few minutes with the big picture to not let it dry on the surface and then rinse it off. I take it a step further and after spraying a surface down and allowing the product to do it's magic I then scrub or wash the surface using either brushes or wash mitts and then rinse. And that's one method of chemical decontamination. I choose to do this to ensure any built-up iron or metal contamination to the surface is removed before I do any mechanical decontamination. As you'll see in the pictures this car was horribly contaminated with some form of iron contamination from who know where over the past 4 decades while it was on the road.
Mechanical decontamination
The most commonly known of form of mechanical decontamination is to spray a painted body panel down with a clay lubricant and the rub some detailing clay over the panel and this process will remove any above surface bonded contaminants. Detailing clay has been around since the early 1990's here in the U.S. and has served us well but today there are other options that can and do work better by removing more contaminants faster.
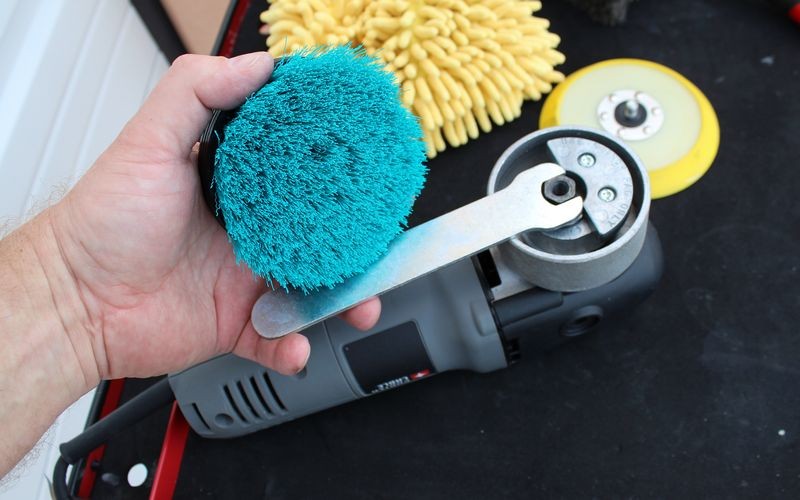
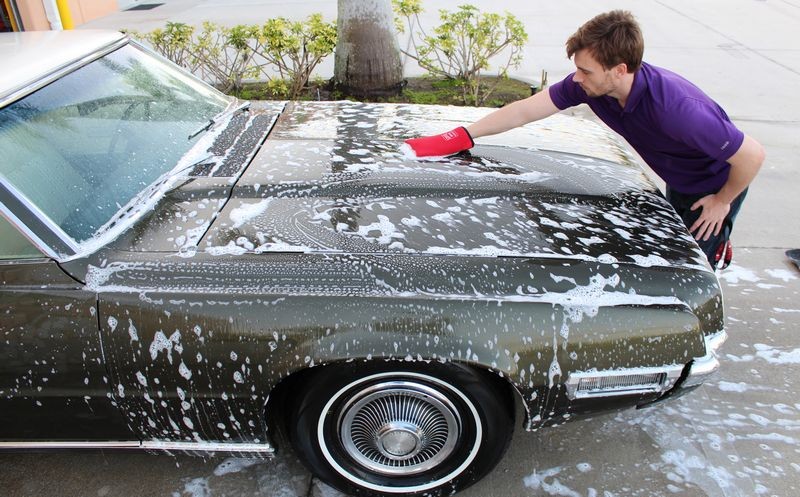
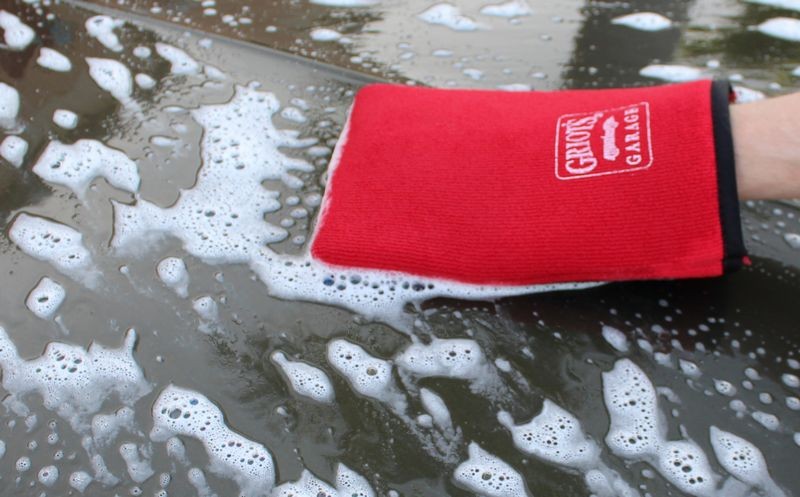
One of my favorite tools for removing above surface bonded contaminants like overspray paint, industrial fallout, air-borne pollution, etc, are a replacement tool for detailing clay where a polymerized rubber surface, like detailing clay, has a special form of abrasive embodied in the rubber material so like detailing clay, when it is rubbed over a contaminated surface it will abrade off the offending contaminants. For this project my friends at Griot's Garage have recently introduced to such products in the form of washing mitts. One side of the mitt is soft microfiber and the other side of the mitt is this polymerized rubber surface for removing bonded contaminants.
Griot's introduced two versions, one is a fine grade for light contamination Grot’s Garage Fine Surface Prep Mitt, and the other is a medium grade for severe contamination Griots Garage Fast Surface Prep Mitt,.
I chose the medium grade mitt because the results of doing the baggie test showed me that paint was horribly contaminated. In fact it felt like #40 grit sandpaper when the paint was felt using a simple sandwich back placed over my hand.
The benefit to the Griot's Garage surface prep mitts is you can use them during the washing process which saves you a step or two since you can rub the mitt over the paint AFTER you have initially washed and rinsed the car to remove loose dirt but while the car is still wet. The idea being that the normal way detailing clay is used is you wash and dry the car and then you spray it with a clay lube, which is getting the car wet again. When you use the surface prep mitt, after washing and removing the loose dirt you can then use the mitt with your car wash soap in your wash bucket as the lubricant and basically wash the car a second time, (with the mitt), which will then remove the bonded contaminants and the rinse and dry the car. At a minimum this saves you one step plus in my opinion these new mitts are more effective an removing the majority of contaminants off the paint while detailing clay can be hit or miss depending upon the type of contaminant that’s on the paint and the strength of the bond it has on the paint.
Start at the top and work your way down
Normally I start at the bottom and then go to the top. That is normally as a practice and in the classes I teach I practice and show washing the wheels and tires first and then move to the top of the car and work your way down. The idea behind this technique is to avoid nasty water spots in the car’s finish by not having rinse water sitting on the car while it’s waiting to be dried off as you move around the car wahsing and rinsing four wheels and tires.
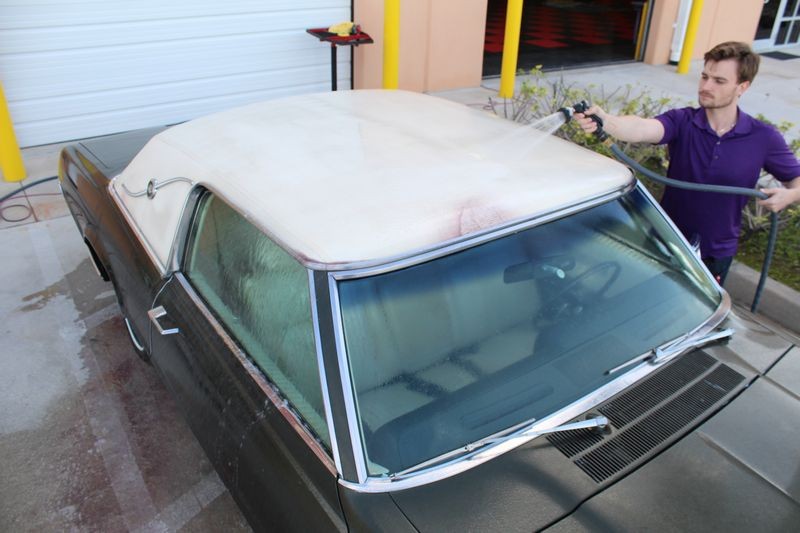
For this car however, since I was only going to wash the original hubcaps and this would be fast and easy and because Paul had installed four brand new tires and there was no tire dressing applied yet, I went ahead and started at the top spraying the top down with the Iron X.
Rivers of red
Just like I suspected the dirty, vinyl top bled red. I have know idea what was on the top and embedded into the grain and I don’t really care. What I do care about is getting the top 100% clean and restored back to a bright white color again.
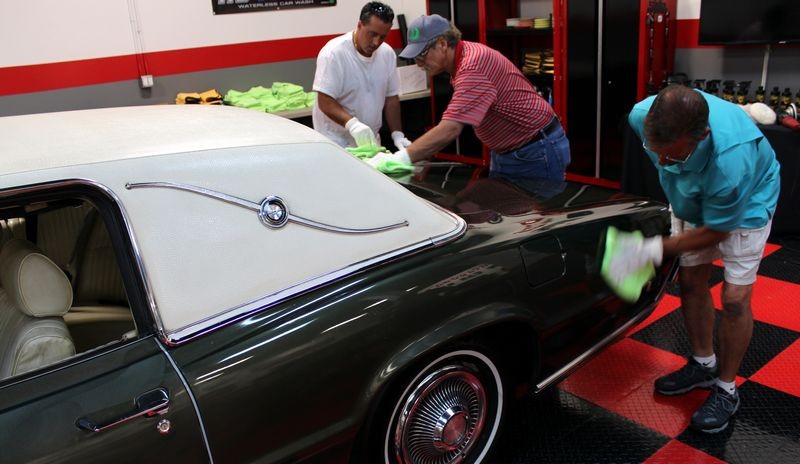
After spraying the vinyl top down with Iron X and allowing it to dwell for a few moments my sidekick Derek began machine scrubbing the top with a Porter Cable 7424XP with a Cyclo Aqua brush attached. After a thorough scrubbing he rinsed the top and you could see decades of dirt and contamination flushing off and a brilliant white color returning to the top.
Next we sprayed the top down with McKee’s Cleans-All Exterior Cleaner, which is a safe, water based all-purpose-cleaner and the machine scrubbed the top a second time. The first cleaning was dedicated at removing iron contamination. While this will remove dirt and grime a dedicated dirt and grime remove will actually work better to remove dirt and grime and build on the results of the Iron X.
Paint comes next
After getting the top clean to my satisfaction next we sprayed all the painted surfaces down with Iron X and allowed it to dwell for a few minutes. Because the paint is dark green it’s hard to capture with a camera the red bleeding effect but to the naked eye it was easy to see the paint was just as contaminated as the vinyl top.
Foam time
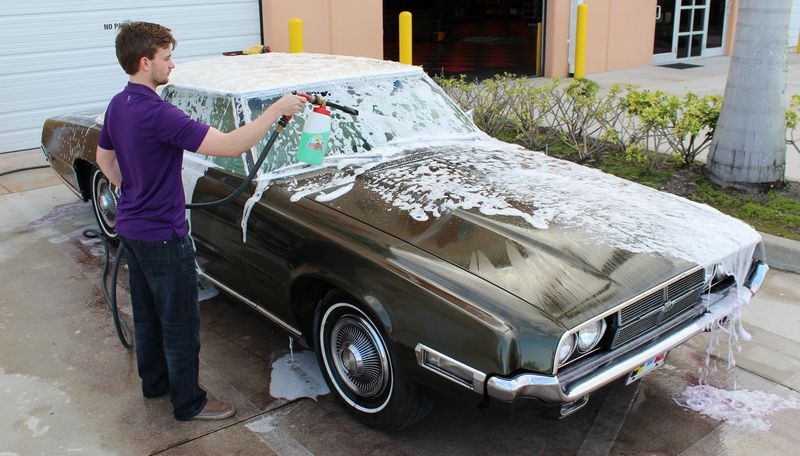
One of my favorite car detailing tools is the Foam Gun. In fact it’s the only way I wash cars. I mixed up a strong dilution of McKee’s 37 Xtreme Foam Formula car shampoo and Derek sprayed the entire car down with a frothy layer of foam.
Chenille wash mitts
Another favorite car detailing tool of mine is the microfiber chenille wash mitts that look like some type of Alien Worm. For the aggressive wash method I use and teach I love these mitts as they really work well. You’ve probably seen similar mitts and retail stores but here’s the deal. The cheapy ones you can buy for cheap fall apart quickly and anytime you wash them in a washing machine. The mitts Autogeek sells are much higher quality and hold up much better so they won’t disappoint you and fall apart in the washing machine.
The entire car, include the vinyl top was now washed and rinsed thoroughly to remove any Iron X, dissolved iron contamination and any loose dirt off the body panels.
Foaming the car a second time
Now that the car is technically clean since it’s been washed and rinsed it’s time to foam the car a second time so we can use the Griot’s Garage surface prep mitts to mechanically decontaminate the paint. I know some of you are going to ask,
Didn’t the Iron X remove the contaminants?
Yes and no.
The Iron X removed the IRON contaminants but it doesn’t remove all the other contaminants that are bonded to the paint. So “no” you can’t get away with a single decontamination process if you want to remove everything and because GLOSS comes from a smooth surface I always use a mechanical decontamination process in order to maximize the gloss of the paint.
After we rubbed the car down with the surface prep mitts it was time to rinse the car again. Next I washed the hubcaps, tires and all the chrome trim, bumpers and misc items like tail lights and head lights, as well as the front and rear grills and the side molding grills.
One more final rinse and then the car was dried using microfiber waffle weave Guzzler drying towels. After the car was dried it was then moved into the garage for the next step.
Here's what the above outline looks like...
The Aggressive Wash
Normally I never wash classics with running water as a professional practice and a professional courtesy to the owner. Why? Because water can cause rust and I don't want to get water into places I can't physically dry. This was an exception because so much of the car was so dirty including dirt that was impacted into the grain of the vinyl top and also a heavy dirt film over all the the rest of the car including paint, glass, chrome trim and the hubcaps.
Process
Chemical Decontamination
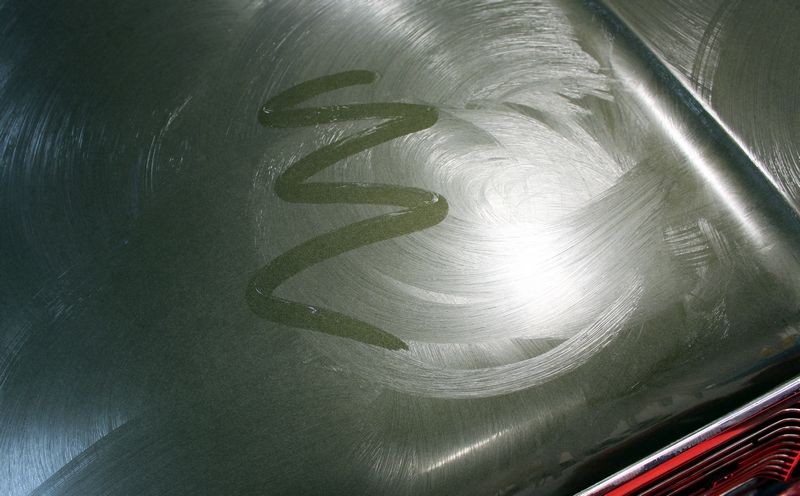
First up we sprayed the vinyl top down with Iron X. If there's any iron or metal contamination on the top we'll see the bleeding effect of the iron contamination turning red.
The paint was also treated with Iron X after scrubbing and rinsing the top.
Foam Gun and Microfiber Chenille Wash Mitt
The paint was washed using a foam gun and microfiber chenille wash mitts to remove the iron contamination plus the dirt film. (no pictures for this step).
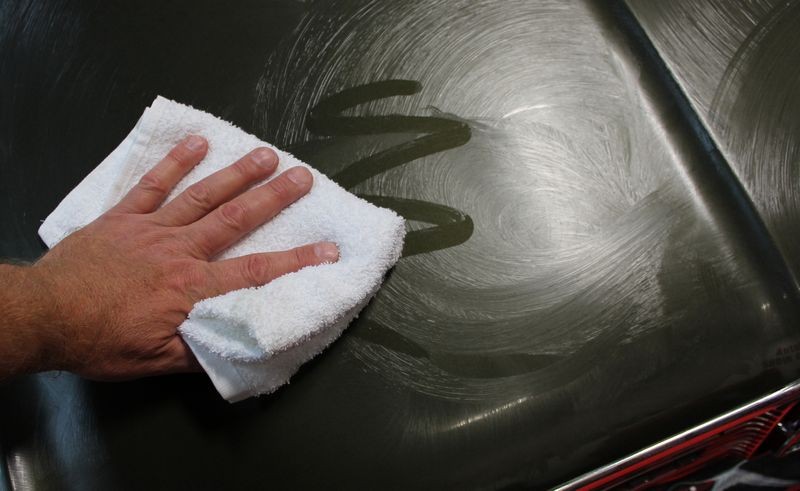
Mechanical Decontamination
The hard surface were then foamed again with the foam gun and then rubbed own using the Griot's Garage Fast Surface Prep Mitt. The paint had a heavy build up of some form of bonded contaminants and these were removed using the Griot's Fast Surface Prep Mitt and then the car as rinsed a third time.
Cyclo Aqua Upholstery Brush attached to a Porter Cable 7424XP
The Iron X bleeding-effect that indicates iron contamination


Mechanically decontaminating the paint using the Griot's Garage Fast Surface Prep Mitt
(This takes the place of traditional detailing clay)

-
Re: How to restore the original paint on a 1969 Ford Thunderbird - #7 Rub Out + FLEX = 3D products
Continued...
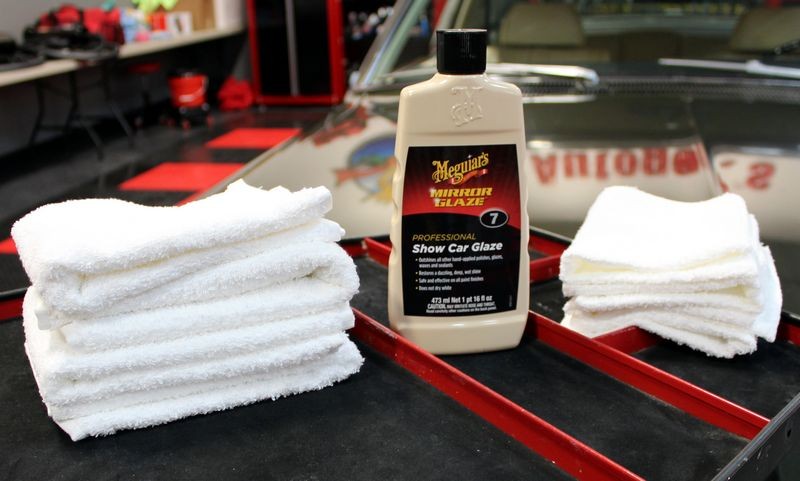
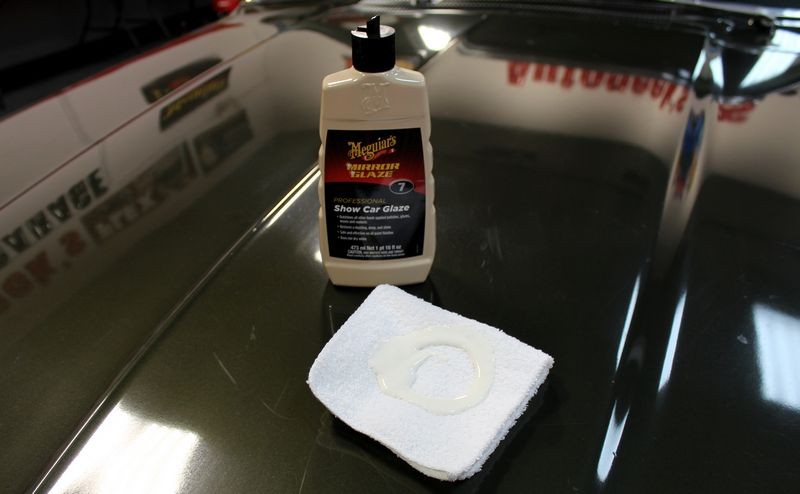
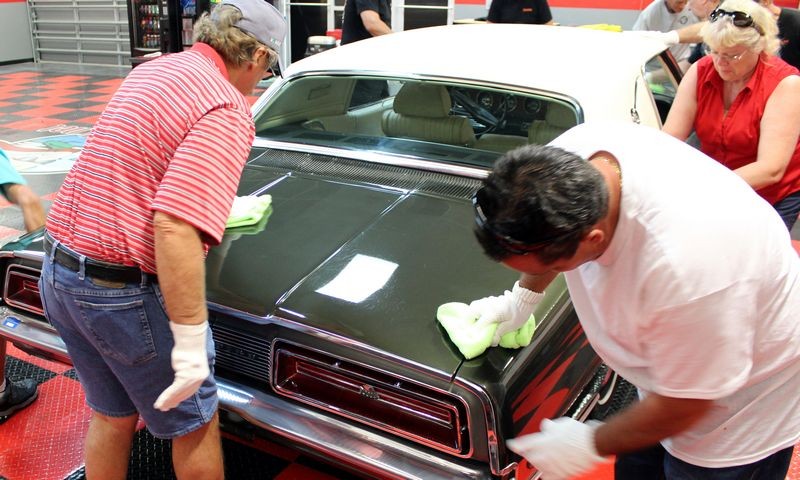
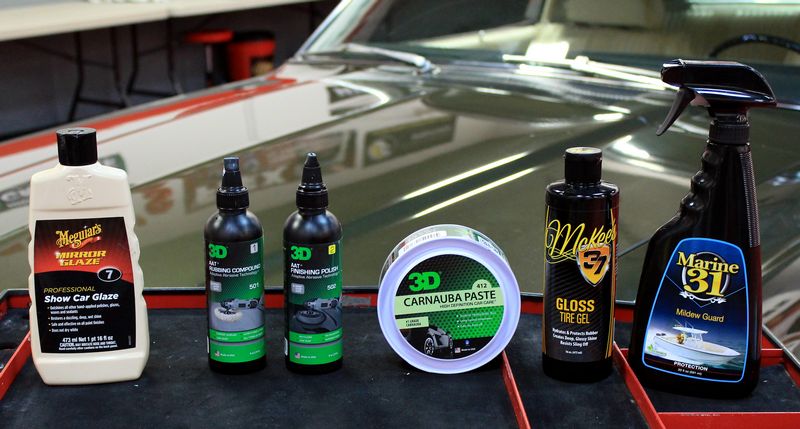
After thoroughly washing the heck out of the car and then drying it next up was to treat the antique, brittle single stage paint to what I call the Meguiar's #7 Rub Down.
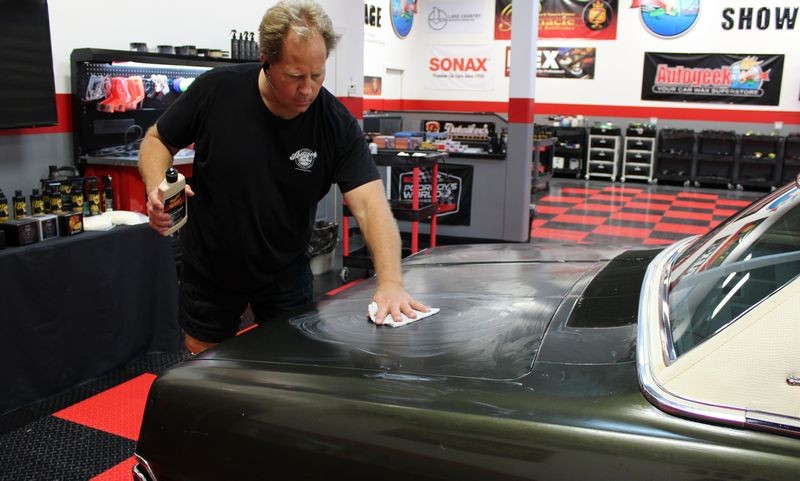
This is where you rub the paint down BY HAND using an extra heavy or wet application of the polishing oils found in the #7 Show Car Glaze. You also use old-fashioned cotton, terrycloth wash cloths to apply and work the #7 over and into the paint.
The #7 Rub Down Technique
This is a product and a technique that I use and teach to others to restore the original, antique paint on cars that are IMPORTANT to them. I’ll include the link to the original article and note in the first paragraph of the original article the word important is in bold red text. If you want to know why, click the link and read the article.
How it works
As I show in the pictures of the original article, (the pictures of the sheet of paper with a drop of #7 on it), because single stage paints are porous (clearcoat paints are NOT porous), the trade secret or TS oils found in the Meguiar’s #7 will migrate INTO the paint and in simple words, revitalize the paint and bring it back to life. These oils will bring out the full richness of color and make old, dried out brittle paint safer to work on. By safe to work on I mean to do things like compound and polish the paint. It’s up to you, but if the paint is important to you then like me, I prefer to do everything I can to preserve the original paint and that means to rub it down with the #7 and let the #7 soak in over night before doing any abrading like compounding or polishing. Again, see my original article and what I say about the word important.
How to apply the #7
Everyone knows I’m a machine guy. I don’t do anything by hand if I can do it by machine. Except rubbing down antique single stage paint using Meguiar’s #7. It’s really a case where a machine cannot do a well of a job as the human hand because the human hand is better at massaging the oils over and into the paint than any type of pad will ever do on some type of spinning or oscillating machine. Try if you want and it’s your car and your paint but for me and my projects I go old school and simply keep it simple and apply the #7 by hand.
Cotton terrycloth
Cotton terrycloth toweling or wash cloths are the preferred method for massaging the #7 oils into single stage paint for a couple of reasons,
1. When restoring neglected paint you don’t want a cloth that is soft and gentle to the paint, (microfiber), you want a cloth that is stout and has some substance to it. That would be old school cotton terrycloth.
2. My technique for restoring antique paint that’s important to you includes NOT using abrasives for the initial step. The initial step, (applying #7) is about gorging the paint with oils, not grinding on it. That said, when antique paint has been neglected there will be some level of dead, oxidized paint on the surface and you do want to remove this dead paint. Instead of using abrasives however, cotton terrycloth, because of its stoutness, together with the #7 oils as a lubricant, will gently abrade off the dead paint. Thus the cotton terrycloth IS the abrasive. Fibers are a form of abrasive they are just a gentle version in the form of cotton terrycloth. Thus by using terrycloth with the #7 your remove the dead paint without abrasive and this is important if preserving the original paint is important.
Heavy or wet
Whenever you see me use the terms heavy or wet in the context of applying a liquid it means to apply a LOT of the product. That’s what the terms heavy and wet means, it means applying an ample amount, sufficient to wet the surface or in other words, use a lot of product. The idea being with the #7 to both lubricate the surface as your rub off years of oxidation but to also gorge the paint with oils both during the rubbing portion of the process and the soaking-in portion of the process.
Application
Application is simple. Shake the bottle of #7 up very well first and the pour a lot of it onto a cotton terrycloth wash cloth and then spread it out over a section of paint using overlapping, circular motions. Work and massage the product for a few minutes per section. Apply more #7 if needed to maintain a wet coating of oils on the surface as you work. Some very old and dried out paints will absorb the oils readily so pay attention and add more product as needed.
After you apply to an entire panel move onto the next panel. Repeat till all body panels are coated in a thick layer of oily #7 and the allow the product to set. Overnight is usually preferred but as long as you can and that fits your schedule.
Option – multiple applications of the #7
If you have the time and the paint is very old and dried-out, after the initial application and soaking you can repeat the process 2-3 more times. My experience as is the experience of others I’ve helped to use this product and technique over the years is that for very oxidized, neglected antique single stage paints, 2-3 applications works miracles and in some cases, after wiping off the final application the paint will look brand new again.
Wipe off – back to cotton terrycloth
When you’re ready to remove the thick, oily coat of #7 Show Car Glaze you want to use clean, 100% cotton terrycloth towels. Like the application process, you don’t want a cloth that is soft and gentle you want a cloth that offers some stoutness to it because the #7 is very oily and a tick on the stubborn side to wipe off.
Two comments…
First, the nap of real terrycloth is a loop of fiber. It’s this loop and the cotton material that makes terrycloth.
Second, this tiny loop of fiber, (the nap), helps you to break-up and remove the oily #7 because the loop of fiber when rubbed against the film of #7 will SLICE into the oily layer helping to break it up and to break it’s hold on the paint surface. I dare you to compare wiping a layer of #7 off with real cotton terrycloth towels and microfiber towels and I’m confident you will agree.
90% removal
Don’t worry or even try to remove 100% of the oily film. It’s not important. It’s also a lot of time and work and again… it’s not important. I know most of you reading this when removing anything off paint aim for 100% removal, be it a compound or a wax and while that might be right for all other paint care products it’s simply not important when it comes to remove the #7 because it just isn’t unless after wipe-off you’re 100% done. If you’re going to apply any other product, that is compound, polish and/or a wax, then any trace amounts of the #7 will come off when you wipe off these other products. So relax and just aim for about 90% removal. This is especially true if you’re going to apply a second, third, or fourth application of the #7.
Soaking session
You want to do the the day before so the oils can penetrate into the paint over night. This product has been around since the early days of the automobile. It is non-abrasive and while it's typically used for glazing fresh paint at a body shop or to give single stage paint that wet-look before a car show, for me I use it to bring antique single stage paint back to life.


-
Re: How to restore a Barn Find!
Correction and polishing
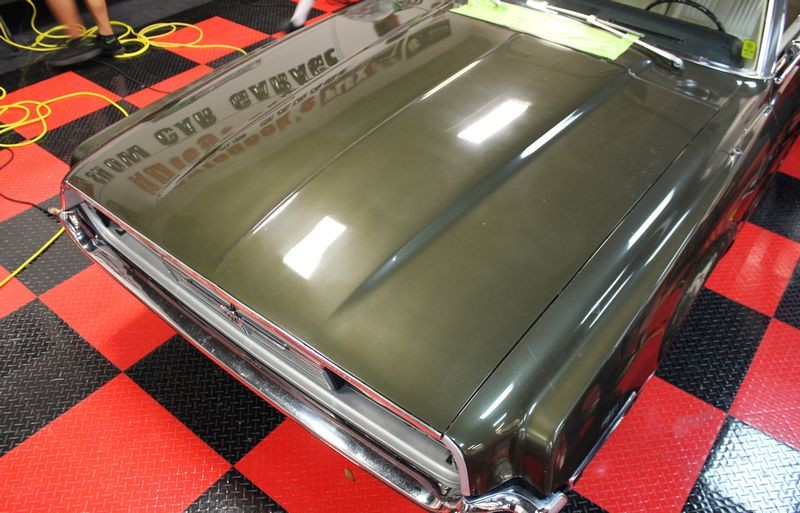
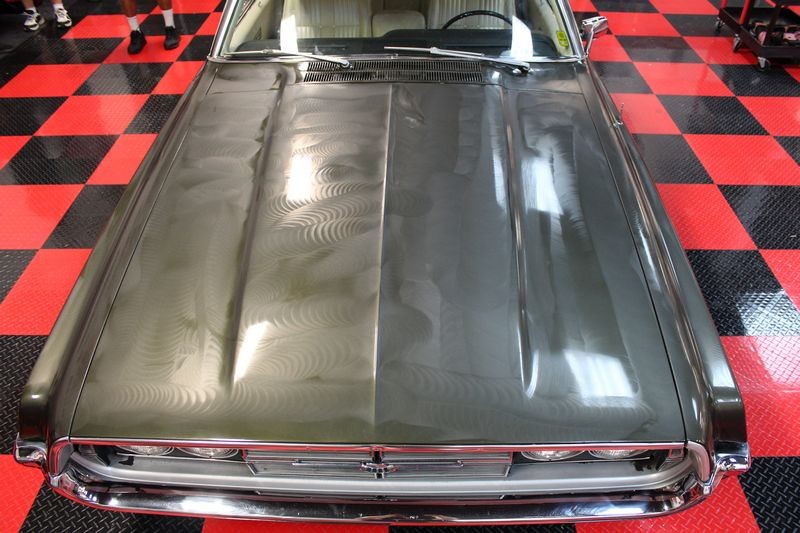
For this 1969 Ford Thunderbird, the paint was so filled with swirls and scratches, even after the application of #7, (#7 is non-abrasive so it’s not going to remove swirls and scratches so don’t expect it to), I chose to machine compound followed by machine polish the paint.
Compounding will remove the majority of the swirls and scratches. It won’t remove all of them because there are too many deeper swirls and scratches to remove safely.
Tiger Stripes
When working on single stage paint and specifically single stage metallic paints, if you compound too long and remove too much paint you can alter the appearance of the paint. Since most people will apply a compound by machine sing some form of back and forth motion, the change that can take place is the appearance of stripes in the paint mimicking the direction the buffer was moved over the paint. The term tiger stripes is an old school term used to describe the appearance of single stage paint when too much paint is removed because of the stripes that appear in the paint.
A bad thing
Removing too much paint and altering the appearance is a really bad thing because there’s no way to undo the damage so when working on single stage paint be careful not to over-buff. This circles back to why you cannot usually remove 100% of the deeper defects because to do so would result in tiger stripes.
High quality abrasive technology
Here at Autogeek I have access to all the best products including compounds and polishes. A few weeks ago I started a poll asking people what they thought, in their opinion, was the most important factor when it comes to polishing paint. Most people voted for technique. Me? I always say abrasive technology. In the poll, I think the people voting ASSUMED in some hypothetical situation that they would be able to control all the factors but that’s not what I envisioned for the poll. In fact, just the opposite. Assuming you have no control when it came to a car detailing project, instead you were to be given everything and in this scenario, what would the most important factor be.
Here’s what I know…. There’s great abrasive technology on the market and no so great abrasive technology on the market and if you’re using what I call caveman, archaic compounds and polishes that use mediocre abrasive technology, then all the technique in the world won’t get you great results. So I respectfully disagree with everyone that thinks technique is the most important factor as I know differently from experience. (I test products as a part of my job and I always test on black paint).
3D Professional Detailing Products
Every product from 3D that I’ve used has produced exceptional results. I know the owner of the company personally and after using his products I have complete confidence in the abrasive technology he uses in his compounds, polishes and cleaner/waxes. Just to note, cleaner/waxes often use some form of abrasive technology so don’t get caught in the trap of only thinking of the categories of compounds and polishes when thinking about abrasive technology.
AAT Rubbing Compound and ATT Finishing Polish
This compound as well as the complimentary finishing polish from 3D, uses what 3D calls AAT or Adaptive Abrasive Technology. I don’t know exactly what they mean by the term adaptive abrasive technology and I don’t really care. What I care about is a compound and a polish that can remove defects without leaving their own defects behind. This is the basis for what I call great abrasive technology.
Another important characteristic of great abrasive technology is for the compound to finish out looking perfect, as though you just removed a coat of wax. Just a few years ago most of the compounds and even some polishes on the market would improve the finish by removing defects but the results still looked dull, hazy and in some cases even scoured. High quality compounds on the market today cut like a son-of-gun and finish out like a fine cut polish and that’s how 3D’s ATT Rubbing Compound works.
Process
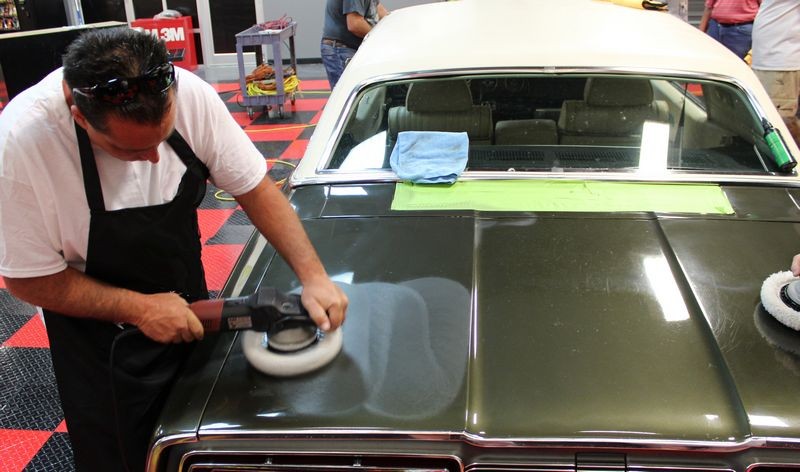
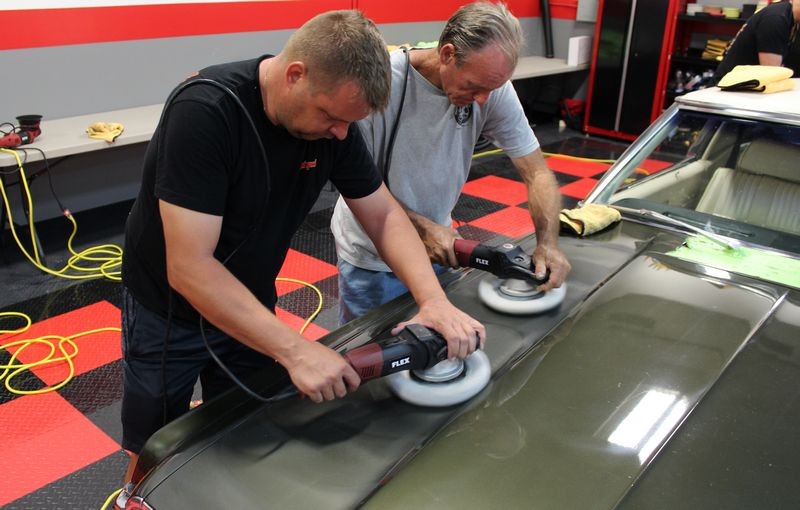
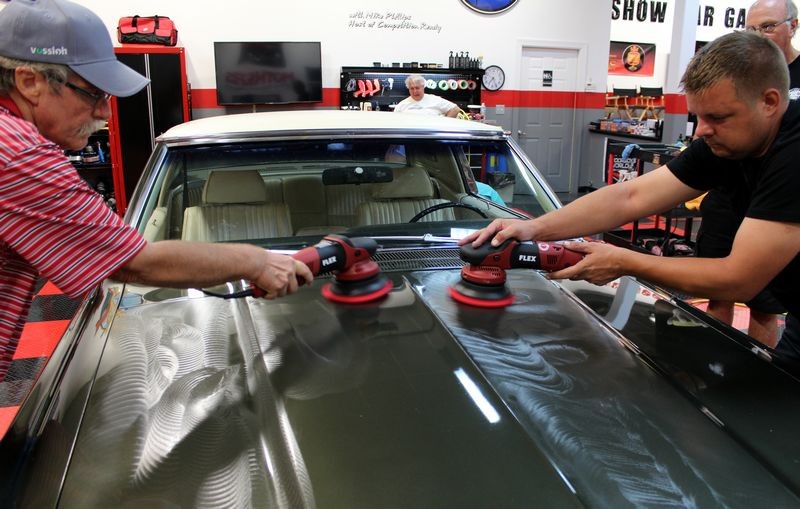
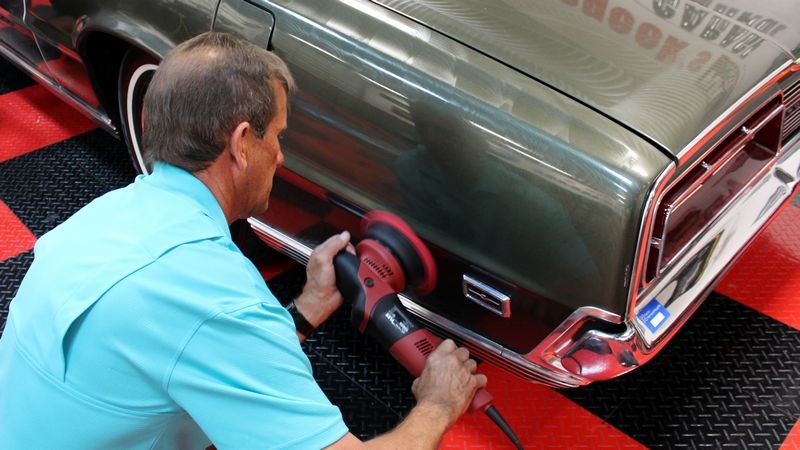
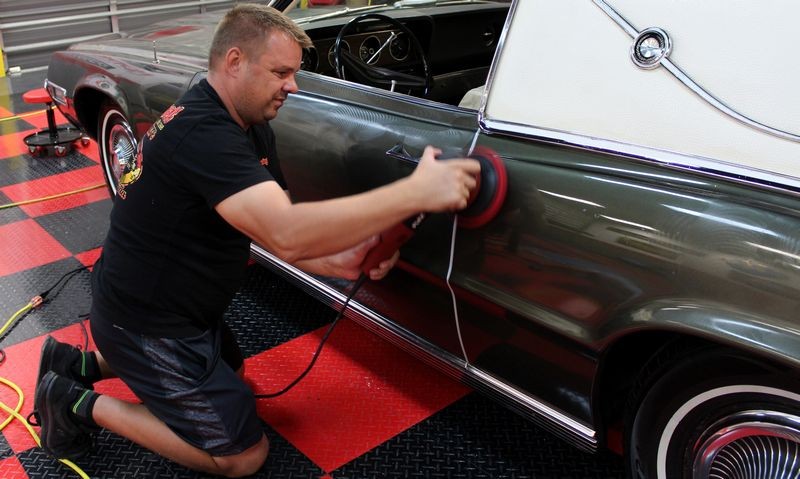
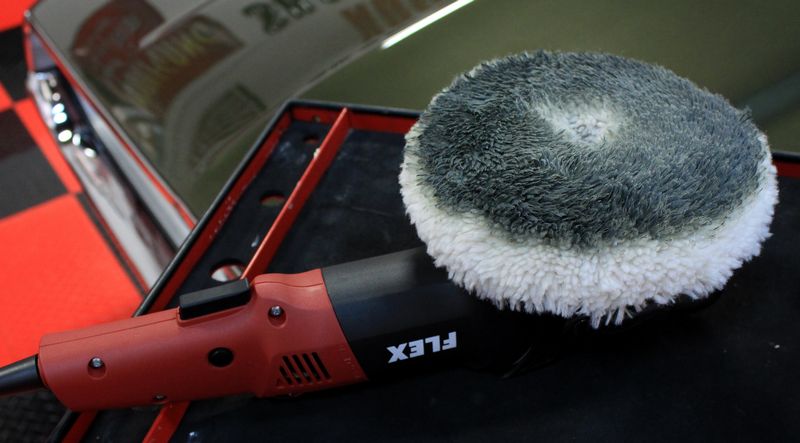
Compounding
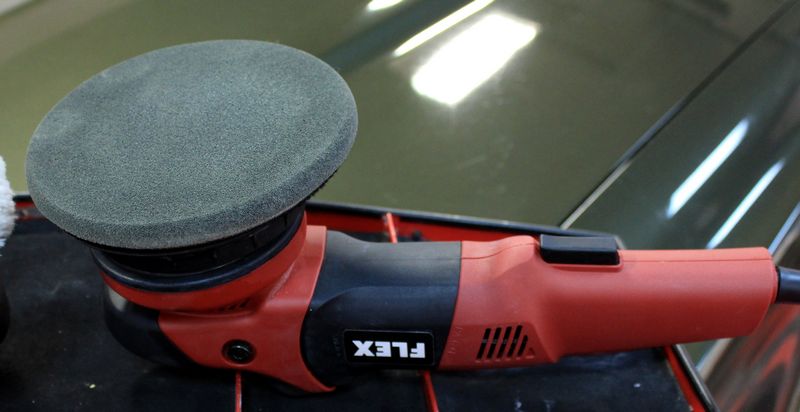
Because the paint is so filled with deep swirls and scratches I chose to use the 3D AAT Rubbing Compound with a wool pad on a FLEX 3401 gear-driven orbital polisher. The FLEX 3401 is the most powerful orbital polisher on the market for buffing out both flat panels, curved panes and tight, complicated panels due to its gear-driven design. With the FLEX 3401 you can do as I say,
Power through a detail job
That simply means buff out a car as fast as possible while still working safely and producing pro-grade results.
I didn’t what to use a rotary buffer due to he risk of creating tiger stripes so the next best safest option for this project was a wool pad on the FLEX 3401.
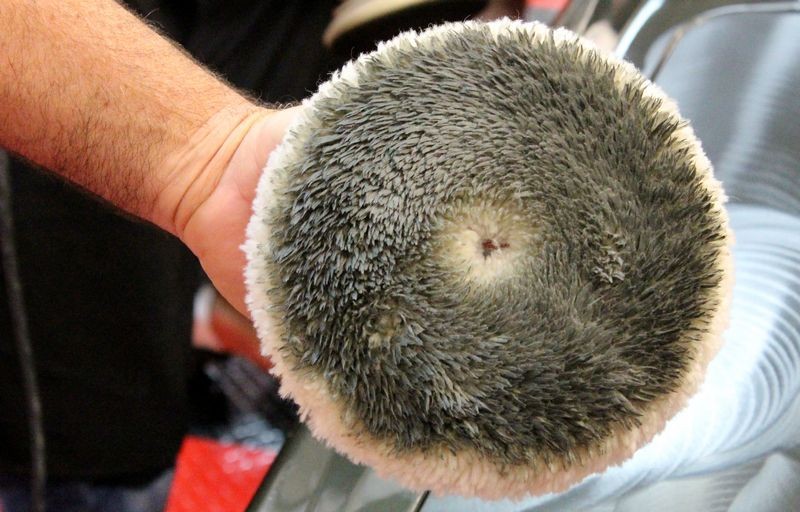
Comment about wool pads
Like I mentioned previously in this article, fibers are a type of abrasive. For faster cutting for this project I chose a wool pad over a foam cutting pad as the simple fact that individual fibers would be worked against the paint adding to and increasing the cutting power of the abrasives in the 3D ATT Rubbing Compound.
The specific wool pad I chose and recommend in my 3-day Competition Ready car detailing classes and my boat detailing classes as well as my how-to books is the Lake Country 7.5” Electrified Wool Polishing pad. Don’t let the word [i]polishing]/i] fool you this is still a fiber pad and close enough in it’s cut to a wool cutting pad that in my book it’s a non-issue. Regardless of the name of this wool pad, why I choose and recommend this pad is because Lake Country puts the wool fibers through an extra step to send an electrical current through the fibers to burn off the natural barbs on the fibers. The result is a wool pad that cuts fast with less scouring of the paint finish. The practical difference to you and mess is a finish that will require less time and less aggressive pads, products and even tools to clean up or perfect.


-
-
Re: How to restore a Barn Find!
Continued....
Machine Waxing
After the compounding and polishing steps it would be time to seal the paint and to do this I chose to use the 3D Carnauba Paste Wax. I prefer to seal old school single stage paints with a traditional carnauba wax plus Im what you call a system guy. That is I tend to like to work within a single manufacturers line of products because its a system, not a hodge-podge of products from multiple manufactures. Multiple manufactures isnt an issue, as here at Autogeek we carry the best of the best when it comes to product lines. What I prefer it to sue products from the same chemist, which means using products from the same manufacturer.
Synergistic Chemical Compatibility
I coined this term about 10 years ago in the online car detailing discussion forums as a way to explain there was a benefit to using a line of products from a single manufacturer or single chemist. The reason why is real simple, the chemist that creates the first step products, for example the rubbing compound, since they know whats inside the compound formula the are the best suited to create the secondary step products, the polishes to maintain a synergistic chemical compatibility. This would go on to include the waxes, sealants and even coatings, in fact the entire line. Make sense?
Nothing wrong with free-wheeling, that is mixing and matching our product selection for a single detailing project from multiple manufacturers and if thats your style as say go fir it but its not mine.
Process
Previously in this article I said Im a machine guy with the exception of applying #7 by hand so when it comes to applying a wax, be it a liquid or a paste, I tend to prefer to apply them both by machine. With a few exceptions, the machine always outperforms the human hand and this includes applying either a car wax or a paint sealant.
To machine apply the 3D Carnauba Paste Wax we used the free spinning FLEX XCE 7 with Lake Country ThinPro soft red foam waxing pads using a low speed setting like the 2-3 sped setting.


Wax removal
After the wax was allowed to dry, we removed it using the Super Soft Deluxe Green Microfiber Towels with Roiled Edges. These are my favorite wax and sealant removing towels because they are so soft and plush. And of course the norm for my projects is to wear microfiber gloves when removing wax because the microfiber gloves enable the human hand to better grip soft, plush microfiber towels plus if you place your hand on the car you dont leave any finger smudges.


-
-
-
Similar Threads
-
By coles_paint_correction in forum Show N' Shine
Replies: 20
Last Post: 08-08-2020, 12:13 PM
-
By Mike Phillips in forum Product Reviews by Mike Phillips
Replies: 29
Last Post: 11-20-2019, 07:56 AM
-
By Mike Phillips in forum Wednesday Night Detailing Classes - Info & Dates
Replies: 29
Last Post: 08-07-2018, 07:31 AM
-
By CAMMIN HEMI in forum Auto Detailing 101
Replies: 17
Last Post: 05-01-2017, 07:41 PM
-
By Mike Phillips in forum PICTURES: Wednesday Night Detailing Classes
Replies: 25
Last Post: 04-11-2016, 08:58 AM
 Members who have read this thread: 0
There are no members to list at the moment.
Posting Permissions
- You may not post new threads
- You may not post replies
- You may not post attachments
- You may not edit your posts
-
Forum Rules
|
| S |
M |
T |
W |
T |
F |
S |
| 31 |
1
|
2
|
3
|
4
|
5
|
6
|
|
7
|
8
|
9
|
10
|
11
|
12
|
13
|
|
14
|
15
|
16
|
17
|
18
|
19
|
20
|
|
21
|
22
|
23
|
24
|
25
|
26
|
27
|
|
28
|
29
|
30
| 1 | 2 | 3 | 4 |
|


 Reply With Quote
Bookmarks