


 Thanks:
  Likes:
  Dislikes:


This guide covers:
- How to inspect and replace the main bearing.
- How to inspect and replace the carbon brushes.
- How to fix a split flex leads.
I ordered these from clean your car: DAS-6 Spares - Clean Your Car
Cost
DAS-6 Bearing - £5.95
DAS-6 Brushes - £5.95
Total Tax: £3.88
Shipping: £12.95
Total £28.73 - €38.83
#1 - How to inspect and replace the main bearing.
With the backing plate off unscrew the counter weight screws
Remove the counter weight
Don't loose the highlighted washers.
Place all parts into the baggie supplied with the brushes.
With some force pull the bearing up and out of it's housing.
Old VS New
Below is a video on how to check the operation of the bearing.
Excess play and noise is sign of a bearing in need of a replacement.
left is the old worn bearing / right is the new unused bearing.
https://www.youtube.com/watch?v=68dINnpBGJk
To refit or replace the bearing follow the above guide in reverse.
#2 - How to inspect and replace the carbon brushes.
First remove this screw from the back of the machine.
Now pull back the black section form the front red section, splitting the two housings.
Run the black housing down the lead and out of the way.
On the left and right sides of the machine you will see the brush mechanisms. Here the brushes are pushed onto the armature from the downward pressure of springs arm, they are connected to the electrical circuit with a female spade connector.
I will cover one side as the process is the same for both.
Unscrew the retaining screw.
And pull up the mechanism and it's spacer.
Bag all the removed parts. ****
This is the mechinisum removed to the side of the machine.
With force pull the spade connector away from the pin.
I had to use a screw driver to brake it free.
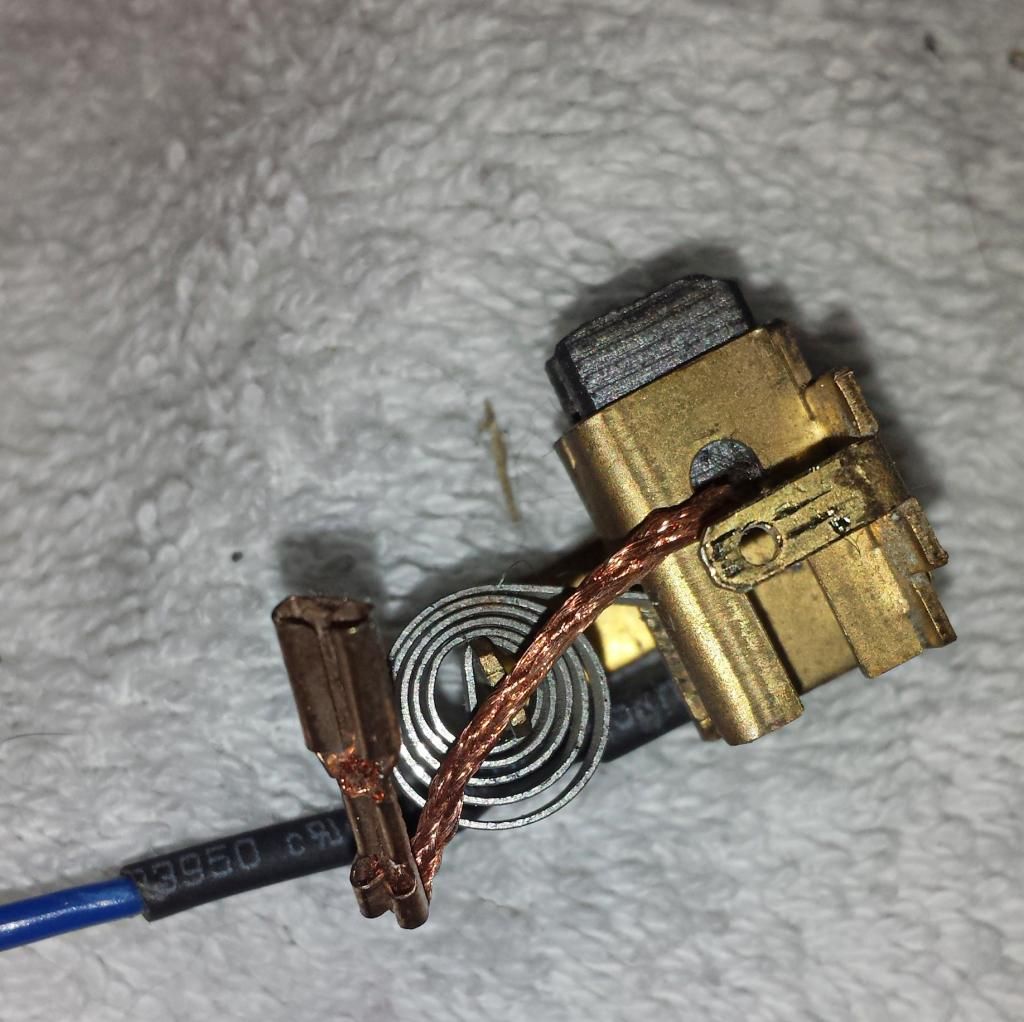
Now pull up the brush by its wire out if it's housing.
Good brushes should be flat and smooth, brushes that have corners chipped off are bad.
Left is the old brush right is the new brush
to refit or replace the brushes first the arm of the spring needs to moved out of the housing. Here i used a skewer, i cut the tip off so the top was flat, a butter knife is another idea.
With the arm up now push it off to this side.
Now place the carbon brush into the housing.
reattach the spade connector and screw down the retaining screw.
To refit or mechanism follow the above guide in reverse. ****
#3 - How to fix a split flex leads.
One common problem with machine polishers is that the leads brake inside the flex, this happens mostly right it the back of the machine and this is due to the constant movement at that point, think of bending a piece of wire between you hands it will snap if you keep bending it in the same place.
This is the symptom of a brake in the leads of the flex.
OP is from detailing world
Originally Posted by iPlod999

With the black housing separated from the rest of the machine you can see the wire of the flex.
remove the screws from the clamp
follow the blue and brown wires into the machine.
Loosen the screw enough so you can remove the Banana Spade connector
Don't remove the screw as it will be difficult to refit
From here cut the flex below the high lighted area about a hands width to be safe.
From here on you will have to let your electrical know how lead you on as i did not have the tools on hand to show the rest
I've learned alot from different forums and from here also, this is my way of paying it forward.
Thanks for looking.
Pictures and video are here for public use: Kestrel DAS6 DIY Service And Repair Guide Photos by jamesdownes1000 | Photobucket
DIY service and repair guide for; Kestrel/Deltalyo DAS6.
The more we share
The more we have
- Leonard Nimoy


|


 Reply With Quote
Bookmarks