 Thanks: 0
 Likes: 0
 Dislikes: 0
-
Super Member

Photography Basics Part 2 - Depth of Field
Photography Basics Part 2 Exploring Depth of Field
What is Depth of Field?
Depth of field is the distance measured between the nearest and farthest objects that appear to be in focus within an image. Learning to manipulate the depth of field in your images will greatly enhance the overall look and feel of your photos, and set them apart from ordinary snap shots.
As noted in Photography Basics Part 1 The Basics of Exposure:
 Originally Posted by zmcgovern45
The aperture of your lens is essentially a circular opening inside of the lens that gets bigger and smaller in order to allow more or less light through the lens and onto the digital sensor. You can think of it much like the iris in your eye. This setting controls what is known as the 'Depth of Field' (DOF for short).
Changing your aperture value is one variable that allows you to manipulate the depth of field in your images. Remember, apertures are typically measured in f-stops and these values have an inverse relationship to the actual diameter of aperture opening. What this means is that smaller f-stop values, i.e. f/1.8, is truly a very large aperture opening. For the rest of the article, please understand that when I say maximum aperture I mean the widest aperture diameter, or the smallest f-stop value. Allow me to elaborate on this for a moment to help you better understand.
The F-Stop (shown as N in the following equation) is equal to the focal length of the lens divided by the diameter of the mechanical aperture inside of the lens.

Note: As the focal length changes while you zoom in or zoom out, the aperture diameter (D) also changes in order to maintain a fixed maximum aperture. If you have a lens that ranges from 24mm-70mm with a constant maximum aperture of f/2.8 at all focal lengths, the aperture diameter within the lens will be approximately 8.5mm at the widest zoom and 25mm at the narrowest zoom. If the aperture diameter did not change within the lens as you zoomed, the maximum aperture at 70mm would be reduced from f/2.8 to approximately f/8. This would greatly reduce the amount of available light at the 70mm focal length. For this reason, constant aperture lenses are typically more expensive than variable aperture lenses. Most kit lenses, for instance, are 18-55mm focal length with maximum apertures that vary from f/3.5 at the widest focal length to f/5.6 at the narrowest focal length. This means that you lose over 1 stop of light when zooming from 18mm to 55mm. Lenses with larger maximum apertures are known as fast lenses because the larger apertures allow you to use faster shutter speeds, so when you see someone referring to a fast lens, it is often a lens with an aperture of f/2.8 or better.
Alright, that should satisfy the technically minded readers for now
for the rest of you, feel free to somewhat ignore the previous paragraph as long as you understand that aperture values are measured in f-stops, and smaller f-stops mean a larger aperture diameter and vice versa.
So, How Do F-Stop Values Affect the Depth of Field?
Smaller f-stop values, i.e. f/1.8, produce a shallower depth of field than a larger f-stop value like f/11. It is important to understand this relationship so that you can properly adjust your settings to produce the desired depth of field.
The following series of photos demonstrates the effect of manipulating the aperture to alter the depth of field. To set this test up, I placed my camera on a tripod and focused on my subject (the Menzerna Power Lock bottle). I then set the exposure in manual mode based on my cameras meter reading, and took the first photo. For the following photos, I adjusted the aperture value down one stop (smaller aperture, less light) and then compensated by changing the shutter speed value up one stop (longer shutter speed, more light) to allow for the same exposure throughout the series. Pay attention to the settings listed for each photo.

Photography Basics - Depth of Field by zmcgovern45, on Flickr
^f/2.8, 0.2sec, ISO500 - Notice how completely out of focus the items in the background are. Even the Menzerna PF2500 is falling out of focus although it is almost right next to the subject (Menzerna Power Lock)

Photography Basics - Depth of Field by zmcgovern45, on Flickr
^f/4.0, 0.4sec, ISO500

Photography Basics - Depth of Field by zmcgovern45, on Flickr
^f/5.6, 0.8sec, ISO500 - You can start to make out more words on the bottles in the background by this point.

Photography Basics - Depth of Field by zmcgovern45, on Flickr
^f/8, 1.6sec, ISO500

Photography Basics - Depth of Field by zmcgovern45, on Flickr
^f/11, 3.0sec, ISO500 - by now you can clearly make out every label, although the D300 is still a bit fuzzy.

Photography Basics - Depth of Field by zmcgovern45, on Flickr
^f/16, 6.0sec, ISO500

Photography Basics - Depth of Field by zmcgovern45, on Flickr
^f/22, 13.0sec, ISO500 - All of the words are completely sharp and in focus at this point.
DIY Project #1: This is always easier if you can experience it on your own. If your camera is easily accessible, go get it! Find a stationary object around your home. Make sure there is plenty of available light you may need to go outside for the best results. Set your camera to aperture priority mode (A for Nikon Users and Av for Canon Users). Take a photo with your subject with the maximum aperture for your current lens. Alter the aperture value and take another shot from the exact same distance and using the same focal length. Take several shots at different apertures and notice the change in the depth of field.
Note: Objects that are farther away from your subject are significantly more out of focus than objects that are nearer to your subject. This is another important relationship to understand. If you want to produce a more out of focus background, but youre already using your maximum aperture, simply move your subject farther from the background. Have a look at the next 2 photos for an example.

Photography Basics - Depth of Field by zmcgovern45, on Flickr
^f/1.8, 1/20sec, ISO500 @ 35mm - Focused on the 'Thank You' text. Notice how completely out of focus the item is in the background.

Photography Basics - Depth of Field by zmcgovern45, on Flickr
^f/1.8, 1/20sec, ISO500 @35mm - Focused on the 'Thank You' text. Notice how much more in focus the 2nd item is by simply moving it closer to the subject.
Exploring the Effects of Focal Length & Distance on Depth of Field
Hopefully youve gotten a grasp on how the depth of field changes with different aperture values. Another variable that plays into the depth of field is the focal length at which you are shooting. Wider focal lengths have a deeper depth of field (more objects in focus) and narrower focal lengths have a shallower depth of field (less in focus). This is assuming your aperture value remains the same, distance from your camera to the subject remains constant, and the distance from the subject to the background does not change.
DIY Project #2: If you still dont have your camera, go get it! Make sure you have a zoom lens on your camera for this test. Again, set your camera to aperture priority mode, and dial in the maximum (widest) aperture value for your lens. If you have a variable aperture lens, set your aperture to the maximum aperture at the narrowest focal length. Standing in one spot, take a photo of your subject at the widest focal length. Now zoom in as far as you can and take another photo. You will notice the DOF is much shallower when you are zoomed in even though you have not physically moved closer to the object, your aperture has not changed, and the distance from your subject to the background has not changed.

Photography Basics - Depth of Field by zmcgovern45, on Flickr
^f/4, 0.25sec, ISO500 @ 12mm - Focused on the gold text on the lens. Notice how the entire counter top is in focus, the wall is starting to become blurry, and the window in the far room is falling out of focus a bit more.

Photography Basics - Depth of Field by zmcgovern45, on Flickr
^f/4, 0.25sec, ISO500 @35mm - Focused on the gold text on the lens. Notice how the edge of the counter top is starting to fall out of focus. The window in the far room is significantly more blurry than it was in the previous photo.

Photography Basics - Depth of Field by zmcgovern45, on Flickr
^f/4, 0.25sec, ISO500 @ 50mm - Focused on the gold text on the lens. Notice how the edge of the counter top is completely blurry. The wall and table in the distance are completely out of focus and unrecognizable. Again, the only variable that has changed in these 3 photos is the focal length of the lens. The camera was placed on a tripod, so the distance to the subject did not change, nor did the exposure settings.
DIY Project #3: Using the same subject, zoom back out to your widest focal length. Again using the maximum aperture, take a photo of your subject. Now, move as close as you can to the subject ( if your lens does not appear to be focusing properly, check your lens specs for the minimum focusing distance i.e. the closest you can be to the subject where your lens can still accurately focus on the subject) and take another photo. You will notice this has a similar effect as zooming in. The closer you are to your subject, the shallower your depth of field will be.

Photography Basics - Depth of Field by zmcgovern45, on Flickr
^f/3.2, 1/6sec, ISO500 @ 50mm - Focused on the 'Yankee Candle' Text. Notice how the background is nicely out of focus, isolating the subject. You can still tell that there is a window in the background however.

Photography Basics - Depth of Field by zmcgovern45, on Flickr
^f/3.2, 1/6sec, ISO500 @ 50mm - Focused on the 'Yankee Candle' Text. By moving several feet closer to my subject, the background is dramatically different because my depth of field has become much smaller. You'll notice that even the rear edge of the candle rim has fallen completely out of focus.
When to Use a Shallow Depth of Field
A shallow DOF produces a nice, soft feeling to your photos. It also allows you to focus on a subject, and blur out any distracting elements in the background. For this reason, a shallow depth of field is often used in portraits and detailed/macro shots. Using a shallow depth of field isolates your subject from distractions and attracts the attention of the viewer.

Our trip to Okoboji, IA by zmcgovern45, on Flickr
^f/1.8, 0.02sec, ISO1600 @ 35mm - In this still life shot, I wanted to draw attention to the detail of the medal hanging on this bottle of wine. Utilizing a wide aperture, I was able to focus on the medal, and allow the foreground and background to fall out of focus. This draws your eyes directly to my intended subject.
Portrait photographers typically focus on their subjects eyes to draw your attention there, however you can choose any particular feature to isolate and draw attention to. Allow me to demonstrate.

Our Trip to Okoboji, IA by zmcgovern45, on Flickr
^f/2.2, 0.01sec, ISO640 @ 35mm - I took this portrait of a friend of mine while we were hanging out at a brewery. I focused directly on her eyes. Notice how sharp, and in focus they are. This attracts your attention right away.
When to Use a Deep Depth of Field
A deep depth of field is particularly useful when photographing a landscape. Utilizing a narrower aperture of f/8-f/22 allows you to ensure the majority of your image is in focus. Remember that the distance from your subject also effects your depth of field, so if you are shooting a vast landscape in which there is going to be many objects that are very far away, you dont necessarily have to use an extremely narrow aperture as long as you are not focusing too closely, but that can be a completely different article on its own (Google hyperfocal distance for more info on that).

Sunset Bridge by zmcgovern45, on Flickr
^f/14, 0.01sec, ISO250 @ 18mm - Notice how the wide angle and narrower aperture allow the entire scene to be in focus. The point of focus was the bridge, however both the foreground and background remain in focus as well.
How Does This Relate to Detailing Photos?
In general, I try to use a deeper depth of field for my basic before/during/after photos so I can be sure to fully capture the details that I am trying to show. I tend to shoot at apertures around f/5.6 and mostly use my 35mm lens. This provides a deep enough DOF for the majority of scenarios.
This is not as big of a deal if you are shooting a vertical panel, such as a door, because the DOF is effectively nonexistent since your subject will fill the entire frame and you will have no background as seen in the following photo.

Photography Basics - Depth of Field by zmcgovern45, on Flickr
^f/5.6, 1/20sec, ISO400 @ 35mm - Focused on the tape line at the flash light. Notice how the entire image is in focus because the entire panel is on one plane, perpendicular to the camera, and therefore there is no real depth.
If you are shooting a horizontal panel, or a vertical panel from an angle, you must consider the DOF and ensure you are focused on the proper area. You must also make sure your aperture value, focal length, and distance to the subject allow for a deep enough DOF to properly capture the details you are seeing.

Photography Basics - Depth of Field by zmcgovern45, on Flickr
^f/11, 1/40sec, ISO400 @ 50mm - Focus point is the crease between front and rear doors. Notice how the entire side of the car is in focus enough that you can clearly see the details in the surface defects. The front fender is starting to show signs of falling out of focus, however this was not important in the shot.
Once I have captured all of my necessary documentation, I like to do a more artistic photo shoot if time allows. For these images, I tend to use a shallow DOF to throw the foreground and the background out of focus and draw all of the attention to the vehicle. I treat these types of images much like portraits.
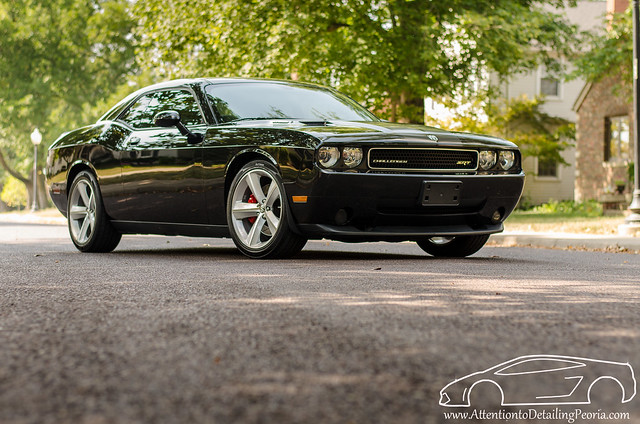
2009 Dodge Challenger SRT8 by zmcgovern45, on Flickr
^f/2.8, 1/320sec, ISO100 @ 50mm - Focused on the front grill. Notice how the foreground and background have a soft, slightly out of focus look. This makes the car stand out even more and produces a 'high quality' look to the image.
You can use the shallow DOF to isolate a particular feature on the car as well.

Photography Basics - Depth of Field by zmcgovern45, on Flickr
^f/2.8, 1/1000sec, ISO200 @ 35mm - Focused on the emblem. You can see how the subject stands out thanks to the shallower depth of field which throws the engine components out of focus in the background.
How Do I Calculate the Exact Depth of Field?
Well, there are a series of complicated equations that you could plug through
or, given the current age of technology that we live in, simply download a DOF Calculator app onto your smart phone. I use a free app for my iPhone called simpleDOF. It is a handy tool, but to be honest, I usually just shoot and adjust my settings accordingly until I see my desired results.
Hopefully this has helped you gain a better understanding of the basics of depth of field and how to manipulate it. Youll find your images will begin to elevate to an entirely different level once you begin to utilize some of these tips. As always, youll get better with practice, so grab your camera and go shoot something!
Please feel free to ask if youve got any questions. I try my best to explain things in a way that I imagine most people can relate to, but believe me, I understand that my brain does not work the same as every other persons brain, so what works for me might not work for you
if you find yourself asking what the heck is he trying to say here?!? just ask! Chances are youre not the only one who needs me to clarify something 
*I apologize for any spelling or grammatical errors... I can only re-read these things so many times over the course of the many hours it takes me to put these together before it all starts to blend together.
As always, Thanks for reading!
-Zach
 Retired Professional Detailer
-
Regular Member

Re: Photography Basics Part 2 - Depth of Field
Thank you for all the time and effort you put into this, Zach. I read, enjoyed, and learned a lot from both Part 1 and Part 2.
-
Regular Member

Re: Photography Basics Part 2 - Depth of Field
-
Re: Photography Basics Part 2 - Depth of Field
-
Super Member

Re: Photography Basics Part 2 - Depth of Field
Another great article Zach.
-
Super Member

Awesome read Zach!
Another item of note regarding depth of field... Some cameras have a "depth of field preview" button on the front:

This is useful for composing a shot when you want to see what will be in focus. The cameras aperture actually works by closing down to the selected f stop when the shutter button is pressed. So when you are looking through the viewfinder, the aperture is wide open allowing in the most available light for the purpose of properly composing your shot.
The depth of field preview button closes the aperture down to your selected f stop allowing you to see what the camera will capture when the shutter button is pressed. Often times the viewfinder will get darker, sometimes too dark to see if you are using a high f stop, because this is the way the camera will be seeing the image.
This was a bigger deal with film cameras because the photographer was better able to get an idea of the apertures effect on the image in real time, because the film had to be processed and printed before the image was viewable to the artist. With digital cameras we can see the image right away and can take another shot immediately if something is not right.
Just food for thought.
Sent from my iPad using Tapatalk
-
Super Member
Re: Photography Basics Part 2 - Depth of Field
Originally Posted by rdf

Thank you for all the time and effort you put into this, Zach. I read, enjoyed, and learned a lot from both Part 1 and Part 2.
^You're very welcome. Glad I could help!
Originally Posted by davidg
Bokeh!
^Bokehlicious! 
Originally Posted by drvnbysound
^Thanks for sharing!
Another member (SR99) shared this one with me: http://www.tawbaware.com/maxlyons/calc.htm
Originally Posted by Chris's FX4
Another great article Zach.
^Thanks for reading, Chris!
Originally Posted by ekennett
Awesome read Zach!
Another item of note regarding depth of field... Some cameras have a "depth of field preview" button on the front:
This is useful for composing a shot when you want to see what will be in focus. The cameras aperture actually works by closing down to the selected f stop when the shutter button is pressed. So when you are looking through the viewfinder, the aperture is wide open allowing in the most available light for the purpose of properly composing your shot.
The depth of field preview button closes the aperture down to your selected f stop allowing you to see what the camera will capture when the shutter button is pressed. Often times the viewfinder will get darker, sometimes too dark to see if you are using a high f stop, because this is the way the camera will be seeing the image.
This was a bigger deal with film cameras because the photographer was better able to get an idea of the apertures effect on the image in real time, because the film had to be processed and printed before the image was viewable to the artist. With digital cameras we can see the image right away and can take another shot immediately if something is not right.
Just food for thought.
Sent from my iPad using Tapatalk
^Very good addition... Thanks!
Retired Professional Detailer
-
Super Member

Re: Photography Basics Part 2 - Depth of Field
Thank you!
-
Super Member

Re: Photography Basics Part 2 - Depth of Field
Great write up thank you. Lots if setting a can use..
-
Super Member
Re: Photography Basics Part 2 - Depth of Field
Retired Professional Detailer
Similar Threads
-
By Coopers ST in forum Auto Detailing 101
Replies: 17
Last Post: 02-22-2017, 09:06 PM
-
By zmcgovern45 in forum How to Articles
Replies: 60
Last Post: 11-17-2014, 12:58 AM
-
By zmcgovern45 in forum How to Articles
Replies: 20
Last Post: 04-02-2014, 01:33 PM
-
By zmcgovern45 in forum How to Articles
Replies: 30
Last Post: 01-27-2014, 04:22 PM
-
By SuperGlide in forum Auto Detailing 101
Replies: 3
Last Post: 12-19-2012, 03:14 PM
 Members who have read this thread: 0
There are no members to list at the moment.
Posting Permissions
- You may not post new threads
- You may not post replies
- You may not post attachments
- You may not edit your posts
-
Forum Rules
|
| S |
M |
T |
W |
T |
F |
S |
| 31 |
1
|
2
|
3
|
4
|
5
|
6
|
|
7
|
8
|
9
|
10
|
11
|
12
|
13
|
|
14
|
15
|
16
|
17
|
18
|
19
|
20
|
|
21
|
22
|
23
|
24
|
25
|
26
|
27
|
|
28
|
29
|
30
| 1 | 2 | 3 | 4 |
|


 Reply With Quote
Bookmarks