 Thanks: 0
 Likes: 0
 Dislikes: 0
-
Finger Painting Technique when using a Rotary Buffer
-
Super Member

Re: Finger Painting Technique when using a Rotary Buffer
Thanks for the sharing. The 'prime the side edges' link is also very interesting thread.
Let me ask, since I only own a 3401 DA and that's what I have to tackle the job.
If you were tackling the same section on last picture with a 3401, would you use the pad flat (but just the edge in contact with area), or would you try the same 'position' you show for the rotary?
I know it's a different action tool, but since the 3401 keeps the pad spinning all the time, it offers the possibility of some action without using the pad fully contacted in the surface.
Difficult to explain what I mean, hope you can understand my question.
Thanks for sharing,
Kind Regards.
Nature is pleased with simplicity. And nature is no dummy 
― Isaac Newton
-
Super Member

-
Super Member

Re: Finger Painting Technique when using a Rotary Buffer
I do this technique with chrome as well. I dab the polish on with finger and then pick it up with the rotary.
HUMP
-
Re: Finger Painting Technique when using a Rotary Buffer
 Originally Posted by Tato

Thanks for the sharing. The 'prime the side edges' link is also very interesting thread.
Little tips of the trade....
Originally Posted by Tato
Let me ask, since I only own a 3401 DA and that's what I have to tackle the job.
If you were tackling the same section on last picture with a 3401, would you use the pad flat (but just the edge in contact with area), or would you try the same 'position' you show for the rotary?
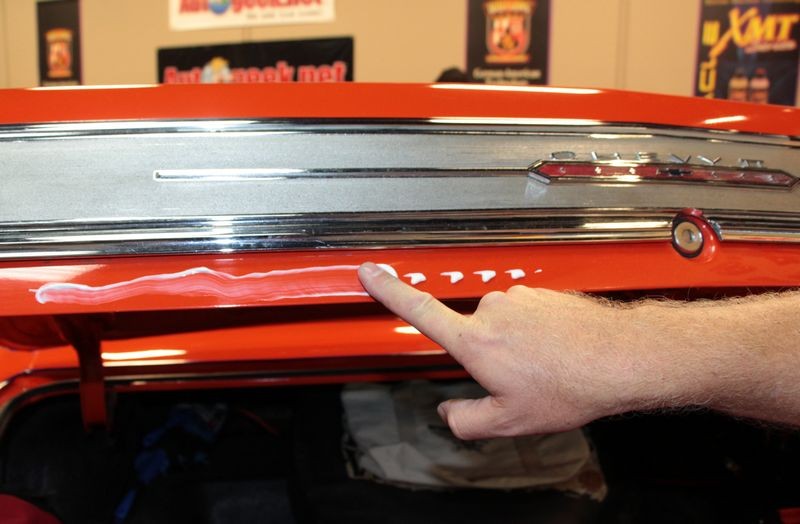
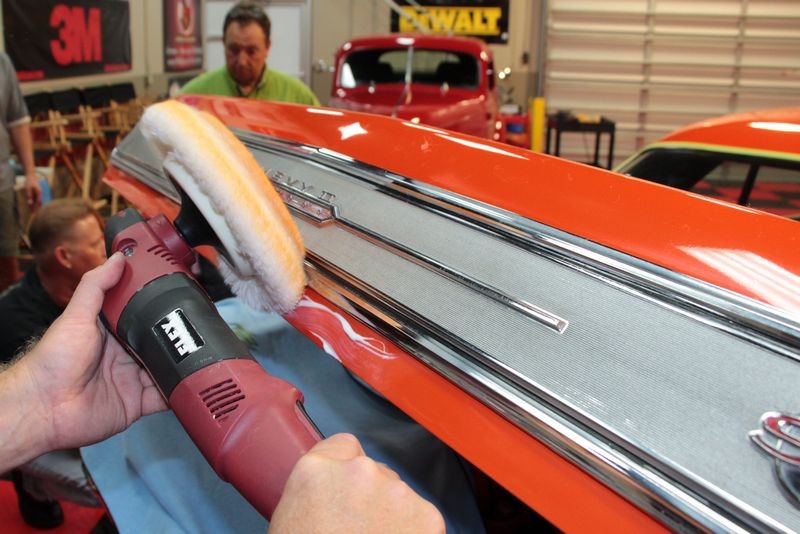
Probably have to go up on edge because if you try to hold the pad flat the pad is going to want to "grab" the edge of the trunk lid and this will jerk you around.
Originally Posted by Tato
I know it's a different action tool, but since the 3401 keeps the pad spinning all the time, it offers the possibility of some action without using the pad fully contacted in the surface.
When you go up on edge with a 3401 it feels to your hands like how it feels when you're driving a car with a very flat tire. Womp, womp, womp.
Another option is to simply knock-out thin strips of paint like I show in the picture by hand.

-
Super Member

Re: Finger Painting Technique when using a Rotary Buffer
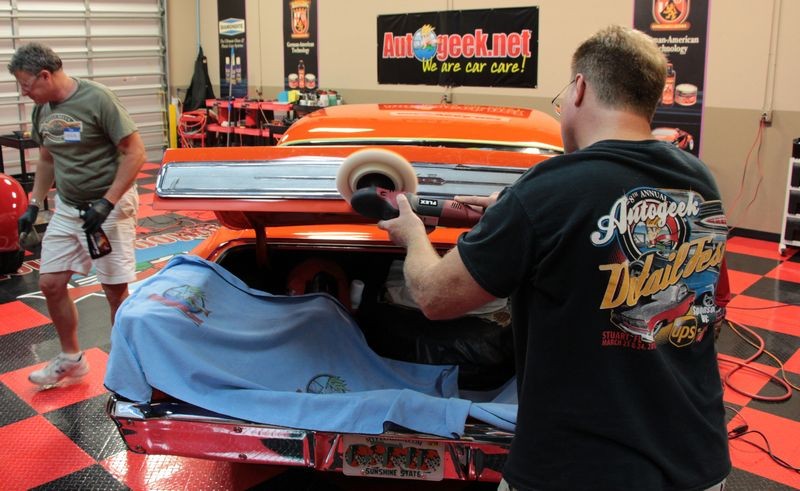
Being there when Mike wheeled the rotary on the Nova and I did see the results. His choice and it needed it. I know I don`t offer much to the site short of encouragement and insight in the garage.
One of the better things I do is keep a threads alive as newer members and old always can benefit the information available on this forum.
Like Mike always says "MAKE IT SHINE".
There is plenty of Pros on the site but equally as much as people trying just to keep the cars shiny and protected.
"Chrome wheeled, fuel injected and steppin' out over the line"
-
Re: Finger Painting Technique when using a Rotary Buffer
-
Super Member
Originally Posted by Mike.Phillips@Autogeek
Cool pictures Art and most of all I'm impressed! You've mastered the art of uploading your pictures to the AG Gallery so you can insert them instead of attach them.
(I looked at the code, that's how I can tell if someone is using Photobucket or AG)

And spreading product out with your product spreader is just the down and dirty way to push through a job. I think sometimes people think there might be some cool technique for various procedures and sometimes there are and sometimes there's just doing what comes natural.
But the key point is to lubricate the paint to reduce the potential to make a mistake, especially when using a rotary buffer with a wool pad and a compound.

Yeah it took me a while to figure out the mastery of uploading one's pictures to AutogeekOnline  I think cos most of the time, about 98% of the time. I used the app and not my actual pc. I think cos most of the time, about 98% of the time. I used the app and not my actual pc.
Also, does the Flex rotary spin backwards like the 3401 does?
I've used it at the first SoCal meet up, but can't remember.
I do remember doing the 10@10 technique backwards though. Just learned it on the fly. The backwards 10@10 on a Flex
-
Re: Finger Painting Technique when using a Rotary Buffer
I always use a yellow foam wax applicator since I avoid to get chemicals on my fingers.
-
Re: Finger Painting Technique when using a Rotary Buffer
Originally Posted by hernandez.art13
Yeah it took me a while to figure out the mastery of uploading one's pictures to AutogeekOnline I think cos most of the time, about 98% of the time. I used the app and not my actual pc.
It's the right way to do it though so good job.
Originally Posted by hernandez.art13
Also, does the Flex rotary spin backwards like the 3401 does?
No, the pad on the Flex PE14 rotates clockwise as you're looking down on it from behind the tool like all over rotary buffers.
Originally Posted by hernandez.art13
I do remember doing the 10@10 technique backwards though. Just learned it on the fly. The backwards 10@10 on a Flex
Correct.
Similar Threads
-
By Mike Phillips in forum Rotary Buffers
Replies: 10
Last Post: 02-19-2014, 07:38 AM
-
By Mike Phillips in forum How to articles
Replies: 3
Last Post: 08-28-2012, 07:26 AM
-
By alko in forum Rotary Buffers
Replies: 14
Last Post: 06-27-2012, 12:43 PM
-
By AutowerxDetailing in forum Auto Detailing 101
Replies: 16
Last Post: 06-19-2012, 08:13 PM
-
By opie_7afe in forum Rotary Buffers
Replies: 10
Last Post: 11-16-2011, 01:33 PM
 Members who have read this thread: 0
There are no members to list at the moment.
Posting Permissions
- You may not post new threads
- You may not post replies
- You may not post attachments
- You may not edit your posts
-
Forum Rules
|
| S |
M |
T |
W |
T |
F |
S |
| 31 |
1
|
2
|
3
|
4
|
5
|
6
|
|
7
|
8
|
9
|
10
|
11
|
12
|
13
|
|
14
|
15
|
16
|
17
|
18
|
19
|
20
|
|
21
|
22
|
23
|
24
|
25
|
26
|
27
|
|
28
|
29
|
30
| 1 | 2 | 3 | 4 |
|


 Reply With Quote

 (just kidding, just call it spreading the product)


Bookmarks