 Thanks: 0
 Likes: 0
 Dislikes: 0
-
Super Member

Re: Flex + Rupes vs Ceramiclear Paint - How to detail a Mercedes-Benz SL 550
Mike,
Thank you. This was extremely instructive to me as I have a 2013 SL550 that I am about to correct and put PBL coating on. My big questions have to do with maskings. Why did you mask the hood heat extractors rather than remove them? Why did you choose not to mask the side skirt vents and why did you not cover the windshield with the beach towel as you show in your videos and your book?
Thanks for the write up and for your answers as I try to learn as much as I can before the work.
-
Re: Flex + Rupes vs Ceramiclear Paint - How to detail a Mercedes-Benz SL 550
 Originally Posted by Tato

Please, can you talk a bit about your compounding residue 'buffing' procedures?
It's not the first time I see some pictures that looks like you polish and then remove the compound from whole (or almost) car?
Please, correct me if I'm mistaken, but that's what looks like.
Thank you for the questions, I'll do my best to answer...
2 ways to compound a car.
Panel by panel
Compound a section or a panel and wipe residue off.
Whole car
Compound the entire car and then wipe the car off.
Which approach depends upon what you're trying to do.
Panel by panel
If you're aiming for 100% perfection, then work panel by panel and inspect your work and re-buff if needed before moving onto the next panel. This approach takes the longest but results in a more perfect finish. This approach is best for doing true show car work.
Whole car
If you're aiming for very good results, then buffing out the entire car and then wiping the compound off all at once is faster because it saves "little chunks of time" as you work around the car by not having to stop buffing and wipe off residue. This approach is best for doing very good work for daily drivers.
This car has a Ceramiclear finish and the idea behind buffing out a Ceramiclear finish is to use the least aggressive products to get the job done. So in this example, the first thing to do is define what "get the job done" means.
For this customer, a good friend and a great customer, he wanted the swirls and scratches removed so the paint will look as good or better than new while tempering the amount of correction by taking into consideration the age of the car, (7 years old), and more important the characteristics of Ceramiclear paint.
From my article and interview with Dr. David Ghodoussi,
Ceramiclear Paints - Be Careful
"After the cerami clear top coat is sprayed, the nano particles of Fumed Silica (SiO2), which are synthetically engineered, migrate to the top 0.2 mils of the clear coat as it is curing.
If you remove this potion of the clear layer of paint, the paint under it will be much softer and will not polish out or react the same way the nano particle portion did or would.
You will at some level have compromised the the finish on the car."
-Dr. Ghodoussi...
So after doing three different tests on the paint going from least aggressive to very aggressive I chose the very aggressive approach and then uniformly buffed out the entire car. The idea being, whatever defects that are not removed are the DEEPER defects and taking the above factors into consideration, to go ahead and leave them in the paint.
That said, when Jim, the owner saw the remaining defects, he asked if I could go even further and remove more of the paint to further remove the defects. So with his permission, I compounded the hood and trunk lid again.
The paint started out with a lot of swirls and scratches, normal for a 7 year old car. But after compounding aggressively, it really came out nice.
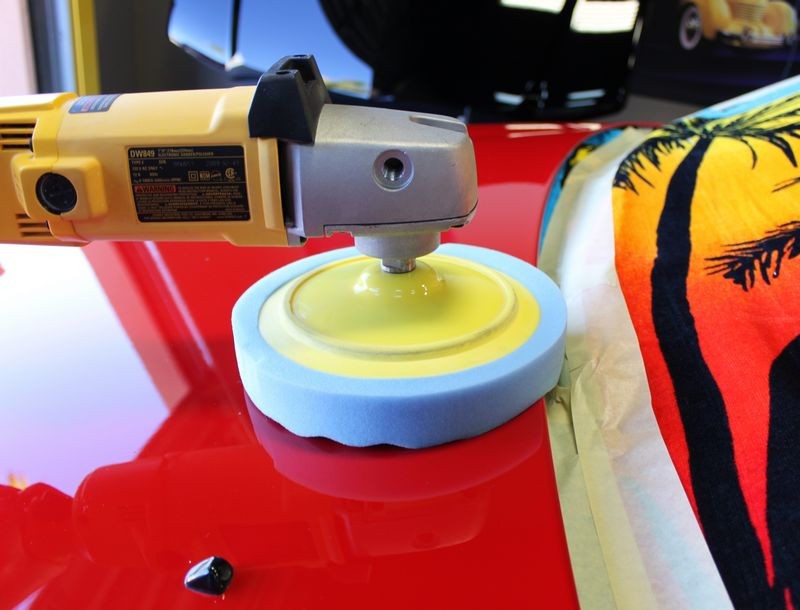
When it comes to specialty paints like Ceramiclear paint systems, you really want and need to be careful. Don't use cheap compounds. Wolfgang Uber Compound uses engineered abrasives, not mined abrasives. This makes it a very safe compound and this is why even after compounding with a wool pad and a rotary buffer the paint looked so clear and glossy, just like this car I used Wolfgang Uber Compound on...
Lady in Red - 1986 Porsche - 4-Step Process
Originally Posted by Mike Phillips
Results from Wolfgang Uber Compound
I took these shots after compounding with Uber Compound and BEFORE machine polishing with the Wolfgang Finishing Glaze. To me the paint looked ready to wax...


So two approaches, both will work just figure out which type will work best for you and/or you and your customer.
Originally Posted by Tato
I'm always afraid of not removing compound residue immediately because I know the pain to remove dried products... how can we do this safely?
Generally speaking, it's always easier to remove both compound and polishing residues immediately after working a section. The idea being to remove the film of product while it's still somewhat wet or liquid as the wetness can act as a lubricant to reduce micro-marring from the physically wiping of the product off the paint which also means wiping it against the paint.
When it comes to "polishes" and especially the LAST machine polishing step, then it's even more important, especially for show car work, less important for production work.
But when it comes to compounding when you know you're going to do at least one more machine polishing step, any toweling marks inflicted during the wipe-off process by letting the compound sit on the car until you're completely done with the compound step will be easily removed during the polishing step.
Plus, if you look at my pictures you'll see instead of fighting off dried compound I re-whetted it using a light mixture of Isopropyl Alcohol and water. This is like a little cheater technique...

Cotton terrycloth for compounds only
Another cheater technique would be to use a high quality cotton terry cloth towel instead of microfiber. I post this all the time and here goes again, unlike microfiber which is SOFT & GENTLE the nap or tiny loop of cotton that makes terrycloth terrycloth is stout and it is this stoutness that enables the tiny loop to slice into the dried residue making it faster and easier to remove than if you were to use a soft and gentle microfiber towel.
Originally Posted by Tato
Thank you very much in advance.
Kind Regards.
I hope the above answered your questions, thank you for asking them...

-
Re: Flex + Rupes vs Ceramiclear Paint - How to detail a Mercedes-Benz SL 550
Originally Posted by Centexhokie
Mike,
Thank you. This was extremely instructive to me as I have a 2013 SL550 that I am about to correct and put PBL coating on. My big questions have to do with maskings.
Why did you mask the hood heat extractors rather than remove them?
Great question!
Behind the scenes what you didn't see was me opening the hood and looking to see how involved it would be to remove the hood heat extractors, which I did.
It takes a Torx Screwdriver and it looks like there are 4 Torx Machine Screws that hold these components in place.
Before simply removing them I identified where the windshield washer fluid lines ran and tracked them to each of the windshield washer squirters that are part of the hood heat extractors.
When looking for the fluid lines as these would have to be removed, I then saw a wiring harness and wiring connectors also housed inside the hood heat extractors. This caused me to stop and consider what these wires could be doing? The only thing I could come up with was some type of independent motors to pump the windshield washer fluid or sensors or actuators? I didn't know for sure but as soon as the components when electronic I decided to NOT unbolt them as I didn't want to deal with any computer, sensor or whatever problem it may have caused.
Once I made the decision to NOT remove them, (and I wanted to), I chose instead to tape them off carefully and then just buff very carefully around the chrome spears that I left exposed so I could get to the paint around them.
But in fact, it would be easier and safer to remove these components. I would ask that if you can unbolt your and take some pictures to show what's involved and also include if there's any issues to be aware of involving the electronics that would be great and would help others into the future. Sorry to say, but I'm not a Mercedes-Benz expert in all things Mercedes-Benz and I have to know where my limits are.
I did think about calling the owner to ask if he knew what the ramification were as it relates to removing these components meaning unhooking the water lines and the electrical wiring but I chose not to since my guess was he wouldn't know not being a Mercedes-Benz mechanic himself but instead like me a Mercedes-Benz owner and enthusiast.
Originally Posted by Centexhokie
Why did you choose not to mask the side skirt vents
I looked at these and if I thought I needed to tape-off and cover them I would have but they were easy enough to buff around. If you look at any of my write-ups on the Internet over the decades, I am a huge fan of taping-off and covering up anything that needs it but if it doesn't need it then I don't do it. Just a judgment call on my part.
When I did the foam pad polishing with the Duetto, I ran the foam pad over all the chrome trim to clean and polish it.

Originally Posted by Centexhokie
and why did you not cover the windshield with the beach towel as you show in your videos and your book?
Great question!
If you look, I did use a cover-up towel to cover over and protect the wiper arm assemblies. This is mostly because I'm lazy and hate wiping splatter dots off components like this but it also has to do with saving time from having to do this kind of "detail" clean-up.
In this case, I opened the hood, wrapped the towel down the top side of the wiper arm assemblies and then pulled the rest of the towel down into the engine compartment.
What this did in one fell swoop was cover and protect these components fast and simple.
Then if you look, you'll see some painter's tape securing the top of the towel exposed to the windshield, and next to it having a strip of fat 3M Painter's Tape securing the edge of the towel to the glass. Look here,

The reason I did this was to hold the towel in place IN CASE I accidentally touched the towel with a wool pad spinning on a rotary buffer as I stated in my write up I machine polished all the glass.
Read what I wrote in post #3 and look at the pictures, specifically at the glass and you'll see there all creamed over with compound residue.
Almost every car I work on has some kind of road film on the glass and you can't make the paint all shiny and then give the customer back a shiny car with dull glass.
See this article I wrote here where I explained the reason for this technique here....
The Beach Towel Tip
The below is just a SMALL portion of this article, I'd recommend reading the entire article and checking out all the pictures...
Now in this example the tape is placed next to the back of the hood, that's due to how this Honda is designed.
Notice how I've run a couple of strips of wide tape along where the Beach Towel meets the rear edge of the hood?


In some cases, the design of the vehicle means there's no gap or air space between the edge of the hood and the glass or wiper arm area, in these cases, you have to be careful when running your polisher not to run the buffing pad into the Beach Towel because the nap is grippy and your buffing pad could grab it and yank it into itself.
So for cars with a low or no air-gap between the paint and the area you're trying to cover up, being careful when buffing these areas is important, but I also run a couple of strips of tape across this area as a buffing pad that's lubricated with product will just bump into the tape, it won't snag it and possibly pull it off the area and into the pad.
Just an extra safety precaution, you can decide how DO or AR you want to get.
But this last picture above showing the pad bumping into the the tape-line, this same thing could happen when I was buffing the windshield and if a wool pad spinning on a rotary buffer were to grab the terrycloth towel and YANK it off the car it would have YANKED the expensive Mercedes-Benz wiper arm assemblies with it and that would cause damage and cost money.
I didn't cover the windshield because I planned on buffing the glass and I DID run a strip of tape between the glass and the towel to avoid a whoops....
Don't ask me how I know these things...
When I buff out cars for other people I always tell them two things,
1. The job was done right. (and safe)
2. The job wasn't done wrong.
That's two things... 
Originally Posted by Centexhokie
Thanks for the write up and for your answers as I try to learn as much as I can before the work.
No problemo... great questions and thank you purchasing my how-to book.
-
Super Member
Re: Flex + Rupes vs Ceramiclear Paint - How to detail a Mercedes-Benz SL 550
Mike,
Thanks. The hood extractors on the R231 2013+ do not have wires and hoses running through them. The new MB "magic vision" sends the washer fluid through the $125 laser drilled wipers rather than have fluid from the hood. My car only has 2 torx screws and a couple of plastic clips holding the extractors on so I am planning to remove them. It now makes sense to me why you didn't. I will do a write up with pictures of all of that when I do it.
The side extractors are a PIA to tape off so I may try your technique to buff around them.
Thanks for the details on the windshield. My glass is in really good shape so I will use the beach towel with the info you provided to cover it as well as the sunroof that is now in the SL550.
Again thanks for the details. I am always trying to learn. My red SL550 needs some correction as it has spider web looking swirls, but no deep scratches so hopefully I can get the correction with a GG and some Menzerna 1500 or 2500. I am inspired by your post and the better weather that has come this week to Texas to get'r done.
Thanks for the write up and for your answers as I try to learn as much as I can before the work.
-
Super Member

Re: Flex + Rupes vs Ceramiclear Paint - How to detail a Mercedes-Benz SL 550
Very nice work Mike. Both on the car and the write up. 
Very interesting and informative question and answers so far. It's nice to know about the complexities involving those heat extractors before hand through your experience with them.
-
Re: Flex + Rupes vs Ceramiclear Paint - How to detail a Mercedes-Benz SL 550
Originally Posted by Radarryan
Phenomenal before and after on the Mercedes, Mike! I'm glad you all took the pictures you did to illustrate the turnaround.
For me this would be a low picture write-up. For the most part the only time I stopped to take pictures is when I was washing my hands after one step and before moving onto the next step and to drink a glass of cold water.
Always have to keep in mind your customer is paying you to work on their car, not take pictures. If you work by a bid price for the entire job then it's more your time and you can take more pictures, but if you're working by the hour then it's their time and a person needs to honor their customer's time.
Originally Posted by Radarryan
I think the only one who didn't approve is Bret Velde of Vero Beach (the car dealer that had the vinyl letters on the back) 
Yeah... that's funny... no harm intended, just nobody rides for free kind of thing...
Originally Posted by Radarryan
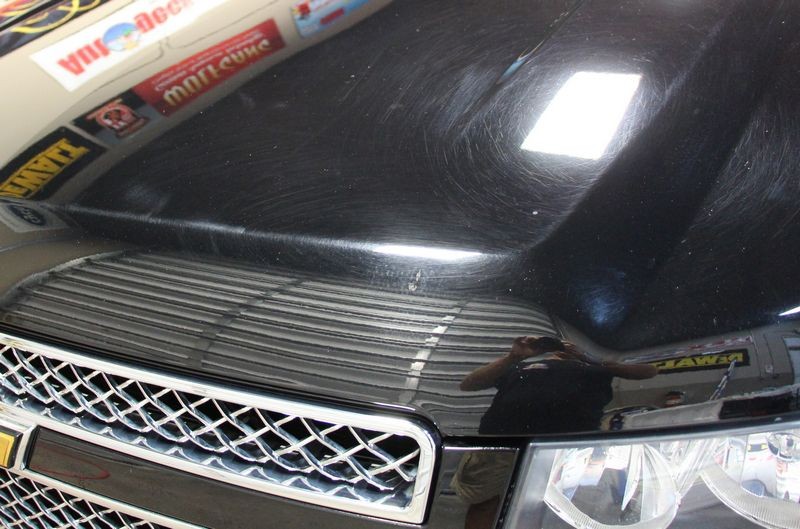
I take it that after the compounding step, the RIDS became easier to see because all the surface scratches were removed, and that's when it became evident that wet (or damp) sanding was necessary?
Kind of right...
The first compounding step definitely removes all the shallow swirls and scratches, that's just common sense. So anything that remains is obviously remaining because it's deeper than the swirls and scratches that were removed.
The way I explain it in this article,
RIDS - The Definition of RIDS and the story behind the term...
Originally Posted by Mike Phillips
RIDS = Random Isolated Deeper Scratches
RIDS
Random Isolated Deeper Scratches. These type of scratches come from normal wear & tear and there is no pattern to them. RIDS are like Tracers in that they are deeper scratches that show up after the shallow scratches have first been removed through a machine or hand buffing process, usually with a compound or paint cleaner.
After the shallow swirls and scratches have been removed, any deeper scratches that remain will now show up like a Sore-Thumb to your eyes because there are no longer thousands of lighter, more shallow scratches camouflaging them.
So "yes", the first compounding or polishing step in any process will as I like to say,
Reveal the random isolated deeper scratches by making them stand out like a sore thumb.
But... the reason I machine wetsanded instead of simply compounding real aggressively is because
Machine wetsanding is cooler to the paint
Clearcoats don't like heat and pushing down hard with a rotary buffer, a wool pad and an aggressive compound to a small area can generate a lot o heat very quickly. This is dangerous as you can burn-through very quickly.
Machine wetsanding lets you control the depth of your sanding marks
A super high quality sanding disc like the 3M #5000 Trizact disc give you a lot of control over the process since you know how deep the sanding marks are that you're replacing the random depth scratches so you know what it will take to remove them.
So I sanded because it was safer, gave me control over the process and was better for the paint and thus better for the owner.
Lots of detailers in the world, some know a little and some know a lot, when the paint on your car is thinner than a 3M Post-it Note you want to make sure that anyone that touches your car's finish knows a little bit about what I call the 3 P's.

Originally Posted by Radarryan
Those must have been some scratches for the Flex rotary, wool pad, and compound to not remove!
My thoughts exactly as the shallow swirls and scratches all buffed out pretty quickly.
Originally Posted by Radarryan
Also, did you see much improvement from the second to final machine polishing steps (Rupes Fine Cut (Yellow) to Ultra Fine Cut (White))?
I saw a difference and the owner says he did too as he watched me.
Originally Posted by Radarryan
I ask just because the paint was so glossy subsequent to this step that I didn't know how much more you could eek out of it!
Or did it become more I want to ensure that the paint is in ultra perfect condition before I apply this coating?
Both...
At this point, I wasn't leaving any shine on the table.
The owner Jim is a member of our local Mercedes-Benz club and one thing he can do that his fellow members can't do is show off how nice the paint looks on all his Mercedes-Benz.
Originally Posted by Radarryan
Like always, thanks for the education, entertainment, and write up. They're always a joy to read and re-read.
Thank you for the kind words...
Buffing out a car is a lot of hard work as is processing all the pictures and putting together a good write-up to document the project. The good news is, unlike some online forms of communication, discussion forums, that's what I'm typing on and you're reading on, are here to stay.

-
-
Re: Flex + Rupes vs Ceramiclear Paint - How to detail a Mercedes-Benz SL 550
Originally Posted by Mike.Phillips@Autogeek
If you look in this picture you'll see a Jawbone UP24 on my wrist...
That is so cool! I can see that coming in very handy for those wanting to monitor their health. What's a set-up like that cost?
Also, I noticed your wool pad. Usually when I use my W4000 pads they get a hole in the center of them starting when I first prep them by spurring them. Often this hole gets bigger during stages of a detail, but I didn't notice this hole in any of your pads pictured. What brand of wool pads were those?
Love the write-up too.
-
Re: Flex + Rupes vs Ceramiclear Paint - How to detail a Mercedes-Benz SL 550
So, on the Nanoskins again, would I be safe with only getting the medium pad? The thinking being, I'm only interested in production style detailing and any marring I did with it, would be taken out in a one step polish or AIO (the least aggressive I would follow with would be Optimum GPS).
-
Re: Flex + Rupes vs Ceramiclear Paint - How to detail a Mercedes-Benz SL 550
Originally Posted by ducksfan
So, on the Nanoskins again, would I be safe with only getting the medium pad?
The thinking being, I'm only interested in production style detailing and any marring I did with it, would be taken out in a one step polish or AIO (the least aggressive I would follow with would be Optimum GPS).
That's a good question...
If you want to stay on the safe side I'd actually go with the Fine Grade pad. The Optimum GPS is a very light cleaner/wax, my guess is it could remove any marring caused by a Medium Grade Nanoskin Autoscrub pad but to be on the safe side you might want to start with a Fine Grade pad.
Down the road, when you need or want to step up to a more aggressive pad you could always get a Medium Grade pad.
Different paints re-act differently to the Nanoskin pads, for example, I used one on this Mercedes-Benz and neither myself or the owner could see any marring at all.
Black Label Diamond Paint Coating
Date: Saturday, December 13th, 2013
How long to wait before waxing a brand new car?

I used the Nanoskin Autoscrub Medium Grade Towel on the hood of this black Tahoe and I could easily see where it marred the paint.
High quality production detailing by Mike Phillips
Right on the edge of the raised body line in the front of this hood it's marred.
This is marring from me rubbing the Nanoskin Autoscrub Towel over the paint, not just the line to the right, but if you look at the scratches between the line and the reflection of the overhead light, anywhere you see a spotted look that's marring. It's the tops of the orange peel that have been dulled.
Do note that the Optimum Finish with a white Hybrid pad on the Flex 3401 did completely obliterate the marring.
Hope that helps....
Similar Threads
-
By Mike Phillips in forum How to articles
Replies: 9
Last Post: 06-20-2016, 06:26 PM
-
By Vivant511 in forum Auto Detailing 101
Replies: 11
Last Post: 06-28-2014, 12:11 AM
-
By jerber1 in forum Ask your detailing questions!
Replies: 8
Last Post: 06-15-2014, 06:41 PM
-
By Marius@F40 in forum Show N' Shine
Replies: 6
Last Post: 04-27-2014, 01:12 PM
-
By Nick McKees37 in forum Show N' Shine
Replies: 16
Last Post: 08-04-2012, 09:43 AM
 Members who have read this thread: 0
There are no members to list at the moment.
Posting Permissions
- You may not post new threads
- You may not post replies
- You may not post attachments
- You may not edit your posts
-
Forum Rules
|
| S |
M |
T |
W |
T |
F |
S |
| 31 |
1
|
2
|
3
|
4
|
5
|
6
|
|
7
|
8
|
9
|
10
|
11
|
12
|
13
|
|
14
|
15
|
16
|
17
|
18
|
19
|
20
|
|
21
|
22
|
23
|
24
|
25
|
26
|
27
|
|
28
|
29
|
30
| 1 | 2 | 3 | 4 |
|


 Reply With Quote

Bookmarks