 Thanks: 0
 Likes: 0
 Dislikes: 0
-
How to wash your car using the two bucket method
How to wash your car using the two bucket method
When it comes to washing your car, the common method is to use a single bucket filled with soapy car wash solution into which you dip your wash mitt and the wash your car. After washing a panel you place your wash mitt back into your wash bucket to either gather more soapy car wash solution or hold the mitt while you rinse the panel you just washed. This method works however, as you work around your car you remove dirt and road grime off the various panels and deposit them into your wash bucket. Then each time you dip your wash mitt into the bucket to gather more wash solution you risk also gathering the dirt you just removed.
Clearcoat finishes are scratch-sensitive
Modern clearcoat finishes are scratch-sensitive. This means while they tend to be harder than traditional single stage paints from years ago, they still scratch easily. Because they tend to be hard, removing the swirls and scratches tends to be both difficult and time consuming. Besides that, the more swirls and scratches you inflict into your car's finish the hazier and duller the finish becomes taking away from the beauty of your car. If you really want to go deep, having millions upon millions of swirls and scratches in the surface of the clearcoat finish on your car makes the paint more open to both the elements and any corrosive substances, both of which will act to cause oxidation and eventually clearcoat failure.
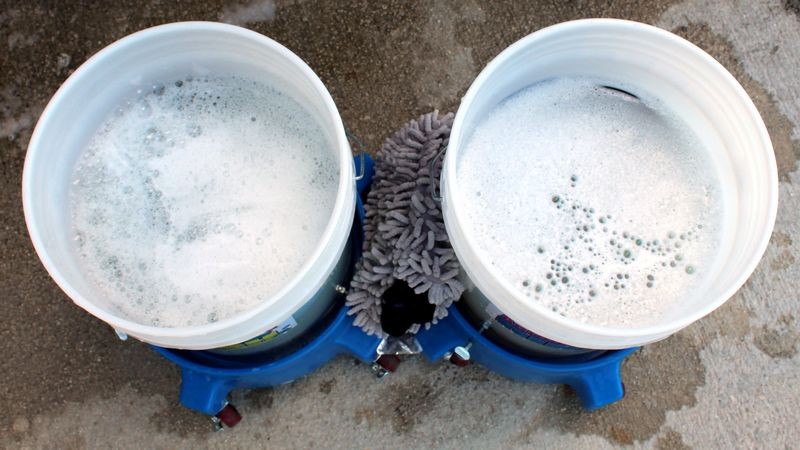
The solution - The two bucket method
While the single bucket method will get your car clean, the two bucket method adds an extra bucket to the process, which adds an extra level of protection to the washing process. With one bucket you mix your car wash shampoo with water like normal. Inside the other bucket you fill with just clean rinse water. Thus you have two buckets filled, one with soapy water and one with rinse water.
The way it works
After washing a panel instead of dipping your now dirty wash mitt back into your wash bucket, instead dip it first into the rinse bucket. Swish the mitt around to loosen any dirt removed off the vehicle. As an option you can place a Grit Guard Insert and or a Grit Guard Insert with a Grit Guard Washboard inside your rinse bucket and the scrub the mitt against the washboard to thoroughly remove any accumulated dirt and roadgrime off your wash mitt.
After rinsing the mitt in the rinse water bucket, next dip the mitt into the wash bucket to gather up more soapy water and then move onto the next panel. Repeat this process as you move around the car.
Helps prevent swirls and scratches
The two bucket method adds an extra step that only takes seconds to perform but helps to prevent cross-contamination and the risk of scratching your car's delicate clearcoat finish.
How to directions with pictures
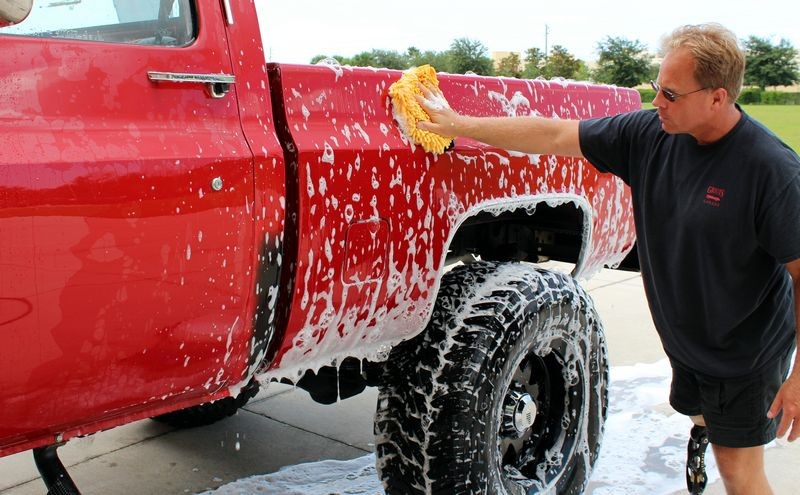
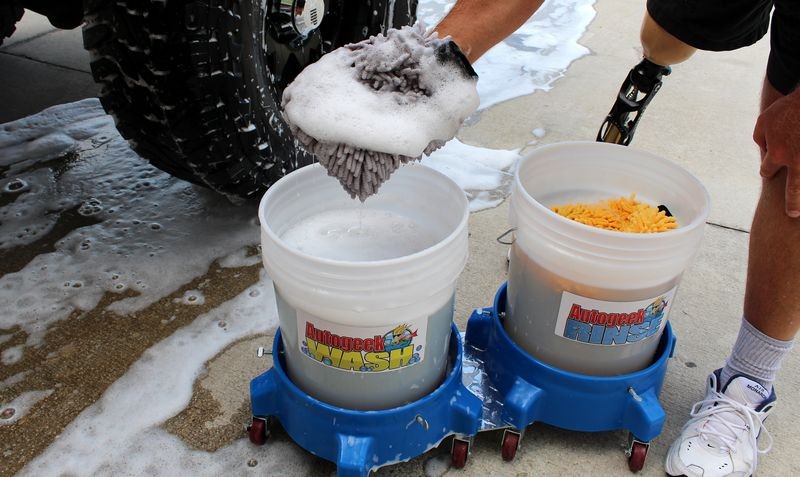
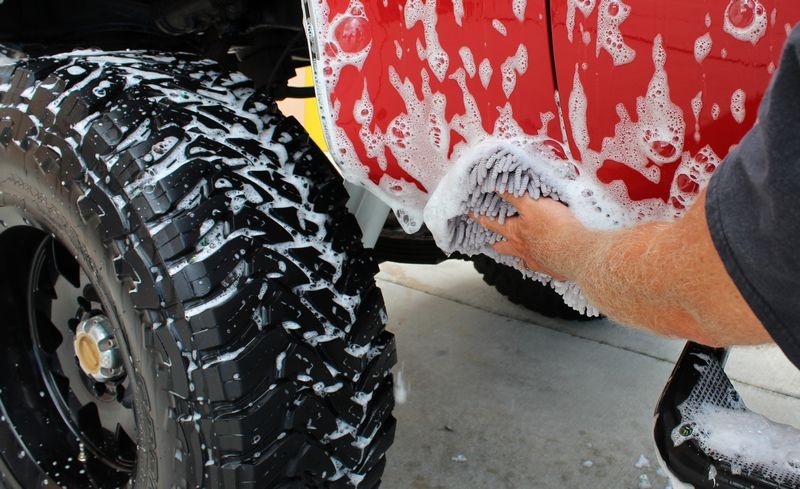
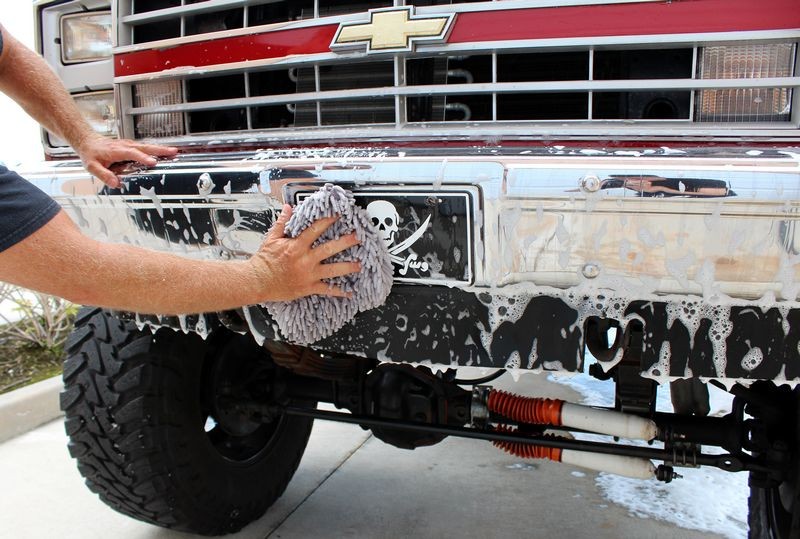
When you go to wash a body panel you always start out dipping your mitt in the bucket with soapy water and then wash a single panel.
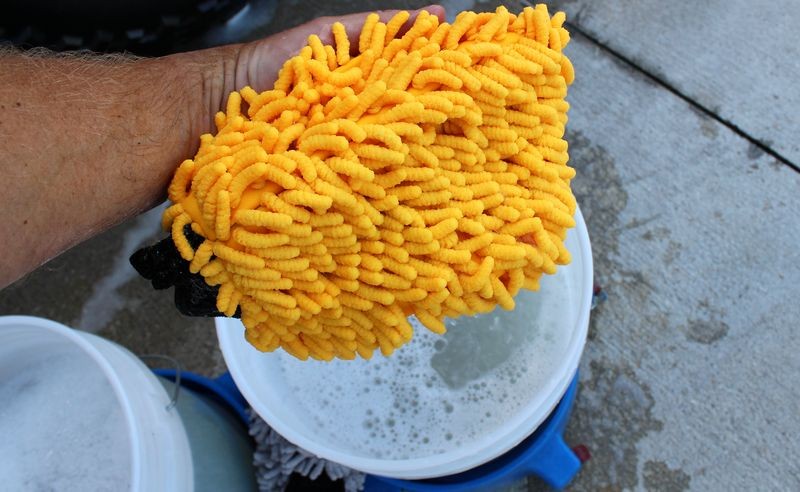
Here's a clean Microfiber Chenille Wash Mitt[IMG]
http://www.autogeekonline.net/gallery/watermark.php?file=106785[/IMG]
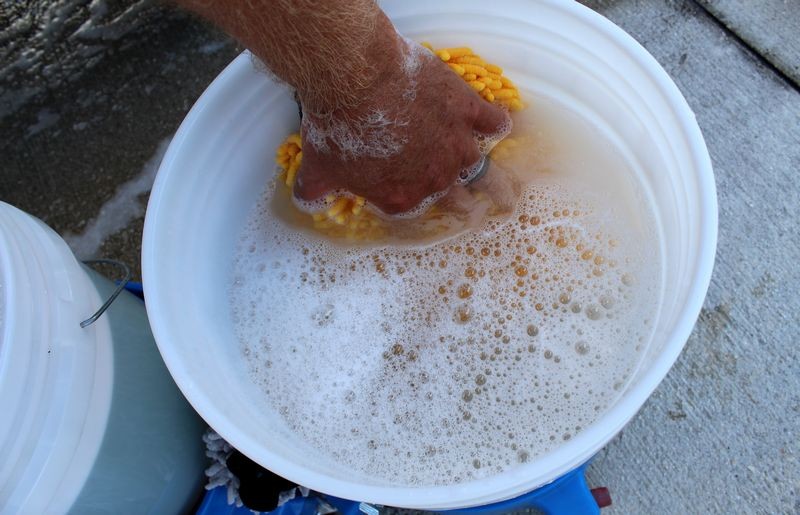
Here's soapy water gathered into and onto the mitt...
Here's washing a single panel. In this example it's the side of a truck bed.

After washing a panel, next you dunk the mitt in the clear rinse water bucket to remove the dirt that accumulated onto the mitt.
NOTE since I'm just starting the clear RINSE water bucket is EASY to identify because the water is CLEAR.

Here I am scrubbing the mitt against the Grit Guard Wash Board to remove the dirt off the mitt. Note what's happening to the clear water?
Here's my mitt, rinsed off clean and ready for the next body panel....
Now look at the buckets?
Which bucket is the wash bucket and which bucket is the rinse bucket?
It's hard to tell isn't it?
Even though they both look like they are soapy water buckets in reality one is a soap and water solution while the other is rinse water with suds floating on top.
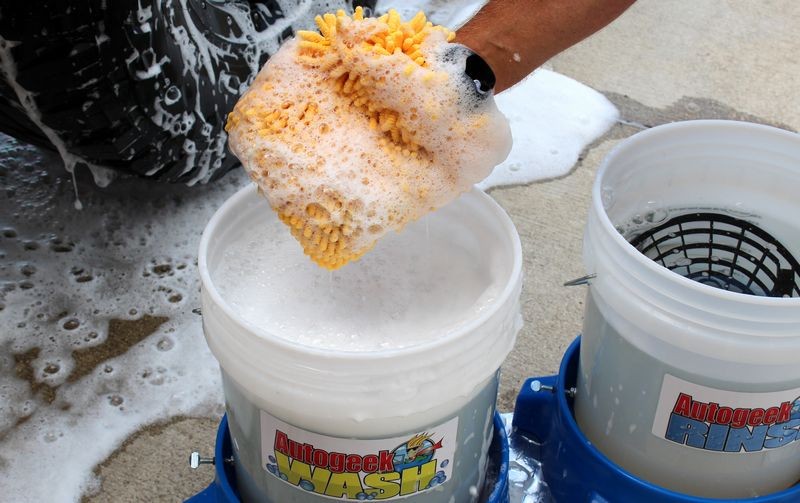
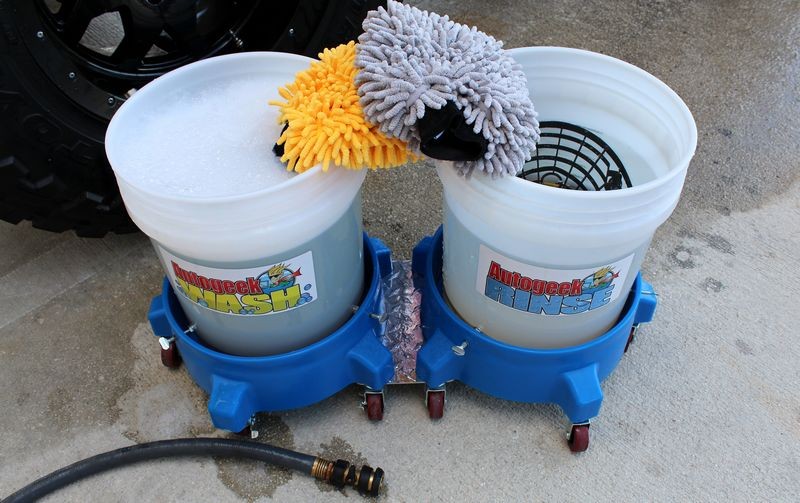
Here's a tip...
When using the two bucket method, mark the sides of your bucket to identify which bucket contains the wash water and which bucket contains the rinse water.
It's all about speed and working effectively
That's what the Autoweek WASH and RINSE labels are for, they make it fast and easy for you to visually identify which bucket is which after you start washing your car. After you dunk your wash mitt ONE TIME into the rinse water bucket without the labels you will not be able to quickly and easily tell which bucket is which.

Here's another tip - the color coding system
See that I have a gold mitt and a gray mitt?
I use the gold mitt for the upper panels, which are usually cleaner with less accumulated dirt and road grime.
When I get to the lower panels, front and rear bumpers, the rear hatch on sports utility vehicles and wagon, or fender lips, I use the gray mitt.
This is a color coding method I use to help prevent transferring the heavier dirt that accumulates on the bottom portions of a vehicle to the upper panels that tend to be a lot cleaner. This helps to prevent swirls, scratches and marring during the washing process. As you wear out your new or best wash mitt allocate it to become the new lower panel wash mitt and add a brand new wash mitt to your car washing arsenal of tools. Removing swirls and scratches can be time consuming. The cost to occasionally purchase a brand new wash mitt is far less than the time it requires to schedule a detail day to completely buff out your car to remove new swirls and scratches.
Gray mitt for the lower, dirtier portions of a vehicle.

Going overkill
If you really want to go nuts then wash the lower portions of your rig first and then start at the top of the vehicle and work your way down. Somewhere on the forum I have an article about why to do it this way but here is the nutshell version.
My natural tendency is to go the extra mile. This applies to life and washing my truck. When I'm washing the upper, cleaner panels it's natural to want to reach a little further to do more work faster. This means using my best mitt, the gold mitt to wash the lower portions and this means contaminating my best mitt with dirt off the lower panels. So one way to avoid this is to wash the lowest dirties portions of a panel first BUT don't wash the upper sections at all. Then rinse and then move to the roof and work downward. By washing the dirtiest portions first with my gray mitt there's no way I can accidentally or by trying to hard, (going the extra mile), that I can contaminate my gold mitt with dirt on the lower panels because I've already washed these areas. This is about as anal retentive as I can get or anyone can get when it comes to washing your vehicle carefully and for most it's overkill but I still thought I would throw this out there.
Drying your car - Avoid water spots
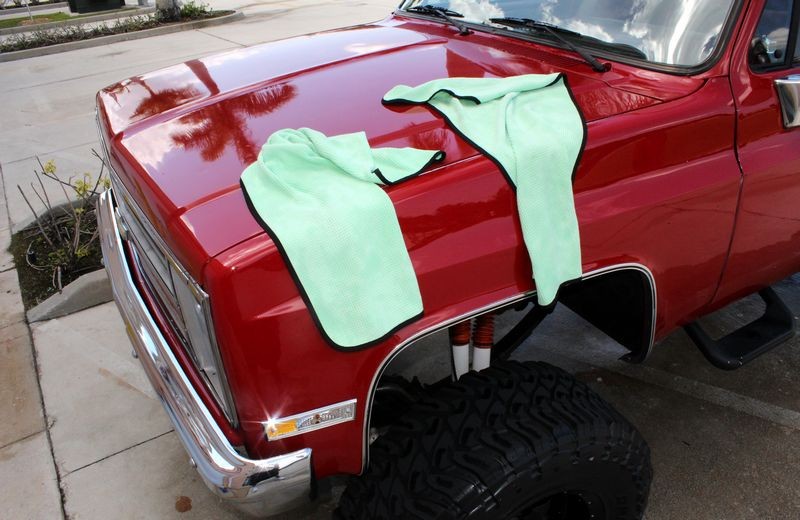
After you've completely washed and rinsed your car (or truck), be sure to dry off any standing water to avoid water spots. Water spots are the worst type of defect to have to remove if there's anything corrosive in the water. Highly contaminated city water or well water can actually leave water spots in the paint that are not spots ON the paint but ETCHINGS IN THE PAINT and the only way to remove these types of water spots is usually to machine compound the paint. That's a lot of work. It's a LOT faster and easier to simply dry the water off.
There's all kinds of tools and all kinds of ways to dry a car Here's a really simple but effective way and that's to use Guzzler Microfiber Waffle Weave Drying Towels. I dried my entire truck using two of the 20" x 40" size towels and then I'll simply throw them in the washing machine and dryer and they'll be clean and ready to use the next time I need to dry my truck or someone's car.
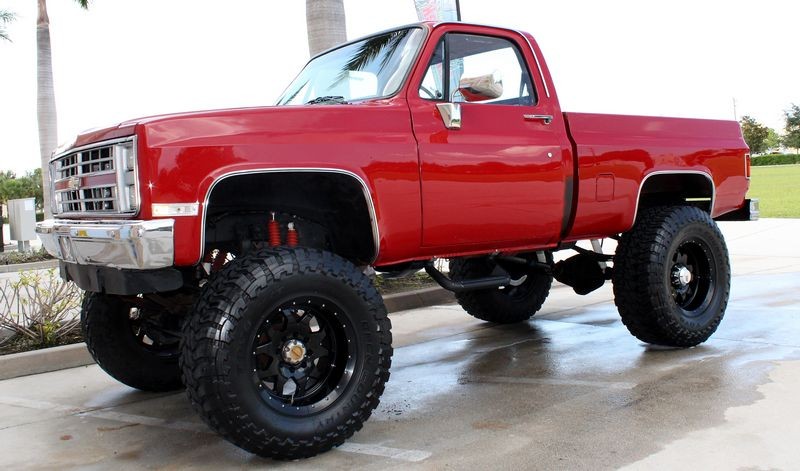
Here she is sparkling clean!
On Autogeek.com
Grit Guard® Dual Bucket Washing System - CLEAR
Grit Guard Washboard Combo
Wash & Rinse Bucket Labels
Micro-Chenille Wash Mitt 3-Pack - Choose Your Color
3 Pack The Supreme Guzzler Waffle Weave Towels, 20 x 40 inches
Questions?
Post them to this thread or call our Customer Care Staff.
1-800-869-3011
They can help you get any or all of the above plus anything else you need to take care of your car the right way.

-
Re: How to wash your car using the two bucket method
I, for no logical reason, do not like to leave soap on a panel for longer than necessary so I...
1. Wash the panel with as few strokes as necessary
2. Rinse the panel
The rest of my process is identical other than I use a leaf blower to take the majority of the water off and have a dozen drying towels that I pat dry with.
I developed this process out of "The Complete Guide to a Show Car Shine" (thanks for signing it Mike!) and went through a lot of iterations until I have a flexible process but I have a way I can get the hose, buckets, products and towels out and get the car clean and dry and towels and mitts into the washer in about 20 minutes. Its all about practice and experimentation. I only ever wash two cars so I am no prop but that doesn't mean my cars can't look like they are maintained by pros.
Is it unnecessary to rise so frequently?
My entire two bucket process is...
1. Mise en place - it is a common French term in coocking but essentially means everything in place. So i stretch the hose out, select the chemicals, select the tools.
2. I attack the wheels. Against the directions I soak each in DP wheel cleaner and then agitate with a brush and flush each wheel.
3. I use black mitt to wash wheels and tires
4. I wash the roof and rinse. Hood, rinse -- rear decklid, driver's front fender, front door, rear door, rear fender, repeat passenger's side, front of car, rear of car
5. Final rinse
6. Leaf blower takes off almost all water
7. quick pat down
8. stretch car and use detailer spray on door jambs
9. Final wipe
10. clean up
-
Re: How to wash your car using the two bucket method
 Originally Posted by rajon

I, for no logical reason, do not like to leave soap on a panel for longer than necessary so I...
1. Wash the panel with as few strokes as necessary
2. Rinse the panel
The rest of my process is identical other than I use a leaf blower to take the majority of the water off and have a dozen drying towels that I pat dry with.
I developed this process out of "The Complete Guide to a Show Car Shine" (thanks for signing it Mike!) and went through a lot of iterations until I have a flexible process but I have a way I can get the hose, buckets, products and towels out and get the car clean and dry and towels and mitts into the washer in about 20 minutes. Its all about practice and experimentation. I only ever wash two cars so I am no prop but that doesn't mean my cars can't look like they are maintained by pros.
Is it unnecessary to rise so frequently?
My entire two bucket process is...
1. Mise en place - it is a common French term in coocking but essentially means everything in place. So i stretch the hose out, select the chemicals, select the tools.
2. I attack the wheels. Against the directions I soak each in DP wheel cleaner and then agitate with a brush and flush each wheel.
3. I use black mitt to wash wheels and tires
4. I wash the roof and rinse. Hood, rinse -- rear decklid, driver's front fender, front door, rear door, rear fender, repeat passenger's side, front of car, rear of car
5. Final rinse
6. Leaf blower takes off almost all water
7. quick pat down
8. stretch car and use detailer spray on door jambs
9. Final wipe
10. clean up
The above is a GREAT way to wash a car.
Nice job outlining your process.

-
Re: How to wash your car using the two bucket method
Mike
don't think that your wash & rinse stickers went unnoticed, cool.
Carlo
-
Re: How to wash your car using the two bucket method
Originally Posted by Mike Phillips
The above is a GREAT way to wash a car.
Nice job outlining your process.
Thanks Mike! Three years later and I wash it the same way when it is above freezing. Also, thanks so much for all the information. I will be an Autogeek customer for life.
Jon
Sent from my Pixel 2 XL using Autogeekonline mobile app
Similar Threads
-
By Newcarsmell in forum Auto Detailing 101
Replies: 13
Last Post: 09-02-2019, 01:48 AM
-
By dennis hiip in forum Auto Detailing 101
Replies: 24
Last Post: 04-29-2017, 09:31 AM
-
By ihaveacamaro in forum Auto Detailing 101
Replies: 3
Last Post: 04-21-2015, 05:14 PM
-
By DRamsey in forum Auto Detailing 101
Replies: 12
Last Post: 04-06-2015, 07:16 PM
-
By AliMusa in forum Auto Detailing 101
Replies: 15
Last Post: 07-28-2013, 05:42 PM
 Members who have read this thread: 0
There are no members to list at the moment.
Posting Permissions
- You may not post new threads
- You may not post replies
- You may not post attachments
- You may not edit your posts
-
Forum Rules
|
| S |
M |
T |
W |
T |
F |
S |
| 31 |
1
|
2
|
3
|
4
|
5
|
6
|
|
7
|
8
|
9
|
10
|
11
|
12
|
13
|
|
14
|
15
|
16
|
17
|
18
|
19
|
20
|
|
21
|
22
|
23
|
24
|
25
|
26
|
27
|
|
28
|
29
|
30
| 1 | 2 | 3 | 4 |
|


 Reply With Quote
Bookmarks