 Thanks: 0
 Likes: 0
 Dislikes: 0
-
Tips and techniques for using detailing clay
Tips and Tricks for using detailing clay
The below is taken from a full write-up on detailing a 2008 Lexus IS 250 To read the entire article, click the below link.
2008 Lexus IS 250 - Pinnacle Detail - August 14th, 2009
Begin excerpt...
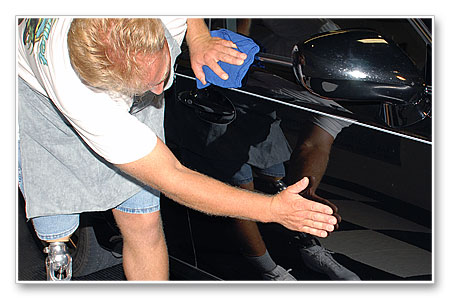
Now that the car is clean and dry we can inspect the paint by feeling the horizontal surfaces for above surface bonded contaminants as well as inspect it visually for defects like swirls, scratches and etchings.
Usually only the horizontal surfaces need to be clayed because that's where air-borne contaminants will land and accumulate over time and if not removed within a day or two, at least some contaminants will bond to the surface.

You can if you like inspect the vertical surfaces too as it is possible to accumulate contaminants like air-borne paint overspray, highway paint, tar and tree sap on these panels.
Inspection Results
After feeling all the major panels, our inspection revealed that there was only light contaminants bonded to the surface and nothing real noticeable on the vertical panels so we'll clay the horizontal panels using the Pinnacle Ultra Poly-Clay which is a very mild clay completely safe for frequent use on cars that are well kept and parked inside or under cover at least part of each day.
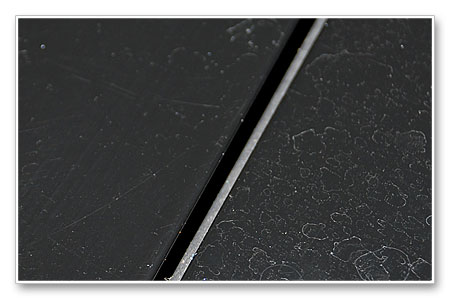
After inspecting the paint for above surface bonded contaminants we visually inspected the paint for swirls, scratches and etchings. These two photos were taken before the car was washed and most of the spots you see on the paint are mineral deposits sitting on the surface as well as some scratches (RIDS), and light swirls.

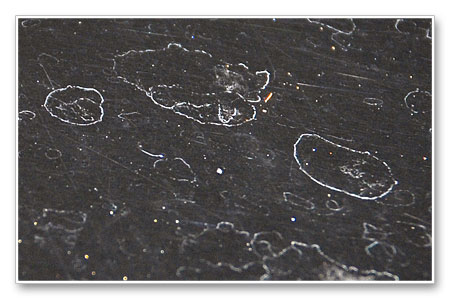
(Down below I'll post what this area looked like after claying)
After washing the car, most of the mineral deposits washed off but some did remain and claying will remove any mineral deposits still sitting on top the surface. If after claying you still see the outline of where the spots were this means the water spots actually etched the surface which means the spots are also a Type II water spot and you'll have to use a compound or swirl mark remover to remove a little paint surrounding the etchings or spots to level the surface smooth again.
Pinnacle Ultra Fine Detailing Clay can be purchased as a single 4 ounce clay bar or two 4 ounce clay bars. 4 ounces is approximately 114 grams which is very healthy chunk of clay that you can easily break into two pieces. Use one piece and save the other for another project.
Remove the cellophane wrapper

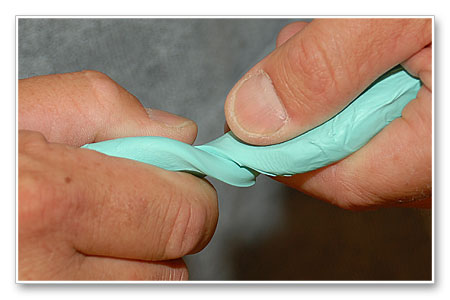
Tear the clay bar into two pieces
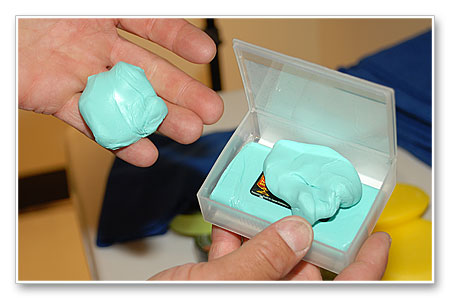
You can store your clay in the plastic container it comes in or some people like to squirt a little quick detailer into a Zip-lock baggie and store it this way as the clay can stick to the plastic container over time.
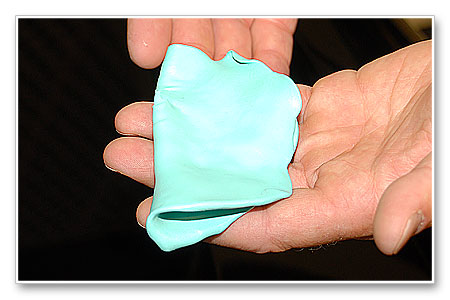
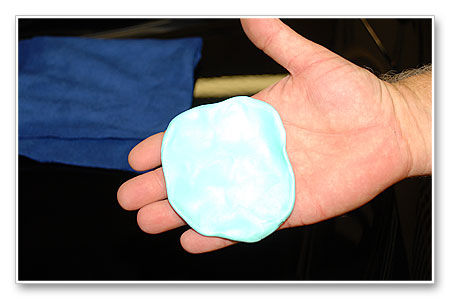
Knead the clay into a flat patty kind of like a small pancake
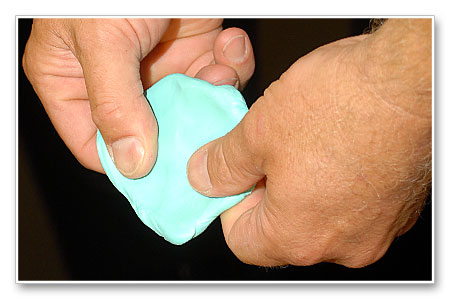
Usually a round patty of clay about 4 to 4.5 inches in diameter works well for most people.

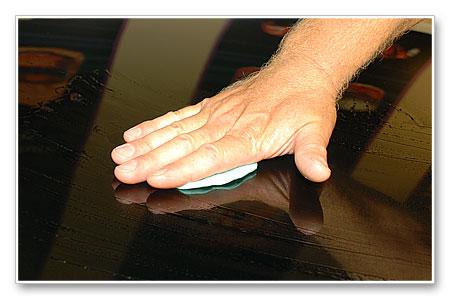
Here's a tip, place the clay patty in you hand with your fingertips extended past the edge of the patty like, I'll explain why down below.
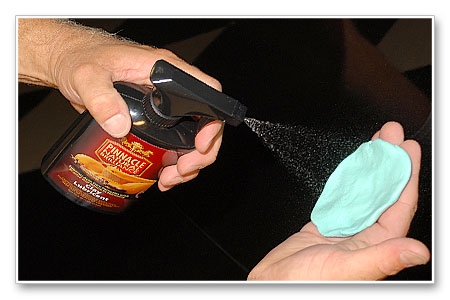
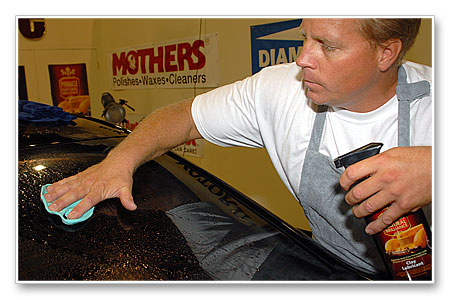
When you're ready to start claying, first mist your clay lubricant onto the face of the clay patty, in this example we're using Pinnacle Clay Lubricant.
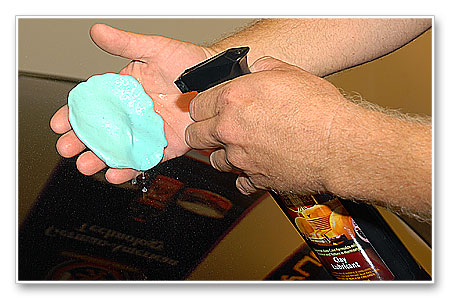
Next, spray the section you're going to clay, this is usually a section about 16" to 20" squarish in size, you don't want to tackle too large of an area at one time because you want to be thorough in your claying passes, so stick with a manageable section.
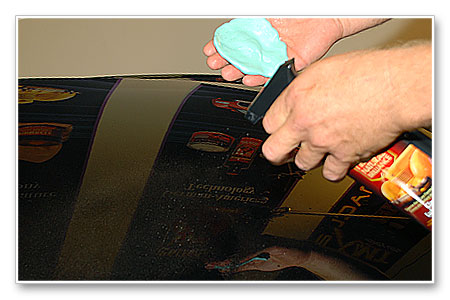
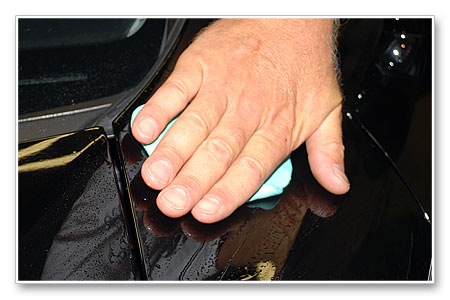
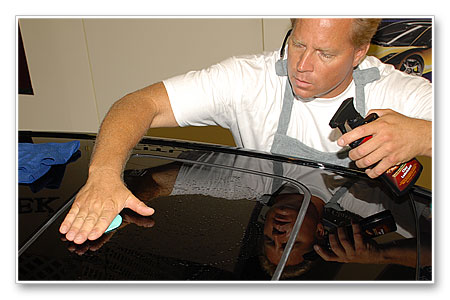
Next, using light pressure for a light light build-up of contaminants, begin moving the clay patty over the paint. You can move your hand in straight-lines or circles or a combination of both if you like. Because this detailing clay is non-abrasive to the paint, as long as everything is clean, it doesn't matter which way you move your hand because you're not instilling scratches into the paint.
In some cases you will feel the clay try to drag as you move the clay patty over the surface, this is and indicator of the clay abrading the contaminants. As the clay removes the bonded contaminants you'll notice a decrease in drag and the clay will begin to glide effortlessly over the paint. This is an indicator that this section of paint is now clean and smooth and you can stop at this time.
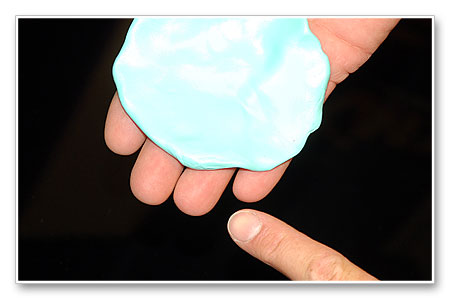
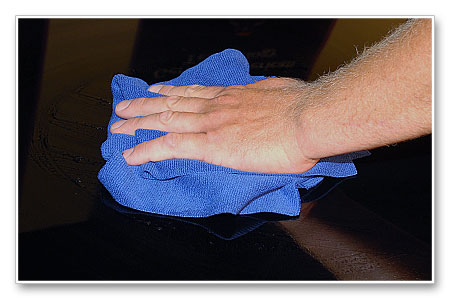
After you're finished claying this section, wipe-off the excess residue from the surface before moving on to new territory. This means having a few clean microfibers on hand and someplace clean and accessible next to the car.
After you wipe the section clean and it's dry, check the surface with a clean dry hand to insure it is in fact smooth and glassy feeling, if it is, try to remember how long you clayed the section or approximately how many strokes you used and then lock this into your memory and duplicate this to each new section you clay. Keep in mind that some bonded contaminants are more stubborn than others and may take more effort to remove or a more aggressive clay formula.
Repeat the above until you've clayed all the panels that felt contaminated wiping the clay lube residue off after claying each section.

-
Re: Tips and techniques for using detailing clay
Continued...
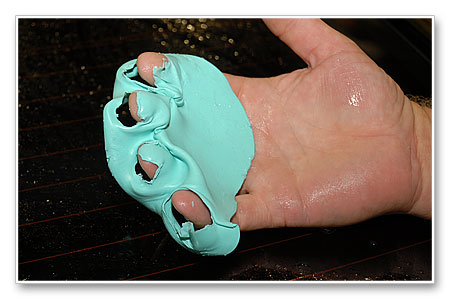
After claying each section turn your clay patty over and inspect the clay for contaminants.
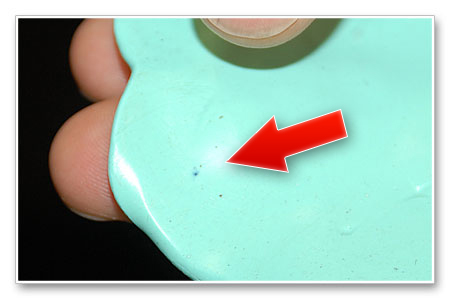
If contaminants are discovered, fold your clay in half and re-knead it to expose a fresh surface.
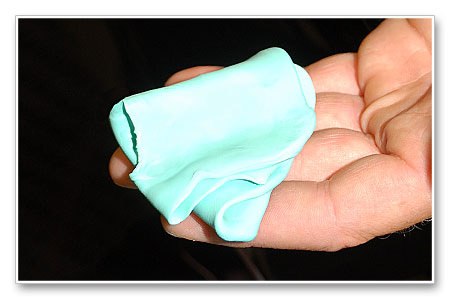
Most people come up with their own personal way to knead the clay back into a flat patty; after folding the clay in half and then in half again I like to form a ball of clay and the place the clay between my palms and then use my fingers to grab my opposing hand and then squeeze the clay ball back out into a starter patty that's small and still somewhat thick.
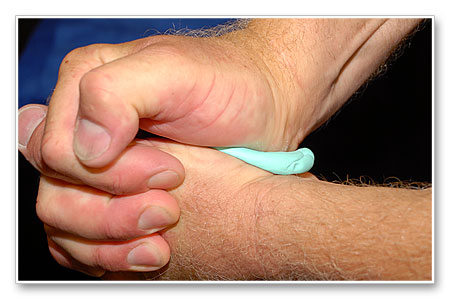
Now that I have the clay patty started I will hold the small, thick patty between my fingers and thumbs and begin methodically kneading it to again create a round patty about 4.5" in diameter.
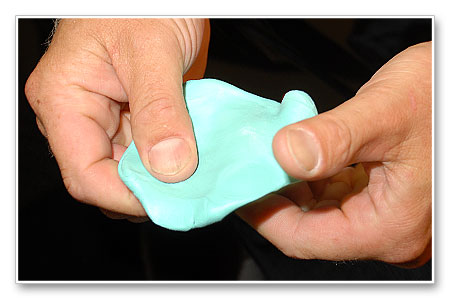
You want it to fit across the distance of your hand with your fingers next to one another like this and with your fingertips extending past the edge of the patty.
Then get back to work, the car isn't' going to clay itself. Spray some clay lubricant onto the face of the clay and then onto the section to be clayed.
Now here's why to place the clay in your hand with your fingertips extended past the edge of the clay patty. If you position the clay like this you'll apply equal pressure over the entire surface of the face of your fingers without really thinking about it and this will help to place equal pressure over the surface of the clay patty. By doing it this way you can use the patty until you decide to stop, fold the clay over and re-knead it. In other words, you're in control.
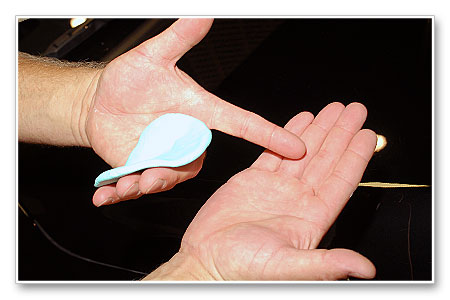
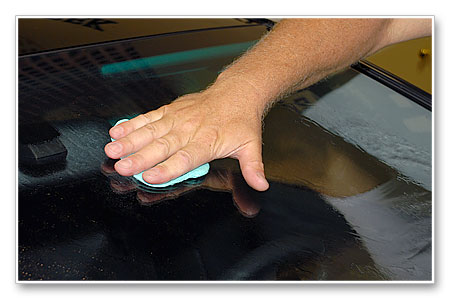
If you place your fingertips inside and on top of the clay patty, without thinking about it you tend to exert more pressure on your fingertips and you'll tend to push holes into and all the way through the clay patty.
Now you have to stop, fold the clay and re-knead it whether you were ready to re-knead it or not. Now the clay is in control.
It's just a little tip but I like to be in control of each process; you can try this technique and then make up your own mind.
If the car you're working on has any kind of vinyl graphics, stickers or pinstripes, avoid claying over them as you can easily cause the tips to lift and once the tips of any graphic has lifted it's never going to lay flat against the surface again and usually the edges will lift more and more. So be careful around graphics when claying. This also applies when working with paint care products. (Avoid rubbing paint care products over graphics)
Key Point
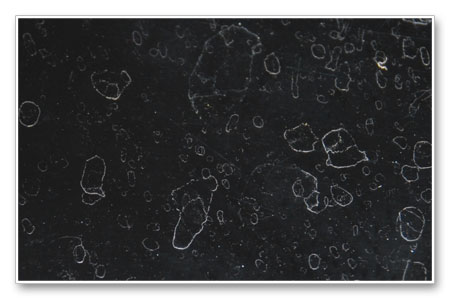
Claying removes Above Surface Bonded Contaminants. Claying does not remove Below Surface Defects like etchings, swirls and scratches. After claying we can see the water spots were not only mineral deposits on the surface, but they also left etchings in the paint. Luckily for this car they were very shallow and as our Test Spot will prove, easily removed with a light swirl mark remover.
Before washing
After washing
After claying
Claying Products
Pinnacle Ultra Fine Poly Clay - 1 four ounce clay bar
Pinnacle Ultra Fine Poly Clay - 2 four ounce clay bars
Pinnacle Clay Lube 64 oz
Pinnacle Clay Lube 128 oz.
Pinnacle Ultra Poly Clay Kit
Pinnacle Ultra Poly Clay PLUS Special
Pinnacle XMT Speed Clay
Pinnacle XMT Speed Clay Bundle
Pinnacle XMT Speed Clay Lube
64 oz. XMT Speed Clay Lube
128 oz. XMT Speed Clay Lube
Wolfgang Elastic Poly Clay Bar 200 Grams
Wolfgang Clay Combo[/b]
Wolfgang Clay Lubricant
Wolfgang Clay Lubricant 64 oz
Wolfgang Clay Lubricant 128 oz.
DP Universal Detailing Clay
DP Universal Clay Lubricant
http://www.autogeek.net/dp365.html
Meguiar's Smooth Surface Clay Kit
Mothers California Gold Clay Bar Paint Saving System - 2 Clay Bars
Griot's Garage Paint Cleaning Clay
Griot's Garage Speed Shine Detailer 35 oz.
Four Star Detailing Clay
Four Star Clay Lubricant
Meguiar's Professional Detailing Clay - Medium Grade
Meguiar's Professional Detailing Clay Aggressive
3M Perfect-It III Cleaner Clay
Further reading
How to Use Auto Detailing Clay
Video Library
Claying Video
Resources
Autogeek Online Detailing Forum
Autogeek Online Store

-
Regular Member

Re: Tips and techniques for using detailing clay
-
Re: Tips and techniques for using detailing clay
Especially good for me was the kneading, then the positioning of the clay in the hand.
Controlling the clay sure helps keep from dropping it when unexpectedly having to stop.
[I know I have to throw it away if I drop it. And I do. But, have always wondered why I can't just re-knead it and lie to the clay and tell it that the crud is from the car not the ground.]
-
Super Member

Re: Tips and techniques for using detailing clay
I like to slap my clay around to remove excess lube before kneading. 
-
Newbie Member

Re: Tips and techniques for using detailing clay
 A true car fanatic and a detailing hobbiest!
-
Junior Member

Re: Tips and techniques for using detailing clay
I finally got around to claying my car today after a 2 bucket wash method. I just got back into taking care of my car after a 9 year break...ya, almost a decade. You can imagine the contaminate build up.
I first used the White Megs Claybar from the claybar kit with the Megs Quik Detailer on my hood. It removed quite a bit, mostly a BROWN looking contaminate, but it still left the area rough. I decided to try my old Clay Magic Blue bar from 9 years ago (still works!) and it pulled out more nasty stuff. BUT, there my hood STILL had little rough spots.
I really want to get the area as clean and glassy as possible before attempting any compounds and polishes.
Are there any claybars better than the Clay Magic Blue bar that can pull out those last few rough spots? Or any other suggestions? Thanks for the help!
-
Regular Member

Re: Tips and techniques for using detailing clay
 Originally Posted by Jossy92

Especially good for me was the kneading, then the positioning of the clay in the hand.
Controlling the clay sure helps keep from dropping it when unexpectedly having to stop.
[I know I have to throw it away if I drop it. And I do. But, have always wondered why I can't just re-knead it and lie to the clay and tell it that the crud is from the car not the ground.]
Because generally, the crud from the ground is a larger particle size, and is more abrasive. Think the difference between a grain of sand vs ultra fine dust
Similar Threads
-
By Mike Phillips in forum How to articles
Replies: 11
Last Post: 12-29-2017, 11:38 AM
-
By T0RCH3D in forum Auto Detailing 101
Replies: 6
Last Post: 09-14-2012, 05:24 PM
-
By Mike Phillips in forum How to articles
Replies: 3
Last Post: 04-06-2012, 03:48 PM
-
By wiscTom in forum Auto Detailing 101
Replies: 3
Last Post: 11-05-2007, 07:29 PM
-
By cls in forum Auto Detailing 101
Replies: 4
Last Post: 06-25-2007, 07:55 PM
 Members who have read this thread: 0
There are no members to list at the moment.
Posting Permissions
- You may not post new threads
- You may not post replies
- You may not post attachments
- You may not edit your posts
-
Forum Rules
|
| S |
M |
T |
W |
T |
F |
S |
| 31 |
1
|
2
|
3
|
4
|
5
|
6
|
|
7
|
8
|
9
|
10
|
11
|
12
|
13
|
|
14
|
15
|
16
|
17
|
18
|
19
|
20
|
|
21
|
22
|
23
|
24
|
25
|
26
|
27
|
|
28
|
29
|
30
| 1 | 2 | 3 | 4 |
|


 Reply With Quote
Bookmarks