 Thanks: 0
 Likes: 0
 Dislikes: 0
-
Re: How to prime a foam pad when using a DA Polisher
 Originally Posted by Buggy Bath

So just spraying a quick detailer or lubricator is not good enough?
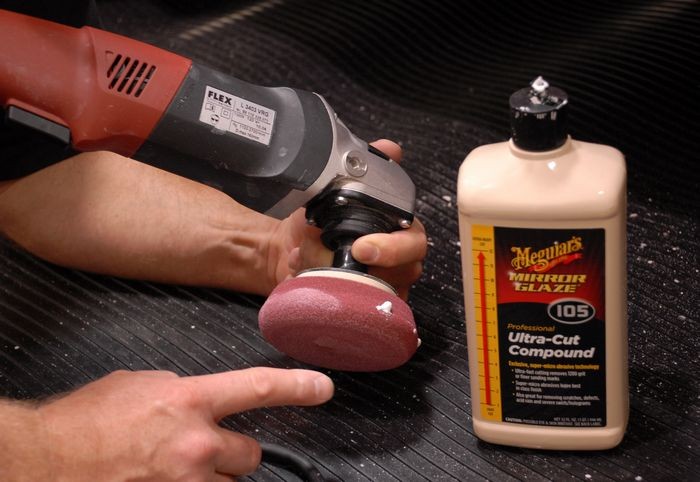
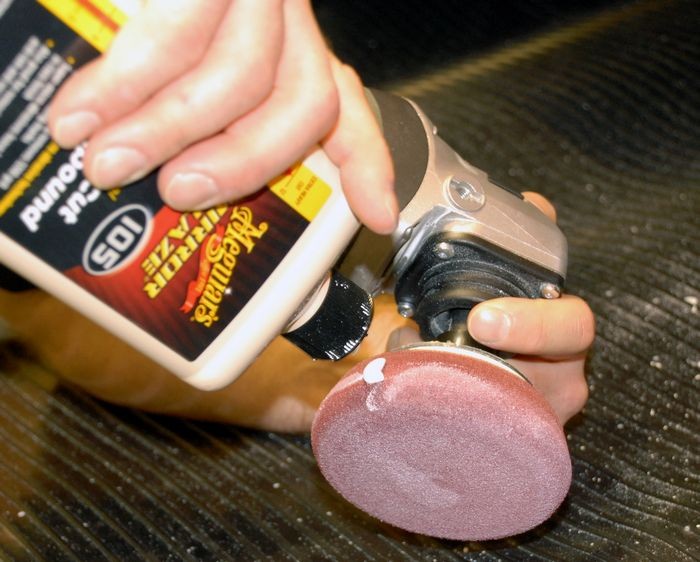
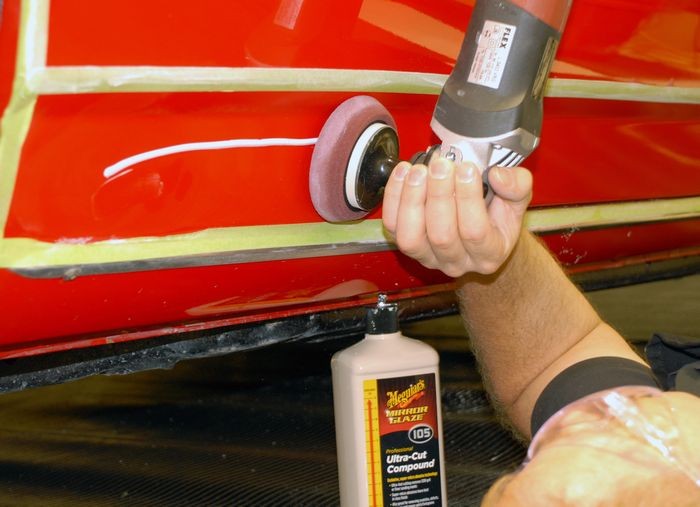
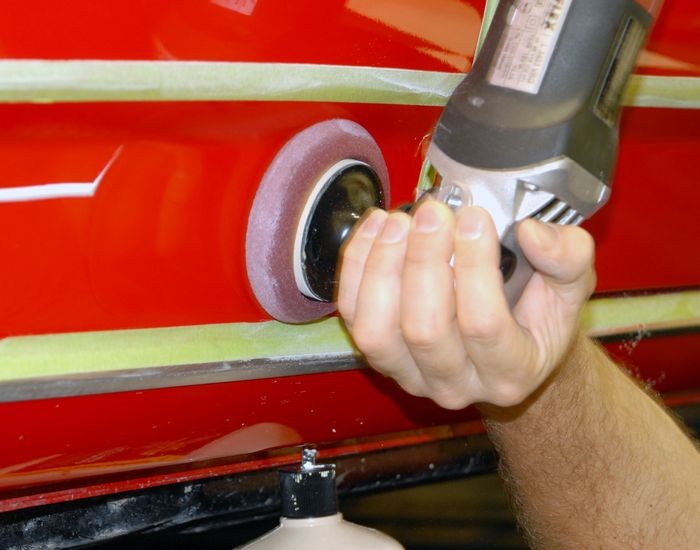
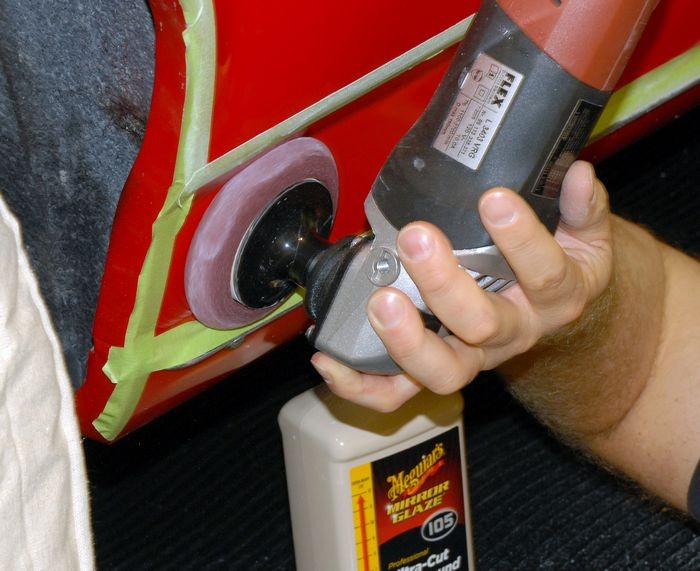
Using only a pad conditioner is an option. Some people like to prime their pad with a pad conditioner and some people like to prime their pad using the product they're going to work with. Priming with the product your going to work with ensures 100% of your buffing pad goes to work for you as soon as you turn on the polisher.
Originally Posted by Buggy Bath
Also, what is a section pass?
From this article I wrote almost 3 years ago... it's actually incredibly detailed with pretty much everything a person needs to know to buff out a car using a PC style polisher. Don't think you'll find a more detailed article on this topic and if you do it will be dated after this was posted and probably mimic the information in the article.
The Definitive How-To Article for Removing Swirls, Scratches and Water Spots Using a Porter Cable 7424XP, G110v2 or Griot's Garage Polisher
Originally Posted by Mike Phillips
The definition of a pass
There are two definitions of the word pass as it relates to machine polishing with any type of machine.
Single Pass
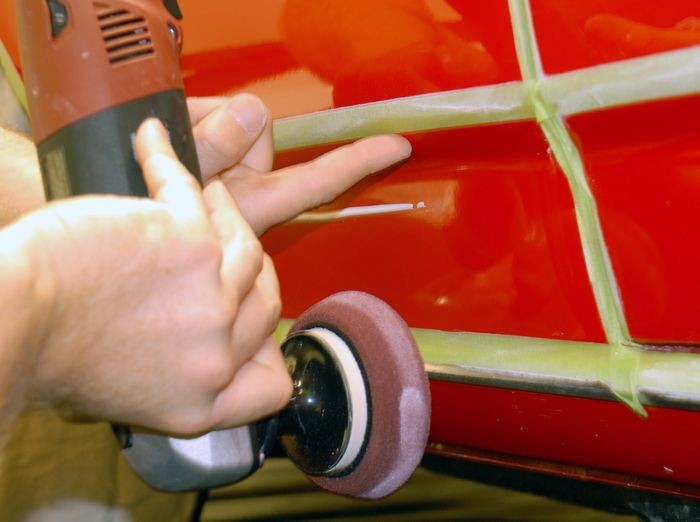
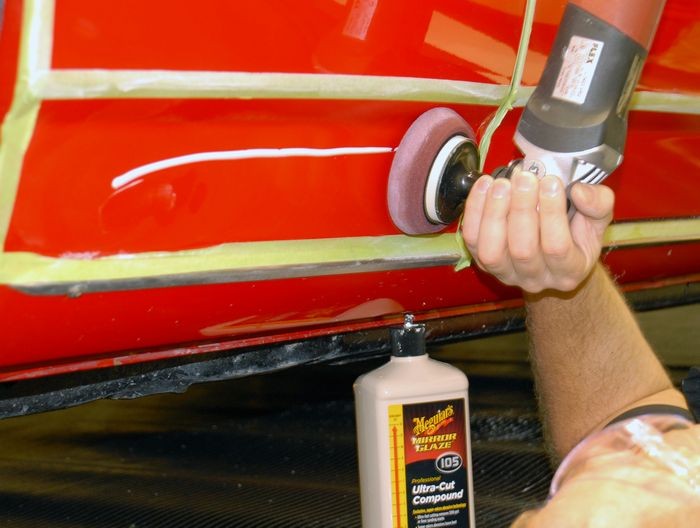
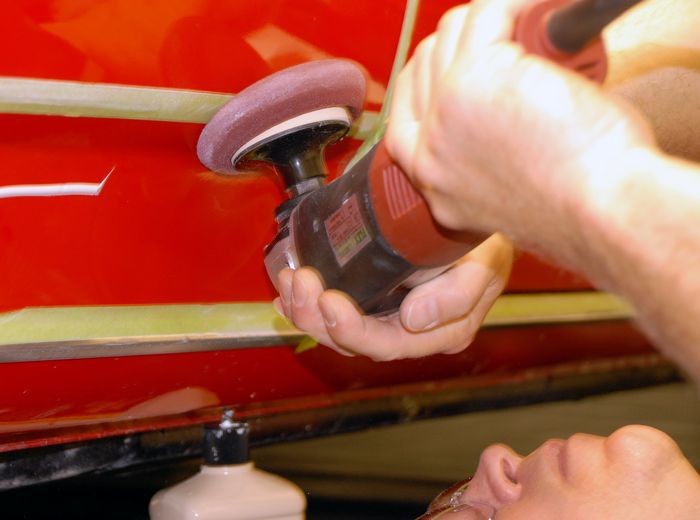
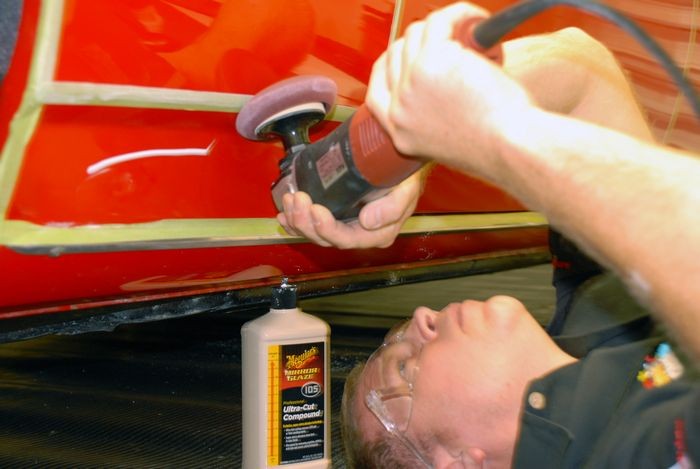
A single pass is just that. It's when you move the polisher from one side of the section you're buffing to the other side of the section you're buffing. That's a single pass.
Section Pass
A section pass is when you move the polisher back and forth, or front to back with enough single overlapping passes to cover the entire section one time. That's a section pass.
Here's how to do a "Section Pass" when trying to remove swirls, scratches and other below surface paint defects.
How to do a Section Pass
-
Regular Member

Re: How to prime a foam pad when using a DA Polisher
Thank you, Mike. I appreciate it.
-
Re: How to prime a foam pad when using a DA Polisher
could onr be used to prime a foam buffing pad
-
Re: How to prime a foam pad when using a DA Polisher
I've seen the Meguiars guys spray #34 Final Inspection on pads prior to putting them on the paint. Is XMT conditioner similar to an instant detailer and can any instant detailer be used as a pad conditioner?
-
Re: How to prime a foam pad when using a DA Polisher
Originally Posted by jim2752
could onr be used to prime a foam buffing pad
Not sure about that product for that purpose. Depends upon how AR you want to get. Dr. David Ghodoussi would have the correct answer, I could check with him. Dr. David Ghodoussi is PhD Organic Chemist and only he know what the ingredients are inside the ONR formula. Point being is machine buffing creates heat to some level, more so with a rotary buffer than any other tool but they all create heat to some level. So the question is, how does any liquid and the ingredients inside the liquid react to heat and the product you're introducing them to, i.e. compound or polish.
Big picture is it's probably not a problem because you control the dilution level of the ONR and you could always make a weak solution.
Here's a commercial we made for Optimum Polymer Technologies, I wrote the script and did my best to instill confidence in the TV viewing audience that Dr. David Ghodoussi is someone you can trust with your car care needs.
Optimum Polymer Technologies
Originally Posted by feds27
I've seen the Meguiars guys spray #34 Final Inspection on pads prior to putting them on the paint.
This is correct. I always post this so here goes again... look what "line" M34 is in? The Professional Body Shop Line, that means no silicones, no ingredients that could cause surface adhesion issues in a "Fresh Paint Environment", M34 is as virgin as you can get when it comes to a spray detailer and Meguiar's does state it can be used as a pad conditioner.
Originally Posted by feds27
Is XMT conditioner similar to an instant detailer
I've never been told or read anywhere that XMT Pad Conditioner is a spray detailer.
Originally Posted by feds27
and can any instant detailer be used as a pad conditioner?
The idea behind any pad conditioner is to soften a stiff, dry or coarse pad to make is softer and less aggressive to the paint when first starting out with a dry pad, this is mostly important when using a foam cutting pad. I'm not a chemist so I'm just guessing that besides water, there must be some type of wetting agents and lubricating agents plus something that could slow down evaporation via heat. Just a guess...

-
Re: How to prime a foam pad when using a DA Polisher
Mike, great article!! A few questions I have though.
First off, I did read the forum rules, so no linking. However if my questions are not appropriate please delete them.
I am just starting out with my PC, thus I have only the pads I need at the moment.
The pads I use have raised foam hexagons in them, with valleys between each hexagon. Im sure you know which I am speaking of. Either way, I have been starting with an "X" of product like you recommend, then "Kissing" the paint to spread product a little. Then shooting my pad with detail spray. After that I put the pad to paint and, using a low setting, spread product out and move into my section passes.
Should I be priming the whole pad up? Or is my current method safe? After my first section pass the pad seems to be loaded up well enough to use only 3 pea-sized drops per panel after that.
I am happy with my current results of method and product selection, but if theres a better way, why not do it?
-
Re: How to prime a foam pad when using a DA Polisher
Originally Posted by glittle75
Mike, great article!! A few questions I have though.
First off, I did read the forum rules, so no linking. However if my questions are not appropriate please delete them.
The only questions that are not appropriate would be questions that break forum rules, I can't imagine someone posting questionst that would break forum rules unless they were here for nefarious reasons.
Originally Posted by glittle75
I am just starting out with my PC, thus I have only the pads I need at the moment.
The pads I use have raised foam hexagons in them, with valleys between each hexagon. Im sure you know which I am speaking of. Either way, I have been starting with an "X" of product like you recommend, then "Kissing" the paint to spread product a little.
Then shooting my pad with detail spray.
After that I put the pad to paint and, using a low setting, spread product out and move into my section passes.
Should I be priming the whole pad up?
Personal preference. Big picture is this,
If you apply product in an X-pattern, or a Circle-Pattern INSTEAD of applying and working a film of product over the entire face of the pad, the big picture is this, after a few passes, the product spreads out and at some point 100% of the pad surface area is working to remove swirls.
If you prime the entire face of a clean, dry pad the from the moment you turn the polisher on the 100% of the pad is removing swirls. It's a small difference in my opinion and for decades people have been successfully buffing out cars using the method Meguiar's has taught ever since this tool has been around.
Meguiar's introduced the tool, Meguiar's started the X-Pattern method of getting some product onto the pad to buff out a car, it's worked for around 20 to 30 years now.
The bigger picture is this... as long as you're using quality products, the right tool and good pads PLUS the right technique you're going to remove swirls no matter how you place the product onto your pad an no matter how you choose to prime the pad if at all.
This isn't rocket science, all we're doing is pushing abrasives around on the surface and removing paint.
Originally Posted by glittle75
Or is my current method safe?
You're current method will work.
Originally Posted by glittle75
After my first section pass the pad seems to be loaded up well enough to use only 3 pea-sized drops per panel after that.
Correct, the pad becomes wet with product so now the pad is lubricated, that is wet with product. That's the opposite of clean and dry and thus not lubricated.
Originally Posted by glittle75
I am happy with my current results of method and product selection, but if theres a better way, why not do it?
A lot of people like to spread some product out over the entire surface of a clean, dry pad to make sure 100% of the pad is both,
- Lubricated with product
- Coated with an equal amount of abrasives
Again, big picture is this... millions of people have buffed out their cars using DA Polishers and knowing NOTHING about any of the techniques we're talking about in this thread. They simply put some product on the pad making a Smilie face, place the pad against the paint and then turn the machine on and in more cases than not they get the swirls removed.
If they don't get the swirls removed it's not a matter of how they primed or didn't prime the pad it has more to do with one of the below items I listed when I wrote the original version of this on MOL, here's the current version...
Read through this and make sure you're not making any of the common mistakes...
DA Polisher Trouble Shooting Guide
When you're first starting out machine polishing and learning to use a DA Polisher it's common to have questions about your results and your results are directly tied to your technique.
Here's a list of the most common problems,
1. Trying to work too large of an area at one time.
2. Moving the polisher too fast over the surface.
3. Using too low of speed setting for removing swirls.
4. Using too little downward pressure on the head of the polisher.
5. Using too much downward pressure on the head of the polisher so the pad quits rotating.
6. Not holding the polisher in a way to keep the pad flat while working your compound or polish.
7. Using too much product or using too little product.
8. Not cleaning the pad often enough. Here's a list of the solutions in matching order,
1. Trying to work too large of an area at one time.
Shrink the size of your work area down. You can't tackle to large of an area at one time. The average size work area should be around 20" by 20". Most generic recommendations say to work an area 2' by 2' but for the correction step, that's too large. You have to do some experimenting, (called a Test Spot), to find out how easy or how hard the defects are coming out of your car's paint system and then adjust your work area to the results of your Test Spot. The harder the paint the smaller the area you want to work.
2. Moving the polisher too fast over the surface.
For removing defects out of the paint you want to use what we call a Slow Arm Speed. It's easy and actually natural for most people new to machine polishing to move the polisher quickly over the paint but that's the wrong technique. One reason I think people move the polisher too quickly over the paint is because they hear the sound of the motor spinning fast and this has psychological effect which causes them to match their arm movement to the perceived fast speed of the polisher's motor.
Another reason people move the polisher too quickly over the paint is because they think like this,
"If I move the polisher quickly, I'll get done faster"
But it doesn't work that way. Anytime you're trying to remove swirls, scratches, water spots or oxidation using a DA Polisher you need to move the polisher s-l-o-w-l-y over the paint.
3. Using too low of speed setting for removing swirls.
When first starting out many people are scared of burning or swirling their paint, so they take the safe route of running the polisher at too low of a speed setting but this won't work. The action of the polisher is already g-e-n-t-l-e, you need the speed and specifically the pad oscillating and rotating over the paint as well as the combination of time, (slow arm speed), together with the abrasives, the pad aggressiveness, and the downward pressure to remove small particles of paint which is how your remove below surface defects like swirls or scratches.
Removing below surface defects is a leveling process where you need the abrasives to take little bites out of the paint and to get the abrasives to take these little bites with a tool that uses a Free Floating Spindle Bearing Assembly you need all of the above factors working for you including a high speed setting.
4. Using too little downward pressure on the head of the polisher.
For the same reason as stated in #3, people are scared, or perhaps a better word is apprehensive, to apply too much downward pressure to the polisher and the result of too little pressure is no paint is removed thus no swirls are removed.
5. Using too much downward pressure on the head of the polisher so the pad quits rotating.
If you push too hard you will slow down the rotating movement of the pad and the abrasives won't be effectively worked against the paint. You need to apply firm pressure to engage the abrasives against the paint but no so much that the pad is barely rotating. This is where it's a good idea to use a permanent black marker to make a mark on the back of your backing plate so your eyes can easily see if the pad is rotating or not and this will help you to adjust your downward pressure accordingly.
Correct technique means finding a balance of applying enough downward pressure to remove defects but not too much downward pressure as to stop the rotating movement of the pad.
This balance is affected by a lot of factors like the lubricity of the product you're using, some compounds and polishes provide more lubrication than others and this makes it easier to maintain pad rotation under pressure.
Another factor that can affect pad rotation are raised body lines, edges and curved surfaces as anytime you have uneven pressure on just a portion of the face of the pad it can slow or stop pad rotation. This is where experience comes into play and experience comes from time spent behind the polisher.
6. Not holding the polisher in a way to keep the pad flat while working your compound or polish.
Applying pressure in such a way as to put too much pressure to one edge of the pad will cause it to stop rotating and thus decrease abrading ability.
7. Using too much product or using too little product.
Too much product hyper-lubricates the surface and the result is that abrasives won't effectively bite into the paint but instead will tend to skim over the surface. Overusing product will also accelerate pad saturation as well increase the potential for slinging splatter onto adjacent panels.
Too little product will means too little lubrication and this can interfere with pad rotation.
Again there needs to be a balance between too much product and too little product and finding this balance comes from reading articles like this one, watching videos an most important, going out into the garage and putting in time behind the polisher and as you're buffing with specific product and pad combinations, pay attention to pad rotation.
8. Not cleaning the pad often enough.
Most people simply don't clean their pad often enough to maximize the effectiveness of their DA Polisher. Anytime you're abrading the paint you have two things building up on the face of your buffing pad,
As these to things build up on the face of the pad they become gummy and this has a negative affect on pad rotating plus makes wiping the leftover residue on the paint more difficult. To maintain good pad rotation you want to clean your pad often and always wipe-off any leftover product residue off the paint after working a section. Never add fresh product to your pad and work a section that still has leftover product residue on it.
Pad Cleaning Articles
Why it's important to clean your pads often...
How to clean your foam pad on the fly
How to use the Grit Guard Universal Pad Washer
-
Could or should this priming be used for rotarys? I've the picking up the bead, and was wondering if this priming should be done
-
Re: How to prime a foam pad when using a DA Polisher
-
Re: How to prime a foam pad when using a DA Polisher
Bumping a old old thread.
I recently bought a porter cable, proper pads, m105 and m205. I've done a lot of reading on the forums and watched videos and this is the first thread I saw where you prime the pad as Mike did in the first post. Is that not saturating the pad too much? afte priming the pad as Mike did why would you add pea sized drops, wouldn't the primed pad have more than enough product to start working?
The reason I'm asking is cause the videos I watched were the Junkman paint correction videos and he primed pad with 4 drops and quickly spread over his work area.
Im not saying Mikes way is wrong or Junkman is right, I'm just looking for some clarification
Thx in advance
Similar Threads
-
By Mike Phillips in forum How to articles
Replies: 2
Last Post: 11-16-2019, 10:31 AM
-
By geoguy in forum Auto Detailing 101
Replies: 12
Last Post: 03-07-2019, 02:51 PM
-
By Mike Phillips in forum Ask your detailing questions!
Replies: 20
Last Post: 01-10-2017, 11:26 AM
-
By 39 Chev in forum Auto Detailing 101
Replies: 8
Last Post: 08-07-2015, 10:46 PM
-
By NLS8520 in forum Ask your detailing questions!
Replies: 6
Last Post: 05-24-2013, 02:35 PM
 Members who have read this thread: 0
There are no members to list at the moment.
Posting Permissions
- You may not post new threads
- You may not post replies
- You may not post attachments
- You may not edit your posts
-
Forum Rules
|
| S |
M |
T |
W |
T |
F |
S |
| 31 |
1
|
2
|
3
|
4
|
5
|
6
|
|
7
|
8
|
9
|
10
|
11
|
12
|
13
|
|
14
|
15
|
16
|
17
|
18
|
19
|
20
|
|
21
|
22
|
23
|
24
|
25
|
26
|
27
|
|
28
|
29
|
30
| 1 | 2 | 3 | 4 |
|


 Reply With Quote


Bookmarks