 Thanks: 0
 Likes: 0
 Dislikes: 0
-
Newbie Member

 How to make your stanless steel door sills look brand new How to make your stanless steel door sills look brand new
The stainless steel door sills on the Cayenne were in pretty bad shape, so I started looking for options to bring them back into respectable condition.
This is what they all looked like before I started:

So after some research and a little trial and error as well this is what I did:
Step 1: Wet sand with 150 grit sandpaper:
This is enough to take out even pretty deep scratches, although some may require a little more pressure in the affected area to get rid of)

Step 2: Wet sand with 220 grit sandpaper

For both of the above steps I used Diablo Palm sander sheets that I had lying around.
I wrapped the sandpaper around a sponge sanding block to ensure even distribution of pressure.
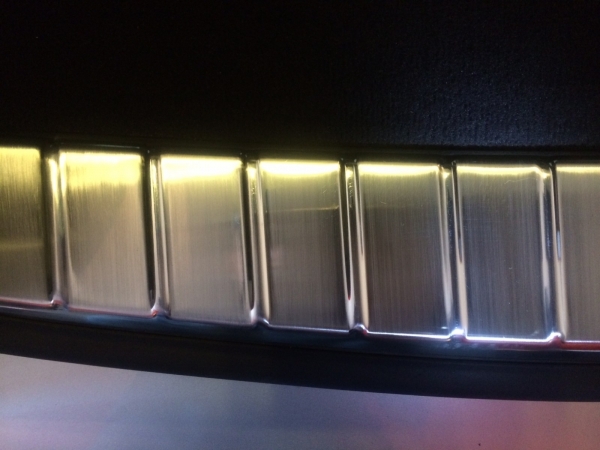
If you are very careful and linear with your motion you can achieve a nice brushed finish as can be seen in the picture.
I actually did this with the trunk trim (pictures later in the post), but for the door sills I wanted a high gloss finish.
For Steps 3 and 4 I used the Eastwood Automotive Polishing Kit Eastwood Buffing Kit - Paint Buffing Kits - Buffing and Polishing Kit
I also used a Craftsman Pro variable speed drill (running at 2500 RPM)
Step 3: Polish with Tripoli (brown) compound and the large round (cylindrical) buff
I do 4 very slow passes with a good amount of downward pressure, followed by 6 more passes reducing the pressure each time, thus allowing the buff to spin increasingly faster with each pass.
This step polishes out most of the 220 Grit sanding marks, but still leaves a slightly hazy appearance.

Step 4: Polish with White Rouge and the spiral sewn wheel.
I do 2 passes with medium pressure, followed by another 4 passes with reduced pressure allowing the wheel to spin faster each time. This results in a high gloss, mirror finish.


For the trunk I wet sanded with 150 to get the deep scratches out, then I polished with brown compound, to smooth it out a little and then went back with 220grit to get the brushed effect.
I didnt have time to finish it off completely today, but here are some pics in the interim. I should have taken some before pics, but basically this area was even worse than the door sills before I started.

 VW
VW: 1990 Golf II CSX, BMW: 1999 323i, 2000 325i, 2001 525i, 2004 120i, 2005 530i, 2007 550i, 2009 X6 xDrive 35i Porsche: 2011 Panamera, 2012 Panamera 4S
-
Super Member

Re: How to make your stanless steel door sills look brand new
Nice work!!
2016 Accord EXL V6 w/Navi & Sensing - Black/Ivory
2019 Acura RDX A-Spec - Black/Red; 2019 Acura TLX Base 2.4L - MSM/Black
2008 CRV EX - Black/Black 2003 Accord EX V6 - Black/Tan
-
Super Member

Re: How to make your stanless steel door sills look brand new
Great wright up 
-
Super Member

Re: How to make your stanless steel door sills look brand new
Nice job on that sill. You think we can get away with using any other compound/polish besides the kit?
 Click on image to view work
-
Super Member

Nice write up, you could seal in your work. Meg's Ultimate or Menzerna Power lock.
You could even clear coat it. I can't find the picture of the metal truck, but when I asked them how they did it. They said we just clear coated it. Which made sense.
Just my opinion, but you don't want to leave metal just exposed like that. So seal it
Keep it up
Art
-
Super Member

Re: How to make your stanless steel door sills look brand new
Great idea! I will definitely use this. Thanks!!
2012 Dodge Challenger RT Classic Bright Silver
2018 Ford F150 Xlt Sport 4X4 Magnetic Grey

-
Super Member

Re: How to make your stanless steel door sills look brand new
I have done many stainless trim parts for my cars and lots more to do.I use these products as well as the rouges.It cuts sanding time in half.The Trizact bands have a short life span for the money but it does speed the process.
Expander Wheel Alone
Eastwood Company: Search Results for 13115c#inproducts
"Chrome wheeled, fuel injected and steppin' out over the line"
-
Newbie Member
Re: How to make your stanless steel door sills look brand new
 Originally Posted by wdmaccord

Nice work!!
Originally Posted by Pureshine
Great wright up
Originally Posted by Cg6LeMoN
Nice job on that sill. You think we can get away with using any other compound/polish besides the kit?
Thanks everyone.
I think it would need to be a hard paste product at least, else it will be spraying all over the place 
I did actually try a couple of paint compounds with a 3 inch GG orbital initially (following the least aggressive first - approach) but that was of no use at all given the depth of the scratches.
I think the key is high RPM at 90 degrees to the plane of the surface, and the ability to apply a good bit of pressure.
Originally Posted by hernandez.art13
Nice write up, you could seal in your work. Meg's Ultimate or Menzerna Power lock.
You could even clear coat it. I can't find the picture of the metal truck, but when I asked them how they did it. They said we just clear coated it. Which made sense.
Just my opinion, but you don't want to leave metal just exposed like that. So seal it
Keep it up
Art
Thanks - very good point. I will be adding some sealant this week. Still trying to decide which one...
I didn't want to clear coat it because I know it will inevitibly get scratched again, so I prefer to be able to go back and repair areas as needed without having to strip the whole thing.
Originally Posted by hoyt66
Great idea! I will definitely use this. Thanks!!
Originally Posted by 57BORNTORUN
Thanks - will take a look.
VW: 1990 Golf II CSX, BMW: 1999 323i, 2000 325i, 2001 525i, 2004 120i, 2005 530i, 2007 550i, 2009 X6 xDrive 35i Porsche: 2011 Panamera, 2012 Panamera 4S
-
Wow impressive. Only one sanding step and the rest used compound? There's no scratches at all even with that aggressive sanding step and no sanding following? I don't have any experience with polishing SS.
-
Super Member

Re: How to make your stanless steel door sills look brand new
Similar Threads
-
By wgasa84 in forum Auto Detailing 101
Replies: 8
Last Post: 08-06-2017, 04:40 PM
-
By frankprozzoly in forum Auto Detailing 101
Replies: 6
Last Post: 07-20-2014, 05:35 PM
-
By andy2485 in forum Auto Detailing 101
Replies: 12
Last Post: 05-21-2013, 09:54 PM
-
By Cat ji in forum Auto Detailing 101
Replies: 8
Last Post: 08-11-2011, 05:58 AM
-
By CLipster in forum Auto Detailing 101
Replies: 12
Last Post: 10-08-2010, 03:53 PM
 Members who have read this thread: 0
There are no members to list at the moment.
Posting Permissions
- You may not post new threads
- You may not post replies
- You may not post attachments
- You may not edit your posts
-
Forum Rules
|
| S |
M |
T |
W |
T |
F |
S |
| 31 |
1
|
2
|
3
|
4
|
5
|
6
|
|
7
|
8
|
9
|
10
|
11
|
12
|
13
|
|
14
|
15
|
16
|
17
|
18
|
19
|
20
|
|
21
|
22
|
23
|
24
|
25
|
26
|
27
|
|
28
|
29
|
30
| 1 | 2 | 3 | 4 |
|


 Reply With Quote
Bookmarks