 Thanks: 0
 Likes: 0
 Dislikes: 0
-
I am officially lost
Ok guys I'm hoping to get some help here on what products I need to purchase to meet my goals. First though a little background on me. Never detailed my cars before. In fact I've been the type of person who's happy when it rains, because my car gets washed! Recently had some mechanical issues on my bmw that got me a $2000.00 quote from the local mechanic. This motivated me to go out and buy tools, and parts and do this work myself. Crawling around under my bmw got me taking a much closer look at the car and realizing what a crappy job I've done taking care of such a nice automobile. I am now motivated to get my car, and my wife's car both cleaned up and looking their best.
I've already purchased a few items, before I stumbled across this community. I plan on finishing buying everything i need from the autogeek store (could have saved some money if I found this place first  ). I have taken some pictures of the problem areas of our cars to show you guys what I am working with. I will also include a list of what I already have. I've found all the wonderful tutorials on this website and read a lot, but I'm still thoroughly confused on what products and steps I'll need to take to get my cars looking good again. Both vehicles are daily drivers that get about 20k miles a year. Neither vehicle is garaged. Both spend a lot of time in large public parking lots too unfortunately. We live in the central valley in northern California, so weather isn't bad. ). I have taken some pictures of the problem areas of our cars to show you guys what I am working with. I will also include a list of what I already have. I've found all the wonderful tutorials on this website and read a lot, but I'm still thoroughly confused on what products and steps I'll need to take to get my cars looking good again. Both vehicles are daily drivers that get about 20k miles a year. Neither vehicle is garaged. Both spend a lot of time in large public parking lots too unfortunately. We live in the central valley in northern California, so weather isn't bad.
My car has some pretty serious issues on both bumpers. I've been hit in the rear of the car while I was in a restuarant. Hit in the front of the car while I was at work. Have door dings on both sides of my car. And scratches from god knows what. Wiper rash and scratches on my windshield. Some water spots but not bad. I don't really have many swirls though, because I never washed my car!! I have no delusions of making my bumpers look perfect, and I'm not paying a body shop a ton of money to fix up a car with 110k miles on it. Here are the pictures of my BMW:


I had a couple more photos, but the internet seems to hate me today. In addition to what I posted my wife's car has severe waterspots on several windows.
I purchased a Griots Garage Random Orbital Polish & Wax Kit. From what I understand however everybody recommends buying a 5 inch backing plate and 5.5 inch pads. I would like to be able to use the pads the kit comes with, but it isn't a complete deal breaker. Here is the stuff I have in my garage right now:
Meguiar's ultimate quick detailer
turtle wax ice car wash
Meguiar's supreme shine high gloss protectant
Meguiar's perfect clarity glass cleaner
Griot's leather care
Griot's interior cleaner
25 pack of 80/20 microfiber towels
3 gallon bucket
pair of microfiber wash mitts.
What I hope to accomplish in no particular order:
Clean the glass of both cars. I believe I have settled on duragloss 755, not sure what pads to use with it. I was thinking the Griot's 3 pack of 6.5 inch white glass pads.
Headlight restoration on my car only. Bought my wife new headlight assemblies and led lights for Christmas. I have a 3m kit with sanding discs and polish in my garage. I think I would like to get a 3 inch backing plate to speed this process up. What pads would I need to get for the rubbing compound in the kit?
I've seen brushes that hook to your drill or da polisher for carpet and upholstery. Any recommendations on what brand to pick up?
I was thinking 303 spot remover and 303 fabric guard for cleaning and protecting carpets, but again would like recommendations on what is preferred around here.
What would I use for the outside trim? The bondo black restore seems popular on amazon.
I have no idea what I am supposed to be using on tires and wheels. The wheels on my BMW are completely covered in brake dust right now. I'll be switching to low dust ceramic pads eventually, but I'll need to get that cleaned up in the mean time.
The most confusing part for me is the paint. I know the machine polish 3 is probably too fine of a polish for the scratches and chips in my paint. Should I be buying Meguiar's m105? Or is there something else I need to try? Even more lost on pads. I've seen microfiber pads, foam pads, flat pads, waffle pads. I'm lost.
Lastly I would like protection that does not have to be reapplied frequently. I know the best of show wax probably isn't it. I would like to use it however, so maybe a sealant on the paint first? I know the Klasse twins are popular, but I'm going to be spending quite a bit of money as it is, so I was looking at Meguiar's m21. It is cheaper and seems to be well liked.
I know this is an extremely long post, with a whole lot of questions, but I really appreciate you guys taking the time to read this and help me out! Thanks and Merry Christmas!
-
Super Member

Re: I am officially lost
New to detailing:
Your car clearly has some damage.
Correcting the damage within your skills, experience level, and willingness to research and learn will be a step by step process.
So focus on the damage last, end prepare to address it after completing all the detailing steps necessary.
Steps:
- Proper Wash Methods.
The majority of paint and clear coat damage occurs in the simple washing process.
So, research proper wash methods and decide which one to use.
As time goes on, experiment with the great products offered here at AG such as rinseless washes and waterless washes.
Most Common Wash Methods:
1. Two Bucket, Grit Guard, Wash Mitt
2. Garry Dean method.
- Wheels, Tires, and Wheel Wells.
You should actually begin the exterior car washing process by cleaning these areas first.
Use wheel and tire specific brushes and cleaning products for these areas.
Degreasers and APC cleaners are great for this as well.
Pay attention to the wheel wells.
These can be hard to reach and collect a tremendous amount of dirt, grease, tar, and contaminants of all kind.
Can also be very time consuming to completely clean.
For wheel wells, Degreasers and APC cleaners are your friend.
A pressure washer and maybe even a steam cleaner might be needed to fully clean.
As time goes on, consider coatings for the wheel well locations.
This can make cleaning and decontamination much easier.
Consider a finishing product such as tire dressing for the tires, and a spray wax or detail spray for the wheels.
Consider the wheel wells for some type of finish product application.
Glass cleaners can often work great as an LSP for wheels and wheel wells in regards to appearance.
Not all glass cleaners are created equal, so keep that in mind.
Some brand glass cleaners will wow you for their ability to reflect and leave a shiny appearance, and last for a long time.
Others, even with well known names in the industry, can leave you unimpressed.
- Exterior Body Wash:
1. The cleaner the water, the better the result.
Distilled water and/or deionized water will produce a result that tap water just cannot compete with, and without leaving water spots.
2. Steam is your friend.
Pick yourself up a decent steamer.
You can get cheap hand held ones for less than $40 that will do a great job.
3. You have to have the right towels.
Microfiber towels are the way to go.
Not all microfiber towels are the same.
Pay attention to terms like weave, denier, pile, nap, etc.....
Don't over think it, but put some thought into it.
4. Never clean any surface on your car with a dirty towel.
If you wet down a panel, and begin to use a wipe all over approach with a clean towel, you will simply take the dirt from the panel that the towel is picking up and wipe it all over the panel.
This will simply scratch and mar paint and clear coat.
So, approach with a microfiber towel folded, giving you eight sides.
Complete single passes, constantly flipping the towel as you begin a new pass.
Start at the top of each panel, and work in straight lines, front to back.
Work your way down to the bottom of each panel.
Once the panel is completely free of dirt, feel free to use a wipe all over approach for drying or for adding additional steps of products.
5. Finish towel buffing:
This is often the difference in a finish that looks good, or a finish that adds a "wow" factor.
Final buffing not only levels of any product applied to each panel, but can remove any liquids that have made their way onto unintended locations.
This while over the expanse of time washing the vehicle.
Degreasers are particularly bad about seeping from crevices, and are something to watch out for.
- Exterior Decontamination:
Washing does very little to actually clean your car.
Washing mainly removes loose dirt and debris.
It is the decontamination process that actually provides cleaning of the vehicle's exterior.
How far you go with the decontamination process depends on what level of clean you are looking for.
The more steps you take, the better results you will get, and the more protection your vehicle's exterior will have as a results of contaminants not being present to commit damage to your paint and clear coat.
The most common and basic exterior decontamination steps necessary for best results are:
1. Bug and Tar Remover
2. Clay Bar with high lubricity product.
3. Iron removal, such as using Iron-X.
- Exterior Finishing:
What finishing approach you take depends on the condition and needs of your vehicle, or simply what you are willing to do.
All things being equal, the following steps are recommended.
1. Cut to the chase:
This is going straight for the finish application.
Typically include any of the following:
A). Applying an exterior detail spray.
B). Applying a spray wax.
C). Applying a premium wax, such as a hard wax.
2. Compound, Polish, and Wax.
Pretty straight forward.
Intended to remove all surface scratches, marring, swirl marks, etc...
Leaves a polished, glossy look and is then protected by the finish wax application.
How much you get out of it depends on how much you put into it.
Requires an understanding of the products, pads, and machines being used.
Also requires an understanding of how to work clean, and properly dispose of waste when finished.
3. Complete Paint Correction.
This includes compound, polishing and waxing, but is so much more.
This is using electronic tools to measure the depth of the paint / clear coat and compounding and/or polishing to level the paint / clear coat to a uniform depth.
Also includes steps such as wet sanding and complete scratch repair.
In more extreme cases, light body and paint work is required, and this actually falls under the auto detailing umbrella.
- Cleaning Auto Glass:
1. Initial cleaning using product of choice.
2. Clay Bar with high lubricity application.
3. Re clean with auto glass cleaner.
4. Final buff.
- Headlight Restoration:
This is not hard to do.
It does take some necessary preparation steps.
You can do this by hand or with machine.
Typically, both hand and machine applications are needed.
Hand applications for the edges are common.
You can use headlight restoration kits, or if you are familiar with wet sanding, compounds and polishes, you can move ahead without the kit.
Kits are great, and are highly recommended for first time headlight restorations.
Most headlight restorations are done with the headlights left in place.
In situations where the headlights are easily accessible and easily removable, consider this an option.
When left in place, make sure to mask off the surrounding external areas of the body.
When raising the hood, make sure the engine bay is completely covered as to not allow "sling" to make its way into the engine bay.
Be careful when applying tape to any panel surface as there is always a risk that paint/clear coat can be lifted and removed from the panel, when removing the tape.
Also consider any rubber or plastic trim that may be in the immediate area of the headlight.
Be sure to protect all surfaces from "sling" that can occur.
- Interior:
Starting out, focus on quality foam cleaners for carpet and upholstery, and surface panel cleaners for each type of surface presented.
You will need various interior cleaning brushes of all kinds, and a good wet&dry vacuum.
Pay attention to what glass cleaner you choose, as it would need to be safe for all window tinting.
As time goes on, I recommend a good steamer, extractor, air compressor and attachment tools, and a Tornador.
-
Re: I am officially lost
Thank you for such a thoughful and detailed reply.
I'll be buying a foam cannon to use with my pressure washer. Washing according to the methods I've learned from reading on this website.
I have to bleed the brakes soon, I was going to replace my brake lines, and front brakes at the same time. I figured I could hose everything down with brake cleaner while I'm at it. What would you recommend I coat the wheel wells with? Also do you have any specific recommendations on tire care products before I simply start experimenting?
What's the purpose of the steamer?
I'm good with the towels for interior use. I don't know if they're soft enough for buffing out the paint though. Might buy some more expensive towels for that. I went through about a dozen towels when detailing the interior of my car so I wouldn't be just spreading the dirt around.
I've got clay bar and lube in my da kit. Didn't even think about bug and tar remover. Probably a good idea though. I drive 2 hours a day past cattle ranches, orchards, and fields. In the spring there are so many bugs hitting the car it frequently sounds like it's raining. Not joking. Is the Iron-X completely necessary? Not sure I completely understand what it does differently from clay, and it seems to be pricey.
For exterior finish my plan was to compound, polish and seal according to the flow chart I found here on autogeek. Didn't know more serious scratch and paint repair was under the detailing umbrella. Is the damage I showed something that can be repaired by DIY methods? This part of the detailing process is easily the most confusing to me and the part that I need the most help with identifying what products to purchase.
When my box shows up I'll have Griot's machine polish 3, and best of show wax. So I'll need a compound. I have no clue what's a good match for the condition of my paint, and the polish I'll be using. I know Meguiar's m105, m205, and ultimate compound are all very popular products though. I also don't have a clue what pads are going to be needed for this process or how many of them. I'll have one orange 6.5" cutting pad, and a red polishing pad that come with the orbital. That's probably not enough I'm assuming, and from everything I've read not even the right size of pads. If I could use those pads and save some money then great, but I'll fork over for the correct 5.5" pads to get the job done right. Can you recommend what pads, and compound I'll need. Also will I need any other polishes or will machine polish 3 do the trick?
I'm going to put the time in to detail both of our vehicles properly, and it's going to be several days worth of work. With this is mind I want to do things correctly the first time.
As far as glass cleaning my windows and windshield are very clean right now. There is some wiper rash that I can see clearly now, and I didn't even know it existed before I cleaned my windshield thoroughly. My wife's windows are awful with water spots. I'm going to polish that out with duragloss nu-glass, and Griot's white glass polishing pads, unless someone suggests otherwise.
I have a 3m kit with sandpaper and rubbing compound to do my headlights with. I though getting a 3 inch backing plate and whatever pads are needed would simply speed that up and make it easier. Not sure what pads to buy however.
Any recommendations on brushes or foam cleaners for the interior? My car interior is pretty good right now after spending a couple hours on it the other day. Smells great, and everything is shiny. The carpet isn't perfect though, because I don't have any attachments for my shop vac. I've got to order in some different sized ends so I can reach everything that needs cleaning. I was thinking about getting a brush to attach to the DA to clean the carpets with as well. Any thoughts on that approach?
Again thank you so much for taking the time to read through this.
 Originally Posted by vanev

New to detailing:
Your car clearly has some damage.
Correcting the damage within your skills, experience level, and willingness to research and learn will be a step by step process.
So focus on the damage last, end prepare to address it after completing all the detailing steps necessary.
Steps:
- Proper Wash Methods.
The majority of paint and clear coat damage occurs in the simple washing process.
So, research proper wash methods and decide which one to use.
As time goes on, experiment with the great products offered here at AG such as rinseless washes and waterless washes.
Most Common Wash Methods:
1. Two Bucket, Grit Guard, Wash Mitt
2. Garry Dean method.
- Wheels, Tires, and Wheel Wells.
You should actually begin the exterior car washing process by cleaning these areas first.
Use wheel and tire specific brushes and cleaning products for these areas.
Degreasers and APC cleaners are great for this as well.
Pay attention to the wheel wells.
These can be hard to reach and collect a tremendous amount of dirt, grease, tar, and contaminants of all kind.
Can also be very time consuming to completely clean.
For wheel wells, Degreasers and APC cleaners are your friend.
A pressure washer and maybe even a steam cleaner might be needed to fully clean.
As time goes on, consider coatings for the wheel well locations.
This can make cleaning and decontamination much easier.
Consider a finishing product such as tire dressing for the tires, and a spray wax or detail spray for the wheels.
Consider the wheel wells for some type of finish product application.
Glass cleaners can often work great as an LSP for wheels and wheel wells in regards to appearance.
Not all glass cleaners are created equal, so keep that in mind.
Some brand glass cleaners will wow you for their ability to reflect and leave a shiny appearance, and last for a long time.
Others, even with well known names in the industry, can leave you unimpressed.
- Exterior Body Wash:
1. The cleaner the water, the better the result.
Distilled water and/or deionized water will produce a result that tap water just cannot compete with, and without leaving water spots.
2. Steam is your friend.
Pick yourself up a decent steamer.
You can get cheap hand held ones for less than $40 that will do a great job.
3. You have to have the right towels.
Microfiber towels are the way to go.
Not all microfiber towels are the same.
Pay attention to terms like weave, denier, pile, nap, etc.....
Don't over think it, but put some thought into it.
4. Never clean any surface on your car with a dirty towel.
If you wet down a panel, and begin to use a wipe all over approach with a clean towel, you will simply take the dirt from the panel that the towel is picking up and wipe it all over the panel.
This will simply scratch and mar paint and clear coat.
So, approach with a microfiber towel folded, giving you eight sides.
Complete single passes, constantly flipping the towel as you begin a new pass.
Start at the top of each panel, and work in straight lines, front to back.
Work your way down to the bottom of each panel.
Once the panel is completely free of dirt, feel free to use a wipe all over approach for drying or for adding additional steps of products.
5. Finish towel buffing:
This is often the difference in a finish that looks good, or a finish that adds a "wow" factor.
Final buffing not only levels of any product applied to each panel, but can remove any liquids that have made their way onto unintended locations.
This while over the expanse of time washing the vehicle.
Degreasers are particularly bad about seeping from crevices, and are something to watch out for.
- Exterior Decontamination:
Washing does very little to actually clean your car.
Washing mainly removes loose dirt and debris.
It is the decontamination process that actually provides cleaning of the vehicle's exterior.
How far you go with the decontamination process depends on what level of clean you are looking for.
The more steps you take, the better results you will get, and the more protection your vehicle's exterior will have as a results of contaminants not being present to commit damage to your paint and clear coat.
The most common and basic exterior decontamination steps necessary for best results are:
1. Bug and Tar Remover
2. Clay Bar with high lubricity product.
3. Iron removal, such as using Iron-X.
- Exterior Finishing:
What finishing approach you take depends on the condition and needs of your vehicle, or simply what you are willing to do.
All things being equal, the following steps are recommended.
1. Cut to the chase:
This is going straight for the finish application.
Typically include any of the following:
A). Applying an exterior detail spray.
B). Applying a spray wax.
C). Applying a premium wax, such as a hard wax.
2. Compound, Polish, and Wax.
Pretty straight forward.
Intended to remove all surface scratches, marring, swirl marks, etc...
Leaves a polished, glossy look and is then protected by the finish wax application.
How much you get out of it depends on how much you put into it.
Requires an understanding of the products, pads, and machines being used.
Also requires an understanding of how to work clean, and properly dispose of waste when finished.
3. Complete Paint Correction.
This includes compound, polishing and waxing, but is so much more.
This is using electronic tools to measure the depth of the paint / clear coat and compounding and/or polishing to level the paint / clear coat to a uniform depth.
Also includes steps such as wet sanding and complete scratch repair.
In more extreme cases, light body and paint work is required, and this actually falls under the auto detailing umbrella.
- Cleaning Auto Glass:
1. Initial cleaning using product of choice.
2. Clay Bar with high lubricity application.
3. Re clean with auto glass cleaner.
4. Final buff.
- Headlight Restoration:
This is not hard to do.
It does take some necessary preparation steps.
You can do this by hand or with machine.
Typically, both hand and machine applications are needed.
Hand applications for the edges are common.
You can use headlight restoration kits, or if you are familiar with wet sanding, compounds and polishes, you can move ahead without the kit.
Kits are great, and are highly recommended for first time headlight restorations.
Most headlight restorations are done with the headlights left in place.
In situations where the headlights are easily accessible and easily removable, consider this an option.
When left in place, make sure to mask off the surrounding external areas of the body.
When raising the hood, make sure the engine bay is completely covered as to not allow "sling" to make its way into the engine bay.
Be careful when applying tape to any panel surface as there is always a risk that paint/clear coat can be lifted and removed from the panel, when removing the tape.
Also consider any rubber or plastic trim that may be in the immediate area of the headlight.
Be sure to protect all surfaces from "sling" that can occur.
- Interior:
Starting out, focus on quality foam cleaners for carpet and upholstery, and surface panel cleaners for each type of surface presented.
You will need various interior cleaning brushes of all kinds, and a good wet&dry vacuum.
Pay attention to what glass cleaner you choose, as it would need to be safe for all window tinting.
As time goes on, I recommend a good steamer, extractor, air compressor and attachment tools, and a Tornador.
-
Super Member

Re: I am officially lost
Easy long lasting protection:
You mentioned about protection that you don't need to apply often, I would personally recommend Blackfire Wet Diamond sealant, I have used it with great results. I have been using Pinnacle Synergy wax recently and really love the look and effect. Once you have some experience applying sealant and wax properly, mainly very very thin coats. I would suggest Wolfgang's coating. I have it on my wheels and front lower panels and it was super easy to apply. I read claims of lasting 2-3 years on one application. This will provide excellent hydrophobic protection, washing will be so easy for you.
Onto your other question:
I would say that paint decontamination of iron is necessary even after claying. Claying removes above surface contamination that is bonded to the paint. Check out the "Baggie test." when these contaminates are removed some still remain that Claying could not remove.
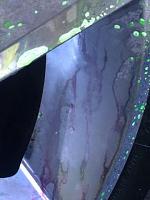
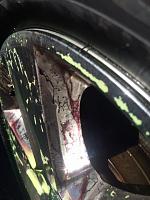
I did a test on my aunts car to show how much Claying leaves behind. I didn't use iron x, but Sonax wheel cleaner that removes iron. If you are not familiar with the product, it sprays on green, then turns red/purple when in contact with iron. It is similar to iron x but a wheel cleaner. The pictures below are of the tested wheel. I have a before picture, the wheel was cleaned with regular wheel cleaner(not shown) then clayed. I then used Sonax to test what contamination was left behind. The final pictures are the finished wheel after it was polished.
As you will see Claying did not remove all the contamination. All that iron and crud from the brake dust and road grime had seriously degraded the wheels. She never washed her car in 2 years. The car was bought new, and already the wheels were trashed and in need of polishing to being back the shine. Removing that extra contamination that claying didn't remove is critical if you want to have nice wheels that don't have CC failure in a few years. Most importantly, after doing all of that work to clean your wheels. YOU MUST SEAL/COAT THEM. If you just clean and walk away the next drive you are back to where you started. Sealing or coating will keep dirt off the CC also make cleaning much easier.
My aunts wheels needed about 45 minutes of cleaning total. My coated, maintained wheels require at most 15-20 total. Sometimes 5-10 depending on the weather and where I drive.
I hope I was able to answer some of your questions!
Donnie
-
Super Member
Re: I am officially lost
Originally Posted by Berstuck
Thank you for such a thoughful and detailed reply.
I'll be buying a foam cannon to use with my pressure washer. Washing according to the methods I've learned from reading on this website.
I have to bleed the brakes soon, I was going to replace my brake lines, and front brakes at the same time. I figured I could hose everything down with brake cleaner while I'm at it. What would you recommend I coat the wheel wells with? Also do you have any specific recommendations on tire care products before I simply start experimenting?
What's the purpose of the steamer?
I'm good with the towels for interior use. I don't know if they're soft enough for buffing out the paint though. Might buy some more expensive towels for that. I went through about a dozen towels when detailing the interior of my car so I wouldn't be just spreading the dirt around.
I've got clay bar and lube in my da kit. Didn't even think about bug and tar remover. Probably a good idea though. I drive 2 hours a day past cattle ranches, orchards, and fields. In the spring there are so many bugs hitting the car it frequently sounds like it's raining. Not joking. Is the Iron-X completely necessary? Not sure I completely understand what it does differently from clay, and it seems to be pricey.
For exterior finish my plan was to compound, polish and seal according to the flow chart I found here on autogeek. Didn't know more serious scratch and paint repair was under the detailing umbrella. Is the damage I showed something that can be repaired by DIY methods? This part of the detailing process is easily the most confusing to me and the part that I need the most help with identifying what products to purchase.
When my box shows up I'll have Griot's machine polish 3, and best of show wax. So I'll need a compound. I have no clue what's a good match for the condition of my paint, and the polish I'll be using. I know Meguiar's m105, m205, and ultimate compound are all very popular products though. I also don't have a clue what pads are going to be needed for this process or how many of them. I'll have one orange 6.5" cutting pad, and a red polishing pad that come with the orbital. That's probably not enough I'm assuming, and from everything I've read not even the right size of pads. If I could use those pads and save some money then great, but I'll fork over for the correct 5.5" pads to get the job done right. Can you recommend what pads, and compound I'll need. Also will I need any other polishes or will machine polish 3 do the trick?
I'm going to put the time in to detail both of our vehicles properly, and it's going to be several days worth of work. With this is mind I want to do things correctly the first time.
As far as glass cleaning my windows and windshield are very clean right now. There is some wiper rash that I can see clearly now, and I didn't even know it existed before I cleaned my windshield thoroughly. My wife's windows are awful with water spots. I'm going to polish that out with duragloss nu-glass, and Griot's white glass polishing pads, unless someone suggests otherwise.
I have a 3m kit with sandpaper and rubbing compound to do my headlights with. I though getting a 3 inch backing plate and whatever pads are needed would simply speed that up and make it easier. Not sure what pads to buy however.
Any recommendations on brushes or foam cleaners for the interior? My car interior is pretty good right now after spending a couple hours on it the other day. Smells great, and everything is shiny. The carpet isn't perfect though, because I don't have any attachments for my shop vac. I've got to order in some different sized ends so I can reach everything that needs cleaning. I was thinking about getting a brush to attach to the DA to clean the carpets with as well. Any thoughts on that approach?
Again thank you so much for taking the time to read through this.
Foam Cannon and Pressure Washer:
Good choice.
Be a little careful with a pressure washer.
Make sure to choose the right nozzle tip, stay at a safe distance away from the paint as to not damage it, and never place your hand in directly in front of the nozzle tip while the pressure washer is running.
- Towels:
It will take some trial and error in choosing and using the correct towels for cleaning your vehicle.
Sometimes what specs on a chosen towel for a specific task comes down to preference, and nothing more.
I suggest a three towel type approach for washing a vehicle.
One type for the initial cleaning and that will get dirty.
A second type for a wipe all over approach, used for drying or further cleaning.
A third type of towel for final buffing.
- Coatings:
I suggest coatings more for wheel wells than wheels, but you can certainly do both.
I am new to coatings, so I would only have generic information to share.
Essentially there are retail lines of coatings, and professional line of coatings only offered to authorized installers.
For wheel wells, or wheels, the retail line is just fine and more than enough quality to meet your needs.
Look into CarPro Cquartz.
- Tire Care:
Personally, I prefer using degreasers and APC cleaners for tires.
There are plenty of quality tire cleaners on the market, and I would suggest trying a few to see how they work for you.
For the money, and actual cleaning power, it is hard to beat degreasers and APC cleaners for tires, and wheels.
Use a good scrub brush and some old terry cloth rags for the bulk of the cleaning on tires.
I prefer to finish with a tire dressing.
This not only makes the tires look great, but treats the rubber and protects it from drying out.
I use either an applicator pad or shop type rags for this.
Shop rags are thin, so they more or less apply, not pick up.
- Steamers:
Steamers are great for pretty much anything related to cleaning both the exterior and interior of a vehicle.
I mostly perform some type of shop wash method when washing a vehicle.
Rarely do I use a hose, except in cases where the pressure and use of streaming water is absolutely necessary.
Steamers offer for the presence of moisture and heat, in the absence of running water.
They are also specifically great at loosening and removing any and all chemicals that are used in the decontamination of the exterior of a vehicle.
I experiment a lot with various products and methods for the decontamination process.
I have grown to really like using degreasers and APC cleaners as part of this process.
Degreasers and APC cleaners will have color additives and various concentrations of chemicals, and both cleaners often have some type of flash chemical for quick drying.
Steamers will break all of this up and ensure no chemicals or color additives are left behind.
Headlight Restoration Kit:
3M is an excellent choice and my go to kit for headlight restoration.
Decontamination:
Suggest applying Bug and Tar remover before and after the initial wash.
Clay Bar and lube will be the main stay of the decontamination process.
Iron-X worth it, yes.
You get out of it what you put into it.
The more steps you take, the better the results in the decontamination process.
Compound and Polish:
Work within your skill level.
Only perform work you know how to do.
Don't feel the need to compete with experienced detailing techs or feel rushed to get up to speed.
Contract an experienced detail technician, or even a local body&paint shop for repairing damage to your vehicle.
Ask questions and see if the one you hire is willing to teach you a few things.
Enjoy the learning process, don't fight with it trying to do things you are not quite ready to do.
Interior Cleaning Brushes:
I am sure AutoGeek makes these tools available.
Also check around your local discount hardware stores and dollar stores for auto detail related items.
-
Re: I am officially lost
Thanks for the help guys. Since I didn't get a specific answer on pads and compounds I figured that it wasn't quite as important as I was making it out to be.
I went with Meguiar's da microfiber kit, then tacked on a 3 inch backing plate and 3 inch pads. The reviews I found seemed to suggest that it is supposed to be user friendly for newbs. I'll update the thread with my results. It'll probably be a while though because it is quite cold outside.
-
Re: I am officially lost
Originally Posted by Berstuck
Thanks for the help guys. Since I didn't get a specific answer on pads and compounds I figured that it wasn't quite as important as I was making it out to be.
It is important... and a huge factor is what type of work you're going to do. The Meguiar's DA Microfiber Correction System is a very capable system, I would recommend watching this video.
Meguiar's MF Training Video - Updated
Originally Posted by Berstuck
I went with Meguiar's da microfiber kit, then tacked on a 3 inch backing plate and 3 inch pads. The reviews I found seemed to suggest that it is supposed to be user friendly for newbs.
It is very user friendly. Most important thing is to clean your pads often. If you have an air compressor and an air squirter then use the air squirter to clean you pads. I show this on page 89 of The Complete Guide to a Show Car Shine.
You can also use a nylon bristle pad cleaning brush and that's on page 90.
For the headlights, the pictures make sanding look like a good option, the key with sanding headlights is to finish out using a high grit sand paper or sanding disc to make compounding out the sanding marks faster and easier.
Autogeek carries Mirka Abralon 3" sanding discs in,
#500
#1000
#1500
#2000
#3000
#4000
There's also an assortment box that contains 2 of each of the above. The assortment box would probably do the job, start with the #500 grit discs on your 3" backing plate on your Griot's Garage 6" DA and then work your way up.
After sanding, use the Meguiar's DA Microfiber Correction Kit to remove the sanding marks and polish to perfect clarity.

-
Super Member

Re: I am officially lost
Originally Posted by Berstuck
Ok guys I'm hoping to get some help here on what products I need to purchase to meet my goals. First though a little background on me. Never detailed my cars before. In fact I've been the type of person who's happy when it rains, because my car gets washed! Recently had some mechanical issues on my bmw that got me a $2000.00 quote from the local mechanic. This motivated me to go out and buy tools, and parts and do this work myself. Crawling around under my bmw got me taking a much closer look at the car and realizing what a crappy job I've done taking care of such a nice automobile. I am now motivated to get my car, and my wife's car both cleaned up and looking their best.
Take Mike Phillips Detail class, you will be blown away!

-
-
Re: I am officially lost
Originally Posted by Mike.Phillips@Autogeek
It is important... and a huge factor is what type of work you're going to do. The Meguiar's DA Microfiber Correction System is a very capable system, I would recommend watching this video.
Meguiar's MF Training Video - Updated
How to use Meguir's DA MF System
It is very user friendly. Most important thing is to clean your pads often. If you have an air compressor and an air squirter then use the air squirter to clean you pads. I show this on page 89 of The Complete Guide to a Show Car Shine.
You can also use a nylon bristle pad cleaning brush and that's on page 90.
For the headlights, the pictures make sanding look like a good option, the key with sanding headlights is to finish out using a high grit sand paper or sanding disc to make compounding out the sanding marks faster and easier.
Autogeek carries Mirka Abralon 3" sanding discs in,
#500
#1000
#1500
#2000
#3000
#4000
There's also an assortment box that contains 2 of each of the above. The assortment box would probably do the job, start with the #500 grit discs on your 3" backing plate on your Griot's Garage 6" DA and then work your way up.
After sanding, use the Meguiar's DA Microfiber Correction Kit to remove the sanding marks and polish to perfect clarity.
Thanks for the feedback. I have no air compressor, but I picked up a pad brush. I plan on working on the headlights as soon as the opportunity presents itself. I'll upload photos after.
Similar Threads
-
By kevperro in forum Auto Detailing 101
Replies: 16
Last Post: 07-14-2016, 11:14 AM
-
By A2D Signature in forum Auto Detailing 101
Replies: 25
Last Post: 11-22-2015, 05:49 PM
-
By tmurph01 in forum How to make money detailing cars
Replies: 10
Last Post: 01-31-2014, 08:05 AM
-
By Gary Sword in forum Off-Topic
Replies: 8
Last Post: 12-02-2007, 12:51 PM
-
By MadOzodi in forum Off-Topic
Replies: 5
Last Post: 07-04-2007, 12:55 AM
 Members who have read this thread: 0
There are no members to list at the moment.
Posting Permissions
- You may not post new threads
- You may not post replies
- You may not post attachments
- You may not edit your posts
-
Forum Rules
|
| S |
M |
T |
W |
T |
F |
S |
| 31 |
1
|
2
|
3
|
4
|
5
|
6
|
|
7
|
8
|
9
|
10
|
11
|
12
|
13
|
|
14
|
15
|
16
|
17
|
18
|
19
|
20
|
|
21
|
22
|
23
|
24
|
25
|
26
|
27
|
|
28
|
29
|
30
| 1 | 2 | 3 | 4 |
|


 Reply With Quote
Bookmarks