 Thanks: 0
 Likes: 0
 Dislikes: 0
-
machine polishing fail - ?
machine polishing fail - ?
Hello all. First time posting here.
I realize this subject is discussed in other threads but the variables differ in my situation. I’ll appreciate any advice offered. My first attempt at polishing – black metallic BMW paint in good condition without significant swirls or defects. But the paint was starting to look dull and I wanted to make it pop by polishing (then sealing/waxing.) Result: cloudy/hazy/dull finish from polishing. Much worse than before polishing.
What I used and how: After washing, claying using a QD as lubricant and drying. Meguiars 205. DA polisher on 5 setting with orange pad. Followed all directions and tips on 205 bottle and have read many forum posts and watched videos. Primed a dry pad with product. Then put 5 pea sized drops of product on pad. Touched pad to panel to distribute some product. Made four passes with moderate pressure over approximately 24x24 area. Wiped off residue by hand immediately with clean microfiber.
What happened: The 205 seemed to dry (flash?) very rapidly during my 3 or 4 passes. By “pass” I mean moving the polisher back and forth (or front to back) enough times to cover the 24x24 section. I went back and forth, then front to back in a crosshatch pattern. Was very difficult to remove the product with the microfiber cloth. Required a ton of buffing.
The end result was paint that was dulled and hazy, not at all glossy. Not swirled or scratched, just dull and hazy.
I tried several variations on other sections – 5 or 6 passes, more product, less product, etc. Same problems. Another issue was dust/powder at times when wiping – I think this was when I used more product. Incidentally I was working in shade and car was not hot.
Can anyone help with advice or pointing out what may have gone sideways? Judging by videos, pics and forum posts, I thought the 205 would give a glossy reflective finish but got just the opposite. Many thanks for your input!
-
Re: machine polishing fail - ?
Do you know if your car has been repainted at any time?
Did you mark your backing plate on the polisher?
Don't know how 205 is but did you give it a good shake before apply it on the pad?
Is it a free spinning 8mm DA polisher you have?
And lastly what brand and line of a pad and what mf towels did you use?
Some question to maybe trouble shooting the polishing experience you had. The wipe off part is not so common to have problems with the 205. It can be a little trouble to finishing on really soft paints. And BMW is known to have generally hard paint. That's why I about if it's been repainted at any time. Then maintain the pad rotation is very important to have any polishing done. It's seems like you should have had it working good with the explanation of you doing the polishing. It can be a little thing that gotten the problems that makes a hughe difference to the end results. With shakeing the bottle is something that could if been missed be one of those things. The hard to buff it off could have inflicted more haze on your paint. Have a QD or a panel prep wipe product at hand to help you next time if you get problems with the wipe off with polishes.
Lastly about what of an armspeed did you have? Useally speed is 1-2" per second. Ohh remembered one more thing that could play a big part. How was the humidity when you polished?
/ Tony
-
Super Member

Re: machine polishing fail - ?
I second Tony’s questions. Too add what year BMW?
-
Re: machine polishing fail - ?
 Originally Posted by SWETM

Do you know if your car has been repainted at any time?
Did you mark your backing plate on the polisher?
Don't know how 205 is but did you give it a good shake before apply it on the pad?
Is it a free spinning 8mm DA polisher you have?
And lastly what brand and line of a pad and what mf towels did you use?
Some question to maybe trouble shooting the polishing experience you had. The wipe off part is not so common to have problems with the 205. It can be a little trouble to finishing on really soft paints. And BMW is known to have generally hard paint. That's why I about if it's been repainted at any time. Then maintain the pad rotation is very important to have any polishing done. It's seems like you should have had it working good with the explanation of you doing the polishing. It can be a little thing that gotten the problems that makes a hughe difference to the end results. With shakeing the bottle is something that could if been missed be one of those things. The hard to buff it off could have inflicted more haze on your paint. Have a QD or a panel prep wipe product at hand to help you next time if you get problems with the wipe off with polishes.
Lastly about what of an armspeed did you have? Useally speed is 1-2" per second. Ohh remembered one more thing that could play a big part. How was the humidity when you polished?
/ Tony
Thanks for your response. I'll try to answer your questions. The car has never been repainted; it is 2014 factory paint. I'm not sure what this means to "mark the backing plate", but the backing plate seemed normal to me. Yes, I did thoroughly shake the bottle. I'm not sure what the 8mm refers to or "free spinning" but it works like a normal dual action polisher i.e. the action is both rotary and random orbit; the brand is "Avid Power" and I bought it on Amazon. The 6 inch foam pads came with the polisher and do not appear to have any branding. The mf towels are from Autozone and I used one that says it's made for detailing and another one that says it's made for wax removal, and both looked and performed the same. Arm speed was in the range you mention. Humidity was about 50%. Thanks again, I appreciate your trying to troubleshoot.
-
Re: machine polishing fail - ?
You put a mark on your backing plate so you can see that the backing plate and pad is spinning. The orbit part is what's geared and connected to the electric motor. The rotation part aka spinning is free spinning and gets it's power from the orbit rotation. So if you push to much pressure or goes up on a edge or basicly is on any but a flat surface the pad rotation can stop and you only get the orbit movement. So basicly if this happens you get no correction from just the orbit movement and need the pad rotation to get it.
Here's a great video by Mike Phillips. Which shows how to see if you maintain pad rotation while you polishing.
https://www.autogeekonline.net/forum...+backing+plate
How many pads did you use in total on the car? And is a backing plate that are 5" or 6"?
If you noticed you got less and less results from when you started to polishing or and when you switched to a fresh pad you got it easier to polishing. It can be that you need to be useing more pads. All from 5-10 can be used generally speaking on a car and that's when you do each step of polishing.
Did it say anything about which kind of foam pad it is in the way of finishing pad or polishing or compound pad with an adition with light or medium or heavy. Sadly pads is not color coded the same over the different brands. And also the quality of the pad does much.
I think that you could have problems with the pad rotation and maybe the aggressiveness of the pad and polish was not enough or too aggressive. It's still a little confuseing that you had so hard to buff it off. And that you had it dusting is useally a sign of overworked polish. But it can be if you polished with a saturated pad as in used it for to long before switch to a clean fresh one. Heat goes up in the pad when saturated and dries the polish in it and release dusting from the polish. Since it's useally a hard clearcoat on the BMW you might got very little correction from it and that's why it's looked as it did. If the foam pad is of low quality it could also leave you with it micro marring the finish you get from it. And with a 5" backing plate and pads it's easier to maintain the pad rotation than with a 6". This is hard to know which it is when you are not there and try different pads and also see how good the polisher is to maintain the pad rotation. Some can be very bad on doing this and some easier. Also you benefit a lot of keeping the pad rotation with a thin foam pad vs a thicker one. So it's much of giving you different kind of problems it can be and that's something you think it could fit your problem.
When you hold the polisher upside down and spinn the backing plate with your hand only. Is it spinning freely or is it like a resistance when you do this? It can be easy to forget and on some cheaper ones the plastic washer between the backing plate and polisher is not there or screwed on to hard. This can make the free spinning go up against the shroud that seals the counter weight and internals of the polisher right above the backing plate. And make it not spinning at all or a high resistance so the power is not enough to make it spinn.
The answers left out from me it seems not to be the problem you haveing. Maybe others can chaim in on how the M205 behaves when not worked enough with. How the wipe off is for them then. Or if you gets a pad saturated with it and if then the polish residue is harder to wipe it off.
As a first thing I would do if your backing plate is 6" now I would get a 5" from Lake Country or Griots Garage. Then get some thin 5.5" polishing pads from these brands or Buff & Shine. And do a test spot and see where it gets you. Also remember to mark your backing plate and even the pad to see so you always has rotations on the pad. You can do it with a clean pad you have now and mark the pad and backing plate and do a test spot where you know you have correction from it. Also not much of pressure is needed to be used. Let the polisher and the weight of your hands be the pressure on the polisher. Don't prime the foam pad and just around 5 drops of M205. And the same method with crosshatch pattern and overlapping by 50%. Do 4-6 passes per sections and stop if you notice it dries on the paint. If you notice it's hard to wipe it off you can use the QD you used as a claylube to easier get it off and a little lubrication while doing so. The test spot you do a section as you would be doing on the rest of the car. You should at least get a glossy finish but maybe not so many defects removed. That you might need to be useing a medium cut polish or compound and a more aggressive pad to get more correction done. But first so you can finish with a glossy paint.
-
Re: machine polishing fail - ?
Originally Posted by Steve Breckenridge
My first attempt at polishing black metallic BMW paint in good condition without significant swirls or defects.
But the paint was starting to look dull and I wanted to make it pop by polishing (then sealing/waxing.)
Result: cloudy/hazy/dull finish from polishing. Much worse than before polishing.
A cloudy, hazy dull looking finish AFTER machine polishing with a random orbital polisher sounds like micro-marring. M205 is known to micro-mar SOFT paints. This is one of the reasons Meguiar's introduced M210 - a polish for softer paints because M205 has been failing in this area for years.
And on another note - what happened to all those experts teaching water polishing?  I never hear anyone talking about this anymore? I never hear anyone talking about this anymore?
BUT - most ORANGE pads are foam cutting pads. A foam CUTTING pad can cause micro-marring. This is why I tell people all the time to START with a foam POLISHING pad as an aggressive pad on softer paint will scratches it.
Micro-marring = scratching
Read, don't scan this article. Try to find any of this information anywhere else as all the experts on Facebook groups and YouTube tell you to use foam cutting pads. Duh.
Good rule of thumb when using an AIO - stick with foam polishing pads by Mike Phillips
Let me break this next section down,
Originally Posted by Steve Breckenridge
What I used and how: After washing, claying using a QD as lubricant and drying.
Sounds good so far. 
Originally Posted by Steve Breckenridge
Meguiars 205. DA polisher on 5 setting with orange pad.
What DA Polisher?
IF this is a Porter Cable, they are one of the weakest DA polishers on the market. They struggle to maintain PAD ROTATION with thick or large pads. About the only pads that work well with this tool for doing correction or polishing work ore THIN pads.
See my article here,
How to Monitor Pad Rotation? Mark Your Buffing Pads
Video: Mark your backing plate to make it easy to see pad rotation
Here are the thinnest foam pads on the market today,
5.5" SUPER THIN FOAM PAD OPTIONS for your Dual Action Polisher
Lake Country 5.5" Flat Pads and CCS pads are only a tick thicker than the above and they also rotate well - as long as they are dry.
Originally Posted by Steve Breckenridge
Followed all directions and tips on 205 bottle and have read many forum posts and watched videos.
For sure - there's lots of experts on YouTube and Facebook.
Originally Posted by Steve Breckenridge
Primed a dry pad with product.
That works. I make a joke about priming foam pads in all my classes and don't do it myself. Good for microfiber pad but not really that important for foam pads UNLESS you're going to put pea sized drops of products on the pad. That's another joke from experts.
Originally Posted by Steve Breckenridge
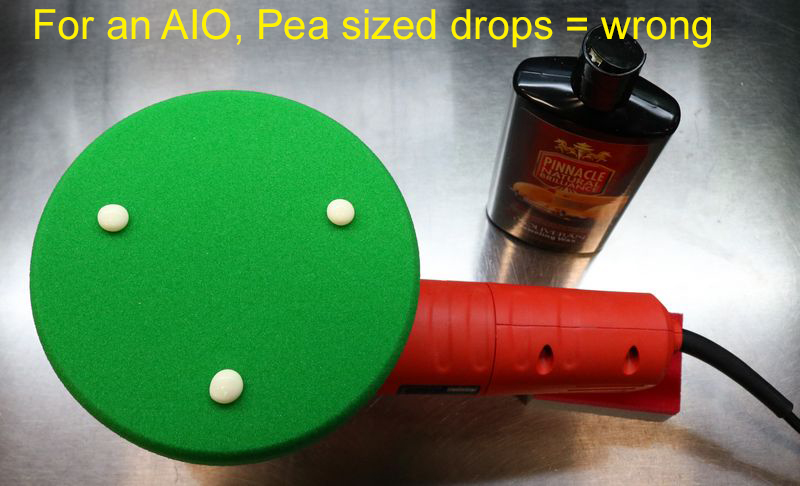
Then put 5 pea sized drops of product on pad.
Because you primed your pads and then put on FIVE pea sized drops, that's like priming your pad and putting on 3 nickel sized drops. Next time just put on 3-4 nickel sized drops and after you buff for about 10 seconds your pad will self-prime and you will have saved yourself the priming time and a messy finger.
See my article below. While this is about using a cleaner/wax or AIO the same holds true for compounds and polishes.
How to correctly use an AIO or Cleaner/Wax by Mike Phillips
Originally Posted by Steve Breckenridge
Touched pad to panel to distribute some product.
That's called "Kissing the Finish" and it's good. Some people call it smooshing but in my book, and in an article dated back to , it's called Kissing the Finish. Check out post #7 from this how-to article in 2010 - 9 years ago. The first and actually only article on damp sanding.
Damp-Sanding Tools, Tips and Techniques by Mike Phillips
Originally Posted by Steve Breckenridge
Made four passes with moderate pressure over approximately 24x24 area.
WAY TO BIG OF AN AREA FOR A SIMPLE TOOL. If you're using the BEAST aka the FLEX 3401 you can easily do a 24" x 24" area. If you're using a Porter Cable, a Harbor Freight, even a Griot's 6" Random Orbital Polisher, then this is too large of an area.
Lay down a 16" x 16" microfiber towel on the hood of your car and this is how large of a section to tackle with any free spinning 8mm random orbital polisher.
Also - you need to make MORE section passes. Even though M205 is a SMAT product, in my experience, you still want to work the product for about 8 section passes. Running the tool at speed 5 and working too large an area WITH only 4 passes is also not good technique.
Here's an article I wrote that discusses the most common mistakes and the remedies.
>>>>>> Start Article<<<<<
DA Polisher Trouble Shooting Guide
When you're first starting out machine polishing and learning to use a DA Polisher it's common to have questions about your results and your results are directly tied to your technique.
Here's a list of the most common problems,
1. Trying to work too large of an area at one time.
2. Moving the polisher too fast over the surface.
3. Using too low of speed setting for removing swirls.
4. Using too little downward pressure on the head of the polisher.
5. Using too much downward pressure on the head of the polisher so the pad quits rotating.
6. Not holding the polisher in a way to keep the pad flat while working your compound or polish.
7. Using too much product or using too little product.
8. Not cleaning the pad often enough.
Here's a list of the solutions in matching order,
1. Trying to work too large of an area at one time.
Shrink the size of your work area down. You can't tackle to large of an area at one time. The average size work area should be around 20" by 20". Most generic recommendations say to work an area 2' by 2' but for the correction step, that's too large. You have to do some experimenting, (called a Test Spot), to find out how easy or how hard the defects are coming out of your car's paint system and then adjust your work area to the results of your Test Spot. The harder the paint the smaller the area you want to work.
2. Moving the polisher too fast over the surface.
For removing defects out of the paint you want to use what we call a Slow Arm Speed. It's easy and actually natural for most people new to machine polishing to move the polisher quickly over the paint but that's the wrong technique. One reason I think people move the polisher too quickly over the paint is because they hear the sound of the motor spinning fast and this has psychological effect which causes them to match their arm movement to the perceived fast speed of the polisher's motor.
Another reason people move the polisher too quickly over the paint is because they think like this,
"If I move the polisher quickly, I'll get done faster"
But it doesn't work that way. Anytime you're trying to remove swirls, scratches, water spots or oxidation using a DA Polisher you need to move the polisher s-l-o-w-l-y over the paint.
3. Using too low of speed setting for removing swirls.
When first starting out many people are scared of burning or swirling their paint, so they take the safe route of running the polisher at too low of a speed setting but this won't work. The action of the polisher is already g-e-n-t-l-e, you need the speed and specifically the pad oscillating and rotating over the paint as well as the combination of time, (slow arm speed), together with the abrasives, the pad aggressiveness, and the downward pressure to remove small particles of paint which is how your remove below surface defects like swirls or scratches.
Removing below surface defects is a leveling process where you need the abrasives to take little bites out of the paint and to get the abrasives to take these little bites with a tool that uses a Free Floating Spindle Bearing Assembly you need all of the above factors working for you including a high speed setting.
4. Using too little downward pressure on the head of the polisher.
For the same reason as stated in #3, people are scared, or perhaps a better word is apprehensive, to apply too much downward pressure to the polisher and the result of too little pressure is no paint is removed thus no swirls are removed.
5. Using too much downward pressure on the head of the polisher so the pad quits rotating.
If you push too hard you will slow down the rotating movement of the pad and the abrasives won't be effectively worked against the paint. You need to apply firm pressure to engage the abrasives against the paint but no so much that the pad is barely rotating. This is where it's a good idea to use a permanent black marker to make a mark on the back of your backing plate so your eyes can easily see if the pad is rotating or not and this will help you to adjust your downward pressure accordingly.
Correct technique means finding a balance of applying enough downward pressure to remove defects but not too much downward pressure as to stop the rotating movement of the pad.
This balance is affected by a lot of factors like the lubricity of the product you're using, some compounds and polishes provide more lubrication than others and this makes it easier to maintain pad rotation under pressure.
Another factor that can affect pad rotation are raised body lines, edges and curved surfaces as anytime you have uneven pressure on just a portion of the face of the pad it can slow or stop pad rotation. This is where experience comes into play and experience comes from time spent behind the polisher.
6. Not holding the polisher in a way to keep the pad flat while working your compound or polish.
Applying pressure in such a way as to put too much pressure to one edge of the pad will cause it to stop rotating and thus decrease abrading ability.
7. Using too much product or using too little product.
Too much product hyper-lubricates the surface and the result is that abrasives won't effectively bite into the paint but instead will tend to skim over the surface. Overusing product will also accelerate pad saturation as well increase the potential for slinging splatter onto adjacent panels.
Too little product will means too little lubrication and this can interfere with pad rotation.
Again there needs to be a balance between too much product and too little product and finding this balance comes from reading articles like this one, watching videos an most important, going out into the garage and putting in time behind the polisher and as you're buffing with specific product and pad combinations, pay attention to pad rotation.
8. Not cleaning the pad often enough.
Most people simply don't clean their pad often enough to maximize the effectiveness of their DA Polisher. Anytime you're abrading the paint you have two things building up on the face of your buffing pad,
As these to things build up on the face of the pad they become gummy and this has a negative affect on pad rotating plus makes wiping the leftover residue on the paint more difficult. To maintain good pad rotation you want to clean your pad often and always wipe-off any leftover product residue off the paint after working a section. Never add fresh product to your pad and work a section that still has leftover product residue on it.
>>>>>> END of Article<<<<<
Originally Posted by Steve Breckenridge
Wiped off residue by hand immediately with clean microfiber.
That's correct. No need to let a compound or a polish dry. Benefits to wiping them off while they are still wet.
Which products need to dry The Car Wax Mentality
The above is a lot to digest. If you ever see one of my Roadshow Classes coming to a town near you - sign-up. You'll learn all of the above and so much more.

-
Re: machine polishing fail - ?
Take some time to watch the video in post #2 - it shows how to correctly use a Porter Cable and the tips and techniques I share will work with ANY brand of free rotating random oribital polisher.
Lots of info in the video too...
Here's what you need to get into machine polishing - Recommendations for a beginner by Mike Phillips
-
Re: machine polishing fail - ?
What a great forum! Thank you SWETM and Mike Phillips for sharing your advice and expertise. Let me try to move the ball downfield a little by responding to some of your points.
First the equipment: The DA polisher - Avid Power brand bought on Amazon 600W with RPMs to 6,000 - it does spin freely and with the moderate to light pressure I used, it seemed to have no problem rotating as well as oscillating. I'll try marking the backing plate to be sure this isn't the issue. The pads had no branding or info of any kind except the orange one I used was called a polishing pad. They are 6" pads on a 5" backing plate. I'll try the other pads you've recommended. I'd understood BMW black metallic paint to be fairly hard and the M205 according to most of what I've read seemed like an appropriate non-aggressive product for a surface that to start with had very little swirling or defects. Since waxing wasn't enough, I was basically trying to use the polish to restore to a glossy finish as opposed to major swirl or scratch removal. Could you recommend a better polishing product that's less prone to micro-marring or less apt to create a hazy dull finish? Also could you recommend other pads (in addition to what you mentioned) to try out, preferably ones that don't cost a small fortune? (but I realize you get what you pay for.)
I only worked two sections - one on a side panel about 18x18 and one 24x24 on the hood. The terrible results stopped me at that point. So there wasn't an issue of overusing or not cleaning the pad. I tried from 4 to 6 passes, more product and less product, slower arm speed and faster, different pressures. In all cases, the same dull and hazy finish resulted. Sounds like what I missed is doing more section passes, like 8, on smaller section like 16x16, so I'll try that. But since the product was flashing and dusting after only a few passes, it seems like I'd be dry buffing by the time I get to 8 passes - is that what I should do? Any other advice on how much pressure to use, etc. would be great. I especially don't get why the product was so difficult to wipe off - ?
Mike, I've watched many of your videos, tried to apply your principles and methods. The videos are fantastic, so thank you. I'll watch/rewatch all those that you linked in your post and undoubtedly learn more.
One general question: on this site or in this forum or anywhere else , is there any kind of glossary of detailing terms and especially acronyms? I know I'm in the minority as a newbie but as I'm educating myself it's a real challenge to try to decipher all the abbreviations and acronyms that are thrown around, or even what's the practical difference between polishing, compounding, buffing, etc.
Thanks again for all of your help and any others who want to chime in.
-
Re: machine polishing fail - ?
Originally Posted by Steve Breckenridge
What a great forum! Thank you SWETM and Mike Phillips for sharing your advice and expertise. Let me try to move the ball downfield a little by responding to some of your points.
First the equipment: The DA polisher - Avid Power brand bought on Amazon 600W with RPMs to 6,000 - it does spin freely and with the moderate to light pressure I used, it seemed to have no problem rotating as well as oscillating.
When removing swirls - you want/need about 5 to 10 pounds of downward pressure and run that tool at the highest speed.
Under pressure, the pads should be rotating at a pretty good clip.
Originally Posted by Steve Breckenridge
I'll try marking the backing plate to be sure this isn't the issue. The pads had no branding or info of any kind except the orange one I used was called a polishing pad. They are 6" pads on a 5" backing plate.
I'll try the other pads you've recommended.
I have nothing for you on no-name pads. Sorry.
Originally Posted by Steve Breckenridge
I'd understood BMW black metallic paint to be fairly hard and the M205 according to most of what I've read seemed like an appropriate non-aggressive product for a surface that to start with had very little swirling or defects.
Since waxing wasn't enough, I was basically trying to use the polish to restore to a glossy finish as opposed to major swirl or scratch removal.
You're off to a good start. Moving forward it's all about gaining experience.
One of the most important things you can do is learn how to do a Test Spot and the VALUE of doing a Test Spot. I cover this in the video I shared a link to. This one, see post #2
Here's what you need to get into machine polishing - Recommendations for a beginner by Mike Phillips
Originally Posted by Steve Breckenridge
Could you recommend a better polishing product that's less prone to micro-marring or less apt to create a hazy dull finish? Also could you recommend other pads (in addition to what you mentioned) to try out, preferably ones that don't cost a small fortune? (but I realize you get what you pay for.)
If you don't plan on using a ceramic paint coating, get a bottle of BLACKFIRE One Step. It works on all paints. It's Bubba-Proof and it will remove any micro-marring.
See my review here,
Review: BLACKFIRE One-Step Cleaner/Wax by Mike Phillips
Get product here,
BLACKFIRE One Step, BLACKFIRE Total Polish & Seal, polish and wax, cleaner wax, car polish
Get Orange and White pads - I'd get 6 of each. You'll be glad down the road.
Lake Country 5.5" Flat pads <-- Simplest pads available, makes these bubba-proof
Originally Posted by Steve Breckenridge
I only worked two sections - one on a side panel about 18x18 and one 24x24 on the hood. The terrible results stopped me at that point. So there wasn't an issue of overusing or not cleaning the pad. I tried from 4 to 6 passes, more product and less product, slower arm speed and faster, different pressures. In all cases, the same dull and hazy finish resulted.
Sounds like what I missed is doing more section passes, like 8, on smaller section like 16x16, so I'll try that. B
ut since the product was flashing and dusting after only a few passes, it seems like I'd be dry buffing by the time I get to 8 passes - is that what I should do? Any other advice on how much pressure to use, etc. would be great. I especially don't get why the product was so difficult to wipe off - ?
Watch the video in post #2 here,
Here's what you need to get into machine polishing - Recommendations for a beginner by Mike Phillips
If you are not getting the same results I get in the video - something's wrong.
Originally Posted by Steve Breckenridge
One general question: on this site or in this forum or anywhere else , is there any kind of glossary of detailing terms and especially acronyms?
I know I'm in the minority as a newbie but as I'm educating myself it's a real challenge to try to decipher all the abbreviations and acronyms that are thrown around, or even what's the practical difference between polishing, compounding, buffing, etc.
Here's this, not sure how up to date it is.
Acronyms
I have a glossary in my how-to book.
The Complete Guide to a Show Car Shine Paperback Book by Mike Phillips
There is a TON of info in the above how-to book. I forget how much stuff is in there until I teach a class and as I go through the class I find pretty much everything I share in the class is in the book.
Thanks again for all of your help and any others who want to chime in.
-
Re: machine polishing fail - ?
I'm not sure if the below link will work but let's try
Yellow Mustang from my Illinois Class this last Saturday
The Mustang started out horribly swirled out and very neglected. My class used BLACKFIRE One Step on it.
Check out the before and after pictures.
Linking to any post on Facebook is a pain, it's such a horrible interface for teaching/education.
If the link above doesn't work, then right now, before I start putting more "stuff" on my FB page, click the link below and scroll down until you see the yellow Mustang.
Mike Phillips Facebook Page
In all my classes, people are always blown away with what you can do with this single product.
If you want to "install a coating" however, then you cannot use a wax or sealant of any type and must stick to water soluble polishes because you're going to have to chemically strip the paint in order to install/apply a coating.
Similar Threads
-
By Mulletman44 in forum Auto Detailing 101
Replies: 11
Last Post: 03-03-2015, 01:36 AM
-
By WRAPT C5Z06 in forum Auto Detailing 101
Replies: 17
Last Post: 06-05-2014, 01:07 AM
-
By nodule in forum Auto Detailing 101
Replies: 7
Last Post: 10-15-2013, 08:41 AM
-
By j.robinson389 in forum Auto Detailing 101
Replies: 16
Last Post: 05-01-2012, 12:14 PM
-
By itzJoker in forum Ask your detailing questions!
Replies: 74
Last Post: 06-23-2010, 04:34 PM
 Members who have read this thread: 0
There are no members to list at the moment.
Posting Permissions
- You may not post new threads
- You may not post replies
- You may not post attachments
- You may not edit your posts
-
Forum Rules
|
| S |
M |
T |
W |
T |
F |
S |
| 31 |
1
|
2
|
3
|
4
|
5
|
6
|
|
7
|
8
|
9
|
10
|
11
|
12
|
13
|
|
14
|
15
|
16
|
17
|
18
|
19
|
20
|
|
21
|
22
|
23
|
24
|
25
|
26
|
27
|
|
28
|
29
|
30
| 1 | 2 | 3 | 4 |
|


 Reply With Quote
Bookmarks