 Thanks: 0
 Dislikes: 0
-
Super Member

Re: 2014 BMW 535i - Removing Dealership Holograms, Swirls and Scratches
 Originally Posted by Giacomello

Flawless job Frank!
Thanks Giacomello, it was a group effort with Mike leading the way. 
-
Re: 2014 BMW 535i - Removing Dealership Holograms, Swirls and Scratches
Originally Posted by ekennett
Awesome job and great write up as always Mike!
Thanks Eric...
Originally Posted by ekennett
Two questions, how much time did you have in this job?
I started setting up at 8:30am, that is getting out the water hose, tools, products, Guzzlers, everything I would need to wash the wheels, tires and car.
Milind arrived right at 8:30am too, so while I was getting set up I had him drive his BMW into the garage to cool off so we could remove the painter's tape.
Started at 9:00am sharp.
Worked straight through with no breaks except to drink a glass of water to 5:00pm for the majority of the project.
From 5:00pm to 5:45pm we did a few little things like wiped down the engine compartment. Someone sprayed some greasy dressing all over the engine compartment and it looks like they didn't wipe off any excess so dirt and dust were accumulating in the greasy residue. Whoever did this also stained the black paint under the hood. We tried to hand polish the paint to remove the stain but no luck.
I sprayed Detailer's Trim Dressing, (an aerosol), over the the engine to help remove the stuff the other guy used but unlike the other guy I took a microfiber towel and gave everything a firm, thorough wipe and in the process removed his stuff and the excess of product I sprayed. Came out looking a lot better.
Swept the floor around the car and then took the after or beauty shots.
Next I had Milind move the car outside because I practice what I preach. I always tell everyone (and it's in my how-to books as well), that after you detail a car you need to move it into a new location with different lighting.
The reason why is because after you've spent an entire day polishing out a car you kind of become blind to it PLUS in the light setting you did the polishing and waxing you might not see any wax smears or residues.
When you move the car into a different light setting, normally any smears or wax residue will show up so you can then carefully wipe it off.
I also recommend getting a friend, neighbor, uncle, brother, sister, etc. to come inspect the car. A FRESH SET OF EYES an be very helpful when it comes to give the car the final inspection.
Get a Fresh Set of Eyes!

So hard time was easily 8 hours and another 45 minutes in soft time.
Anyone that's worked with me, for instance in this example Frank, they know I don't take breaks. Never do. I'm like a machine. Once I start I don't stop till the job is done. It's my style, not a good one by the way and I don't recommend it to anyone but that's how I've always worked. The longest break I'll take is usually to drink some liquids and then get back to work.
If I do eat something it's just enough time to inhale it and then get back to work. Buffing out entire cars in one day when doing a multiple-step process is time intensive. Most of you guys reading this know this.
Originally Posted by ekennett
2- after you compounded, you finger painted compound onto the rids. Did you compound the rids with a rotary and wool before finish polishing the whole car?
Originally Posted by chupr0kabra
I am curious about this as well. Can you elaborate on this?
I used the Meguiar's Burgundy Soft Buff 4" Foam Cutting pad on the Flex PE14, here's a picture....


Meguiar's did a great job of designing the shape of this pad. The thickness together with the taper works well to keep the face of the pad from twisting or tapering inward when buffing.
The foam formula for cutting is one they've had for decades now and it's a proven performer when it comes to cutting. Just be careful as with any foam cutting pad on a rotary, big or little, you can generate a lot of heat quickly.
This is especially true when only buffing a small area. The reason why is because you're focusing all the action and thus heat to a small footprint. When you're buffing out a large section of the paint while you're off buffing one side of the section the area you were just buffing is cooling and dissipating the heat.
When you're only buffing a small area there's no time for cooling and dissipating and if you're not careful you burn-through or twist the paint.
So use my fight or flight method of checking surface temperature when doing precision buffing like this to remove RIDS
Fight or Flight Method for Gaging Surface Temperature

Originally Posted by chupr0kabra
Great work! I lurk frequently, but don't post much.
Thanks!
-Mike
Thanks for chiming in and doubling down on Eric's question.
Just to note, normally I would machine sand the deeper scratches using 3M's 3" Trizact #3000 or #5000 discs on a Griot's Garage 3" Mini Polisher and then simply remove my sanding marks.
The reason I didn't here is because I found I was almost able to remove the RIDS simply using the DA polisher. Almost.
So instead of making a zillion passes with a 5.5" pad on oscillating tool I reduced the size of the pad and switched to a more powerful rotary buffer and then just carefully massaged the deeper scratches out.
Good questions!

-
Re: 2014 BMW 535i - Removing Dealership Holograms, Swirls and Scratches
Originally Posted by Saved by Grace
Mike, I saw you mentioned purchasing the mini Griot's polisher. I have the 6" polisher but simply bought a smaller backing plate for it. Fits and seems to work fine.
Am I missing something that I need to buy the smaller polisher to match the smaller backing plate?
Thanks!
Totally up to you.
I prefer holding the smaller, lightweight 3" polisher for a number of things, machine waxing being one of them.
The other thing I use the 3" polisher for is machine sanding with 3" discs. I have a number of articles on this topic in my article list under wetsanding.
Most people don't wetsand so they wouldn't need this tool for that procedure.

-
Super Member

Re: 2014 BMW 535i - Removing Dealership Holograms, Swirls and Scratches
Car looks fantastic, Mike. Hopefully he takes everything you taught him for maintenance home with him and keeps that shine going for as long as possible!
A year from now, you'll wish you started today.
@utopiandetailing on Instagram.
-
Super Member

Re: 2014 BMW 535i - Removing Dealership Holograms, Swirls and Scratches
Originally Posted by Mike.Phillips@Autogeek
Taking a new car to a Car Dealership to have anything done, oil change, tune-up, service work is a great idea. But NEVER let them wash your car and NEVER let them detail your car or you will get DISO
DISO = The Dealership Installed Swirl Option
This Mustang was detailed at a local Dealership.
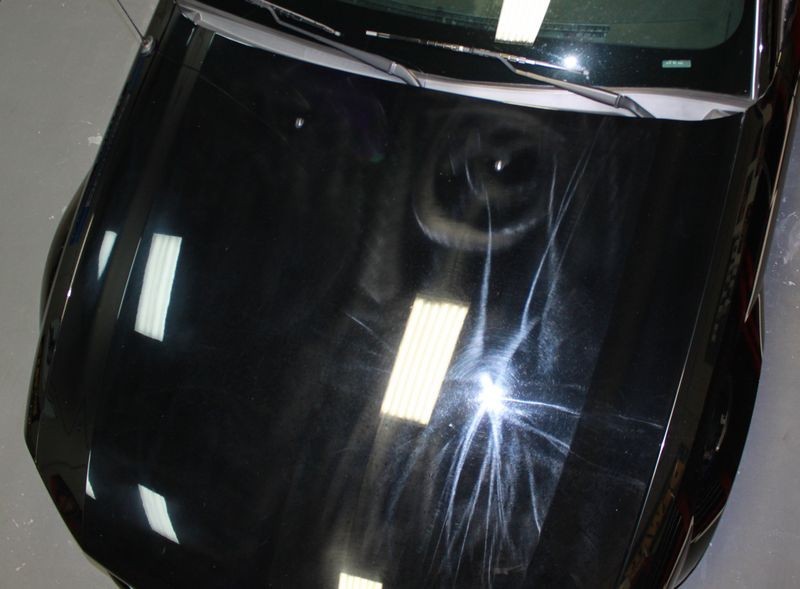
Lovely huh?
U...G...H!! Unreal. I just don't get it, time and time again these things happen. It's like giving a surgical equipment salesman an operating room and a patient with their chest-cavity open and saying "Good luck!" Just because they deal with these vehicles or swap oil and replace parts DOES NOT mean they're qualified to touch the paint (which after all no matter how you splice it, IS the primary visually appealing aspect). I just never stop shaking my head that teenagers making minimum wage with no real-world experience are allowed to "detail" expensive beautiful vehicles, simply by putting a rotary in their hands in a dimly lit bay with a drain.
"Don't Drive Dull!"
Carsmetic Rehabilitation Detailologist: Aesthetic Actualization

-
Re: 2014 BMW 535i - Removing Dealership Holograms, Swirls and Scratches
Originally Posted by runrun411
Mike,
1) With all the swirls and scratches on the car, it seems like there was no need to tape the front end. Right?
2) Can you please post the link on how to tape on a painters tape bra?
3) I'm always interested in how long it took.
The bra made out of Scotch brand, medium adhesion painter's tape was applied to the car before the owner drove the car approximately 200 miles to Stuart, Florida to protect the front of the car from Love Bugs.
Although the paint on the front of the car already had holograms, swirls and scratches, Love Bugs can do worse damage. The guts of the bug are strong enough to actually eat or etch through the clear layer of paint and once this happens the only way to fix the problem or undo the damage is to re-paint the affected area.
So the tape bra was to protect the paint from Love Bug damage to avoid having to re-paint the front of the car from the trip from the East coast of Florida to the West coast of Florida.
The owner and his girlfriend applied the tape to create the tape bra, I think they said it took them at least an hour or so....
Here's the article I sent them to show them what a painter's tape bra looks like. They used this article as a reference.
Power of Blue Painters Tape
-
Re: 2014 BMW 535i - Removing Dealership Holograms, Swirls and Scratches
Originally Posted by swanicyouth
All I can say is - NICE!
Just keep in mind though, not all dealers are hacks. My BMW dealer is pretty good - but they still would never touch my car.
I completely understand that not all detailers at dealerships are hacks, in fact I wrote about this very carefully in this article.
The story of 3 H's - Horrendous, Horror Story and Hack Detailers...
If you click the link and read the article I think you'll find I was very careful to be sensitive to all detailers in all work environments.
Originally Posted by Desertnate
After all that work, did the owner have to tape up the car again to drive it out of love bug territory and home?
I'd hate to put painter's tape all over that beautiful finish.
Great question and thank you for asking it.
The answer is "no". The owner told me they only hit a couple of bugs during the trip so it looks like the Love Bug Season is over. Because confidence was high the Love Bug issue wouldn't be a problem for the trip home we chose not to create a new painter's tape bra for the reason you brought up and that was to not have to put tape all over the beautiful finish.
I did recommend to the owner to pull over to as many gas stations and quickie marts on the way home and take a quick moment to inspect for Love Bug splatter and if discovered to remove it immediately and in a follow-up phone call to the owner he told me they did this and again only hit a few bugs on the way home and these were removed as soon as discovered.
Originally Posted by addysdaddy
Hey Mike, gorgeous work as always but I wanted to ask if you experienced any trim staining from the Synergy?
No. I have never had any issues with Synergy staining anything I've applied it to.
Originally Posted by Saved by Grace
Mike, I saw you mentioned purchasing the mini Griot's polisher. I have the 6" polisher but simply bought a smaller backing plate for it. Fits and seems to work fine. Am I missing something that I need to buy the smaller polisher to match the smaller backing plate?
Thanks!
I use the Griot's 3" Mini Polisher for machine waxing and machine sanding with the 3M Trizact discs. In my opinion, it is a must-have tool for anyone that does wetsanding.
I show this in all of my detailing boot camp classes as well as a class I teach at Mobil Tech each year.
As for using it to wax? You can use your full size Griot's to machine wax. The 3" Hydro-Tech pads FIT inside the Synergy tin so that's why I used the 3" Griot's to machine apply the wax.
I could have put a 3" pad on a full size DA polisher but the tool becomes "tippy" when working on horizontal panels as well as cumbersome due to the large size of the tool for the small size of the pad.
If you look through enough of my write-ups you'll see I often times use a 5.5" LC Flat pad on a Porter Cable to machine wax. What I rarely do is anything by hand including waxing. A machine will always do a better job faster.
Great questions!
-
Re: 2014 BMW 535i - Removing Dealership Holograms, Swirls and Scratches
-
Re: 2014 BMW 535i - Removing Dealership Holograms, Swirls and Scratches
Originally Posted by builthatch
you have to see what cars look like that drive around down there during the love bug season. they get hammered. the bugs get stuck everywhere - radiator, oil cooler...all over the place. layers of gross, dead bugs. they are sometimes not very easy to remove, depending on how much driving you've done.
plus the tape bra can help against rock chips and such on a long journey.
Good points...
One suggestion for anyone having to make a long drive during Love Bug season that doesn't want to risk the damage and mess caused by these gross bugs is to leave your nice car at home and rent a car for the trip. Let the car rental company take the hit or hits....

-
Super Member

Re: 2014 BMW 535i - Removing Dealership Holograms, Swirls and Scratches
Originally Posted by Mike.Phillips@Autogeek
This thread is now OPEN!
If you have any questions or comments please feel free to ask! There's no such thing as a dumb question on the AGO forum.
Thank you for looking!
Wow, that is stunning, brilliant, amazing!
Great write up as usual Mike and I really like the fact that the owner took the time to be involved and learn hands on.
It makes me want to go polish my Genesis again.
It boggles my mind the damage so many dealerships do to vehicles in the pre delivery prep phase or when they sit on the lots for an extended period of time. When I picked up my Genesis two years ago it was coming off the delivery truck and they thought I was nuts when I told them to just peel the protection off and leave it at that. To the point I had to be adamant about it.
2013 Genesis Coupe 3.8 Track Edition
2015 Hyundai Sonata Limited, 2016 Pearl White Nissan Altima SR
2019 Nissan Rogue SL
Similar Threads
-
By muscleman in forum Auto Detailing 101
Replies: 2
Last Post: 03-16-2014, 06:05 PM
-
By Skoob in forum Auto Detailing 101
Replies: 10
Last Post: 01-10-2014, 10:24 PM
-
By Mike Phillips in forum Auto Detailing 101
Replies: 12
Last Post: 09-25-2012, 03:04 PM
-
By shadowstep in forum Auto Detailing 101
Replies: 21
Last Post: 09-28-2010, 01:30 PM
-
By Locutus in forum Auto Detailing 101
Replies: 7
Last Post: 06-11-2010, 01:04 PM
 Members who have read this thread: 0
There are no members to list at the moment.
Posting Permissions
- You may not post new threads
- You may not post replies
- You may not post attachments
- You may not edit your posts
-
Forum Rules
|
| S |
M |
T |
W |
T |
F |
S |
| 31 |
1
|
2
|
3
|
4
|
5
|
6
|
|
7
|
8
|
9
|
10
|
11
|
12
|
13
|
|
14
|
15
|
16
|
17
|
18
|
19
|
20
|
|
21
|
22
|
23
|
24
|
25
|
26
|
27
|
|
28
|
29
|
30
| 1 | 2 | 3 | 4 |
|


 Likes:


 Reply With Quote
 your collaboration on that project was really crucial... Of course, not to mention Mike's detailing experience conducting the project not only the steps involved on the to make this vehicle shine like a diamond, but also the effort on picture taking and the post-session involved tasks (Donwloading pics, writing for the thread, answering questions, providing tips...)
Bookmarks