 Likes: 0
 Dislikes: 0
-
Re: All about the Defelsko Paint Thickness Gauge by Mike Phillips
 Originally Posted by bcombs

Mike-
Great article!
When is your follow up on "How and Why" to use it coming out?
I shared this recently in this thread, see the portion about
Big Picture Indicator
https://www.autogeekonline.net/forum...ml#post1470497
Originally Posted by bcombs
I have a Defelsko combo and get it to work great (consistent) on the bench, but struggle with consistency of readings on vehicles. I've been taking pictures of the vehicles, printing them and writing my readings on the pictures.
My concern is that my readings are inconsistent at the same locations (plus or minus 7 microns-ish)....with most of my readings in the 90 - 100 micron range. I know the vehicle has never been "corrected" before as I've owned it since new. I want to get consistent with the defelsko before moving on to much more expensive vehicles.
Thanks in advance,
Bret
In order to get precise and consistent measurements when gauging paint you need to re-test in the exact same place.
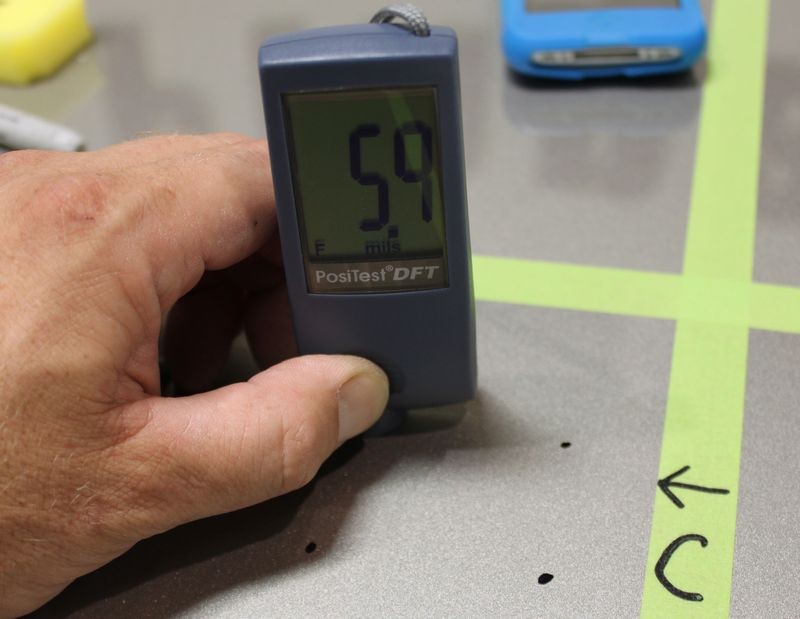
Tip: Place bottom of the palm of your hand against the paint so your hand stays stable in the same place and then measure, lift and measure till you're satisfied.
I can try to take a picture of what I mean and post it to this thread next week when I have a couple of cars here to detail for product review.

-
Re: All about the Defelsko Paint Thickness Gauge by Mike Phillips
Just to note...
Back in 2009 I invented a way to take very close measurement over the same area over and over again for a wet sanding project.
For some reason, this link isn't working but our Admin is looking into it...
Removing Orange Peel & Sanding Marks with the Griot's ROP and the Wolfgang Twins
From post #2
Run what you brung - Use what you have
Black paint always works best for most paint related demonstrations. Black paint is also best for capturing photos of sanding marks plus before and after reflection shots but for this kind of demonstration it's important to be working on real-world paint which means a factory baked-on clear coat that's as thin as the norm for factory paint. I'm a big fan of using what you have and what I have is a beige colored hood off a 1999 Chevy Silverado that's never been repainted.
For this experiment I'm going to sand in three different section and do my very best to sand each section equally, as though I were actually sanding the orange peel flat and then remove my sanding marks and throughout the process measure and record 4 places in each of the 3 sections and then look at the numbers to see how much paint is being removed. At some level this will be a test of my ability to remain constant in my sanding ability, something that is key in the real world when hand sanding paint.
Whenever you do any kind of testing it's vitally important to remove and reduce as many variables as possible, so I came up with a way of using 3M Painter's Masking Tape to create a grid pattern on the hood that I could use to locate the 3 locations in a repeatable method.
I then used the 3M Painter's Tape Grid System to take my measurements with the goal being to record measurements from the same locations for each reading as much as possible. To check myself and my consistency in sanding and compounding, I chose 3 places to duplicate the same test and recorded all the measurements as a "control".
So here we go...
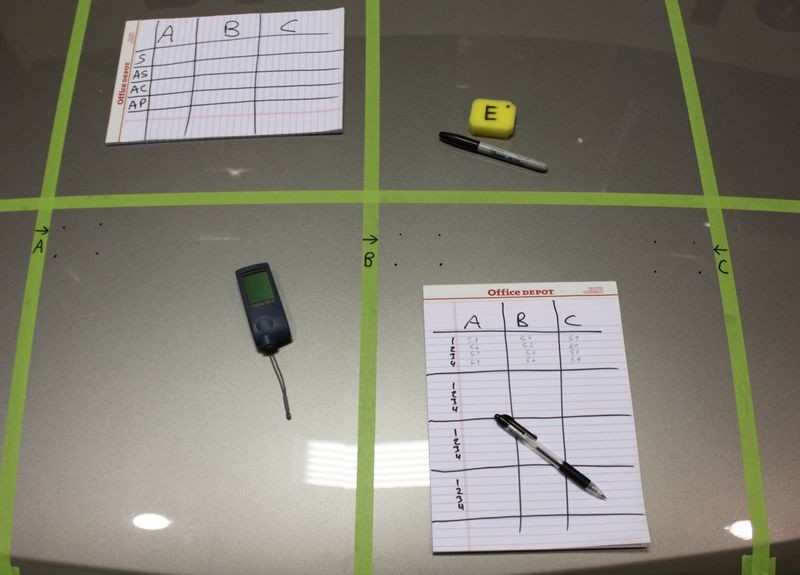
A grid pattern laid out to provide 3 areas to test that are all flat in shape and in places where we would hope the paint thickness or film-build would be as uniform as possible from a factory paint job as compared to testing on the hood, a door, (vertical panel), or some other curved or slanted panel. Again, trying to reduce the variables as much as possible.
3M Painter's Tape Grid System

Three sections marked A, B, and C. The piece of foam is marked with the letter E which stands for "Equalizer" as I need a quick simple tool to help me place 4 dots on the paint in roughly the same place for each step and measurement. I hindsight a piece of thin cardboard with 3-4 holes punched into the corners would have been more accurate but this isn't Rocket Science, I'm just trying to show how much paint is being removed on average when hand-sanding with the higher grit papers like the average online enthusiast might do in their garage. In other words, I'm keeping it real-world.


Then I used the PosiTest Paint Thickness Gage and measured each dot 3 times and took the average of the 3 readings. I started in the upper left hand corner and moved around the dots in a clockwise manner. In this picture I've just finished taking the last reading of the number #4 dot at the C location on the panel. (The upper left hand corner dot)
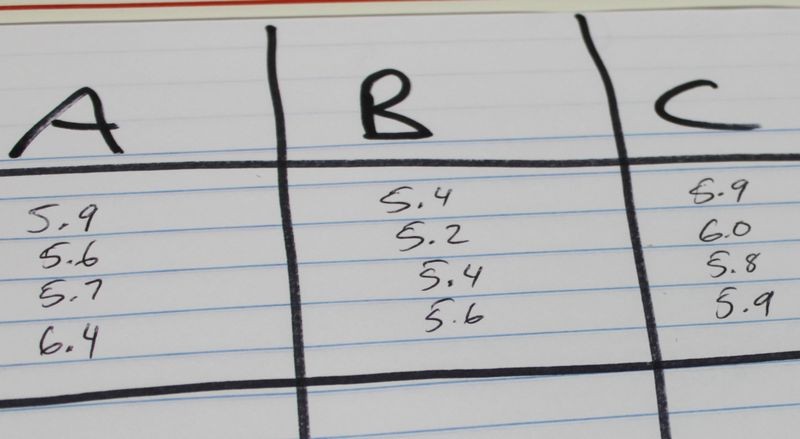
Here are the results from the first set of measurements from the three locations on the paint panel.
Don't know if that helps but it worked for me as caveman as it was...
-
Re: All about the Defelsko Paint Thickness Gauge by Mike Phillips
Mike-
Thank you very much! This helps a lot.
Once I get the skill of measuring down - I'll start practicing with my new Rupes Bigfoot (thanks for including your book with the kit!). I do worry about how much "cut" to expect from each of their compounds - I'm thinking I should stay at the least aggressive (fine/ultrafine, yellow/white pads) until I get comfortable with the new equipment.
Regards,
Bret
-
Re: All about the Defelsko Paint Thickness Gauge by Mike Phillips
Originally Posted by bcombs
Mike-
Thank you very much! This helps a lot.
Once I get the skill of measuring down - I'll start practicing with my new Rupes Bigfoot (thanks for including your book with the kit!).
I do worry about how much "cut" to expect from each of their compounds - I'm thinking I should stay at the least aggressive (fine/ultrafine, yellow/white pads) until I get comfortable with the new equipment.
Regards,
Bret
Hi Bret,
RUPES in my opinion, has done a GREAT job of labeling their compounds. They also use GREAT abrasive technology in all their products. I harp a LOT on the topic of abrasive technology on this forum, in the Facebook world and in my classes BECAUE IT'S IMPORTANT.
Paint is thin, you only have so much to work with.
Cheap abrasive technology may remove defects but it leaves behind it's own defects. The only way to remove the defects cheap abrasive technology leaves behind is to RE-DO your work using better products.
Here's the deal though... cheap product remove paint. Using good products to undo the damage done by cheap products removes more paint. That's a lose/lose situation.
A better idea is to start with quality products. You can trust RUPES compounds and polishes and also just to note, anything I've shown on our TV show uses great abrasive technology as does all the products I show in our Competition Ready Detailing Classes.
Also any products I use for our Thursday night products or when I detail cars personally, these all use great abrasive technology.
The other thing about the RUPES products is they did a GREAT job of naming them. The first identifier name for each product is kind of flowery, that's marketing. The wise aspect when creating the names and labels was to add the secondary identifier below the flowery name. In RUPES example, this would be,
Coarse
Medium
Fine
Ultra Fine

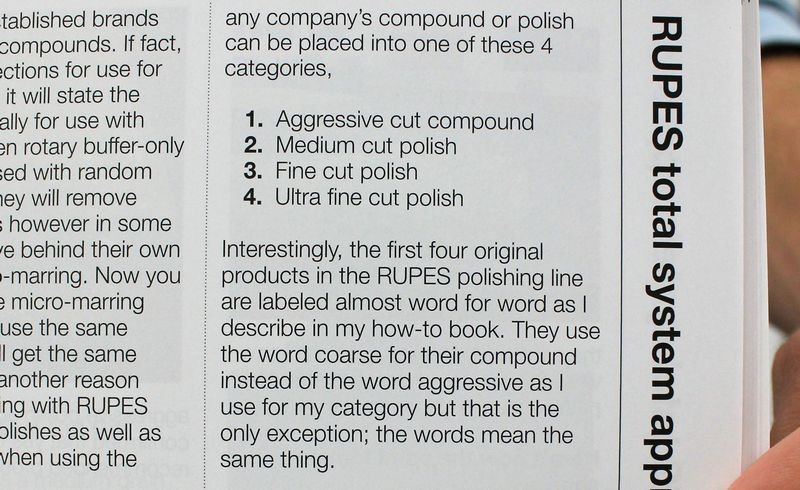
Now if you read pages 30 and 31 of my RUPES how to book,
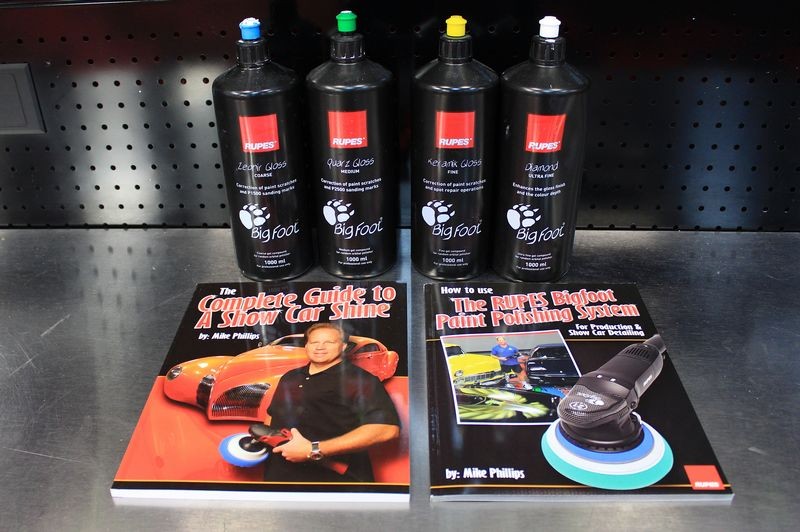
You'll see that I reference what I wrote about the 4 different categories of compounds and polishes in my other book, The Complete Guide to a Show Car Shine.
What I said was that the first 4 original products in the RUPES line are named almost word for word what I wrote in The Complete Guide to a Show Car Shine, that is ANY brand of compound or polish can be placed into one of four categories only in my book I used the word aggressive in place of the word coarse like RUPES used. The reason I chose to use the word aggressive is because I think the word coarse make it sound like your product will scratch or scour the finish (because it's coarse), but either way, by using these simple words coarse, medium, fine and ultra fine on the label of each of their products they made it EASY for the average person to
A: Understand what the product is and how aggressive or how NON aggressive it is.
B: Understand which product to choose for the condition of the paint they are working on and/or the goal they are trying to reach.
C: Which order to use the products as normally you always followed more aggressive products with less aggressive products and the flowery names don't send this message.
Here's pages 30 and 31 in the book

The specific portion...
Originally Posted by bcombs
I do worry about how much "cut" to expect from each of their compounds -
I'm thinking I should stay at the least aggressive (fine/ultrafine, yellow/white pads) until I get comfortable with the new equipment.
Starting out with the fine and ultra fine gel compounds, (RUPES words for their polishes is gel compounds), is a safe way to go. I will tell you that they are compoletely safe and for this reason you won't see much if any cut from them as it should be.
So after you test the waters, jump up to the green or blue gel compounds.
Most important... have some fun!
-
Super Member

Re: All about the Defelsko Paint Thickness Gauge by Mike Phillips
I am a total noob when it comes to reading paint thickness and what it really means. So with that, I am trying to get the concept of paint thickness established in my mind.
Factory paint is around 2 mils.
Post-it note is around 3 mils.
So a custom paint can range anywhere from 3 mils and on up to 5mils? Is this correct?
Wet sanding removes how many mils?
Compounding removes how many mils?
Polishing removes how many mils?
At what mil reading do you not polish and walk away from a job? 1 mil?
Tom
Mr Tommy's
Wash, Buff, Wax
Website: mrtommyshine.com
-
Re: All about the Defelsko Paint Thickness Gauge by Mike Phillips
Originally Posted by TMQ
Factory paint is around 2 mils.
Post-it note is around 3 mils.
That's the thickness of the clearcoat component of the basecoat/clearcoat (BC/CC) system. The total thickness is usually something like 5-6 mils once you include e-coat, primer, and basecoat. Mike and others have spoken about how the factory finishes keep getting thinner, though, so don't write that in stone.
Originally Posted by TMQ
So a custom paint can range anywhere from 3 mils and on up to 5mils? Is this correct?
I think a lot thicker than that...or a repaint at a body shop where they have just scuffed and gone over the original finish.
Originally Posted by TMQ
Wet sanding removes how many mils?
Compounding removes how many mils?
Polishing removes how many mils?
There are just to many variables to answer that...what compound? What machine? What pad? How many passes? How much pressure? Hardness of the paint? Joe Fernandez and Todd Helme, and maybe Kevin Brown have compared material removal of sanding vs. compounding (maybe Mike Phillips has done this too), and in some cases determined that less material is removed by wetsanding than by compounding--for specific defect removal. Ok, maybe it was just Todd...I know Joe did a video comparing how much was removed by sanding vs. compounding.
Originally Posted by TMQ
At what mil reading do you not polish and walk away from a job? 1 mil?
There is really no pat answer to this...the instrument that is the subject of this thread cannot differentiate between the separate layers of paint. The types of instruments that can do that only work on certain substrates. Generally, it's impossible to tell exactly how much clear is left by measuring the total paint thickness. What you CAN do is measure how much YOU have removed, but since you usually can't be sure if anyone has buffed the car before, and since you don't know what the actual clear thickness was when you started, you can't really tell what's left.
-
Post Thanks / Like - 1 Thanks, 0 Likes, 0 Dislikes
 TMQ
TMQ thanked for this post
-
Super Member
Re: All about the Defelsko Paint Thickness Gauge by Mike Phillips
Thanks Setec for chiming in.
Been searching via google and pretty much lines up with what you were saying.
My intent was to develop a "Big Picture" mindset regarding overall paint thickness on a car and to determine if it's a "go or no a go" regarding polishing/compounding etc.
Tom
Mr Tommy's
Wash, Buff, Wax
Website: mrtommyshine.com
-
Super Member

Re: All about the Defelsko Paint Thickness Gauge by Mike Phillips
I have been using Mike's VIF and begun measuring the same 10 areas for every car I work on (even my own cars), regardless of what I am doing to it. I will have a 'database' of the readings from different cars and will have a idea of what is too thin. I had a older Benz recently that I refused to machine polish the hood, as there was obvious clear coat failure. But it was good for taking reading on.
My PTG was set to read in mils, and this weekend I changed it to microns to noted both readings on my form, just to compare the numbers.
-
Re: All about the Defelsko Paint Thickness Gauge by Mike Phillips
***Bump***
Quality tool.
If you want one, get the best.
-
Re: All about the Defelsko Paint Thickness Gauge by Mike Phillips
Originally Posted by Setec Astronomy
I notice that the Highline II instrument that Autogeek also carries, which seems to be a less-expensive imitator of the DeFelsko, comes with ferrous and non-ferrous substrate calibration discs to put the cal shims on top of so that you don't have to find a suitable substrate as you had to
Yes, the cheaper Highline II does come with test shims. I find this PTG as compared to the Defelsko PTG to be lacking in quality and ease of use. I never use it. I pass it around in my classes and let others try it out but it's truly a get what you pay for type thing as compared to the super high quality Defelsko unit.
Originally Posted by Setec Astronomy
--does the DeFelsko not come with something like that because of the internal calibration feature, which essentially makes the using the shims/discs unnecessary?
That would be my guess.
The Defelsko unit is nice. And yes, it's a lot more money, but that's why it's nice.
Similar Threads
-
By allenk4 in forum Products Guides
Replies: 8
Last Post: 02-29-2016, 10:54 PM
-
By swanicyouth in forum Ask your detailing questions!
Replies: 10
Last Post: 06-28-2012, 08:28 PM
-
By Perfections in forum Wet-Sanding, Cutting & Buffing
Replies: 7
Last Post: 10-12-2010, 04:48 PM
-
By Meghan in forum New Car Care Products
Replies: 8
Last Post: 10-06-2009, 11:24 AM
 Members who have read this thread: 1
Posting Permissions
- You may not post new threads
- You may not post replies
- You may not post attachments
- You may not edit your posts
-
Forum Rules
|
| S |
M |
T |
W |
T |
F |
S |
| 31 |
1
|
2
|
3
|
4
|
5
|
6
|
|
7
|
8
|
9
|
10
|
11
|
12
|
13
|
|
14
|
15
|
16
|
17
|
18
|
19
|
20
|
|
21
|
22
|
23
|
24
|
25
|
26
|
27
|
|
28
|
29
|
30
| 1 | 2 | 3 | 4 |
|


 Reply With Quote

Bookmarks