 Thanks: 0
 Dislikes: 0
-
Re: The #7 Rub Down Technique by Mike Phillips
 Originally Posted by Knozzmoeking

I'm not Mike but from personal experience the #7 should be removed with clean terry cloth towels before you do anything else. When I've run across areas that were hard to remove either due to sun or wind, I've simply rewet that area with some additional #7 and then gone back to the clean terry cloth for removal. Hope that helps. In any case, the #7 should be removed before any attempts at washing. All IMO.
lol it was a joke bro i was trying to say i put it on with my hand like he said and i couldn't wash it off my hand as in the skin on my hand. sry bad joke i guess
-
Re: The #7 Rub Down Technique by Mike Phillips
Originally Posted by fightnews
hi mike, i applied the #7 with my hand like you said but now it won't come off, ive been washing it for an hour and a 1\2, do u have to use a special soap or something?
Originally Posted by fightnews
lol it was a joke bro i was trying to say i put it on with my hand like he said and i couldn't wash it off my hand as in the skin on my hand. sry bad joke i guess
To be honest, I would not have figured out what you wrote was joking or kidding around until your follow-up post stating so.

-
Re: The #7 Rub Down Technique by Mike Phillips
Originally Posted by mcate
Just curious, what about glazes other than #7?
I've got Poorboy's Black Hole & White Diamond, & CG EZ Creme.
Is it reasonable to expect similar results with other glazes?
I think any oily product will make old single stage paint look good and even better. That's the nature of an oily product introduced to a dry chalky dull porous surface.
What other glazes, polishes or products by a zillion non-sensical names don't have are the proprietary Trade Secret Oils used in #7 which besides rejuvenating the paint also bring out the full richness of color. It has to do with the source of the specific oils used in this product and the pigments used to make old single stage paint.
I care not what anyone uses, heck there's a guy in the FB world that is alwasy saying #7 is nothing more than mineral oil but he's wrong.
Use what you like.
What I do is try to help people that has something that is IMPORTANT to them do everything they can to preserve it. The words something and it meaning antique single stage paint.
If you click the link below and read what I wrote in the paragraph where the word important is in bold red letters, this is what I'm talking about when it comes to helping others restore and preserve the paint on their whatever.
The Secret to Removing Oxidation and Restoring a Show Car Finish to Antique Single Stage Paints
-
-
Re: The #7 Rub Down Technique by Mike Phillips
I was just reading through this classic thread, actually a thread and information you cannot find anywhere else on the Internet.
I noticed I didn't include some pictures that show the single stage paint coming off the car as we did the paint correction steps or a link to the actual write-up for the work. My bad...
Here's a few pictures that tell the rest of the story,
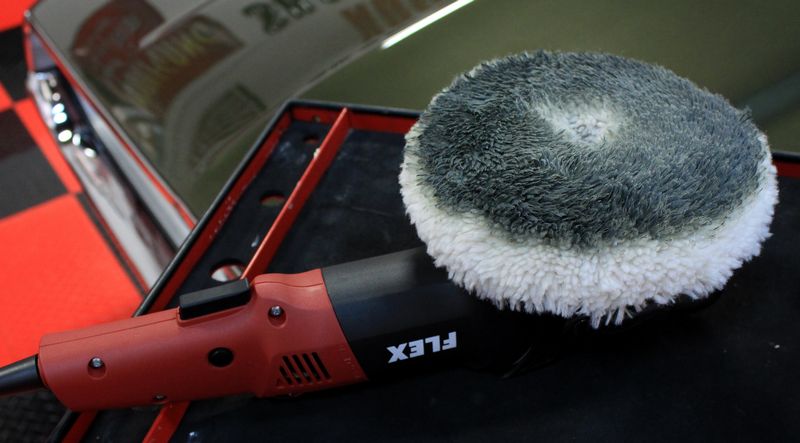
Tools and pads
Compounding
For the major correction step, that is removing almost 50 years of swirls, scratches, water spots and oxidation we used the 3D AAT Rubbing Compound with the 7.5" Electrified White Sheepskin Final Polishing Pad on the FLEX XC 3401 VRG HD Dual Action Orbital Polisher.
The FLEX 3401 at this time is the only gear-driven orbital polisher on the market. It's German engineered and that means it's a super high quality tool that you can depend on for years of service duty. The gear-drive feature forces the pad to both oscillate and rotate and no matter how hard you push down or what the shape of the body panel is you're buffing you cannot make the pad stop oscillating or rotating and this means nothing can stop you from doing was I say,
Power through a detail job
And that's because the FLEX 3401 enables you do to high quality production work and high quality show car work faster than any free spinning tool simply due to the fact you can tackle curved panels and tight areas without the pad stalling out which means the pad isn't oscillating or rotating.
Electrified Wool Pad?
The word electrified means Lake Country has taken the extra step to electrify the wool fibers used to make this specific pad which removes the natural sharp barbs found on wool fibers creating a pad that cuts fast but finishes with less scouring of the paint. This is a real benefit when buffing thin, scratch-sensitive clearcoat finishes. It also means cleaning up after the compounding step with the polishing step will be faster and easier and require a less aggressive pad and product. That's win/win/win as you see Richard Rawlings say in his Gas Monkey Garage promos.
The Flex 3401 HD with a Lake Country 7.5" Electrified Wool Polishing Pad
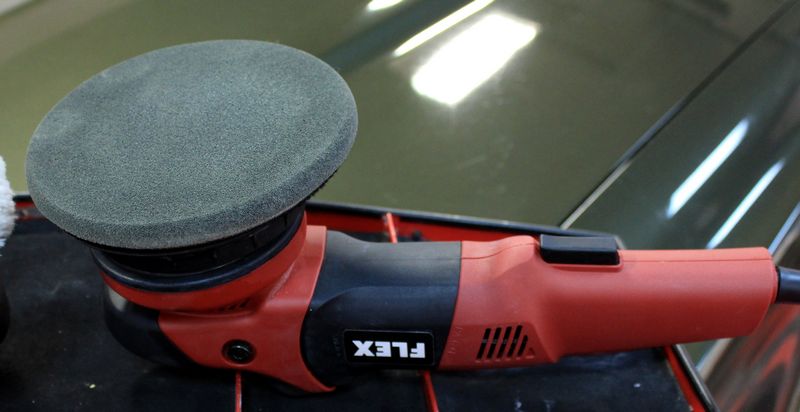
Polishing
Anytime you cut paint with a fiber pad, ANY type of fiber pad everything from coarse fast wool cutting pads to soft microfiber dual action polisher pads the fibers act as a type of abrasive. This means the fibers, like the abrasives in a compound, are cutting the paint. For this reason for a more perfect finish you must follow any fiber pad compounding step with a less aggressive polishing step using a less aggressive product and a less aggressive pad.
For the secondary polishing step for this 1969 Ford Thunderbird we used the 3D AAT Finishing Polish
on a Autogeek ThinPro white foam polishing pad on the FLEX XCE 7 free spinning orbital polishers. Unlike the FLEX 3401, which is gear driven, the XCE 7 is a free spinning orbital polisher what offers a 15 mm orbit stroke length. The results from switching from a powerful gear-driven orbital polisher to a free spinning, large stroke orbital polisher is a not only a dramatically safer polishing process but a polishing action that will create a super high gloss finish. This second polishing step removes any haze in the paint left by the much more aggressive compounding step and maximizes gloss and clarity to take this 47 year-old paint to its maximum potential.
Autogeek's ThinPro padsIt's a fact that thin pads rotate and oscillate better than thick pads on free spinning tool. I can remember when all we had were THICK foam pads borrowed from the rotary buffer world for use with orbital buffers and while they kind of worked they severely lacked in pad rotation performance.
The Autogeek ThinPro pads are only 11/16" or 17.5mm thin. That's THIN! And these are the perfect companion pad for the FLEX XCE 7 free spinning orbital polisher. They are available in 5 different options from super coarse for fast correction to super soft for machine waxing or jeweling.
Then to seal the paint we used the 3D Carnauba Paste Wax with an Autogeek 6.5" ThinPro red waxing pad on the same tool we used for the secondary polishing step the FLEX XCE 7 free spinning orbital polisher.
The combination of pre-soaking the antique, dry brittle paint with the TS oils found in the #7 Show Car Glaze followed by the methodical machine compounding, polishing and waxing process took an antique car with antique paint that most people would have assumed would have to be repainted and restored a finish that looks like the car just rolled out of the dealership show room in 1969.
-
-
Super Member

Re: The #7 Rub Down Technique by Mike Phillips
Had to bump this, got a buddy with an old Spitfire that’s gonna try this.
My crack at the technique
The #7 rubdown technique on a 51 Mercury
-
Re: The #7 Rub Down Technique by Mike Phillips
Originally Posted by 2wookies
Had to bump this, got a buddy with an old Spitfire thats gonna try this.
I've owned 6 British Sports cars when I was younger and went through the "British Sports Car Phase" of my life, 2 of these were Triumph Spitfires.
Besides my own British sports cars, I've worked on a few and here's my experience,
Generally speaking - they didn't have what I would consider "good paint". And by this, it just didn't seem as though the factory paint on some of the Spitfires and MBGs I've worked on polished-up as good as paint systems from other manufactures.
I like to give the benefit of the doubt so it could be my experiences were the exception to the rule and these cars have perfectly good and normal paint that polishes-up great.
Originally Posted by 2wookies
And you done did good!

-
Re: The #7 Rub Down Technique by Mike Phillips
Please tell him to get a few GREAT before pictures.
It's the before pictures that count the most. Here's my article on this topic,
The power in the after shots is created in the before shots
In the picture below, if you DIDN'T know how bad the paint was BEFORE the paint correction, you wouldn't have as much appreciation for the AFTER results.
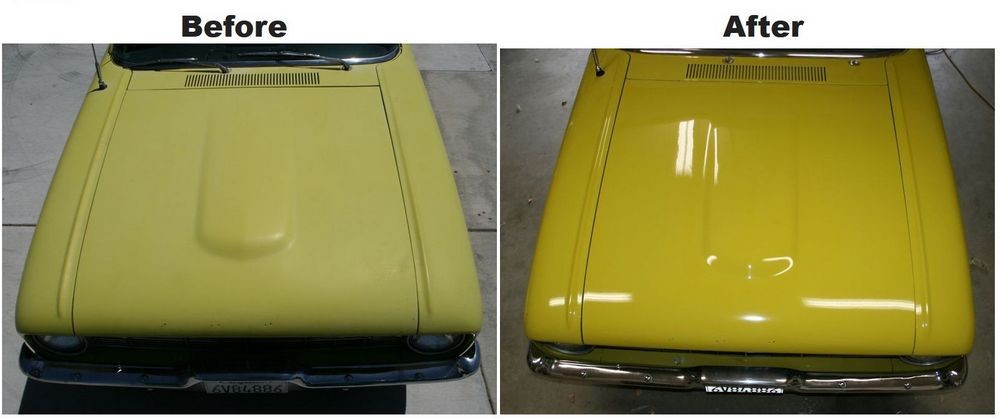
It's the before shot that gives perspective. It's the before shot that provides context.
The power in the after picture is created in the before picture -Mike Phillips
Before starting any detailing project, take the time to capture the before condition pictures. Take my word for it, you'll regret it if you don't.
Plus - how can anyone truly know how bad the paint, or the interior, or the engine compartment was before you worked your magic. Without good before pictures, you saying how bad it was is just words. Sure you may have a great reputation but like the saying goes,
A picture tells a thousand words
You have one chance to get the before shots...
In my life I've had the good fortune to work on a lot of cool cars and with a lot of cool people for which I'm always very thankful for. I've also had the good fortune to work on a lot of very neglected cars, some special interest and some not but to the owner it was always important and when it's important to the owner then it's important to me.
One of the biggest problems with capturing a great before shot is someone, not understanding the value in the before shot and all it's ugliness, will take some kind of paint polishing product and make a clean, shiny spot in an otherwise really neglected and ugly panel like the hood or the trunk-lid.
It's this single shiny spot that ruins the dramatic "before" pictures.
These types of panels make the best before and after shots because they are usually large, they are usually in the worst shape, you can look down on them, or in this case take an overhead shot of them, and the hood is specifically the panel that gets the most attention from car enthusiasts.
Also, after you polish out a neglected car you can ALWAYS get the after shots, just walk out to the garage and take some pictures. But you can NEVER go back in time to take the "before shots.
So over the years when I've discussed doing future extreme makeovers on project cars with the owners I've always stressed the importance of not touching the paint till AFTER we get the before shots.
It's just so uncanny that if you don't bring this topic up, then sometime before you arrive at the car's location or the car is brought to your location, someone and their good intentions will do you the favor of rubbing something smack dab in the middle of the hood and make a shiny spot and ruin the before pictures.
Anyway, a couple of years ago while scheduling an Extreme Makeover, I wrote this little sentence that I think states the concept very clearly and wanted to post it in it's own thread with a time stamp for others to learn from and hopefully explain the "why" behind the idea...
So here it is and you can quote me on this,
"If you ever do an extreme makeover on a car or some other project, remember the power in the after shots is created in the before shots"
So do your best to get GREAT before shots before bringing your hand or your polisher down onto the paint and making a shiny spot. And try to educate the owner if there's going to be time passing before the project is scheduled to also not take any action until after the before shots area captured. Just as a precaution. Better safe than sorry.
Often times I'll see a great write-up on a spectacular and dramatic before and after project and the detailer will say something like,
"Sorry I didn't get any before pictures"
This happens all the time. It's happened to me because I didn't have a camera handy or the batteries were dead.
So just a note to anyone reading this, if you ever do an extreme makeover on something cool or special interest, remember, the power is in the before pictures, so make plans to capture them before buffing on the car.
-
Newbie Member

Re: The #7 Rub Down Technique by Mike Phillips
I just purchased a 1951 Ford Victoria with single stage paint, so I read this old thread with special interest. Instructions are quite thorough but nowhere did I read anything about clay barring the vehicle. I am assuming that would be a good place to start?
Similar Threads
-
By Mike Phillips in forum How to articles
Replies: 12
Last Post: 06-01-2021, 08:28 AM
-
By Mike Phillips in forum Ask your detailing questions!
Replies: 27
Last Post: 04-01-2021, 01:14 PM
-
By Mike Phillips in forum How to articles
Replies: 11
Last Post: 02-14-2019, 02:29 PM
-
By mallic in forum Ask your detailing questions!
Replies: 4
Last Post: 08-27-2016, 04:47 AM
-
By Mike Phillips in forum How to articles
Replies: 37
Last Post: 08-27-2015, 02:39 PM
 Members who have read this thread: 0
There are no members to list at the moment.
Posting Permissions
- You may not post new threads
- You may not post replies
- You may not post attachments
- You may not edit your posts
-
Forum Rules
|
| S |
M |
T |
W |
T |
F |
S |
| 31 |
1
|
2
|
3
|
4
|
5
|
6
|
|
7
|
8
|
9
|
10
|
11
|
12
|
13
|
|
14
|
15
|
16
|
17
|
18
|
19
|
20
|
|
21
|
22
|
23
|
24
|
25
|
26
|
27
|
|
28
|
29
|
30
| 1 | 2 | 3 | 4 |
|


 Likes:


 Reply With Quote
Bookmarks