 Thanks: 0
 Likes: 0
 Dislikes: 0
-
Super Member

Review: McKee's 37 Wax Remover for Plastic
McKee's 37 Wax Remover for Plastic
Product information: Voted #1 wax remover for plastic!
You need McKees 37 Wax Remover for Plastic in your detailing arsenal. Whether you only detail your own cars or you detail cars as a business, you know how frustrating it is to remove dried wax, compound or polish residue off of plastic, vinyl and rubber trim. It's a real pain! Guess what? McKees 37 Wax Remover for Plastic actually works, so you can feel confident with your purchase! Keep a bottle or two in your cabinet of detailing supplies; youll need it sooner or later.
Product directions:
1. Shake product well before use.
2. Spray McKee's 37 Wax Remover for Plastic onto the affected area. Allow to penetrate for about 30 seconds.
3. Agitate with a nylon brush or a microfiber or cotton terrycloth towel.
4. Wipe the residues off the surface.
5. Seal and protect the surface using McKee's 37 Trim Detailer.
The Review
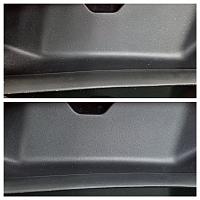
I tested this in my detail shop recently on a customer's vehicle. An older couple had brought me a late model Mustang GT. The owner had an XP7424 and let me know that he had been doing basic waxes himself for the past couple of years. After I washed it and brought it in, I noticed there was a lot of wax splatter on the plastic cowl. I was unable to scrape any off with my fingernail, so it had been there a while. I knew this would be a good candidate to test the product out on. I took photos before of 3 different sections, then photos after I had cleaned those parts using the pad.
Products used: McKee's 37 Wax Remover for Plastic, cotton terrycloth towel, 2" blue cutting pad (Lake Country), MF towel
Steps:
1. After the car was washed and dried, I pulled it into my shop. It was about 70 degrees at the time of the test.
2. After shaking the bottle, I sprayed a pretty heavy coat of the product onto the affected area (for testing, about 1/2 of the cowl).
3. After about 30 seconds of soaking, I scrubbed the area clean with a cotton terrycloth towel
4. I then flipped the towel over to the clean side and made sure it was completely dry.
**After these steps, there was virtually no difference from when I started. So I tried method #2**
1. I pre-soaked the affected area for about 30 seconds as outlined above.
2. I then scrubbed the area with the 2" pad (listed above) with short, fast strokes. I went one way to begin and then perpendicular.
3. I then used a clean MF towel too wipe the area clean.
Impression: This is a great product. I was a little let down after the 1st attempt but I know how hard it is to remove wax. I had a pad ready to go and figured I would start with the least aggressive method 1st. The pad was abrasive, but not abrasive enough to scratch or haze the plastic. It worked up a good foam and was very easy to wipe away. After the first attempt using the product and the pad, I would say I removed about 90% of the splatter. I allowed the panel to completely dry as I finished the detail and I did not apply any finishing product, so as not to cover up any remaining splatter. I did another quick cleaning using the steps above and remove the rest of the product.
Afterwards, I compared the finish of the cleaned panel to that of the other plastic panels on the car and it was very slightly duller. This is the reasoning for the recommendation of the trim sealer, so I applied some trim cleaner conditioner (Meguiars M40) to those areas and it looked great. Overall, I really liked it. It works much better than any APC would and didn't stain anything. It wasn't too abrasive, and a little seemed to go a long way. Sometimes these products can be used up quickly but this wasn't the case. This is something that I will continue to use. I haven't had any luck finding a suitable product in the past!
**** Overall rating: 5 of 5 stars ****
Similar Threads
-
By Marc08EX in forum Product Reviews
Replies: 33
Last Post: 01-13-2017, 12:25 PM
-
By Audios S6 in forum Product Reviews
Replies: 12
Last Post: 11-15-2016, 10:30 PM
-
By Jaretr1 in forum Product Reviews
Replies: 5
Last Post: 11-15-2016, 01:07 PM
-
By Pats300zx in forum Product Reviews
Replies: 7
Last Post: 10-11-2016, 11:13 AM
-
By Jeremy1976 in forum Product Reviews
Replies: 2
Last Post: 09-24-2016, 05:30 PM
 Members who have read this thread: 0
There are no members to list at the moment.
Posting Permissions
- You may not post new threads
- You may not post replies
- You may not post attachments
- You may not edit your posts
-
Forum Rules
|
| S |
M |
T |
W |
T |
F |
S |
| 31 |
1
|
2
|
3
|
4
|
5
|
6
|
|
7
|
8
|
9
|
10
|
11
|
12
|
13
|
|
14
|
15
|
16
|
17
|
18
|
19
|
20
|
|
21
|
22
|
23
|
24
|
25
|
26
|
27
|
|
28
|
29
|
30
| 1 | 2 | 3 | 4 |
|


 Reply With Quote
Bookmarks