autogeekonline car wax, car care and auto detailing forum
car wax, car care and auto detailing forumAutogeekonline autogeekonline car wax, car care and auto detailing forum HomeForumBlogAutogeek.net StoreCars WallpaperLink To UsvBGarageGallery

Go Back   Auto Geek Online Auto Detailing Forum > Auto Detailing Forums > Show N' Shine

Register FAQ Upload Photos Search Today's Posts Mark Forums Read

Featured Photos
by admin
· · ·
Autogeek's 3rd Annual Detail Fest
531 photos
23 comments
by admin
· · ·
Autogeek's 3rd Annual Detail Fest
531 photos
23 comments
by admin
· · ·
Sema Show 2008
433 photos
10 comments
by admin
· · ·
Sema Show 2008
433 photos
10 comments

» Autogeek Car Care Products
Dodo Juice Car Waxes
Tags: , , ,

Reply
 
Thread Tools Display Modes
  #1  
Old 12-09-2006, 01:03 PM
killrwheels@autogeek's Avatar
Moderator
 
Join Date: Mar 2006
Location: South Florida
Posts: 10,219
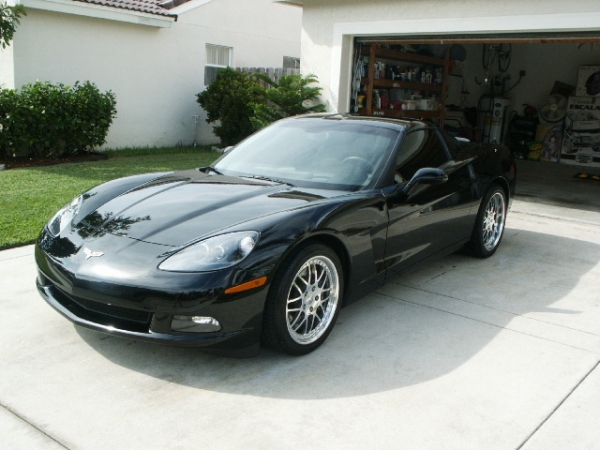
Entire Process for C6 Owners , and obviously all others !! (Long Post)

I have to admit to an extent I am lazy , why ??? Because I have been PM'd or asked thru email at least 10 dozen times how I keep the Vette looking good, and whats my technique. I usually rattle off a couple of items, and we correspond back and forth numerous times. So ... with a little time, and effort on my part I have made some notes and pics to help you all.

First, swirls are indicitive of paint seeing something abrasive come across it. Dirt, washing, drying, rough towels, and numerous other items can induce swirls. To alleviate them entirely cannot be done , but hopefully some of these steps will help you see some ways in which to reduce them. Once we have them we will need to "hide" them thru filling, or "remove" them thru polishing. We will do it in the correct fashion below.

Wheels

First, lets start with an area closest to the ground that should not touch paint. You will need a soft towel and wheel cleaner specific to your wheels. I am using P21S as is safe on all wheels, and my Iforged Wheels are not clearcoated and thus easily damaged. I spray on liberally, and then use a soft small microfiber to aggitate the dirt. I then soak the wheels liberally with water to remove soap, dirt, and any contaminents.
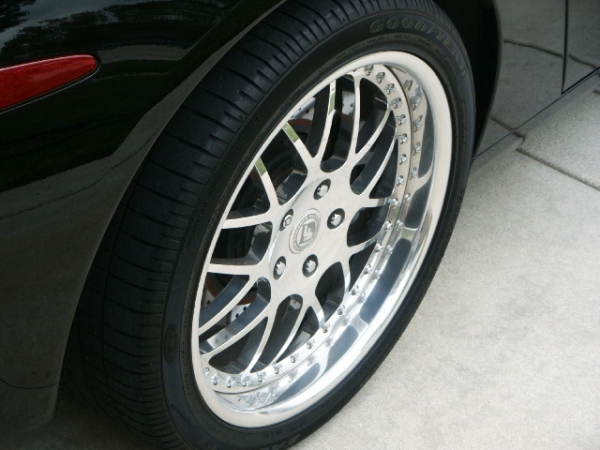
Before -- Dirty

After --- Notice Additional Shine

Last edited by killrwheels@autogeek : 12-15-2007 at 11:12 PM.
Digg this Post!Add Post to del.icio.usBookmark Post in TechnoratiFurl this Post!
Reply With Quote
  #2  
Old 12-09-2006, 01:13 PM
killrwheels@autogeek's Avatar
Moderator
 
Join Date: Mar 2006
Location: South Florida
Posts: 10,219
Washing


My first line of attack is to study the paint, and how bad it is. Would a standard wash work, has the crispness ended ?? In this case the car is not extremely dirty but the reflections (see leaves, not very sharp) are not as well defined. Now this has a little to do with overcast day, but we certainly can "jewel" the paint a bit.


I get out my handy foam gun (soap, soft microfiber mitt, a bucket) and I proceed to mix my first batch (the presoak). I then spray the entire car with a good batch of it, before readding soap/water to foam gun, and filling my bucket with lots of clean water. (we change that after 1/2 car)


As you can see the car is quite foamy and the soap is doing some work by moving some contaminents away from the paint prior to me jumping in. Now my next technique involves spraying each panel right before washing it. I also wash in straight lines, never circles. After each panel the mitt is washed out in the clean bucket of water. Usually at 1/2 point I wash down the car with water, and refill bucket. Since it was cool and overcast, I moved on after just refilling bucket.


The car has now been washed, used a liberal amount of water to truly wash down the car, any remaining dirt and soap and have a clean palate to work on. I could also clay at this point, but paint feels great based upon baggie test, so we will skip it this time, and rehit at the 4 month detailing session.

Last edited by killrwheels@autogeek : 12-09-2006 at 01:24 PM.
Digg this Post!Add Post to del.icio.usBookmark Post in TechnoratiFurl this Post!
Reply With Quote
  #3  
Old 12-09-2006, 01:21 PM
killrwheels@autogeek's Avatar
Moderator
 
Join Date: Mar 2006
Location: South Florida
Posts: 10,219
Drying
I love this stage most (not) as this is where many a swirl can be added, and where many fail leaving a car looking bad/worse then before the wash. I immediately plug in my leaf blower and turn it onto full power. Start with the tops and intentionally leave some water droplets on finish. Otherwise with hard water you will get spotting. Pay special attention to stay away from water on driveway and move downwards at every panel.

So now I have all water out of the cracks, I have all the water out of the tire ribbing, and I am now at a decision point. Do I polish and wax, or do I need to qd+. Since I am going to polish/protect then I only want a qd'er with some lubrication to help me remove any remaining spots and to lubricate the surface just enough to slide the Guzzler over the finish.

Now you can see next to the towel my first spritz. It is relatively fine, but covers the entire area, and is almost as wet as those remainging droplets. I wipe panel by panel in only one direction to finish drying the car. When done properly your Guzzler should remain only slightly damp and you might be able to use it on a second car.

Ok she's dried and looking pretty snazzy. You should note that I have dressed the wheelwells only, not the tires, as I dont want to allow my polish or protect towel to touch rubber dressing and smear onto car. The reason I dressed wheelwells now is overspray, any will be picked up by polish without issue.
Digg this Post!Add Post to del.icio.usBookmark Post in TechnoratiFurl this Post!
Reply With Quote
  #4  
Old 12-09-2006, 01:29 PM
killrwheels@autogeek's Avatar
Moderator
 
Join Date: Mar 2006
Location: South Florida
Posts: 10,219
Polishing

This stage is the hardest because you will need alot of practice to grab the correct polish and the correct pad. Since paint was not in too bad a condition, I went with a final polish and a medium pad for a little more bite.


This area is likely to big for a beginner, it is however a cool day and overcast and the polish I chose allows ample polishing time. What I want you to note is the overlapping. What you cannot see is speed. The PC is at full tilt from just after intial spread (3) to finish. Work your areas for 5 minutes on average and allow the polish to haze and talc as it diminishes the abrasives, stopping to soon, is like rubbing sand paper across the paint.


After each panel wipe off the area, and look for additional swirling and reflection. You should have easily removed any oxidation making paint look new, but swirls can take alot longer. Using an alcohol/water wipe is good idea as it will remove any fillers the polish might contain.
Digg this Post!Add Post to del.icio.usBookmark Post in TechnoratiFurl this Post!
Reply With Quote
  #5  
Old 12-09-2006, 01:34 PM
killrwheels@autogeek's Avatar
Moderator
 
Join Date: Mar 2006
Location: South Florida
Posts: 10,219
Protection

Well the polishing really worked (we will see shortly), and we are ready to protect our work. So do we wax or do we seal ??

seal --- durability , reflection, crispness, gloss
wax --- wetness, depth, richness

Today I decided to seal, and thats because I have found several newer sealants (UPP, Duragloss, DP) that are less plastic looking, and really add to black. I also plan on waiting till February to redetail as possible.


Note two items in this picture. First, the sealant (as is all sealants) is added as thin as I can handle. The game in not to gunk it on in hopes that more is better. Also note, I am still trying to apply/remove in straight lines. Circles can equal swirls. I did two coats back to back with about 4 hours inbetween, in a perfect world it would have been a little longer, but time management was also a key point in wife allowing me to waste part of Saturday during the Holiday season.
Digg this Post!Add Post to del.icio.usBookmark Post in TechnoratiFurl this Post!
Reply With Quote
  #6  
Old 12-09-2006, 01:40 PM
killrwheels@autogeek's Avatar
Moderator
 
Join Date: Mar 2006
Location: South Florida
Posts: 10,219
Final Check, Wipe Down, Dress Tires


Well this is where we pull her out and hope all went well. Garages are easily known for reflection as most light is refracted and darker to begin with. We really need the sun or natural light to guage our work.


I then like to rewipe certain area's with a qd'er+ type product to really add some umph to paint. This is a competitors spray but I have found it quite nice to work with in any sealant situation. Quikshine, Crystal Mist, Aquawax and more would also be acceptable and you can wait several hours as possible.

I would also now consider dressing the tires. No longer will you be moving any towels around the area where they could pickup and move onto paint. Remember to also dress any noticable trim, especially the dust guard under the front, and even the 5th tire on SUV's if you can see them underneath the bumper. I also use some Plexus on the headlamps and the tailamps to renew them. If you got any polish/sealant/wax on glass, this would also be a great time to remove.
Digg this Post!Add Post to del.icio.usBookmark Post in TechnoratiFurl this Post!
Reply With Quote
  #7  
Old 12-09-2006, 01:43 PM
killrwheels@autogeek's Avatar
Moderator
 
Join Date: Mar 2006
Location: South Florida
Posts: 10,219
Noticable Difference in Detailing Properly

Before -- on what most would consider to be kept up !!


After


so was it worth the time needed to detail correctly ?? Maybe we should have just flown into a touchless wash, and been done. You decide !!
Digg this Post!Add Post to del.icio.usBookmark Post in TechnoratiFurl this Post!
Reply With Quote
  #8  
Old 12-09-2006, 02:03 PM
Russecu's Avatar
Senior Member
 
Join Date: Oct 2006
Location: Charleston
Posts: 401
Great write-up killr! I was just getting ready to pm you to ask your process jk But it is nice to know your process since you hear alot about how mard the Vette's Clear is. Your car looks awesome. Thanks
Digg this Post!Add Post to del.icio.usBookmark Post in TechnoratiFurl this Post!
Reply With Quote
  #9  
Old 12-09-2006, 02:07 PM
Senior Member
 
Join Date: Dec 2006
Location: Orlando, FL (UCF)
Posts: 135
Great write up

I hope you don't mind if I ask a question, however... I dressed my wheel wells for the first time today (looking great!) but I'm having some trouble as far as the areas that aren't directly near the tire (like further back in the well). What is the best way of getting there? I can't really get my towel I was using to wipe down the AA tire foam back there, and couldn't really fit the can in there to spray (I didn't want to spray from far away and risk getting a mess all over, including the tread of the tire).

My tC is stock height as well, so techincally I have a lot of space to work with (so not sure how I'm supposed to do it when I finally get it lowered heh)... how do you do it with your tight wells?

thanks, sorry for the verbose question
Digg this Post!Add Post to del.icio.usBookmark Post in TechnoratiFurl this Post!
Reply With Quote
  #10  
Old 12-09-2006, 02:23 PM
Truls's Avatar
Senior Member
 
Join Date: Oct 2006
Location: Norway
Posts: 1,747
NOW Thats what I call a write up.

GREAT work Killr, its a keeper
__________________
EVOIX
Digg this Post!Add Post to del.icio.usBookmark Post in TechnoratiFurl this Post!
Reply With Quote
Reply


Thread Tools
Display Modes

Posting Rules
You may not post new threads
You may not post replies
You may not post attachments
You may not edit your posts

vB code is On
Smilies are On
[IMG] code is On
HTML code is Off
Trackbacks are On
Pingbacks are On
Refbacks are Off

» December 2008
S M T W T F S
30 1 2 3 4 5 6
7 8 9 10 11 12 13
14 15 16 17 18 19 20
21 22 23 24 25 26 27
28 29 30 31 123
Powered by vBadvanced CMPS v3.0 RC2

All times are GMT -5. The time now is 09:43 PM.


vBulletin style developed by Transverse Styles

Powered by vBulletin® Version 3.6.8
Copyright ©2000 - 2008, Jelsoft Enterprises Ltd.
Copyright ©PBMA - Autogeekonline.net® All Rights Reserved.

1 2 3 4 5 6 7 8 9 10 11 12 13 14 15 16 17 18 19 20 21